Retired Document
Important: This document may not represent best practices for current development. Links to downloads and other resources may no longer be valid.
What’s New in QuickTime 6
Welcome to QuickTime 6.
This document provides a list of the new features, changes, and enhanced capabilities that are available in QuickTime 6. If you are a QuickTime API-level developer, content author, multimedia producer or Webmaster who is currently working with QuickTime, you should read this document.
Using Gestalt to Get the QuickTime Version
As always, the standard way for Apple developers to determine
which version of QuickTime is installed is by calling the Macintosh
Toolbox API Gestalt function. (This Mac
OS function is also included in QuickTime for Windows.)
Listing 1-1 shows a code snippet that demonstrates how you can check the version of QuickTime that is installed––in this case, QuickTime 6. Note that the number 0x06008000 will test for the GM version of QuickTime 6 but will fail on pre-release versions of QuickTime.
Listing 1-1 Determining which version of QuickTime is installed by calling the Gestalt function
{ |
/* check the version of QuickTime installed */ |
long version; |
OSErr result; |
result = Gestalt(gestaltQuickTime,&version); |
if ((result == noErr) && (version >= 0x06008000)) |
{ |
/* we have version 6! */ |
} |
} |
Documentation and Other Resources
This document is intended to provide QuickTime developers with detailed information designed to support their programming and development efforts. It is designed to supplement the information provided in the QuickTime API Reference and the suite of QuickTime documentation which is available online, in both HTML and PDF formats, for download at
http://developer.apple.com/techpubs/quicktime/qtdevdocs/RM/newsframe.htm |
For other QuickTime developer documentation, you should refer to
http://www.apple.com/quicktime/developer/ |
For complete QuickTime API documentation, refer to
http://developer.apple.com/techpubs/quicktime/qtdevdocs/RM/frameset.htm |
Updates to the QuickTime technical documentation website are provided on a regular basis; developers can also subscribe to various mailing lists for the latest news and information.
To sign up for any of Apple’s Developer Programs, refer to
http://developer.apple.com/membership/index.html |
Bug Reporting
If you encounter any problems using QuickTime 6, please report them, using the standard Apple bug reporting mechanism described in the Release Notes accompanying the QuickTime 6 release. It is very important to include a copy of the file when you report such bugs.
Installing QuickTime 6
QuickTime 6 is available for download for Mac OS 8 and 9, Mac OS X, and Windows. The download site is:
www.apple.com/quicktime/download/ |
This is the first QuickTime release that has included an installer for Mac OS X. Users of Mac OS X version 10.1.5 can install QuickTime 6 using the installer on the QuickTime download page.
Note that the QuickTime 6 installer for OS X will not work on the Jaguar release of Mac OS X, including pre-release versions of Jaguar that contain an earlier version of QuickTime 6. The released version of Mac OS X that corresponds to Jaguar already contains a slightly newer version of QuickTime 6 than the one available for download.
If you have difficulty performing an installation over the Web because of a firewall, or if you need to perform multiple installations on a campus or business, you can download stand-alone installers by following the links on the download page.
QuickTime Pro users should note that QuickTime 6 requires new registration numbers. The registration numbers for QuickTime 5 or earlier versions do not unlock the pro features of QuickTime 6. For the pro version of QuickTime 6, you need to purchase new registration numbers from Apple. The price is currently $29.99 USD.
If you need to uninstall QuickTime, run the installer, select the custom install, and choose Uninstall from the pop-up menu.
If you need to install an earlier version of QuickTime, installers for QuickTime 5 and QuickTime 4 are available from QuickTime support:
http://www.info.apple.com/usen/quicktime/ |
Summary of Changes and Enhancements
QuickTime 6 is the first major iteration of QuickTime that
is designed to support the International Organization for Standardization
(ISO) specification for MPEG-4 video and audio. This is a significant
advance beyond earlier versions of QuickTime, in that it allows multimedia
producers, content authors and video artists the capability of distributing .mp4 files––in
native MPEG-4 video and audio format––across the Internet, so
that those files can be decoded and played on other players that
conform to the ISO MPEG-4 standard.
In one scenario, QuickTime authors will be able to simply
install QuickTime 6 and move through their normal workflow, and
then, in addition to having the option of encoding a file using
the Sorenson 3 or H.263 codec, authors will be able to output the
content of that file as an .mp4 file.
This content could then, potentially, be played on any ISO-compliant device
available to end users.
In addition to support for the MPEG-4 standard, this release of QuickTime also includes a number of new features and enhancements, discussed in this document.
Enhancements
Support for ISO-compliant MPEG-4 video and audio, both encode and decode. Developers, authors, and multimedia producers can now create and play back MPEG-4 video content, as well as MPEG-4 audio encoded using Advanced Audio Coding (AAC). Discussed in the section Support for MPEG-4.
QuickTime 6 also supports use of the MPEG-4 video and AAC audio codecs in QuickTime movies. In many cases, you can choose to create either a native
.mp4file or a QuickTime.movfile using MPEG-4 compression. This allows you to mix MPEG-4 audio and video with other QuickTime media, such as VR panoramas, sprites, or Flash tracks. Discussed in the section MPEG-4 and Web Developers.A new group of MPEG-4 settings dialogs in QuickTime Player that enable QuickTime Pro users who work with MP4 files to make a number of adjustments in video and audio tracks, streaming and compatibility. Discussed in the section Working with MPEG-4 Files.
A new video codec for MPEG-4 video compression. The new codec is ISMA compliant and conforms to the Profile 0 standard of the MPEG-4 specification, with an extremely low data rate of 64 Kbits/second. The advantage that this new codec offers is interoperability with other systems. Interoperability is the primary goal of the new codec. Discussed in the section New Video Codec for MPEG-4.
A new MPEG-4 audio codec that plays audio files of AAC and handles ISMA profile levels 0 and 1. In the current release both encode and decode are supported. Discussed in the section MPEG-4 Audio Support.
Support for native MPEG-4 streaming. Standard hinted MPEG-4 files (
.mp4) can be served directly, without converting to QuickTime Movie (.mov) files. Discussed in the section Native MPEG-4 Streaming.A new, RTSP Instant-On enhancement to QuickTime streaming that provides near instantaneous start of streamed movies when the available network bandwidth significantly exceeds the data rate of the target media. Discussed in the section RTSP Instant-On Enhancement to Streaming.
Support for JPEG 2000, a high-quality, still-image compression and coding standard that uses state of the art compression techniques based on wavelet technology. Note that JPEG 2000 support is only provided on Mac OS X in the current release of QuickTime 6. Discussed in the section JPEG 2000 Support.
New and updated components related to Macromedia Flash 5 support in QuickTime. The Flash media handler and the Flash movie importer have been updated, and a new Flash Properties panel has been added to the QuickTime Player info panels. Discussed in the section Flash 5 Support.
A new QuickTime tasking mechanism and new APIs to handle idling of applications. Discussed in the section New APIs for Tasking QuickTime.
A new Carbon Movie Control mechanism for Mac OS X that makes the process of using QuickTime within a Carbon Event-based application easier and faster. Discussed in the section New Carbon Movie Control.
A new group of Sprite APIs, as well as a number of new wired actions and operands. Discussed in the section Sprite API Changes.
Support for writing and using variable bitrate (VBR)-enabled sound compressor components. Both the QuickTime Movie exporter component available in the export dialog (also known as the
ConvertMovieToFileAPI dialog) and the Standard Sound compression dialog component have been updated to use and recognize VBR compressor components. Discussed in the section VBR Sound Compression Support.A new API that provides tween components with an interrupt-safe interface. Discussed in the section New Tween Component API.
New, enhanced effects dialogs. Effects may choose to implement custom controls to allow the user to more easily edit complex parameters that are ill-served by simple sliders or type in boxes. Effects may allow a custom control for either a single parameter, or for a group of parameters. Discussed in the section Changes to Effects Dialog.
A new improved None codec (also known as the Raw codec) that replaces the previous None codec with a more complete implementation. Discussed in the section None Codec Enhancements.
Support for Exif JPEGs and Exif TIFFs, including support for thumbnails, which was previously only available in QuickTime 5 on Mac OS X 10.1, and is now available for QuickTime on Mac OS 9 and Windows. Discussed in the section Additional Still Image Metadata Support in Mac OS 9 and Windows.
New QuickTime data handler-aware APIs that make using Apple and custom data handlers easier for third-party developers. Discussed in the section Improved Movie Toolbox Support for Data Handlers.
New UserData APIs that can be useful in copying information from one UserData container to another (page 152).
Support for a number of new features and enhancements in QuickTime for Java, including support for JDK 1.4 (Windows only), and the introduction of the
JQTCanvasclass, a new lightweight version of theQTCanvasclass which supports scaling of Flash content. Discussed in the section QuickTime for Java Enhancements.A new, improved sequence grabber user interface which includes new settings available on all platforms. A new group of Sequence Grabber APIs are also included in QuickTime 6. Discussed in the sections New Sequence Grabber User Interface and New Sequence Grabber APIs.
New Image Compression APIs that allow compressors to supply the User Interface for their options within the compression dialog (page 183), as well as new Image Decompression Manager APIs (page 188).
New media handler calls that developers can use to write media handlers that support keyboard focus. If you want to add interactive capabilities to your application, you need to use these media handler calls. Discussed in the section New Media Handler APIs For Keyboard Focus.
New APIs that provide a mechanism for preflighting operations on QuickTime content that may be restricted. Discussed in the section New QuickTime Restrictions APIs.
New APIs for better controlling memory usage in movies in Mac OS X (page 203).
Miscellaneous enhancements to QuickTime VR, and an additional movie errors API (page 205).
A new XML exporter––Export to QuickTime Media Link––which creates a small XML file that contains the URL of a movie, as well as other user settings. Discussed in the section New XML Exporter.
JavaScript support for ActiveX controls, Netscape 6 and browsers based on Mozilla. This means you can now use JavaScript to control QuickTime when Web pages are viewed using Internet Explorer for Windows, or any other browser that supports the COM interface to ActiveX controls. Discussed in the section JavaScript Support for ActiveX, Netscape 6 and Mozilla.
Support for DVCPro PAL (DV format 4:1:1) on Mac OS X (10.1.2).
Changes
Changes to the QuickTime Player user interface. Notably, the Hot Picks movie and the Channel pane have a new layout, with channel categories on the left and a movie on the right. Discussed in the section User Interface Changes.
Changes to AppleScript and AppleScript terminology that are new in QuickTime 6. Most notably, QuickTime Player is now a recordable application. There are also a number of new commands, classes, and properties, and well as modifications to existing terminology elements. Discussed in the section AppleScript Changes.
Changes to the QuickTime menu in the Windows system tray, which includes a number of new menu items. Discussed in the section New QuickTime Menu in Windows.
Updates
New documentation on how to deal with the ever-increasing number of effect components. This section documents atoms that can be used for tagging effects into useful categories. Two groupings for effects are defined here: Major Class and Minor Class. Discussed in the section QuickTime Effects Classes.
Some effects with complex parameters would like to provide the user with groups of useful parameter values that can be easily selected. This section documents an optional mechanism that can be used by effects to define these “presets.” Discussed in the section QuickTime Effects Presets.
New and updated documentation on QuickTime XML importers. These importers, introduced in QuickTime 5, create movies based on the contents of certain kinds of XML files saved with the
.movfile extension. XML files with the.movfile extension are treated by networks and operating systems as QuickTime movies. There are importers for three XML types currently built into QuickTime: SMIL importer, QuickTime media link importer, and component preflight importer. Discussed in the section QuickTime XML Importers.QuickTime 6 allows you to play current Shoutcast or Icecast streams that use MP3 compression. This section Playing Shoutcast or Icecast Streams in QuickTime discusses the various features of Shoutcast and Icecast streams, as well as what you need to know in order to deliver these streams in real-time over a network.
For Web Developers
Specific information about the different ways that you can use QuickTime 6 and MPEG-4, if you are a developer who creates websites, website authoring tools, or QuickTime movies that are intended for distribution over a network or the Internet. Discussed in the section MPEG-4 and Web Developers.
Support for MPEG-4
QuickTime 6 supports ISO-compliant MPEG-4 video and audio, both encode and decode. This means that you can create and play back MPEG-4 video and audio content. In addition, you can play back MPEG-4 audio encoded using Advanced Audio Coding (AAC).
Of notable importance is that an .mp4 file
is not a QuickTime movie. It must be imported into QuickTime. You
can open .mp4 files using
API functions that support importers, such as NewMovieFromFile or NewMovieFromDataRef,
or by calling an MPEG-4 importer directly. End users can open .mp4 files
using QuickTime Player’s Open or Import commands, by drag-and-drop,
or using the QuickTime browser plug-in (see the section MPEG-4 and Web Developers).
Double-clicking an .mp4 file
from the desktop may or may not open the file in QuickTime, as other
applications can register to handle this file type.
Using the Export to MPEG-4 option in the export dialog, you
can create an .mp4 file containing
either video, audio, or both, as discussed in the section Working with MPEG-4 Files.
Background
In February 1998, the International Standards Organization (ISO) formally adopted the QuickTime file format as the starting point for the MPEG-4 file format, the latest in a series of standards for transmitting video and audio information. MPEG-4 differs from MPEG-1 and MPEG-2 by adopting a component-based architecture for multimedia, an approach similar to QuickTime’s architecture. Other existing standards have less flexibility and treat multimedia as just an array of picture elements.
MPEG-1 and QuickTime
MPEG-1, often simply called MPEG, is fairly common on the
Web and CD-ROMs, typically with the .mpg file
extension. MPEG-1 supports one kind of video compression and a few types
of audio compression. MPEG-1 allows coding of moving pictures and
associated audio for digital storage media at up to about 1.5 Mbit/second.
The content of an MPEG file is one or more MPEG streams. Elementary
audio and video streams can be multiplexed into a combined stream.
MPEG-1 was designed to provide VHS-quality video at T1 data rates (single speed, or 1x, CD-ROM). It is the basis for the video CD standard, which is little used in the United States or Europe but is popular in Asia. Most commercial DVD players can play video CDs, however, and the rapid spread of CD-R burners and DVD players is currently fueling renewed interest in this format.
QuickTime can open and play MPEG-1 video on both Windows and Macintosh (requires QuickTime 5 or later for Windows). It can then export the video to other formats using any of the QuickTime compressors. Currently, QuickTime treats the entire MPEG-1 stream as a single sample, so you cannot cut or copy part of an MPEG-1 video unless you convert it to a different compression format first.
MPEG-1 can also contain audio. The audio can be compressed in two different formats: layer 2 (often called MPEG-1 audio) and layer 3 (known as MP3). QuickTime plays both layer 2 and layer 3 audio without difficulty, including streaming MP3 such as ShoutCast. QuickTime can also play multiplexed layer 2 audio (audio and video streams combined), but it cannot export or extract layer 2 audio from a multiplexed MPEG-1 stream.
QuickTime Player does not export to MPEG-1 streams, nor does it compress audio or video using MPEG-1 compression. MPEG-1 compression can be added to QuickTime with the Heuris MPEG codec (www.heuris.com/) or with the MPEG-1 encoder included with Roxio Toast (www.roxio.com/).
MPEG-4 and QuickTime
The MPEG-4 standard was recently revised to MPEG-4 Version 2, which is the latest standardized version. (Note that amendments to Version 2 have already been added, as the standard grows and evolves.) In any case, the standard outlines file conventions and compression formats not only for audio and video, but for text and multimedia integration. Because the MPEG-4 file format is largely based on the QuickTime file format, MPEG-4 files are potentially as diverse in content as QuickTime movies. This is a rich and complex specification.
Software and hardware vendors will implement the MPEG-4 specification in stages. The parts of the specification that are implemented by a given MPEG-4 player are called a player profile.
A profile is, essentially, a grouping of technologies, defined as “tools” in MPEG terminology. Profiles are a “normative” part of the standard, in that an implementation must conform to a profile in order to claim conformance to the standard itself. Profiles are specified in such a way as to maximize interoperability.
A good example is the way in which this was applied to the MPEG-1 Audio standard. There are three layers in MPEG-1 Audio. Layer 1 has the least complexity but the lowest compression performance, while Layer 3 has the highest complexity but also the highest compression performance. Profiles that include layer 3 also typically include layers 1 and 2. In this case, interoperability is maximized because a terminal implementing a profile which includes layer 3 can decode layer 1, 2 and 3 bitstreams, while a layer 2 terminal can decode only layer 1 and 2 bitstreams and a layer 1 decoder only a layer 1 bitstream.
No one currently implements the full MPEG-4 specification. There are no widely distributed MPEG-4 video codecs. (There was a codec available for Windows Media Player called MS MPEG-4, but this was actually a proprietary Microsoft codec that was partly based on a draft specification for MPEG-4. The early version released by Microsoft was not compatible with the final standard, and has since been renamed. Microsoft has also released a standard MPEG-4 codec, but it is not in an interoperable file format.)
QuickTime’s MPEG-4 video codec focuses on low-bandwidth video for Internet delivery, with the goal of delivering near-television quality over DSL and cable modems, and reasonable quality over dialup modems.
QuickTime’s implementation of MPEG-4 is designed to be interoperable with products from other standards-compliant vendors.
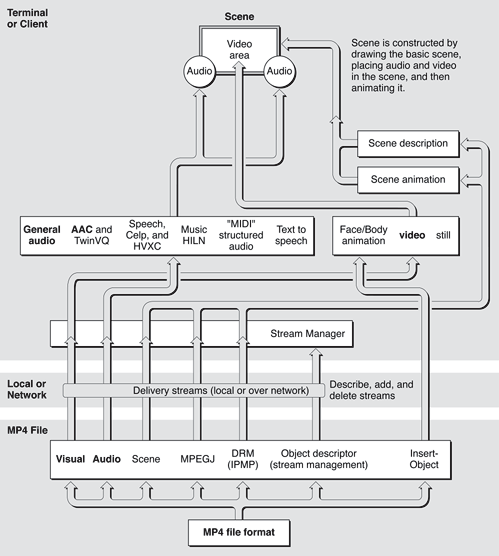
A diagram of the MPEG-4 system architecture is shown in Figure 1-1. The items in bold in specific boxes indicate the various parts of the architecture that QuickTime currently supports.
MPEG-4 File Format and QuickTime
The MPEG-4 File Format (MP4), which is derived from the QuickTime File Format, is a format that is designed to store MPEG-4 data in a file. This process is outlined by Rob Koenen, chair of the MPEG-4 Requirements Group, in his document MPEG-4 Overview, which provides a brief overview of the MPEG-4 File Format, as follows:
“The MP4 file format is designed to contain the media information of an MPEG-4 presentation in a flexible, extensible format which facilitates interchange, management, editing, and presentation of the media. This presentation may be ‘local’ to the system containing the presentation, or may be via a network or other stream delivery mechanism. The file format is designed to be independent of any particular delivery protocol while enabling efficient support for delivery in general. The design is based on the QuickTime format from Apple Computer Inc.”
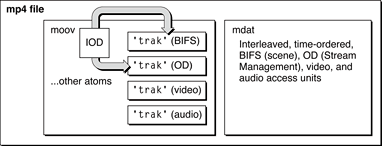
The diagram shown in Figure 1-2 gives an example of a simple interchange file. Note that BIFS, an acronym for Binary Format for Scene, specifies the Scene, and OD (Object Descriptor) specifies the Stream Management.
Inside the QuickTime File Format
The QuickTime file format is designed to accommodate the various kinds of data that need to be stored in order to work with digital media. Because the file format can be used to describe almost any media structure, it is an ideal format for the exchange of digital media between applications, regardless of the platform on which the application may be running.
The basic data unit in a QuickTime file is the atom. Each atom contains size and type information along with its data. The size field indicates the number of bytes in the atom, including the size and type fields. The type field specifies the type of data stored in the atom and, by implication, the format of that data.
Atom types are specified by a 32-bit integer, typically a four-character code. Apple Computer reserves all four-character codes consisting entirely of lowercase letters. Unless otherwise stated, all data in a QuickTime movie is stored in big-endian (network) byte ordering. All version fields must be set to 0, unless otherwise stated. Atoms are hierarchical in nature. That is, one atom can contain one or more other atoms of varying types.
For more detailed information, refer to the volume Inside QuickTime: QuickTime File Format (351 pp, 2.3 MB), which is available as a free download from Apple’s QuickTime API website in both HTML and PDF formats at
http://developer.apple.com/techpubs/quicktime/qtdevdocs/RM/frameset.htm |
The book begins with an introduction to QuickTime atoms, then presents the structure of the QuickTime file format in detail. This is followed by a series of code examples for manipulating a QuickTime file using the QuickTime API. A series of appendixes describe some common file formats that can be contained within a QuickTime file as data. The book is intended primarily for developers who need to work with QuickTime files outside the context of the QuickTime environment.
MPEG-4 Web Resources
The home page of the Moving Picture Experts Group (MPEG), a working group of ISO/IEC in charge of the development of standards for coded representation of digital audio and video, can be found at
http://mpeg.telecomitalialab.com/ |
An in-depth presentation of MPEG-4 can be found at
http://www.cselt.it/mpeg/standards/mpeg-4/mpeg-4.htm |
Answers to specific MPEG-4 questions can be found at
http://www.cselt.it/mpeg/faq.htm |
MPEG-4 standards are in the 14496 series and the specifications can be purchased from ISO at
http://www.iso.ch |
The MPEG-4 implementation forum promotes MPEG-4 and is spearheading licensing efforts at
http://www.m4if.org |
The Internet Streaming Media Alliance (ISMA) is promoting a specification and integration of products around a subset of MPEG-4 over IP networks at
http://www.isma.tv |
Acronyms and Terms for Understanding MPEG-4
A veritable alphabet soup of acronyms and terms has emerged in the MPEG-4 specification, a sampling of which is shown here.
Acronyms and Terms Specific to MPEG-4
BIFS Binary Format for Scene
CIF Common Intermediate Format (352 x 288)
ESD Elementary Stream Descriptor
IEC International Electrotechnical Commission
IOD Initial Object Descriptor
MP4 MPEG-4 File Format
M4IF MPEG-4 Industry Forum
OD Object Descriptor
Other Useful Terms
AVP Audio Visual Profile (IETF RFC 1890)
cRTP Compressed Real-Time Protocol(IETF RFC 2508)
IETF Internet Engineering Task Force
IP Internet Protocol
IPv4 Internet Protocol Version 4
IPv6 Internet Protocol Version 6
ISMA Internet Streaming Media Alliance
ISO International Organization for Standardization
QCIF Quarter Common Intermediate Format (176 x 144)
QoS Quality of Service
RFC Request for Comment
RTP Real-Time Protocol (IETF RFC 1889)
RTSP Real-Time Streaming Protocol (IETF RFC 2326)
SDP Session Description Protocol (IETF RFC 2327)
TCP Transmission Control Protocol (IETF RFC 793)
UDP User Datagram Protocol (IETF RFC 768)
Working with MPEG-4 Files
QuickTime 6 provides transparent access to MPEG-4 files. You
can open .mp4 files using API
functions that support importers, such as NewMovieFromFile or NewMovieFromDataRef.
End users can open .mp4 files
using QuickTime Player's Open or Import commands, or by drag-and-drop.
The process is similar to working with an .avi file
or other playable non-movie file. Double-clicking an .mp4 file
from the desktop may or may not open the file in QuickTime, as other
applications can register to handle this file type.
Currently, in order to save an .mp4 file,
you use the new QuickTime MPEG-4 movie exporter. The exporter offers
basically two ways of working:
Encoding to MPEG-4 video or audio for each track.
If the data is already MPEG-4 compatible, then it will perform a pass-thru option for those tracks.
How The Process Works
Typically, when you open a movie, QuickTime finds the movie
atom in the file, processes it, and creates a movie object, i.e.,
instantiates it. When you use MP4, you have to invoke the importer.
What the importer does is scan the file, find the 'moov' atom,
and then conform the 'moov' atom––which
is an MPEG-4-style movie atom––into a 'moov' atom
that is QuickTime-style. QuickTime then creates the movie object.
In the case of exporting, where the data is already in MPEG-4 format––MPEG-4 video or audio––the exporter has QuickTime flatten the data to the file. This produces the movie atom, which points to the file. The exporter once again conforms the movie atom, which is QuickTime-style, into a movie atom which is MPEG-4-style. The exporter then writes this to the file. This is pass-thru.
For an encoding or re-encoding export, the exporter compresses and then writes the MPEG-4 data to a file, whose movie is subsequently made to conform to MPEG-4 style.
New Dialogs for Handling MP4 Files
QuickTime 6 introduces a new set of dialogs in QuickTime Player (illustrated in this section with examples from Mac OS 9 and Mac OS X) that enable end users to open MP4 files.
To work with MP4 files, end users or content authors need to perform a series of import-export operations, using QuickTime Pro. The steps are as follows:
Open a
.movfile in QuickTime Player.In the File menu, click Export.
A dialog appears with a list of export options. Choose Movie to MPEG-4.
Save the
.movto a.mp4file.The
.mp4file can now be played on any player that supports MPEG-4.
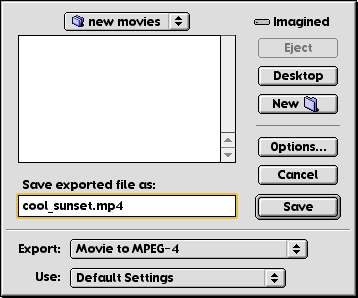
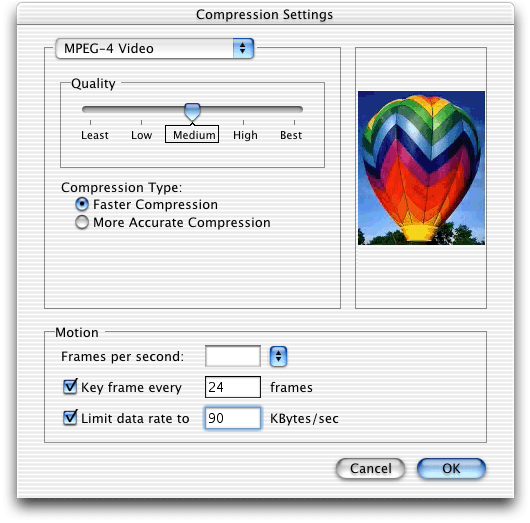
Figure 1-3 shows the dialog (in Mac OS 9) that appears when
you want to save a QuickTime movie, in this case “cool sunset”
to a .mp4 file. From
the list of options in Export, you choose Movie to MPEG-4.
If you click the Options button in the dialog shown in Figure 1-3, the MPEG-4 Settings dialog appears, as shown in Figure 1-4. In this dialog, you can set the basic video track, the physical size of current movie, and the audio track as necessary. If Basic is selected, the video will make use of the basic settings for MPEG-4 and ensure the widest possible range of playback on MPEG-4 compatible devices.
Note that Profile 0, in the text of the dialog, is the ISMA-specified Profile 0, and not the MPEG-4 defined Profile 0. For more information about ISMA and Profile 0, refer to the section ISMA and Definitions of Profile 0.
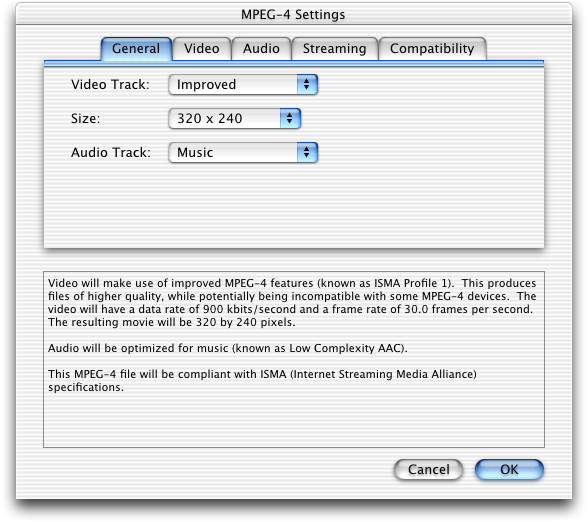
Note that the lower portion of the dialog in Figure 1-4 contains additional description and explanation about the choices that are available to the user. Audio can be optimized for music––in this case, AAC. (Note AAC can handle a full range of music and other audio.)
In the Video settings dialog in Mac OS X shown in Figure 1-5, the end user can adjust specific settings for video, such as the number of kbits per second, or the frame rate––for example, 15 frames per second, if that is the rate desired.
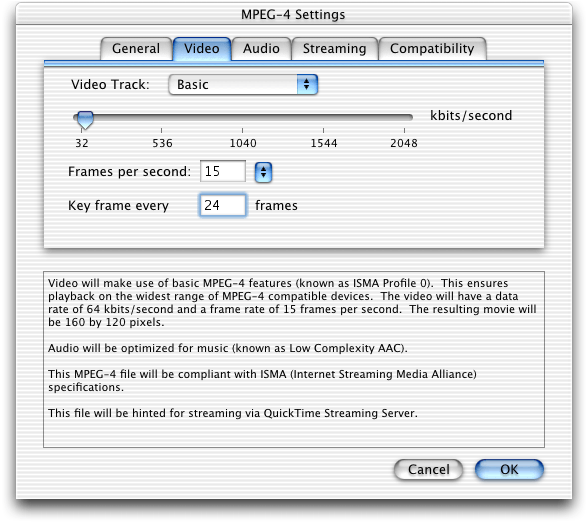
Figure 1-6 shows the settings available for audio in Mac OS X––for stereo or mono encoding. If the user selects music in the basic panel, it automatically selects a high data rate and selects stereo.
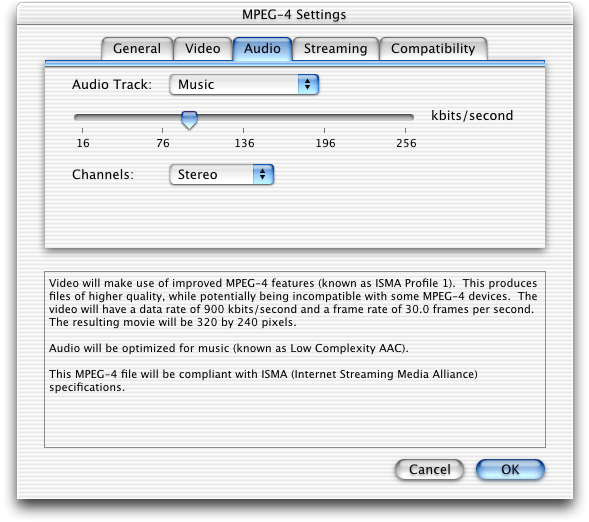
Figure 1-7 shows the settings dialog for streaming, which enables the user to select the type of hinting required, as well as maximum packet size and maximum packet duration.
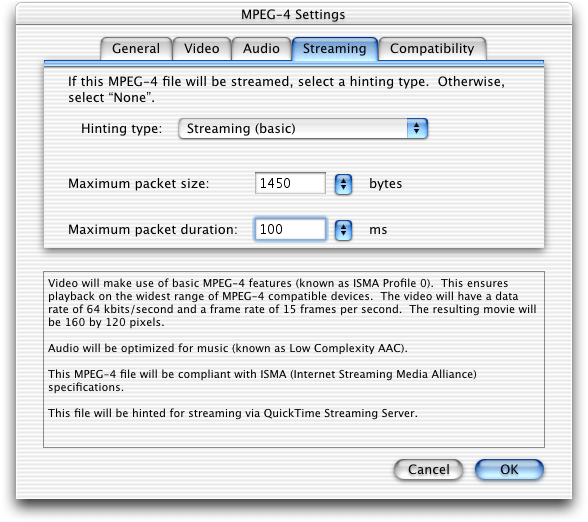
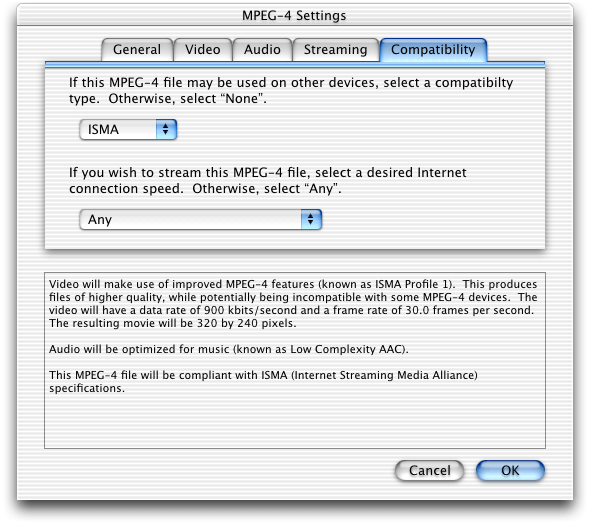
Figure 1-8 shows the Compatibility settings dialog in Mac OS X. By default, QuickTime produces a generic MPEG-4 stream. QuickTime does not check for any specific layer compatibility features that might be required by ISMA or other organizations. Nor does QuickTime check if the overall data rate of the MPEG-4 you’re producing is any particular data rate.
The user can select ISMA compliance, and also select the speed at which you want to stream the file––for example, at a medium data rate.
New Video Codec for MPEG-4
QuickTime 6 provides a new video codec for MPEG-4 video compression. The new codec is ISMA compliant and conforms to the Profile 0 standard of the ISMA specification. It can provide an extremely low data rate of 64 kbits/second. The advantage that this new codec offers is interoperability with other systems. Interoperability is the primary goal of the new codec.
For application developers, this new codec is similar to other codecs that ship with QuickTime. As such, it behaves like any other codec that developers have had experience with, such as the JPEG codecs. From a programming point of view, developers will be able to pop up the Standard Compression dialog and that will provide a choice for users.
Developers may want to develop certain applications around this codec for broadcasting, for example, because of its low data rate and because it builds on the H.263 specification.
The key features of the new video codec for MPEG-4 video compression can be summarized as follows:
Implements MPEG-4 Video Simple Profile, which supports
Video at 50 kbps to 4 Mbps
Streaming
Delivery to wireless handheld devices
Stored content
Kiosk applications
Set-top boxes
Decodes most ISMA and 3GPP streams
Displays a detailed warning if it can’t open a particular stream
Encodes ISMA- or 3GPP-compliant streams
Improved video processing, including gamma correction
ISMA and Definitions of Profile 0
The Internet Streaming Media Alliance (ISMA) specification <http://www.isma.tv/> is
aimed at producing a technical standard based on MPEG-4 for files
and streaming MPEG-4 video and audio over IP networks. In that standard,
a file will have one video track and one audio track, likewise for
streaming tracks. The aggregate data rate cannot exceed the limit
of 64 Kbits/second, which conforms to Profile 0.
As ISMA defines it:
“To be compliant with this specification a product must completely implement profile 0, and may implement additional profiles. For example, an on-demand video server would likely need to implement all possible profiles to address a wide client base. However a decoder/terminal may only support profile 0.
“This approach has been taken to ensure that any product certified as ISMA compliant, has the capability to minimally interoperate with any other ISMA compliant product.
“This is a definition of base interoperability. Vendors are still free to add additional functionality beyond that specified in this document. However that said, a conforming product cannot make any additional requirements beyond this specification to interoperate with another conforming system.”
In the specification, Profile 0 is defined this way:
“Rationale: This profile was selected to allow for video and audio at bitrates suitable that match capabilities of narrowband and mobile wireless infrastructures and to align with the patent pool work in M4IF.”
For video, this includes the following:
REQUIRED - MPEG-4 ISO/IEC 14496-2:1999 + Cor 1:2000 + Cor 2:2001
MPEG-4 Simple Profile @ Level 1
Typical Visual Session Size is QCIF (176x144)
Maximum bitrate is 64kbit/s
ISMA Restriction: Profile 0 is limited to one (1) video object only.
Profiles and Levels Defined
A profile can be thought of as a grouping together of different algorithms, specifying what your video codec can and cannot do. A level, on the other hand, specifies how much your codec can do. A level, for example, may restrict the computational complexity within a profile, specifying the bitrate constraints on a video or audio stream. Both profiles and levels are stored within an MPEG-4 file, so that the playback device “knows” whether or not it can in fact play back the file.
ISMA Profile 0
MPEG-4 Video Simple Profile
176 x 144 at 15 fps and 64 kbps
ISMA Profile 1
Simple or Advanced Simple Profile
352 x 288 at 30 fps and 1.5 Mbps
3GPP (Third Generation Partnership Project)
Similar to ISMA Profile 0
Designed for wireless handheld devices
Gamma Correction
In QuickTime 6, the MPEG-4 video codec performs gamma correction, so that MPEG-4 files look the same when they are displayed on both Macintosh and Windows computers. An MPEG-4 video stores both gamma and color space information, while the video codec performs per-platform gamma correction.
Additional Dialog for MPEG-4 Video Compression
Figure 1-9 shows a Compression Settings dialog in Mac OS X (available in QuickTime Player Pro) that provides MPEG-4 Video as a selectable choice for the content author or end user. The dialog also provides two selectable compression types: Faster and More Accurate.
Summary
For developers, some important points to keep in mind about QuickTime 6 support for MPEG-4:
MP4 files can be opened by any application that uses the standard QuickTime calls.
Any application can create MP4 files by using the standard QuickTime export calls.
MPEG-4 codecs behave like other QuickTime codecs.
MPEG-4 Audio Support
QuickTime 6 plays audio files of AAC and handles ISMA profile levels 0 and 1, with the exception of CELP audio. In the current release both encode and decode of AAC are supported. (Note that encode is AAC [Low Complexity] only.) QuickTime 6 conforms to the MPEG-4 audio specification.
QuickTime 6 audio can handle reading in MP4 files, and can export them to QuickTime movies.
A few current limitations:
Audio can only handle ISMA Profile 0 and Profile 1 for AAC.
Audio cannot handle multichannel AAC.
Defining AAC
The characteristics of AAC include
Perceptual audio codec, similar to MP3
Multichannel capability
“Indistinguishable” audio quality––that is, you can take an encoded file and the source from the encoded file and you should not be able to tell the difference over a stereo system. From a CD source:
AAC Low Complexity requires 96 kbps per channel.
MP3 requires at least 128 kbps per channel.
QuickTime AAC Encoder
The characteristics of the QuickTime AAC encoder include
AAC-Low Complexity
Acceptable source
44.1 kHz or 48 kHz. It is recommended that when encoding audio, your source should be an even multiple of those numbers.
Mono or stereo
Output
Mono: 16 to 256 kbps
Stereo: 16 to 256 kbps
The sample rate is automatically scaled to the bitrate.
Table 1-1 is a mapping of the input sample rate + output bitrate + output number of channels to output sample rate.
Input sample rate |
Output bitrate |
Output sample rate (one channel) |
Output sample rate (two channels) |
|---|---|---|---|
48000 |
8000 |
8000 |
none defined |
16000-20000 |
16000 |
8000 |
|
24000-28000 |
22050 |
11025 |
|
32000 |
32000 |
16000 |
|
40000, 480000 |
32000 |
22050 |
|
56000 |
32000 |
24000 |
|
64000, 80000, 96000, 112000 |
48000 |
32000 |
|
128000+ |
48000 |
48000 |
|
44100 |
8000 |
8000 |
none defined |
16000, 20000 |
16000 |
8000 |
|
24000, 28000 |
22050 |
11025 |
|
32000 |
32000 |
16000 |
|
40000, 48000 |
32000 |
22050 |
|
56000 |
32000 |
24000 |
|
64000, 80000, 96000, 112000 |
44100 |
32000 |
|
128000+ |
44100 |
44100 |
You are best advised to provide content in these sample rates, regardless of the target bitrate. If you already have content in a different sample rate, however, it is not a problem. QuickTime will perform the necessary Sample Rate conversion.
QuickTime AAC Decoder
The characteristics of the QuickTime AAC decoder include
AAC Low Complexity
8 to 320 kbps
8 to 48 kHz
Mono or stereo
ISMA Profile 0, 1 compliant
Native MPEG-4 Streaming
QuickTime 6 provides support for native MPEG-4 streaming.
Standard hinted MPEG-4 files can be served directly, without converting
to .mov files.
For authoring in QuickTime 6, there are new packetizers and
reassemblers, one for audio and one for video. These are used to
take a .mov or .mp4 and
produce a hinted .mov,
or a hinted .mp4. (MP4
files have in them a definition of hint tracks, which is the QuickTime
version of hint tracks.) Authors can then take this movie and place
it on a Streaming Server. The MPEG-4 file format includes hint tracks
which are the same as native QuickTime hint tracks.
Using QuickTime Streaming Server 4––Apple’s streaming media server––for example, you can serve ISO-compliant hinted MPEG-4 files to any ISO-compliant MPEG-4 client, including any MPEG-4 enabled device that supports playback of MPEG-4 streams over IP. You can also serve on-demand or live MPEG-4 streams, and reflect playlists of MPEG-4 files.
Note that QuickTime 6 does not support interleave for RTP audio packing.
MPEG-4 and Web Developers
This section discusses the various ways that you can use MPEG-4 in QuickTime, as well as how to create, compress, and play MP4 files on the Web. It also provides an example of how to embed an .mp4 file in a Web page so that it will be played only by QuickTime. The section concludes with a discussion of some of the issues involved in creating ISO-compliant MP4 files to ensure that they are interoperable with players other than QuickTime.
If you are a developer who creates websites, website authoring tools, or QuickTime movies intended for distribution over a network or the Internet, you will want to read this section.
Ways To Use MPEG-4 In QuickTime
There are three different ways you can use MPEG-4 in QuickTime.
You can create QuickTime movies (.mov) that use the MPEG-4 video and/or audio codecs. These are not .mp4 files, and MP4 players will not play them. They are QuickTime movies and they require QuickTime 6 or later to play.
You can create MPEG-4 files (.mp4) that are ISO-compliant. These are MP4 files. They are not QuickTime movies. All ISO-compliant players should be able to play these files with no difficulty. QuickTime Player is an ISO-compliant player and can play ISO-compliant MP4 files created on any platform.
You can create MPEG-4 files (.mp4) that are not ISO-compliant. These MP4 files may not play on other MP4 players, but they will play in QuickTime 6. (For more information about issues involving ISO compliance, see the section ISO Compliance.)
QuickTime 6 allows you to create both fast-start and streaming versions of your movies in both .mov and .mp4 format. Movies that use MPEG-4 codecs can be hinted for streaming, exported to .mp4 files, or both, without recompressing the audio or video.
Why Use MPEG-4 On The Web?
MPEG-4 is an ISO standard supported by a wide range of companies in a variety of industries, as discussed in the section Support for MPEG-4. This means that an MPEG-4 file can be played by many different players in addition to QuickTime, not only on personal computers, but also on cell phones, PDAs, and television set-top boxes. This is a huge step forward from the current proprietary environment, which may lead you to deliver your movies using different compressors and multiple formats––such as Real, Windows Media, and QuickTime––just to serve your Mac and Windows customers.
QuickTime movies compressed using MPEG-4 audio and video codecs
can be exported to MPEG-4 file format without recompression, allowing
you to serve your movies in multiple formats (.mov and
.mp4) without sacrificing quality or time.
At typical Internet data rates, the MPEG-4 simple video codec is comparable to Sorenson3 video. This a good reason for using a codec in itself, but there are other advantages. The MPEG-4 video codec scales very well at extremely low bitrates, making it suitable for cell phones and PDAs with data rates even lower than dialup modems. In addition, MPEG-4 video compression can be very fast, making it suitable for live broadcasts and decreasing the time spent compressing movies.
MPEG-4 audio uses the Advanced Audio Codec (AAC), as discussed in the section MPEG-4 Audio Support. This codec provides better quality than mp3 audio at any given bitrate, or equivalent quality at a lower bitrate (typically about 30% lower). At higher bitrates, AAC supports multichannel surround-sound audio. Like MP3 before it, MP4 audio is a standard, so it is entirely possible that devices currently supporting MP3 (MP3 players, CD players, DVD players) will soon be available for MP4 as well. This is a premium quality audio codec for ISDN data rates and above.
For low bandwidth audio suitable to dialup modems or portable wireless connections, however, the QDesign2 music codec and Qualcomm Purevoice codecs remain better choices.
The MPEG-4 specification includes a low bandwidth audio codec based on CELP (codebook excited linear predictive) algorithms similar to the Purevoice codec.
Creating QuickTime Movies With MPEG-4 Compression
You can use the MPEG-4 audio and video compressors as you would any other QuickTime codecs, as explained in the section New Video Codec for MPEG-4. The MPEG-4 video and audio codecs are available in the standard QuickTime compression dialog box.
From QuickTime Player, choose Export (File menu), Movie to QuickTime Movie (pop-up menu), and click the Options button. Click the Settings button for audio or video and choose MPEG-4 from the compressor list. There are a variety of settings for audio and video, such as frame rate, quality, and data rate limit. Click the Size button to change the pixel dimensions of the video track. Click Okay, then Save.
Other applications that use the standard file compression dialog automatically gain the ability to use MPEG-4 compression when you install QuickTime 6.
Creating .mp4 Files
To create .mp4 files from QuickTime Player, choose Export (File menu), Movie to MPEG-4, (pop-up menu), and click the Options button. This opens a dialog box with tabs for General, Video, Audio, Streaming, and Compatability. Use this dialog box to select your MPEG-4 compression settings. These panels are described and illustrated in the section New Dialogs for Handling MP4 Files.
The General settings allow you to export audio, video, or both. You can make some choices about audio and video compressor settings here as well.
One of your compression choices is Pass Through. Use this setting to export a QuickTime movie with MPEG-4 compression to the .mp4 file format without recompressing the data. This is a very fast operation and does not degrade audio or video quality.
The Size menu gives you three choices in the current release of QuickTime 6––Current, 320 x 240, and 160 x 120. If you need a different frame size, you can resize the movie and choose Current.
The Video settings allow you to set a video bitrate limit, frame rate, and keyframe rate.
The Audio settings allow you to set an audio bitrate limit and number of channels.
Text at the bottom of each pane changes as you choose settings to help you undertand the options and monitor ISO compliance. The Compatability pane lets you override audio and video settings to ensure ISO compliance. For more information, see the section ISO Compliance.
The Streaming pane lets you create a fast-start or streaming .mp4. If you choose streaming, QuickTime will add a hint track. You can choose this option with the codecs set to Pass Through to turn a fast-start movie with MPEG-4 compression into a hinted .mp4 without recompressing.
You can stream .mp4 files using the QuickTime Streaming Server (version 4 or later), the Darwin Streaming Server (version 4 or later), or any ISO-compliant streaming server. QuickTime 6 can also play MP4 streams from any ISO-compliant source.
Playing .mp4 Files in QuickTime
Double-clicking .mp4 files from the desktop may launch QuickTime Player, or it may launch some other application that is registered for .mp4 files on your computer.
Files created on the Mac OS have a creator code as well as a file type, so the operating system will usually call QuickTime Player for an .mp4 file created locally on a Mac. This creator code is normally lost, however, if a file is stored on Windows or Unix file systems, something which commonly occurs when a file is transferred over the Internet.
To deliver .mp4 files
over the Internet, your Web server needs to be configured for the
.mp4 MIME type (video/mp4). Once this is done, a browser will play
.mp4 files using the plug-in or ActiveX control registered for video/mp4.
If you post your .mp4 file to the Web and attempt to view it using
QuickTime, an error stating that “This is not a file that QuickTime
understands,” or an attempt to display the file as text, generally
indicates that the Web server is not configured for the mp4 MIME
type.
To embed an .mp4 file in a Web page so that it will be played
only by QuickTime, use both the OBJECT tag––specifying
the QuickTime ClassID and Codebase––and
the EMBED tag, with SRC set
to a QuickTime MIME type––such as .qtif or .pntg––and QTSRC
set to the .mp4 file, as shown in the following example.
Example: Playing .mp4 files over the Web
<OBJECT |
CLASSID="clsid:02BF25D5-8C17-4B23-BC80-D3488ABDDC6B" |
CODEBASE="http://www.apple.com/qtactivex/qtplugin.cab" |
WIDTH="320" HEIGHT="256" > |
<PARAM NAME="src" VALUE="My.mp4" > |
<PARAM NAME="autoplay" VALUE="true" > |
<EMBED SRC="QTMimeType.pntg" TYPE="image/x-macpaint" |
PLUGINSPAGE="http://www.apple.com/quicktime/download" |
QTSRC="My.mp4" WIDTH="320" HEIGHT="256" |
AUTOPLAY="true" > |
</EMBED> |
</OBJECT> |
The OBJECT tag
works with Internet Explorer 4 and later on Windows. The ClassID specifies the
QuickTime ActiveX control, and the Codebase tells
Explorer where to find the ActiveX control if it is not installed.
The PARAM tag with name="src" has
the URL of your MP4 file as its value.
The EMBED tag works
with all other Windows browsers and all Mac browsers including Internet
Explorer. The SRC parameter
is set to a file whose MIME type is used exclusively by QuickTime,
such as .pntg (image/x-macpaint)
or .qtif (image/x-quicktime).
You can also use .mov (video/quicktime). This file must exist and
is downloaded by the browser, but it is not displayed. The browser
uses the QuickTime plug-in to handle any file of this MIME type.
The PLUGINSPAGE parameter
tells the browser where to find the QuickTime plug-in if it is not
installed. The QTSRC parameter
holds the url of your MP4 file, and this is what QuickTime plays.
ISO Compliance
The MPEG-4 specification is more than just a video codec or an audio codec. It defines a rich set of multimedia, including such things as text and facial animation, as discussed in the section Support for MPEG-4.
No software is currently able to display all the different media described in the MPEG-4 specification. Consequently, MPEG-4 defines profiles (discussed in the section Profiles and Levels Defined, which describe the subset of MPEG-4 features a particular player supports, and the feature set a particular movie requires.
A Profile 0 player, for example, can play simple MPEG-4 video at speeds up to 64 kbit/second, and AAC audio at 44.1 and 48 kHz in mono or stereo. A Profile 0 movie does not require any other features for correct playback. A Profile 0 player can play any Profile 0 movie.
A Profile 1 player has a larger required feature set that includes everything in Profile 0 as well as features such as multichannel sound and higher bitrate video.
If an MP4 movie uses even one feature of theProfile 1 set (that is not also part of the Profile 0 set), it is a Profile 1 movie, because it requires a Profile 1 player for reliable playback.
If an MP4 player is missing even one feature required for Profile 1, it is a Profile 0 player, even though it may be able to play many Profile 1 movies.
QuickTime 6 is a Profile 0 player. It can play any Profile 0 movie. QuickTime 6 also has some features of a Profile 1 player, such as the ability to handle higher bitrate video, but it does not have the full Profile 1 feature set and cannot play all Profile 1 movies.
QuickTime can create and play Profile 0 movies that use video at higher bitrates than 64 kbit/second. If you know your movie will be played by QuickTime, you may want to take advantage of the higher bitrates available, but be aware that this produces files which are not ISO-compliant. Other Profile 0 players may not be able to play these files, even though QuickTime can.
To ensure interoperability with other players, use only ISO-compliant MP4 files.
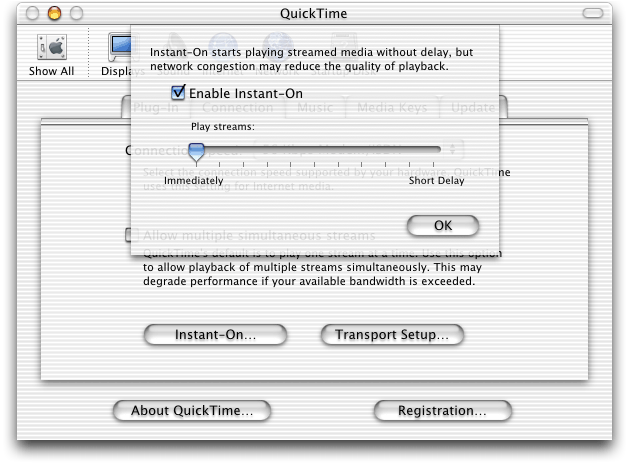
RTSP Instant-On Enhancement to Streaming
QuickTime 6 introduces a new feature in streaming: Instant-On. This feature provides broadband users with quick access to streaming content, thus reducing the wait before playback. Users with a broadband connection can “scrub” through on-demand streams in real-time by using the time slider. The playback is updated instantaneously, allowing you to locate precisely the content that you want to view in a QuickTime movie.
This feature enables the nearly instantaneous start of streamed movies when the available network bandwidth significantly exceeds the data rate of the target media.
Users can enable this feature in the QuickTime Settings control panel (shown below). The slider varies the amount of pre-buffering that QuickTime will do from a maximum of 2x the movie data rate to a minimum of very little pre-buffering.
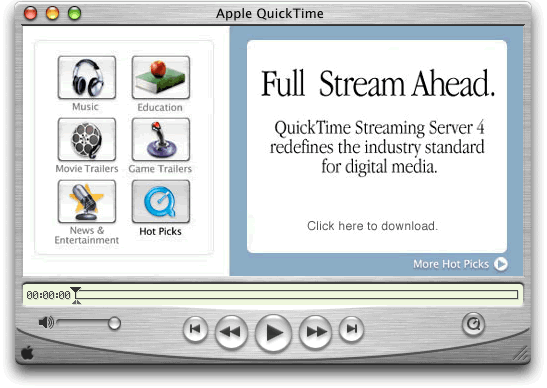
User Interface Changes
There are some minor changes to the QuickTime Player user interface that are introduced in QuickTime 6, as discussed in this section. These include the following:
The Channel button (below) that was marked “TV” in previous versions of QuickTime is now marked with a “Q”.

The Hot Picks movie and the Channel pane have a new layout (below), with channel categories on the left and a movie on the right. The list of channel categories is now dynamic.
The Favorites pane is no longer an alternate for the Channel pane. It is now a stand-alone panel (shown below). Instead of icons, favorite movies are shown as a list of file names or URLs.
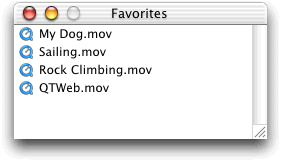
The Favorites panel can be accessed only from the Favorites menu. There is no longer a heart icon to switch between Channels and Favorites. Both can now be displayed simultaneously if the user wishes.
There is a new menu item in QuickTime Player. Under File, there is now an Open Recent > selection, with a submenu of the last 10 movies.
These changes should not affect programmers working with QuickTime at the API level.
JPEG 2000 Support
QuickTime 6 includes support for JPEG 2000, a high-quality, still-image compression and image coding standard that uses state of the art compression techniques based on wavelet technology. QuickTime 6 provides support for encoding, decoding, import, and export to the format.
The JPEG 2000 standard is based on discrete wavelet transform (DWT), scalar quantization, context modeling, arithmetic coding and post-compression rate allocation. The standard lends itself to a variety of uses, ranging from digital photography to medical imaging to advanced digital scanning and printing.
For more information on the JPEG 2000 standard for still image coding, refer to
http://www.jpeg.org/JPEG2000.htm |
Most notably, JPEG 2000 provides high compression efficiency––in many cases, visually lossless compression at 1 bit per pixel or better.
Note that for this release of QuickTime 6, JPEG 2000 is only supported in Mac OS X.
Flash 5 Support
QuickTime 6 includes several new and updated components related to Macromedia Flash support in QuickTime. The Flash media handler and the Flash movie importer have been updated, and a new Flash Properties panel has been added to the QuickTime Player info panels.
New Flash Media Handler
The new Flash media handler supports Macromedia Flash files (also known as SWF files) that conform to Flash 5 versions and earlier of the SWF specification. (Previous releases of QuickTime supported files that conformed to Flash 4 and earlier.) You should refer to Macromedia’s documentation for a complete listing of the features added to Flash 5. The most significant additions include
greatly expanded ActionScript capabilities
HTML text rendering
XML data exchange
All these features work properly under the new Flash media handler––with a few limitations. (Refer to the QuickTime 6 Release Notes, which specify those limitations.)
SWF files opened by QuickTime-savvy applications are converted to QuickTime movie files by the Flash movie importer, discussed in the next section. These movie files consist of a single Flash track, whose media data is simply the data in the original SWF file. Virtually all of these movie files play back in QuickTime Player, in other QuickTime-savvy applications, or in the QuickTime browser plug-in exactly as if the original SWF file had been opened using the Flash Player application or the Flash browser plug-in.
Flash Movie Importer
The new Flash movie importer is “smarter” than the previous
importer in several ways. The principal change is that the new importer
scans some or all of the Flash file being imported to try to determine
whether the file is set to automatically start playing when it is
opened. (Previous importers assumed that all imported SWF files
should be autoplayed.) Several other settings are unchanged from
earlier versions of the Flash importer: the play-all-frames option
is set to TRUE and the
looping flag is set to FALSE.
New Flash Properties Info Panel
Flash tracks can be combined with other kinds of tracks in a QuickTime movie file. This is especially useful when using controls in the Flash track (buttons, sliders, etc.) to control the playback and settings of other tracks (video tracks, sound tracks, VR tracks, etc.)
In this situation, the content author needs to be aware of a new consideration that did not arise in earlier versions of the Flash media handler: version 5 ActionScripts can read the position of the cursor and/or the state of the mouse button at any time. This means that some ActionScripts may respond to mouse button clicks even if those clicks do not occur on some interactive element in the Flash track. If the Flash media handler accepts and processes all clicks in the track rectangle, then those clicks cannot be passed to tracks layered behind the Flash track. This effectively prevents the user from interacting with sprite tracks and QuickTime VR tracks layered behind the Flash track.
The new Flash media handler allows a movie author to decide on a per-track basis whether all mouse button clicks are accepted and handled by that particular instance of the Flash track or whether clicks that are not on an interactive element in the track are passed to tracks layered behind it. The setting for a specific Flash track can be adjusted using the new “Flash Properties” info panel in QuickTime Player, shown in Figure 1-10.
This panel contains a single check box labeled “Mouse Capture Enabled”. If the box is checked, then all mouse clicks are directed to the Flash track (unless some track in front of the Flash track processes the click); if the box is unchecked, only mouse button clicks on interactive elements in the Flash track are processed.

When a Flash file is imported as a movie with a single Flash track, mouse-capturing is enabled for that track. If you combine that track with other tracks, you may need to adjust the mouse capture setting to achieve the proper user experience.
Controlling Mouse Capturing Setting
The mouse capture setting of a Flash track is stored in the media properties atom of the track.
The Movies.h header
file contains the constant kFlashTrackPropertyAcceptAllClicks to
identify the atom type; the atom data is a Boolean value, where TRUE means
to accept all mouse button clicks and FALSE means
to accept only those mouse button clicks on an interactive element in
the Flash track.
The following snippet of code sets a Flash track to accept all clicks:
QTAtomContainer trackProperties = NULL; |
Boolean acceptAllClicks = true; |
GetMediaPropertyAtom(flashMedia, &trackProperties); |
if (trackProperties != NULL) { |
QTInsertChild(trackProperties, 0, |
kFlashTrackPropertyAcceptAllClicks, 1, 1, |
sizeof(acceptAllClicks), &acceptAllClicks, nil); |
SetMediaPropertyAtom(flashMedia, trackProperties); |
QTDisposeAtomContainer(trackProperties); |
} |
New APIs for Tasking QuickTime
QuickTime 6 introduces a new tasking mechanism designed to improve application performance and operation.
Periodically, applications have to give time to QuickTime
by calling such routines as MCIsPlayerEvent(), MCIdle(), MoviesTask(),
or TaskMovie(). Typically,
QuickTime developers ask the question, how often should I call a
particular routine? The answer most frequently given is, 10 to 20
times per second. This works in most cases. But in many other cases,
while an application is tasking QuickTime 10 or 15 times per second,
half the time QuickTime does not really need to be called, and the
application will just be sitting there, spinning. As a consequence,
there is an inefficient use of processor time.
In QuickTime 6, a new group of APIs are provided that improve QuickTime tasking from an application’s point of view. These are
QTGetTimeUntilNextTask()QTInstallNextTaskNeededSoonerCallback()QTUninstallNextTaskNeededSoonerCallback()
For example, where an application once did this
while (true) { |
WaitNextEvent(..., &event, 2, ...); // if no event pending, return a |
// null event after |
// 2/60 of a second |
MCIsPlayerEvent(mc, &event); |
} |
it can now do something like this
UInt32 t; |
while (true) { |
QTGetTimeUntilNextTask(&t, 60); // how long in 60ths of a second? |
WaitNextEvent(..., &event, t, ...); |
MCIsPlayerEvent(mc, &event); |
} |
QTGetTimeUntilNextTask is a new API that lets you pass in a scale––for example, 1/60 of a second or 1/1000 of a second––and returns a duration, that is, the number of 60ths or 1000ths (whatever you ask for) until the next time QuickTime needs to be called.
For example, as shown in the code snippet above, on Mac OS
9 you would call QTGetTimeUntilNextTask, passing in 60 because WaitNextEvent() wants
ticks. It will tell you how many 60ths of a second until QuickTime
needs to be called again. WaitNextEvent() will not
return either until that amount of time has gone by, in which case
it will give you a NULL event, or an event took place, in which
case it will give you that event.
On Mac OS X, the recommended way to do this on a Carbon application is to use the Carbon event loop timer, as discussed in the section New Carbon Movie Control. This is a timer routine that you set up to be called periodically from the Carbon event loop. You set a duration for how often you want it to happen.
The following code snippet shows how you can use both QuickTime’s
new tasking mechanism and the Carbon event loop timer code. It also
shows how to use the new QTInstallNextTaskNeededSoonerCallback() API.
MyMovieIdlingTimer() is
installed by the sample routine InstallMovieIdlingEventLoopTimer() shown
in the code snippet below. This routine performs the actual work
of idling the movies and/or movie controllers that the application
has in use.
static void MyMovieIdlingTimer(EventLoopTimerRef inTimer, |
void *inUserData) |
{ |
OSStatus error; |
long durationInMillis; |
MyStatePtr myState = (MyStatePtr)inUserData; // Application's state |
// related to its list of movies |
You insert the code here to idle the movies and/or movie controllers
that the application has in use––for example, calls to MCIdle().
// Ask the idling mechanism when we should fire the next time. |
error = QTGetTimeUntilNextTask(&durationInMillis, 1000); |
// 1000 == millisecond timescale |
if (durationInMillis == 0) // When zero, pin the duration |
// to our minimum |
durationInMillis = kMinimumIdleDurationInMillis; |
// Reschedule the event loop timer |
SetEventLoopTimerNextFireTime(myState->theEventTimer, |
durationInMillis * |
kEventDurationMillisecond); |
} |
TaskNeededSoonerCallback() is
installed using the new QTInstallNextTaskNeededSoonerCallback() to
enable QuickTime to awaken the application in order to reschedule
some idle time between calls to the event timer function.
static void TaskNeededSoonerCallback(TimeValue duration, |
unsigned long flags, |
void *refcon) |
{ |
SetEventLoopTimerNextFireTime((EventLoopTimerRef)refcon, |
duration * kEventDurationMillisecond); |
} |
The InstallMovieIdlingEventLoopTimer() function
performs the actual installation of the Carbon event loop timer
function. This is called once when the first movie is opened. It
also installs a TaskNeededSooner callback
that the Idle Manager calls when QuickTime needs your attention.
static OSStatus InstallMovieIdlingEventLoopTimer(MyStatePtr myState) |
{ |
OSStatus error; |
Note that myState is
a structure the application maintains to “remember” the event
loop timer reference, as well as the list of movies or movie controllers
that it will need to idle.
error = InstallEventLoopTimer( |
GetMainEventLoop(), |
0, // firedelay |
kEventDurationMillisecond * kMinimumIdleDurationInMillis, |
// interval |
NewEventLoopTimerUPP(MyMovieIdlingTimer), |
myState, // This will be passed to us when |
// the timer fires |
&myState->theEventTimer); |
if (!error) { |
// Install a callback that the Idle Manager will use when |
// QuickTime needs to wake me up immediately |
error = QTInstallNextTaskNeededSoonerCallback( |
NewQTNextTaskNeededSoonerCallbackUPP(TaskNeededSoonerCallback), |
1000, // Millisecond timescale |
0, // No flags |
(void*)myState->theEventTimer); // Our refcon, the |
// callback will |
// reschedule it |
} |
return error; |
} |
As shown in the above code snippet, when QuickTime decides that the next task is needed sooner, it will call the QTInstallNextTaskNeededSoonerCallback routine. Using that routine, you can reschedule your Carbon event loop timer. This callback proc may be called from interrupt-time or called from another thread on Mac OS X. You can call the Carbon API to reschedule the Carbon event loop timer. When you install the callback, you tell it what scale you like, and then when the callback comes, QuickTime will pass you a duration.
Often when you ask QTGetTimeUntilNextTask, it will return
you a 0, which means it needs to be tasked right away. It’s not
recommended that you pass a 0 into WaitNextEvent(), for
example, because what will happen is that you will completely swamp
the CPU. Passing in a 1 to WaitNextEvent() is
a good minimum.
QTGetTimeUntilNextTask
Provides the time in specified units, until QuickTime next needs to be called.
OSErr QTGetTimeUntilNextTask (long * duration, long scale);
Parameters
- duration
A pointer to the returned time to wait before tasking QuickTime again.
- scale
The requested time scale.
- return value
Error code (for example,
paramErrorMovieToolboxUninitialized).
Discussion
Using this routine, you pass in the scale that you’re interested in, whether it is a 60th of second (scale=60), or a 1000th of second (scale=1000). This call then returns a duration that specifies how long you can wait before tasking QuickTime again. In Mac OS X, with the Carbon event loop timer, you generally pass in 1000 and get milliseconds in return, and then schedule your Carbon event loop timer.
Introduced in QuickTime 6.
Declared In
Movies.hQTInstallNextTaskNeededSoonerCallback
Installs a callback that is called when QuickTime “changes its mind”about when it next needs to be tasked.
QTInstallNextTaskNeededSoonerCallback (QTNextTaskNeededSoonerCallbackUPP callbackProc,
TimeScale scale,
unsigned long flags,
void * refcon);
Parameters
- callbackProc
A callback procedure.
- scale
The time scale of the duration that will be passed to the callback.
- flags
Unused. Must be zero.
- refcon
A reference constant.
Discussion
This routine installs a callback procedure that specifies when QuickTime next needs to be tasked. The callback procedure may be called from interrupt-time or on Mac OS X from another thread, so you must be careful not to do anything that might cause race conditions. You can call the Carbon API to reschedule the Carbon event loop timer from another thread.
You specify what scale you like, and when the callback is returned, it will pass you a duration.
Note that you can install or uninstall more than one callback procedure if necessary.
All callbacks will be called in sequence. You can also install the same callback multiple times with different refcons. It will be called once with each refcon value.
Introduced in QuickTime 6.
Declared In
Movies.hQTUninstallNextTaskNeededSoonerCallback
Uninstalls your NextTaskNeededSooner callback
procedure.
QTUninstallNextTaskNeededSoonerCallback
(QTNextTaskNeededSoonerCallbackUPP callbackProc,
void * refcon);
Parameters
- callbackProc
A callback procedure.
- refcon
A reference constant.
Discussion
This routine takes a callback procedure and your reference constant, so that you can uninstall one instance of a callback you have installed more than once with different refcons.
Introduced in QuickTime 6.
Declared In
Movies.hThe Idle Manager APIs
QuickTime 6 introduces a new group of Idle Manager APIs that let media handlers, data handlers, and movie importers report their various QuickTime idling needs. These new APIs, discussed in this section, include
QTIdleManagerSetNextIdleTime
QTIdleManagerSetNextIdleTimeNow
QTIdleManagerSetNextIdleTimeNever
QTIdleManagerSetNextIdleTimeDelta
MCSetIdleManager
MovieImportSetIdleManager
DataHSetIdleManager
MediaGGetIdleManager
MediaGSetIdleManager
The Idle Manager introduced in QuickTime 6 is an opaque object that your component can make calls against.
To work with the Idle Manager object, you have to implement
the appropriate SetIdleManager component
APIs, so that your component can be handed an Idle Manager. When
your component is handed an Idle Manager, you will need to tell
the Idle Manager when you next need to be idled. (Note that media
handlers also need to implement a GetIdleManager routine.)
When you next need to be idled means: if you idle me before this time, I will do no work, so don’t bother. It’s a hint, not explicit instructions. If you don’t tell the Idle Manager anything different, then you’ll continue to be idled all the time because the Idle Manager still thinks you need one back then, which is now.
In QuickTime 6, there are three types of components that can get handed an Idle Manager object:
media handlers
data handlers
movie importers (but only certain types).
Using these various Idle Manager routines, your component can specify when it needs to be idled.
Derived Media Handlers
Derived media handlers are so called because they derive much
of their functionality from the base (or generic) media handler.
Historically, derived media handlers have requested idles from the
generic media handler by means of flags passed to MediaSetHandlerCapabilities. There
are three basic modes the derived media handler can request:
Don’t idle me (
noIdle).Idle me once per sample in my track (
0). No flags are set.Idle me all the time (
noScheduler,wantsTime, or both).
These modes can be changed at any time by calling MediaSetHandlerCapabilities again.
Derived media handlers that only use modes 1 and 2 don’t
need to do anything with Idle Management. All their Idle Management
will be handled for them by the generic media handler. They should
not implement MediaGSetIdleManager or MediaGGetIdleManager.
Derived media handlers that currently use mode 3, but would
like the ability to throttle back the idle rate, should implement MediaGSetIdleManager and MediaGGetIdleManager.
They can then use various Idle Manager routines to tell QuickTime
when they would like to be idled next.
MediaGGetIdleManager
Retrieves the Idle Manager object from a derived media handler.
MediaGGetIdleManager (MediaHandler mh,
   IdleManager * pim);
Parameters
- mh
A media handler component instance.
- pim
A pointer to an idle manager that the media handler will fill in.
Discussion
This routine must be implemented by a derived media handler that wants to report its idling needs.
Introduced in QuickTime 6.
Declared In
MediaHandlers.hMediaGSetIdleManager
Gives an Idle Manager object to a derived media handler, so it can report its idling needs.
MediaGSetIdleManager (MediaHandler mh,
   IdleManager im);
Parameters
- mh
A media handler component instance.
- im
An idle manager.
Discussion
This routine must be implemented by a derived media handler that wants to report its idling needs.
Introduced in QuickTime 6.
Declared In
MediaHandlers.hWhat To Do Next
After receiving an idle manager by means of the above calls, a derived media handler can call the following routines to tell QuickTime when they need to be idled next:
QTIdleManagerSetNextIdleTimeQTIdleManagerSetNextIdleTimeNeverQTIdleManagerSetNextIdleTimeNowQTIdleManagerSetNextIdleTimeDelta
Three Useful Idle Manager Calls
There are three useful Idle Manager calls you should consider:
QTIdleManagerSetNextIdleTimeNow, which specifies that your component needs an idle now. The only parameter is your Idle Manager.QTIdleManagerSetNextIdleTimeNever, which specifies that your component will not need to be idled until further notice––in other words, don’t idle me.QTIdleManagerSetNextIdleTimeDelta, which specifies that your component needs to be idled this amount of time from now. Using this routine will get you one idle. If you don’t specify anything different, then you’ll continue to be idled all the time because the Idle Manager still thinks you need one back then, which is now. Every time you get idled, you need to tell the Idle Manager again when your next idle needs to be. This call will tell the Idle Manager how long when you pass in a duration, but then you have to tell it what the units of that duration are.
QTIdleManagerSetNextIdleTimeNow
Specifies that your component needs to be idled now.
QTIdleManagerSetNextIdleTimeNow (IdleManager im);
Parameters
- im
An idle manager.
Discussion
This routine specifies that the calling component needs to be idled right away, that is, continuously, until further notice.
Introduced in QuickTime 6.
Declared In
Movies.hQTIdleManagerSetNextIdleTimeNever
Specifies that your component will not need to be idled until further notice.
QTIdleManagerSetNextIdleTimeNever (IdleManager im);
Parameters
- im
An idle manager.
Discussion
This routine specifies that your component should not be idled.
Introduced in QuickTime 6.
Declared In
Movies.hQTIdleManagerSetNextIdleTimeDelta
Specifies that your component needs to be idled a certain amount of time from now––for example, a quarter of second from now, or three seconds from now.
QTIdleManagerSetNextIdleTimeDelta (IdleManager im,
   TimeValue duration,
   TimeScale scale);
Parameters
- im
An idle manager.
- duration
The time from now in the scale specified.
- scale
The time scale.
Discussion
This routine lets you pass in a duration and a scale. For example, if you need an idle a half second from now, you can pass in a duration of 500 and a scale of 1000, or a pass in a duration of 1 and scale of 2. In both cases, this is a half second. Typically, developers will have a time scale they are used to working in, such as milliseconds or 60ths of a second.
Introduced in QuickTime 6.
Declared In
Movies.hGeneral Purpose Idle Manager API
There is a more general purpose Idle Manager call for specifying absolute wallclock time of the next required idle.
QTIdleManagerSetNextIdleTime can be called to do this, passing
in a fully filled out TimeRecord,
using QuickTime’s wallclock timebase. Note that any derived media
handlers that use this call may need to do their computations in
track time, and then convert to wallclock time, using ConvertTime.
The wallclock timebase can be found by calling QTGetWallClockTimeBase.
QTIdleManagerSetNextIdleTime
Specifies the next time to idle.
QTIdleManagerSetNextIdleTime (IdleManager im,
   TimeRecord * nextIdle);
Parameters
- im
An idle manager.
- nextIdle
A pointer to a
TimeRecordcontaining the wallclock time when the calling component would like to be idled.
Discussion
If your component needs to call QTIdleManagerSetNextIdleTime,
you need to do wallclock time calculations, so you need to call
QTGetWallClockTimeBase.
QTGetWallClockTimeBase (TimeBase * wallClockTimeBase) |
In addition, you may need to call ConvertTime() in
order to convert from track time or media time to wallclock time,
and ConvertTimeScale() in
order to convert to the timescale you like to work in.
Introduced in QuickTime 6.
Declared In
Movies.hData Handlers
Certain data handlers support scheduling reads in the future.
These data handlers implement DataHTask,
so that they will have an opportunity to start that read sometime
later. These data handlers can throttle back the calls to DataHTask by
implementing DataHSetIdleManager,
and using the Idle Manager calls to say when they want to be idled
next.
DataHSetIdleManager
Gives an Idle Manager object to a data handler, so it can report its idling needs.
DataHSetIdleManager (DataHandler dh,
   IdleManager im);
Parameters
- dh
A data handler component instance.
- im
An idle manager.
Discussion
This routine must be implemented by a data handler that wants to report its idling needs.
Introduced in QuickTime 6.
Declared In
QuickTimeComponents.hWhat To Do Next
After receiving an idle manager by means of the above calls, a data handler can call the following routines to tell QuickTime when they need to be idled next:
QTIdleManagerSetNextIdleTimeQTIdleManagerSetNextIdleTimeNeverQTIdleManagerSetNextIdleTimeNowQTIdleManagerSetNextIdleTimeDelta
Movie Importers
In general, movie importers don’t get idled. Typically, a movie importer just examines a file, scans it, and then creates a movie that will point at the file and describe how to play it. The media data is in that file, but the movie itself is in memory.
There is a special kind of movie importer component that remains
open to do further work after the movie is constructed. These importers
implement MovieImportIdle.
These “idling importers” can throttle back their idles by implementing MovieImportSetIdleManager,
and then using the Idle Manager calls to specify when they want
to be idled next.
MovieImportSetIdleManager
Gives an Idle Manager object to a movie importer component, so it can report its idling needs.
MovieImportSetIdleManager (MovieImportComponent ci,
   IdleManager im);
Parameters
- ci
A movie importer component instance.
- im
An idle manager.
Discussion
This routine must be implemented by a movie importer that wants to report its idling needs.
Introduced in QuickTime 6.
Declared In
QuickTimeComponents.hNew Carbon Movie Control
QuickTime 6 for Mac OS X introduces the Carbon Movie Control. This mechanism makes the process of using QuickTime within a Carbon Event-based application easier and faster. This is accomplished by using a single API that can be shared among all such applications.
This API accepts a movie and a window and will construct a
control containing a standard movie controller. The control can
then act as a Carbon Event target, receiving Carbon Events and dispatching
them to its movie controller. Using this mechanism, an application does
not need to use WaitNextEvent() and
calls to MCIsPlayerEvent().
In addition, the movie controller is automatically idled by means
of an event loop timer, using the Idle Manager to optimize idling
frequency.
Background
QuickTime movie playback APIs have traditionally been dependent
on the classic Macintosh application paradigm, i.e., the WaitNextEvent() loop.
In this loop, an application delegates events to a movie’s Movie
Controller (if present) and shares some of its idle time with QuickTime,
which results in “idling” of movies. In the cooperatively scheduled
world of Mac OS 9 and earlier versions of the Macintosh operating
system, this scheme worked well.
In Mac OS X, however, a new application paradigm was introduced. This paradigm depends on Carbon Events and associated handlers to communicate user events to the application. Older models that rely on periodic polling are replaced by the more “tunable” event loop timer mechanism, which enables an application to have greater precision over the frequency of idling.
As a consequence, application developers may need to construct event handlers for their windows to funnel events to their Movie Controllers and create event loop timers to “idle” their movies.
How It Works––An Event Target
The Carbon Movie Control is implemented as a custom control, which installs an event handler to handle the Carbon Events sent to controls. When a Carbon Movie Control is created for a movie, a movie controller is also created. The movie control then directs User Interface events to this movie controller.
The application can install event handlers on the Carbon Movie
Control to handle such things as contextual menu clicks or to intercept
events to do special processing. Control Manager calls can be made
as well. For example, the GetControlBounds() and SetControlBounds() functions
can be used to obtain or modify the control’s size and location.
Providing Time to Movies
The Carbon Movie Control’s custom control implementation takes care of all event routing to the movie. In order to distribute time to these movies, an event loop timer is set up which “idles” all movie controllers associated with Carbon Movie Controls within the application. The frequency of this timer is set using information it gets from the QuickTime Task Management APIs, discussed in the section New APIs for Tasking QuickTime. Thus, the amount of time devoted to movie processing is minimized.
Support for Editing
The Carbon Movie Control also supports basic movie editing features, such as cut, copy, paste, and clear, and performs the work of updating the Edit menu, enabling or disabling editing command items as appropriate.
Interface
The interface for the Carbon Movie Control feature is a single API routine:
CreateMovieControl
OSErr CreateMovieControl (
   WindowRef theWindow,
   Rect *localRect,
   Movie theMovie,
   UInt32 options,
   ControlRef *returnedControl);
Parameters
- theWindow
The window in which the control is placed.
- localRect
The rectangle in the local coordinates of the window in which the movie control is placed. If NULL is passed for
localRect, the movie control is positioned at 0,0 within the window and will have the natural dimensions of the movie, plus height of the movie controls, if visible. If thelocalRecthas 0 height and width (top == bottom, left == right) it is interpreted as an anchor point and the top left point of the movie control will be located at this position. Its height and width will be as in the NULL rectangle case. For all other cases of rectangles, the movie control is centered within the rectangle by default and will be sized to fit within it while maintaining the movie’s aspect ratio.- theMovie
The movie to be displayed within the movie control.
- options
A bitmask containing zero or more option bits:
kMovieControlOptionHideController-
The movie controller is hidden when the movie control is drawn.
kMovieControlOptionLocateTopLeft-
The movie is pinned to the top left of the localRect rather then being centered within it.
kMovieControlOptionEnableEditing-
Allows programmatic editing of the movie and enables drag and drop.
kMovieControlOptionHandleEditingHI-
Installs event handler for Edit menu commands and menu updating (also asserts
kMovieControlOptionEnableEditing). kMovieControlOptionSetKeysEnabled-
Allows the movie control to react to keystrokes and participate in the keyboard focus mechanism within the window.
kMovieControlOptionManuallyIdled-
Rather than being idled by the movie control event loop timer, this movie control is idled by the application, manually.
- returnedControl
-
This is the Movie Control, suitable for passing to Control Manager APIs.
Discussion
This routine returns an error if there is a problem with one
of the parameters or if an error occurred while creating the underlying
movie controller or the custom control itself. If an error is returned,
the value of returnedControl is
undefined.
The control can be deleted by calling DisposeControl().
Note that the control is automatically disposed of if the enclosing
window is destroyed. Note, too, that the underlying movie controller
is disposed of when the control is deleted.
Introduced in QuickTime 6.
Declared In
Movies.hSupported on Mac OS X
Access to Underpinnings
Once a movie control is created, you can access its associated
movie, its underlying movie controller or change certain options
using the GetControlData() and SetControlData() routines.
The following are the selectors that can be passed to these control manager functions:
kMovieControlDataMovieControllerUse with
GetControlData()to obtain the movie controller. This allows the application access to more features of QuickTime and finer control over aspects of movie playback and editing. IMPORTANT NOTE: Do not dispose of this movie controller; it is owned by the movie control it is associated with. You also must not useMCSetControllerAttached()to detach the controller from the movie.kMovieControlDataMovieA
GetControlData()convenience to obtain the movie associated with a movie control after its creation.kMovieControlDataManualIdling-
Used with
GetControlData()andSetConrolData()to obtain and modify the state of the movie control’s idling behavior. By default, all movie controls are given time by the movie control event loop timer. Setting this Boolean item toTRUEwill allow the application to manually idle the movie usingMCIdle().
Sprite API Changes
QuickTime 6 introduces a new group of APIs that enable software application developers to request, display, and manage images that are hosted outside of the Movie in which they are used.
Loading Images into a Sprite Track
Each sprite in a sprite track has an image associated to it. Typically, that image is visible to the user when the movie is presented. A Sprite track can have a number of images in it and you can assign another image to a sprite by setting its image index.
In general, many of the images that could be used in interactive Web content are simultaneously being integrated into HTML, perhaps updated by server-side scripts, created by art departments in larger production teams, or are simply not available during the Movie authorship process. In earlier versions of QuickTime, it was not possible for a movie author to manage the dynamic loading and processing of sprite images. Images had to be integrated into the movie when it was generated.
Now, in QuickTime 6, with two simple sprite track wired actions (discussed in the section New Sprite Actions), the movie author can load any image format supported by QuickTime, either from a local or remote source, and manage its display and persistence during the playback of a movie. Sprite images, like sprites before them, now have two unique identifiers associated with them to help movie creators manage many images over the course of a movie’s lifetime, index and ID.
New Sprite APIs
The following APIs, discussed in this section, are new in QuickTime 6.
SpriteMediaNewImage
Creates a new sprite image.
ComponentResult  SpriteMediaNewImage (                     // IV-2677
   MediaHandler   mh,   // IV-2677
   Handle dataRef,      // IV-2683
   OSType dataRefType,  // IV-2695
   QTATomID desiredID );// IV-2675
Parameters
- mh
The sprite media handler for this operation.
- dataRef
A pointer to the url
dataRefor an alias that references the image to be added to the sprite track.- dataRefType
A
FourCharCodedescribing thedataRefparameter. For example, you can useURLDataHandlerSubTypeif thedataRefis a URL.- QTAtomID
A
longused to request a unique ID identifier for the image. If the requested ID is in use, the call fails. If a 0 is passed in, NewImage will assign the next available (incremental) integer ID––which is usually the same as the next available index, unless that ID has been previously assigned.
Return Value
If successful, the new image can be used by the target sprite track like any other sprite image. The image is referenced by the next available image index, equal to the number of images in the track before the call was made + 1, and by the ID that was requested via parameter or was automatically assigned.
SpriteMediaDisposeImage
Frees the memory allocated for a new sprite image, and removes that image from the track.
ComponentResult  SpriteMediaDisposeImage (                   // IV-2677
   MediaHandler mh,   // IV-2677
   short imageIndex );// IV-2687
Parameters
- mh
The sprite media handler for this operation.
- imageIndex
The index of a sprite image previously acquired via a
SpriteMediaNewImagecall.
Function Result: The image disposed of is no longer available to the sprite track, and the image index location will remain “empty” for the duration of the current key sample.
Introduced in QuickTime 6.
C interface file: Movies.h
SpriteMediaImageIndexToID
Returns the ID of a particular image given the index of that image.
ComponentResult  SpriteMediaImage  (                         // IV-2677
   MediaHandler mh,         // IV-2677
   short imageIndex,
   QTAtomID *imageID );     // IV-2687
Parameters
- mh
The sprite media handler for this operation.
- imageIndex
The index of a sprite image.
- imageID
On return, a pointer to the ID of the image.
Return Value
You can access Movie
Toolbox error returns through GetMoviesError (I-505) and GetMoviesStickyError (I-506),
as well as in the function result. See Error Codes (IV-2718).
Declared In
Movies.hIntroduced in QuickTime 6.
SpriteMediaImageIDToIndex
Returns the index of a particular image, given the ID of that image.
ComponentResult  SpriteMediaImage  (                         // IV-2677
   MediaHandler mh,         // IV-2677
   QTAtomID imageID,        // IV-2687
   short *imageIndex );
Parameters
- mh
The sprite media handler for this operation.
- imageID
The ID of a sprite image.
- imageIndex
On return, a pointer to the index of the image.
Declared In
Movies.hFunction Result: If no image is found with a corresponding ID, the image index returned will be 0.
Introduced in QuickTime 6.
Sprite Hit-Testing Mode
When a sprite is clicked in a sprite track, it “receives” the mouse click. However, there are times when you may want to have sprites that do not receive a mouse click, and instead, you want the mouse click to “pass through” that sprite (and on to another sprite or perhaps another track behind the sprite track). In earlier versions of QuickTime, this was not possible.
In QuickTime 6, however, this behavior––passing a mouse click through a sprite––can be controlled through a new sprite property. In addition, you can control all the sprites in a sprite track through a new sprite track property.
Controlling Hit-Testing Mode of an Individual Sprite
In QuickTime 6, each sprite has a property:
canBeHitTested |
This property can have a Boolean value of either TRUE or FALSE.
When a sprite is created, this property is defaulted to TRUE.
The property is an actual property of sprites within a sprite world.
Thus, this property can be set and retrieved by means of sprite
world calls directly: SetSpriteProperty and GetSpriteProperty,
using the kSpritePropertyCanBeHitTested (defined
in Movies.h) constant
and passing and receiving the property value of TRUE or FALSE.
Further, when calling a sprite world’s SpriteHitTest or SpriteWorldHitTest routines,
you can pass the new flag spriteHitTestTreatAllSpritesAsHitTestable to
have SpriteWorld’s hit testing ignore the individual sprites’
own canBeHitTested property
and make all sprites hit testable. Note there is no flag for making
all sprites not hit testable.
Since sprite media uses sprite world, this property can also
be manipulated by means of SpriteMedia calls: SpriteSetSpriteProperty and SpriteGetSpriteProperty,
passing kSpritePropertyCanBeHitTested and
passing/receiving the property value of TRUE or FALSE.
Finally, this property can be manipulated by means of non-primary
source data using the kTrackModifierObjectCanBeHitTested (also
defined in Movies.h)
constant.
Controlling Hit-Testing Mode of a Sprite Track
Sprite Tracks in QuickTime have a property:
allSpritesHitTestingMode |
It can have three values, as defined in MovieToolbox.h:
kSpriteHitTestUseSpritesOwnPropertiesMode = 0, |
kSpriteHitTestTreatAllSpritesAsHitTestableMode = 1, |
kSpriteHitTestTreatAllSpritesAsNotHitTestableMode = 2 |
When a sprite track is created, this property defaults to kSpriteHitTestUseSpritesOwnPropertiesMode.
This property can be specified in the media by having a QTAtom of
type kSpriteTrackPropertyAllSpritesHitTestingMode,
a size of short, and
a value of 0, 1 or 2.
Also, this property can be set at runtime by means of SpriteSetSpriteProperty,
which normally is used to set properties of sprites, but has been
overloaded to now be able to set track properties. To do so, the
spriteID should be equal to FOUR_CHAR_CODE('Trck'),
the property type should be kSpriteTrackPropertyAllSpritesHitTestingMode and
then the property value should be 0, 1, or 2.
Correspondingly, the track property can be retrieved via SpriteGetSpriteProperty with
a sprite ID of FOUR_CHAR_CODE('Trck') and
a property type of kSpriteTrackPropertyAllSpritesHitTestingMode.
Handling Mouse Clicks
When a mouse click occurs within a sprite track, the sprite
media handler will first examine its kSpriteTrackPropertyAllSpritesHitTestingMode property
to see how to handle the click.
If the property is set to kSpriteHitTestUseSpritesOwnPropertiesMode,
the sprite media handler will then use the individual hit testing
property kSpritePropertyCanBeHitTested of
the sprite clicked on to determine if the sprite will “receive”
the click or not. If not (i.e., the sprite’s kSpritePropertyCanBeHitTested property
is FALSE), and the mouse
click is over another sprite, the media handler will then consider
that sprite’s kSpritePropertyCanBeHitTested property
and, if TRUE, will have
that sprite receive the mouse click. If FALSE,
then the process continues with other sprites under the mouse until
one receives it or there are no further sprites at the location
of the mouse click. If none, the sprite media handler will inform
QuickTime it does not wish to handle the mouse click at all, which
will then propagate the mouse click to the Track underneath it in
the movie.
If the kSpriteTrackPropertyAllSpritesHitTestingMode property
of a Sprite Track is set to kSpriteHitTestTreatAllSpritesAsHitTestableMode,
then the sprite media handler will ignore the kSpritePropertyCanBeHitTested sprite
properties of all sprites within the track and instead consider
all the sprites as being able to receive mouse clicks.
If the kSpriteTrackPropertyAllSpritesHitTestingMode property
of a Sprite Track is set to kSpriteHitTestTreatAllSpritesAsNotHitTestableMode,
then the sprite media handler will ignore the kSpritePropertyCanBeHitTested sprite
properties of all sprites within the track and instead consider
all the sprites as being unable to receive mouse clicks.
Sprite Track Setting Enhancements
A Sprite Track enhancement is provided in QuickTime 6 that gives content creators, primarily, and users, secondarily, greater flexibility and control over the pixel depth of the offscreen Graphics World (GWorld) that a Sprite Track utilizes for the composition and management of its sprites.
Limited Control of Offscreen Bit Depth
In earlier versions of QuickTime, there was a limited amount of control a content creator or user had over the offscreen bit depth. In the QuickTime Player Properties 2 Info Panel of a Sprite Track, you could choose one of these options:
Best Depth. (Have the Sprite Track determine empirically the best depth for the track)
256. (8-bit Pixels)
Thousands. (16-bit Pixels
Millions+. (32-bit Pixels)
Each option is at best a suggestion to the Sprite Track as to what the offscreen bit depth should be. Even though, for example, 256 is selected, the Sprite Track might, depending on various parameters––such as monitor bit depth, memory constraints, track or sprite graphics modes––create an 8-bit offscreen, a 16-bit offscreen or even a 32-bit offscreen graphics world.
While this may at times yield better visual results, it also may result in poor memory usage, degraded performance, or even worse––a visual result not intended by the content creator.
Although such a suggestive approach makes sense for the Best Depth setting where the user is explicitly asking the Sprite Track to make such a decision, it may be counter-productive for the other three available choices.
New Preferred Bit Depth Info Panel
QuickTime 6 now provides users with greater control and flexibility over the depth of the Sprite Track offscreen graphics world. To accomplish this, QuickTime 6 has added a new mode, called Actual Depth, that has the same four options as Best Depth, 256, Thousands and Millions+.
Note that for purposes of backward compatibility, QuickTime also maintains the old method, which is called Preferred Mode.
The difference between Actual and Preferred modes is that in Actual Mode, a choice of 256, Thousands or Millions+ dictates that the Sprite Track offscreen depth be exactly as chosen. This provides explicit choice and control over image quality, performance and memory usage.
The option of Best Depth under Actual Mode is analogous to Best Depth under preferred Mode: although the algorithms differ slightly, both modes allow the Sprite Track to determine the offscreen bit depth according to what is best under the current circumstances.
Switching Between Modes
A user can switch any sprite movie from Preferred Mode to Actual Mode and from Actual Mode to Preferred Mode by holding down the Option Key on Mac OS 9 or Mac OS X, or the Alt Key on Windows while clicking the Set button in the Properties 2 Info Panel and subsequently clicking the OK button in the dialog that comes up and allows you to choose a setting. If you choose Cancel in the dialog, there is no change in mode.
The user can tell if a Sprite Track is in Actual or Preferred mode, as the label in the Info Panel switches on the fly between “Actual Depth:” and “Preferred Depth:”.
A New Sprite Track Property
In order to support the new Actual Depth mode, a new Sprite Track Property has been added:
kSpriteTrackPropertyPreferredDepthInterpretationMode = 109 |
This property is optional. If the property is absent, the Sprite Track operates in Preferred Depth mode.
If this property is present, it has a single value, of size short, that can be one of these values:
kSpriteTrackPreferredDepthCompatibilityMode
= 0
kSpriteTrackPreferredDepthModernMode = 1
If the value of this property is kSpriteTrackPreferredDepthCompatibilityMode,
then the Sprite Track operates in Preferred Depth mode. However,
if the value is kSpriteTrackPreferredDepthModernMode, then
the Sprite Track operates in the new Actual Depth Mode.
Using the
SpriteSetSpriteProperty API
To programmatically set the Sprite Track depth mode, you use
the SpriteSetSpriteProperty call of
the Sprite Media Handler:
pascal ComponentResult SpriteSetSpriteProperty(Media media, |
QTAtomID spriteID, |
long propertyType, |
void *propertyValue); |
Pass a four character code of ‘Trck’ for
the spriteID and specify kSpriteTrackPropertyPreferredDepthInterpretationMode as
the property type. Finally, pass a value of kSpriteTrackPreferredDepthCompatibilityMode or KSpriteTrackPreferredDepthModernMode directly
as the propertyValue.
For example, to Set a Sprite Track to use the Actual Depth mode:
error = SpriteSetSpriteProperty(SpriteMedia, |
‘Trck’, |
kSpriteTrackPropertyPreferredDepthInterpretationMode |
kSpriteTrackPreferredDepthModernMode,); |
New Wired Actions and Operands
The following wired actions and operands are new in QuickTime 6.
New Sprite Actions
The following new actions enable interactive content creators to request, display, and manage images hosted outside of the Movie in which they are used.
kActionSpriteTrackNewImage = 7182, /* ( C string imageURL, QTAtomID |
desiredID) */ |
Loads an image and gives it the next available image index, and the desired ID, if available.
kActionSpriteTrackDisposeImage = 7183, /* (short imageIndex) */ |
Disposes of an image that has previously been loaded and has the supplied image index.
The two new actions, kActionSpriteTrackNewImage and kActionSpriteTrackDisposeImage,
always interact with the images loaded at runtime, and should always
be used to reference indexes higher than those of the images that
are integrated within the movie when it is created.
kActionSpriteTrackNewImage takes
as a parameter the URL of the image to be requested and an ID with
which you can reference that image. Passing an ID of 0 will prompt
this action to assign the next available (unique) ID greater than
the current image count. In comparison, the index assigned will
always be the integer one greater than the current image count.
For example, a target sprite track has 2 images with index/ID
pairs of 1/1 and 2/777, respectively, before this action is executed.
The new image action is called with “image.jpg” as
the URL and a desiredID of
6. Assuming the URL is valid, the new image action will be given
the index 3 and honor the requested ID of 6. If the URL is invalid,
or if ID 1 or 777 is requested, index 3 will not be assigned nor
will any ID, because the image has failed to load. A subsequent
call of kActionSpriteTrackNewImage will
attempt to use index 3 again. For this reason, it is advantageous
for the movie author to maintain a tally or query the number of images
in the Track (kOperandSpriteTrackNumImages)
to predict the new index.
kActionSpriteTrackDisposeImage takes
as a parameter the index of the image to be released from memory.
The image specified by the index is required to be one loaded through kActionSpriteTrackNewImage.
In other words, the index is required to be one previously assigned by
a kActionSpriteTrackNewImage.
Images authored into the movie, either as data or by reference, cannot
be disposed of in this way. Note also that subsequent calls to kActionSpriteTrackNewImage will
not fill the “holes” left by kActionSpriteTrackDisposeImage,
but will continue to increment the index. Thus, kActionSpriteTrackDisposeImage exists
to enable movie authors to manage the memory usage of a movie during
playback––for example, when the movie may only need an externally
referenced image temporarily.
New Sprite Operands
Two new operands have been added in QuickTime 6 to allow script authors to reference images by either index or ID. These are
kOperandSpriteTrackImageIDByIndex = 3107 /* ( short imageIndex ) */ |
Returns the ID for an image that has the index supplied as the parameter.
kOperandSpriteTrackImageIndexByID = 3108 /* ( QTAtomID imageID ) * |
Returns the index of the image whose ID is equal to that supplied as the parameter. This operand will return a 0 if no image index matches the ID given.
New Wired Actions and Operands for Chapter Lists
The following new actions and operands allow you to have access to chapter names in the chapter track and their corresponding times in the movie.
They conceptually extend what you can do with kActionMovieGoToTimeByName.
You can navigate through chapters by index to pick one and go to
the time associated to it. You can get the name of a chapter from
index, or get the index of a chapter from name.
Going To a Chapter by Index
The following actions go to the time associated to a chapter. The chapter is specified relative to the current chapter or by index.
kActionMovieGotoNextChapter = 1039, /* no params */ |
Changes the movie time to the start of the next chapter.
kActionMovieGotoPreviousChapter = 1040, /* no params */ |
Changes the movie time to the start of the previous chapter.
kActionMovieGotoFirstChapter = 1041, /* no params */ |
Changes the movie time to the start of the first chapter.
kActionMovieGotoLastChapter = 1042, /* no params */ |
Changes the movie time to the start of the last chapter.
kActionMovieGotoChapterByIndex = 1043, /* ( short index ) */ |
Changes the movie time to the start of the nth chapter
Getting the Name and the Index of a Chapter
The following operands allow you to get the name or the index of a chapter. There is also an operand that returns the number of chapters in the movie.
kOperandMovieChapterCount = 1038, |
Gets the chapter count.
kOperandMovieChapterIndex = 1039, |
Gets the current chapter index.
kOperandMovieChapterName = 1040, |
Gets the current chapter name.
kOperandMovieChapterNameByIndex = 1041, /* ( short index ) */ |
Gets the name of the nth chapter.
kOperandMovieChapterIndexByName = 1042, /* (cstring name) */ |
Gets the index of the chapter with passed in name.
New Wired Actions and Operands for Sprites and Sprite Tracks
The following new actions and operands allow you to have access to the sprite property and the sprite track property described above, having full control over how the sprites in a sprite track interact with mouse clicks.
Sprite Hit Testing Property, Actions, and Operands
A wired action and a wired operand let you get and set the sprite hit testing property.
kActionSpriteSetCanBeHitTested = 3094, /* ( short flag ) */ |
Sets the value of the hit testing property.
kOperandSpriteCanBeHitTested = 3105, |
Returns the value of the hit-testing property.
Miscellaneous Wired Actions and Operands
A few miscellaneous new actions and operands have been added in QuickTime 6.
kQTEventKeyUp Event
Type Added
QuickTime 6 adds the kQTEventKeyUp event
type that can be used in wired actions. It corresponds to key-up
events on the keyboard. Applications may need to take special actions
in order to receive key-up events (which are then passed to a movie
controller using MCIsPlayerEvent).
For example, Carbon applications that use the classic event model may
need to call:
SetEventMask(everyEvent); |
since by default the OS does not report key-up events to an
application. Similarly, Carbon-event-based applications may need
to register a handler for kEventRawKeyUp.
The movie controller also now supports the mcActionKeyUp action.
Random Seed
The following action can be used in conjunction with kOperandRandom.
kActionSetRandomSeed = 6164, /* long randomSeed */ |
Sets the QuickDraw seed value which is starting point for
any subsequent kOperandRandom calls.
QTVR Object Actions and Operands
QTVR has the concept of view states for object movies depending on the mouse button. These are alternate images that are displayed depending on the state of the mouse button.
The following actions and operands provide control of the view state:
kActionQTVRSetViewState = 4109, /* long viewStateType, short state */ |
Sets the object node's state type to the new state value.
kOperandQTVRViewStateCount = 4103, |
Gets the count of view states for an object node.
kOperandQTVRViewState = 4104, /* long viewStateType */ |
Gets the value of a view state.
The valid view state types are defined as follows:
typedef UInt32 QTVRViewStateType; |
enum { |
kQTVRDefault = 0, |
kQTVRCurrent = 2, |
kQTVRMouseDown = 3 |
}; |
Additional New Actions and Operands
The following are new actions and operands available in QuickTime 6:
kActionMovieSetScale = 1044, /* (Fixed xScale, Fixed yScale) */ |
Sets the target movie’s scale. This action operates in a similar manner to QTPlayer’s menu commands for setting the movie’s size:
Menu kActionMovieSetScale parameters |
Half Size : 0.5, 0.5 |
Normal Size : 1.0, 1.0 |
Double Size : 2.0, 2.0 |
This new action allows the scriptor to scale a movie by means of an action (similar to the QTPlayer’s menu commands), and provides a way to enlarge skinned movies.
The following new action allows the scriptor to query the movie for the predefined annotations that begin with the copyright symbol.
kOperandMovieAnnotation = 1043, /* (c string requested, long flags) */ |
"flags" |
1 : return data as a string |
2 : return data as xml formatted string |
"requested" |
as string: a single annotation type, that is, "qt-userdata-cpy" as
XML: an empty string means return all appropriate user data as an
XML-formatted string. Otherwise, it is a comma-deliminated list
of the specific user data that the scriptor wants returned as an XML-formatted
string.
Because the copyright symbol is only in the Macintosh font
table, the scriptor will need to prefix requests with "qt-userdata-".
If, for example, the request is for '©nam',
the scriptor must pass in "qt-userdata-nam".
Other examples:
'©cpy' : "qt-userdata-cpy" |
'©aut' : "qt-userdata-aut" |
The following new operands in QuickTime 6 allow scripts to capture what the controller is displaying for streamed movies that are connecting, buffering, and so on.
Returns the current state of the streaming flags.
kOperandMovieConnectionString = 1045, |
Returns the current string that may have been displayed in the controller. This is only meaningful if the flags are non-zero.
VBR Sound Compression Support
QuickTime 6 adds support for using variable bitrate (VBR)-enabled
sound compressor components. Both the QuickTime Movie exporter component
available in the export dialog (also known as the ConvertMovieToFile API
dialog) and the Standard Sound compression dialog component have
been updated to use and to recognize VBR compressor components.
QuickTime 6 also provides QuickTime developers with the capability of building their own custom VBR-enabled sound compressor components, as discussed in this section.
Background
QuickTime 4.1 and the Sound Manager introduced support for the playback of VBR audio––in particular, VBR support for the decoding and playback of MP3 audio. A number of modern audio compression formats, such as MP3, either support or require VBR decoding.
Versions of QuickTime prior to QuickTime 4.1 provided support only for constant bitrate (CBR) audio. The fundamental difference between constant bitrate and variable bitrate audio is related to the rate at which audio data is presented to the sound decoder to generate sound.
In CBR audio, the rate is constant. If one second of audio requires 40 K bytes, then 5 seconds will require 200 K bytes (= 40 Kbytes/sec * 5 sec). Moreover, given a stream of 3 minutes of audio compressed like this, to start playing at 2:30, you would advance 6,000K into the stream.
With VBR audio, the data rate varies depending upon the complexity of the encoded sound. For example, a very quiet passage of a score could be compressed much more than a very exciting passage. A VBR encoder will analyze the audio and use the appropriate number of bits, varying its usage in the process. This means that the amount of data for a complex passage is greater than for a less complex passage. This also complicates locating data in the stream because the “road map” is located within the stream.
By way of analogy, video encoding formats are typically VBR in nature. A more complex image requires more bits than a less complex image. As different images are encoded, the number of bits required for each will vary. The analog to CBR audio in the video space is raw RGB or uncompressed YUV.
QuickTime 6 VBR Support
As discussed, QuickTime and the Sound Manager have been able to decode self-framed, variable bitrate formats such as MP3 since QuickTime 4.1. In addition, the QuickTime Movie file format has been able to carry variable bitrate audio.
With QuickTime 6, QuickTime and the Sound Manager add much richer and more comprehensive support for VBR audio, including support for both compression of VBR audio and decompression of non-self-framed VBR audio formats. An example of a non-self-framed audio format is AAC, described in the section Defining AAC. Table 1-2 shows the audio support available since QuickTime 4.1.
Version |
VBR Audio |
Support |
|---|---|---|
QuickTime 6 |
Encode and decode, e.g., MP3 |
Non-self-framed VBR audio, e.g., AAC |
QuickTime 5 |
Decode and playback |
Self-framed VBR |
QuickTime 4.1 |
Decode and playback, e.g., MP3 |
Self-framed VBR |
Some Techniques For Compressing VBR Audio
This section discusses some of the techniques you can use if you need to compress VBR audio.
Because variable bitrate audio may contain audio frames of
different sizes, it is important that an application use the appropriate
APIs to generate the compressed audio. If, for example, your application
receives a -213 (siVBRCompressionNotSupported)
error from QuickTime or the Sound Manager, it indicates either QuickTime
or the Sound Manager doesn’t “know” about VBR compression,
or doesn’t believe your application understands VBR compression.
To inform QuickTime that your application understands the details of VBR compression, here are some steps that you should consider:
To begin with, you must use the
SoundConverterFillBuffer()API. If you are using theSoundConverterFillBuffer()API, you’ve already done most of the work. AlthoughSoundConverterConvertBuffer()cannot be used for VBR compression, you can configure the SoundConverter without making a decision as to using FillBuffer or ConvertBuffer yet, in case you want to continue using theSoundConverterConvertBuffer()routine for fixed compression audio. There is no good reason to do so, but it may be important in your current implementation.Your application must inform the SoundConverter that it can handle VBR audio. To do this, immediately after opening the SoundConverter with
SoundConverterOpen(), make a call toSoundConverterSetInfo(), passing thesiClientAcceptsVBRselector like the following:SoundConverterSetInfo(theSoundConverter, siClientAcceptsVBR,(void*)true);
This lets the sound converter know that you are VBR compression-aware.
After configuring the sound converter with compression parameters (if present), request the compressor’s compression information, so you know how many PCM samples are generated per audio frame.
Ask for
siCompressionFactorand look at the resultingCompressionInfo. If the compInfo.compressionIDfield is set tovariableCompression, then the codec is configured to generate VBR audio. If it has another value, the codec is configured for a fixed bitrate––just as it would in versions of QuickTime prior to QuickTime 6. Remember that a single codec can support fixed and variable compression, so don’t assume its capabilities from its codec type.
Just as before, samplesPerPacket holds
the PCM sample count per audio frame (packet). For VBR audio, you
can ignore bytesPerFrame/bytesPerPacket,
since the sizes aren’t constant.
For variable compression codecs, you need to know the worst case size of a single audio frame (packet). You can then allocate the output buffer for use with the
SoundConverterFillBuffer()routine, based on a multiple of this size. Failing to do this might result inSoundConverterFillBuffer()not being able to generate even a single audio frame. If you spin onSoundConverterFillBuffer()waiting for it to generate at least one audio frame before continuing but don’t provide a large enough output buffer, you have the makings of a really cool and involved infinite loop.
Use the new selector siCompressionMaxPacketSize to
retrieve the worst case packet size. The following code shows an
example:
UInt32 maxPacketSize = 0; |
err = SoundConverterGetInfo( theSoundConverter, |
siCompressionMaxPacketSize, |
&maxPacketSize ); |
If a VBR codec doesn’t support this selector, you may want to use a worst case output buffer size such as 32K.
Use
SoundConvertFillBuffer()to perform the encoding, as shown in the code below. The value should be tied to the codec’s current configuration.err = SoundConverterFillBuffer(theSoundConverter, //a sound converter
fillBufferUPP, // proc
fillBufferRefCon, // refCon passed to FillDataProc
soundOutputBuffer, // compressed audio buffer
soundOutputBufferSize, // size of compressed audio buffer
&actualOutputBytes, // number of output bytes
&outputFrames, // number of output frames
&outputFlags); // fillbuffer returned advisory flags
The difference with VBR compression is that each call only
returns audio, where all the frames have the same size in bytes.
This is necessary because the SoundConverterFillBuffer() API returns
the number of bytes it wrote and the number of frames but doesn’t
return any kind of array indicating the boundaries between frames.
If you divide actualOutputBytes by outputFrames,
you can determine how large each audio frame is.
As an example, if the audio frames have the following sizes in bytes
[ 40 ] [ 40 ] [ 50 ] [ 50 ] [ 50 ] [ 30 ] [ 40 ] |
at least four calls to SoundConverterFillBuffer will
be necessary in order to encode these frames. This call would return
the following values:
actualOutputBytes outputFrames |
----------------- ------------ |
80 2 |
150 3 |
30 1 |
40 1 |
Using the Standard Sound Compression Component and VBR Compression
Like the SoundConverter, QuickTime doesn’t want to offer
VBR sound compressors to applications that cannot support them.
This means that if your application uses the Standard Sound Compression
dialog to select and configure sound compressors, you should pass
the new (in QuickTime 6) scSoundVBRCompressionOK selector
to SCSetInfo() as in
the following code example:
ComponentInstance ci = OpenDefaultComponent(StandardCompressionType, |
StandardCompressionSubTypeSound); |
if (ci ) { |
Boolean doVBR = true; |
SCSetInfo (ci, scSoundVBRCompressionOK, &doVBR); |
. . . |
If you don’t pass the new scSoundVBRCompressionOK selector
to SCSetInfo(), only
fixed compression codecs will be presented in the list.
In fact, compressors that perform fixed and variable compression
will be presented if this selector is not called, but those compressors
will only offer their fixedCompression options. Since AAC only performs
variable compression, it will not appear in the dialog unless you
call SCSetInfo with scSoundVBRCompressionOK.
In QuickTime 6, a new Standard Compression selector is provided
in QuickTimeComponents.h that
returns a list of available codecs. The selector, a pointer to a
handle, is defined as follows:
scAvailableCompressionListType = FOUR_CHAR_CODE('avai') |
This is the same kind of handle as the existing scCompressionListType selector.
Applications that need to build lists of codecs (compressors) for
their user interface should adopt this API. If the scAvailableCompressionListType
selector is not recognized, use the previous code.
Audio File Formats and VBR Compression
Not all audio file formats can hold variable compression audio, since the information about framing isn’t always available in every format.
QuickTime Movies provide a format that can hold the information, just as MPEG-4 files can. AIFF and WAVE, however, are formats that do not carry such information.
This explains why you see the MPEG-4 audio codec available
in the QuickTime Movie exporter’s sound options––but not in
the AIFF options. Not surprisingly, these exporters use the Standard
Sound Compression dialog as above. Because VBR compression is opted in
by the client, only the QuickTime Movie exporter passes the scSoundVBRCompressionOK selector.
Doing Something with VBR Audio Data
At this point in the process, your application is either generating VBR audio to be stored in a QuickTime Movie for playback later, or you want to play or decode the audio directly. Of course, you may be using your own format to store the audio, but remember, you need to store the framing information yourself.
If you store the data in the QuickTime Movie, you need to store the generated audio frames in a way that is compatible with how QuickTime stores VBR audio in sound tracks.
To play or decode the audio, you need to use the additional
fields in the ExtendedSoundComponentData, ExtendedScheduledSoundHeader,
or ExtendedSoundParamBlock,
depending on how you are playing the data. Fortunately, they are
the same fields.
The following fields are introduced in QuickTime 6:
long frameCount; // number of audio frames |
long * frameSizesArray; // pointer to array of longs with frame sizes |
// in bytes |
long commonFrameSize; // size of each frame if common |
Specifically, frameCount, frameSizesArray and commonFrameSize are
relevant for playback and decoding of AAC audio, as well as for
other non-self-framed audio VBR audio formats.
As discussed earlier, QuickTime versions prior to QuickTime
6 could handle self-framed VBR audio. This is why the existing extended bufferSize field
is sufficient for MP3 audio. AAC audio, though, doesn’t have information
within it to indicate framing, and depends upon out-of-band data
to carry that information. In the case of QuickTime and MPEG-4 movies,
that information is in the sample tables.
The fields just described (new in QuickTime 6) are used to
convey the information to the audio decoder (or sound decompressor
in Sound Manager parlance) and are necessary for use with AAC audio.
In all cases, these fields all describe a single buffer of audio.
The existing sampleCount, buffer and bufferSizes fields
all must be valid.
In addition, either frameCount and frameSizesArray or commonFrameSize must
be valid (indicated by extendedFlags)
in order to decode AAC data. (Note that frameCount and frameSizesArray must
be valid as a unit because they work together, not as separate fields.)
The flags for extendedFlags are
in the header file Sound.h as
follows:
kExtendedSoundFrameSizesValid = 1L << 2, |
// set if frameSizesArray is valid |
// (this will be nil if all sizes are common and |
// kExtendedSoundCommonFrameSizeValid is set) |
kExtendedSoundCommonFrameSizeValid = 1L << 3, |
// set if all audio frames have the same size and |
// the commonFrameSize field is valid |
If commonFrameSize is
set, this means that all audio frames in the VBR buffer have exactly
the same size in bytes. There is no frame count, since bufferSize divided
by commonFrameSize is
the frame count.
If frameCount and frameSizesArray are
valid (remember, these fields must be considered as a unit), then frameCount holds
a count of the number of elements in the frameSizesArray array.
This array is a set of 32-bit values holding the size of each audio
frame. In the above example, the fields would look like this:
frameCount = 7; |
frameSizeArray = --> { 40, 40, 50, 50, 50, 30, 40 } |
Just as you can use the SoundConverterFillBuffer() routine
to encode VBR audio, you can also use it to decode AAC audio. However,
the SoundConverterFillBufferDataProc’s
returned ExtendedSoundComponentData must
set the appropriate flags, including the fields described above.
New Tween Component API
In QuickTime 6, tween components now provide an interrupt-safe
interface using a new API routine, QTDoTweenPtr.
This new call provides for return values in a pointer rather than a
handle. Some specific tweens implemented as components required
changes to ensure their interrupt safeness. Not all Apple-defined
tween components support this new API. However, all of those needed
for effects have been so revised.
QTDoTweenPtr
Runs a tween component, providing for return values in a pointer rather than a handle.
OSErr QTDoTweenPtr (QTTweener tween,
TimeValue atTime,
Ptr result,
long resultSize) ;
Parameters
- tween
A tween to be run.
- atTime
A value that defines the time to run the tween.
- result
The result of the tweening operation.
- resultSize
The size of the result returned.
Discussion
This routine is an interrupt-safe version of the QTDoTween routine,
which also runs a tween component. Note that it has the following
limitations:
Not all tween types support this call (those which must allocate memory), in which case they return
codecUnimpErr.The QTAtomContainer used for the tween must be locked.
The
dataSizemust be large enough to contain the result.This call is not supported for sequence tweens; you should use interpolation tweens instead.
Introduced in QuickTime 6.
C interface file: Movies.h
Changes to Effects Dialog
In QuickTime 6, the effects dialog has been revised and enhanced. The new features include
Grouping into types within the scrolling list on the left side of the dialog. In this new design, each effect defines what subgroup it belongs to, as shown in Figure 1-11. Any third-party effects installed appear under “Misc” until they are revised to include their subgroup information.
Resizability of the dialog and split bars to control the list vs. preview vs. effect-specific areas. Note that the resize control is only drawn in Mac OS 8.1 and later.
Providing a widget for picking points, which can be used in any effect that allows the selection of points (that is, x and y values). Notice that such items have turned from a multitude of sliders into this point-picking widget.
Allowing effect components to specify custom “picking interfaces” for parts of their user interface, while allowing the Generic effect to handle the remainder.
Providing a way to set slider values by typing. Any slider within the effects dialog will now allow this. Command-clicking any slider brings up a modal dialog. The dialog is centered below the control to edit. The dialog is sized appropriately for name and length of number edit. The dialog contains a type-in field, parameter name label, and OK and Cancel buttons.
A knob control that provides a way to set angles greater than 360 degrees. This is used in the Slide effect. Knob control now has an inner section that serves as an hour hand. When the knob is manipulated beyond one rotation, the hour hand increments. This wraps properly both forward and backward over the 12 o’clock position.
Effects may now specify some common “presets” that the user can easily select. These are used in the Slide effect. When such an effect is selected, the first subpanel is a list of presets, each with a name and preview. The pane scales to the available space, and implements a scroll bar if needed.
The subgroup pop-up menu at the top of the screen will read Easy and Custom if there are no additional subpanes. If there are, the pop-up menu reads Easy and the names of the other subpanes.
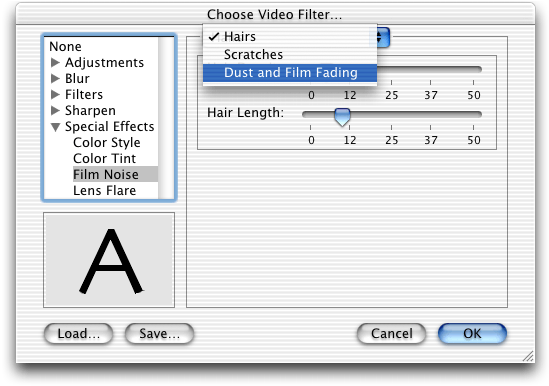
A new effect called Channel Composite provides a way to create a bitmap whose color components are a combination of source A and B color components, reshuffled, and inverted as desired.
The Color Tint effect now allows user to specify an amount of tinting to allow a gradual transition to a particular color, such as Sepia. A new pair of sliders controls this. Tweening is allowed. The default value is to tint fully (for backwards compatibility) for the entire duration of the effect.
Effects may now have tween values when filtering during export, that is, Movie to QuickTime Movies. Some effects, such as Lens Flare and RGB Balance, now have a starting and ending value that you can set. Some (such as RGB Balance) display this information only if the Option key is pressed when selecting the Filter button. This is because tweening these values is uncommon.
Custom Effect Controls
Effects may choose to implement custom controls to allow the user to more easily edit complex parameters that are ill-served by simple sliders or type in boxes. Effects may allow a custom control for either a single parameter, or for a group of parameters.
Parameter(s) for a custom control must still be data types defined by the standard set, or for complex records of data, must be defined within a group as individual parameters made up from base data types (for example, a point is a group containing two Fixed point numbers).
This is to allow applications that do not wish to use the custom control for the effect to set values themselves.
Effects should be aware that these custom controls may be deployed by the application in either a dialog or a window, with application-defined background colors or patterns, along with application-defined font characteristics for the window.
It is recommended that an effect implement custom controls only when needed, and that custom controls be used for specific types of parameters (i.e., point, rectangle, polygon, path) rather than the entire user interface for the effect. Effects may choose to implement multiple custom controls that combine with standard controls to present the total user interface.
For effects that have very complex user interfaces not well
suited for inclusion within a single window, it is recommended to
use kParameterImageIsPreset––which
allows the effect to have an external editing application for parameters
that may then be set within the standard User Interface via the
open file dialog or drag and drop. The Lens Flare (shown in Figure 1-12) effect’s
“Flare Type” is an example of such a preset.
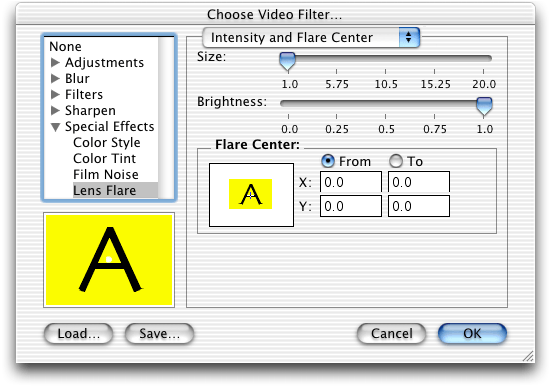
New
Behavior Flag kCustomControl Added
For parameters that use a custom control to control a single
parameter value, a new behavior flag has been added (kCustomControl),
and the behavior for the parameter should be kParameterItemControl.
For parameters that are groups, the same flag (kCustomControl)
should be used, and the behavior should be kParameterItemGroupDivider.
Groups with the kCustomControl bit
set will be implemented by calling the custom control for that group––the
parameters within that group will not be processed in the normal
manner.
In both cases, the new customType and customID fields
of the behavior must be filled in. These are used in order to allow
your custom control to determine which parameter is being edited
in the case where the custom control is used for the editing of
multiple parameters. These values are passed into the pdActionCustomNewControl call.
Since the custom control mechanism is also used by QuickTime’s
default effect dialogs, you should be prepared to pass onto the
base effect any pdActionCustomNewControl calls
for type/id pairs that you do not handle yourself. When pdActionCustomNewControl is
called for controls of types handled by QuickTime, customType is kParameterAtomTypeAndID and
customID is the ID of the parameter atom.
Using
pdActionCustomNewControlControl to
Create New Custom Controls
pdActionCustomNewControlControl is
called by the application to create a new custom control or set
of controls for an effect parameter. When pdActionCustomNewControl is
called, the effect should perform any basic allocation it needs
for storage and return the result in storage. The options parameter
tells the control if the application wishes to support interpolated, optionally
interpolated, or a single value parameter.
Since pdActionCustomNewControlControl may
call upon your effect for other items within the dialog, it is recommended
that your effect have an easy way to determine which controls it
implements by using one of these two techniques:
by having storage be a pointer with an OSType at the beginning to mark controls implemented by your code
keeping track in your component globals those custom controls that you have created
When pdActionCustomDisposeControl is
called, any allocation done by the control should be disposed of.
In addition, pdActionCustomDisposeControl is
the last chance the control has to commit any user changes into
the sample.
Controls that implement type-in fields typically need to commit any final user edits at this time.
struct QTCustomControlNewRecord { |
void * storage; /* storage allocated/disposed by the control*/ |
QTParameterDialogOptions options; /* options used to control |
interpolation/not*/ |
QTAtomContainer sample; /* sample that holds the data to be edited*/ |
long customType; /* custom type and ID specified by effect for |
creation of this control*/ |
long customID; |
}; |
typedef struct QTCustomControlNewRecord QTCustomControlNewRecord; |
typedef QTCustomControlNewRecord * QTCustomControlNewPtr; |
pdActionCustomPositionControl is
called by the application to position the control within a window
or dialog.
The control should determine if it will fit in the allotted
area and position itself there. It should also return the space
taken up by the control. Note you are free to implement controls
which are variable in size depending upon which parameter you are
editing. You don’t need to scale your control to the requested
size. If the area presented to your control is too small, set didFit to FALSE.
You should still return in used the size you would have liked to
use for the control. The application will then try again with
a new size. Note that all controls must be able to fit within a
minimum of 300 by 250 pixels.
Displaying Text Properly in Application Windows
Custom controls that draw text should make note of the text font, size, and style at this time in order to properly display within application windows.
Note that the default state for the control is hidden. You
will receive a pdActionCustomShowHideControl in
order to enable your control. You should not draw your control in
response to pdActionCustomPositionControl.
struct QTCustomControlPositionControlRecord { |
void * storage; /* storage for the control*/ |
WindowPtr window; /* window to be used by the control*/ |
Rect location; /* location within the window the control may use*/ |
Rect used; /* returned by the control to indicate size it actually |
used*/ |
Boolean didFit; /* did the control fit in the specified area?*/ |
Boolean pad[3]; |
}; |
typedef struct QTCustomControlPositionControlRecord QTCustomControlPositionControlRecord; |
typedef QTCustomControlPositionControlRecord * QTCustomControlPositionControlPtr; |
pdActionCustomShowHideControl is
called when the application wishes to enable/disable your control,
or completely disable drawing of the control.
Your control should make note of the new state (if different
from the last) and perform an InvalRect() on
your drawing area, or you may draw your control’s initial state
in the case of show. You should not attempt to erase your control
as the result of a hide. Instead, call InvalRect() and
allow the application to process the resulting event as appropriate.
struct QTCustomControlShowHideControlRecord { |
void * storage; /* storage for the control*/ |
Boolean show; /* display the control?*/ |
Boolean enable; /* enable the control (ie, black vs gray display)*/ |
Boolean pad[2]; |
}; |
typedef struct QTCustomControlShowHideControlRecord QTCustomControlShowHideControlRecord; |
typedef QTCustomControlShowHideControlRecord * QTCustomControlShowHideControlPtr; |
Using
pdActionCustomHandleEvent To
Process Events
pdActionCustomHandleEvent is
called to allow your custom control to process events.
Typical controls handle the following events:
activateto draw your control in normal/gray modeupdateto draw your controlmouseDownto handle clickskeyDownto handle typing when you have focusidleto perform idle drawing (if applicable)
If your control handles the entire event, set didProcess to TRUE.
If you handled the event, but other controls still need the event,
set didProcess to FALSE.
If your control supports the concept of focus for the purposes
of typing (such as by having a type-in box for the parameter), then
you set the tookFocus Boolean
as part of your processing of the event. It is assumed that your
control will draw the appropriate focus user interface as a result,
and the calling application will disable any focus drawing within the
remainder of the user interface.
By default, custom controls are not given idle time. If you
need idle time, set needIdle to TRUE in
response to the event that causes you to need idle (typically the
taking of focus, or the first draw).
Your control will continue to be given idle events until you
set needIdle to FALSE
in response to a nullEvent.
struct QTCustomControlHandleEventRecord { |
void * storage; /* storage for the control*/ |
EventRecord * pEvent; /* event to process*/ |
Boolean didProcess; /* did we process entire event?*/ |
Boolean tookFocus; /* did we take focus as a result of this event |
(typically mouseDowns)*/ |
Boolean needIdle; /* does this control need idle events?*/ |
Boolean didEdit; /* did we edit the samples?*/ |
}; |
typedef struct QTCustomControlHandleEventRecord
QTCustomControlHandleEventRecord;
typedef QTCustomControlHandleEventRecord
* QTCustomControlHandleEventPtr;
Using
pdActionCustomSetFocus to
Set or Advance Current Focus
pdActionCustomSetFocus is
called in order to set or advance the current focus of the user interface,
typically because the user has pressed the tab or shift-tab keys,
or because the user clicked within the area defined by your control.
Your control will be called with pdActionFocusFirst, pdActionFocusLast,
or pdActionFocusOff to
set or clear focus on your control. Your control will be called
with pdActionFocusForward or pdActionFocusBackward to
cycle focus within your control (if your control has multiple focus). If
your control does not support focus, or the focus request results
in focus moving beyond your supported range, return pdActionFocusOff in
the focus parameter. Otherwise, return the focus that you set.
Controls which have no focus would always set focus to be pdActionFocusOff.
Controls with a single focus would set pdActionFocusFirst when
requested to set either pdActionFocusFirst or pdActionFocusLast,
and would set pdActionFocusOff for
either pdActionFocusForward or pdActionFocusBackward.
enum { pdActionFocusOff = 0, /* no focus */ pdActionFocusFirst = 1, /* focus on first element */ pdActionFocusLast = 2, /* focus on last element */ pdActionFocusForward = 3, /* focus on next element */ pdActionFocusBackward = 4 /* focus on previous element */ }; struct QTCustomControlSetFocusRecord { void * storage; /* storage for the control*/ long focus; /* focus to set, return resulting focus*/ }; typedef struct QTCustomControlSetFocusRecord QTCustomControlSetFocusRecord; typedef QTCustomControlSetFocusRecord * QTCustomControlSetFocusPtr;
Using
pdActionCustomSetEditMenu To
Locate The Edit Menu
pdActionCustomSetEditMenu will
be called to inform your custom control of the location of the edit
menu.
If your control has editing boxes, this is useful in order to allow the user to perform cut, copy, and paste operations when focus is on one of these boxes.
struct QTCustomControlSetEditMenuRecord { |
void * storage; /* storage for the control*/ |
MenuHandle editMenu; /* edit menu, or NIL*/ |
}; |
typedef struct QTCustomControlSetEditMenuRecord QTCustomControlSetEditMenuRecord; |
typedef QTCustomControlSetEditMenuRecord * QTCustomControlSetEditMenuPtr; |
Using
pdActionCustomSetPreviewPicture To
Preview Information
pdActionCustomSetPreviewPicture is
called to inform your custom control of preview information that
you may wish to use in the drawing of your user interface.
struct QTCustomControlSetPreviewPictureRecord { |
void * storage; /* storage for the control*/ |
QTParamPreviewPtr preview; /* preview to set*/ |
}; |
typedef struct QTCustomControlSetPreviewPictureRecord QTCustomControlSetPreviewPictureRecord; |
typedef QTCustomControlSetPreviewPictureRecord * QTCustomControlSetPreviewPicturePtr; |
pdActionCustomSetEditCallout tells
your control of the need by the application to be informed of changes
to the parameter values (typically for the purposes of updating
previews).
If a callout is available, your custom control should call it whenever a change has been made to the parameter(s) that your control is editing (as a result of user actions, most typically). If you choose not to implement this, live dragging or updating of values will not work.
struct QTCustomControlSetEditCalloutRecord { |
void * storage; /* storage for the control*/ |
QTParamPreviewCalloutPtr callout; /* requested callout, or NIL to |
disable*/ |
}; |
typedef struct QTCustomControlSetEditCalloutRecord QTCustomControlSetEditCalloutRecord; |
typedef QTCustomControlSetEditCalloutRecord * QTCustomControlSetEditCalloutPtr; |
Using
pdActionCustomGetEnableValue to
Enable or Disable Other Controls
pdActionCustomGetEnableValue allows
you to return a value for the purposes of enabling or disabling
other controls.
Most custom controls do not need to implement this call.
If your control is able to control the enabling and disabling of other parameter controls (such as is done by standard pop up or enumerated type controls), you need to supply a value that can be use for greater than or less than types of comparisons.
struct QTCustomControlGetEnableValueRecord { |
void * storage; /* storage for the control*/ |
long currentValue; /* value to compare against for enable/disable |
purposes*/ |
}; |
typedef struct QTCustomControlGetEnableValueRecord QTCustomControlGetEnableValueRecord; |
typedef QTCustomControlGetEnableValueRecord * QTCustomControlGetEnableValuePtr; |
Using
pdActionCustomSetSampleTime to
Specify Duration and Start Time
pdActionCustomSetSampleTime tells
your control information from the application about the duration
and start time for the sample being edited.
Most controls do not need this information, but some may choose to use it in the interface they present the user. However, this call need not be made by applications, so the custom control should be prepared to run when the sample time information is not available.
struct QTCustomControlSetSampleTimeRecord { |
void * storage; /* storage for the control*/ |
QTParamSampleTimePtr sampleTime; /* sample time information or NIL*/ |
}; |
typedef struct QTCustomControlSetSampleTimeRecord QTCustomControlSetSampleTimeRecord; |
typedef QTCustomControlSetSampleTimeRecord * QTCustomControlSetSampleTimePtr; |
pdActionCustomGetValue tells
your control to store any value(s) into the specified atom container.
All custom controls must implement this call.
struct QTCustomControlGetValueRecord { |
void * storage; /* storage for the control*/ |
QTAtomContainer sample; /* sample to store into*/ |
}; |
typedef struct QTCustomControlGetValueRecord QTCustomControlGetValueRecord; |
typedef QTCustomControlGetValueRecord * QTCustomControlGetValuePtr; |
Using
pdActionCustomDoEditCommand to
Handle Edit Commands
pdActionCustomDoEditCommand tells
your control to handle edit commands if it allow focus and type
in boxes.
All custom controls must implement this call if they support edit boxes.
struct QTCustomControlDoEditCommandRecord { |
void * storage; /* storage for the control*/ |
long command; /* command to execute, return 0 here if processed*/ |
}; |
typedef struct QTCustomControlDoEditCommandRecord QTCustomControlDoEditCommandRecord; |
typedef QTCustomControlDoEditCommandRecord * QTCustomControlDoEditCommandPtr; |
typedef long QTParameterDialog; |
enum { |
elOptionsIncludeNoneInList = 0x00000001 /* "None" effect is included |
in list */ |
}; |
typedef long QTEffectListOptions; |
enum { |
pdOptionsCollectOneValue = 0x00000001, /* should collect a single |
value only*/ |
pdOptionsAllowOptionalInterpolations = 0x00000002, /* non-novice |
interpolation options are shown */ |
pdOptionsModalDialogBox = 0x00000004, /* dialog box should be modal */ |
pdOptionsEditCurrentEffectOnly = 0x00000008, /* List of effects will not |
be shown */ |
pdOptionsHidePreview = 0x00000010 /* Preview item will not be shown */ |
enum { |
effectIsRealtime = 0 /* effect can be rendered in real time */ |
}; |
The following is a new API introduced in QuickTime 6.
QTGetEffectsListExtended
Provides for more advanced filtering of effects to be placed into the effect list.
QTGetEffectsListExtended (QTAtomContainer * list,
   long minSources,
   long maxSources,
   QTEffectListOptions getOptions,
   OSType majorClass,
   OSType minorClass,
   QTEffectListFilterUPP filterProc,
   void * filterRefCon);
Parameters
- list
The effect list returned here.
- minSources
The minimum number of sources that an effect must have to be added to the list. Pass –1 as this parameter to specify no minimum.
- maxSources
The maximum number of sources that an effect can have to be added to the list. Pass –1 as this parameter to specify no maximum. The
minSourcesandmaxSourcesparameters allow you to restrict which effects are returned in the list, by specifying the minimum and maximum number of sources that qualifying effects can have.- getOptions
The options for populating the list.
- majorClass
The major class to include, 0 for all.
- minorClass
The minor class to include, 0 for all.
- filterPro
Additional client filtering.
- filterRefCon
A reference constant for the filter proc.
Discussion
This routine provides for more advanced filtering of effects to be placed into the effect list. Applications can filter on:
the number of input sources
effect major or minor class
custom filtering through a callback
The callback is called for each effect which passes the other
criteria for inclusion. If the callback returns a TRUE result,
the effect is included in the list.
Note that your filter proc may receive multiple effects from
various manufacturers. If you return TRUE for
multiple effects of a given type, only the one with the higher parameter version
number will be included.
If you wish other filtering such as effects from a given manufacturer,
you can do this by returning FALSE for
the other effects and TRUE for
those that you prefer.
typedef CALLBACK_API( Boolean, QTEffectListFilterProcPtr )(Component |
effect, long effectMinSource, long effectMaxSource, OSType majorClass, OSType minorClass, void *refcon); |
typedef STACK_UPP_TYPE(QTEffectListFilterProcPtr) QTEffectListFilterUPP; |
Introduced in QuickTime 6.
QTGetEffectsList,
which returns a QT atom container holding a list of the currently
installed effects components.
C interface file: Movies.h
QuickTime Effects Classes
With an ever-increasing number of effect components, it has become difficult for applications and users to navigate through the list. This section documents upcoming atoms that can be used for tagging effects into useful categories.
This will be of use to developers of applications that supply custom effect picking UI. It will also be of use for developers of effect components. Two groupings for effects are here defined: Major Class and Minor Class.
Major Class
The Major Class for an effect defines the purpose of an effect
to allow applications to perform better filtering. It is not intended
that the user see effects grouped by major class. For example, a
two source effect might be given a major class of kTransitionMajorClass,
which allows applications to tell the difference between two source
effects that perform a transition vs. those that perform operations
such as Chroma Key. Some applications may wish to exclude all effects
that are not transitions.
Effects supply information about their Major Class through the use of an atom that can be found within their Effect Parameter Description atom container. Applications can read in this atom to determine the Major Class of a particular Effect.
#define kEffectMajorClassType 'clsa' |
#define kEffectMajorClassID (1) |
The following are the defined legal values for the Major Class
atom. Effects that fail to include a kEffectMajorClassType will
be classified as kMiscMajorClass.
Developers who feel their effect requires a new Major Class should
contact Apple. Because Major Classes are used for filtering by applications,
any extensions will need to be documented before they can become
useful.
#define kGeneratorMajorClass 'genr' // zero source effects |
#define kFilterMajorClass 'filt' // one source effects |
#define kTransitionMajorClass 'tran' // multisource morph |
// effects |
#define kCompositorMajorClass 'comp' // multisource layer |
// effects |
#define kMiscMajorClass 'misc' // all other effects |
Minor Class
Like the Major Class, the Minor Class of an effect serves to group the effect into a more refined definition. Unlike the Major Class, however, the Minor Class is intended to be used for grouping for the purposes of User Interface presentation. It is not intended that the Minor Class should be used for limiting the list of effects that a user might see––that is the purpose of the Major Class.
Effects supply information about their Minor Class through the use of an atom that can be found within their Effect Parameter Description atom container. Applications can read in this atom to determine the Minor Class of a particular Effect.
#define kEffectMinorClassType 'clsi' |
#define kEffectMinorClassID (1) |
The following are Apple-defined values for the Minor Class
atom, along with the recommended name to be used for display purposes.
Effects that fail to include a kEffectMinorClassType will
be classified as kMiscMinorClass.
Effects are free to define their own Minor Classes, although Apple
recommends that standard values be used if at all possible.
#define kGeneratorMinorClass 'genr' // "Generators" |
#define kRenderMinorClass 'rend' // "Render" |
#define kFilterMinorClass 'filt' // "Filters" |
#define kArtisticMinorClass 'arts' // "Artistic |
#define kBlurMinorClass 'blur' // "Blur" |
#define kSharpenMinorClass 'shrp' // "Sharpen" |
#define kDistortMinorClass 'dist' // "Distort" |
#define kNoiseMinorClass 'nois' // "Noise" |
#define kAdjustmentMinorClass 'adst' // "Adjustments" |
#define kTransitionMinorClass 'tran' // "Transitions" |
#define kWipeMinorClass 'wipe' // "Wipes" |
#define k3DMinorClass 'pzre' // "3D Transitions" |
#define kCompositorMinorClass 'comp' // "Compositors" |
#define kEffectsMinorClass 'fxfx' // "Special Effects" |
#define kMiscMinorClass 'misc' // "Miscellaneous" |
Effects that don’t fit into the above listed groupings can supply another value for their Minor Class. However, it is likely that these effects will want to have a user visible name to go along with their class. The name is supplied by another atom, which should contain a Pascal string that is the name of the minor class. If the minor class is one which already has a standard name, this atom will be ignored.
#define kEffectMinorClassNameType 'clsn' |
#define kEffectMinorClassNameID (1) |
QuickTime Effects Presets
Some effects with complex parameters would like to provide the user with groups of useful parameter values that can be easily selected. This section documents an optional mechanism that can be used by effects to define these “presets.” Applications may also use these presets to present to the user a list of selectable effect parameters.
Atom Contents
Like most options within effects, the presets are defined
through the use of atoms present within the Effect Parameter Description
atom container. Effects may define any number of presets, with the
atom type being kEffectPresetType and
the ID being numbers from 1 to N (where N is the number of presets).
Within each preset, three child atoms are found:
#define kPresetNameType 'pnam' |
#define kPresetNameID (1) |
#define kPresetPreviewPictureType 'ppct' |
#define kPresetPreviewPictureID (1) |
#define kPresetSettingsType 'psst' |
#define kPresetSettingsID (1) |
The preset name defines the name of the preset as a Pascal string. The preset preview picture defines the image to be displayed to the user as a picture with a minimum size of 86 by 64 pixels. The preset settings atom contains within it all of the parameter values that define a particular preset.
Example Effect
'atms' Resource
This example shows the presets present in the Slide effect
that define a Top and Bottom directed slide. The example is a portion
of the 'atms' resource
and demonstrates how to define these presets through the use of
Rez.
// atom type ID Child count |
kEffectPresetType, 1, 3, |
{ |
}; |
kPresetNameType, kPresetNameID, noChildren, |
{ |
string { "Top" }; |
}; |
kPresetPreviewPictureType, kPresetPreviewPictureID, noChildren, |
{ |
lstring { |
$"08A0 0000 0000 0040 0056 0011 02FF 0C00" |
/* MORE PICTURE DATA HERE */ |
$"7FE0 03AB 7FE0 03AB 7FE0 03AB 7FE0 00FF" |
}; |
}; |
kPresetSettingsType, kPresetSettingsID, 2, |
{ |
}; |
'pcnt', 1, 2, |
{ |
}; |
'twnt', 1, noChildren, |
{ |
kParameterTypeDataFixed; |
}; |
'data', 1, noChildren, |
{ |
long { "0" }; |
long { "65536" }; |
}; |
'angl', 1, noChildren, |
{ |
Fixed { "0.0" }; |
}; |
// atom type ID Child count |
kEffectPresetType, 2, 3, |
{ |
}; |
kPresetNameType, kPresetNameID, noChildren, |
{ |
string { "Bottom" }; |
}; |
kPresetPreviewPictureType, kPresetPreviewPictureID, noChildren, |
{ |
lstring { |
$"083C 0000 0000 0040 0056 0011 02FF 0C00" |
/* MORE PICTURE DATA HERE */ |
$"0277 BF42 1F08 5FE8 001F 00FF" |
}; |
}; |
kPresetSettingsType, kPresetSettingsID, 2, |
{ |
}; |
'pcnt', 1, 2, |
{ |
}; |
'twnt', 1, noChildren, |
{ |
kParameterTypeDataFixed; |
}; |
'data', 1, noChildren, |
{ |
long { "0" }; |
long { "65536" }; |
}; |
'angl', 1, noChildren, |
{ |
Fixed { "180.0" }; |
}; |
None Codec Enhancements
QuickTime 6 includes an improved None codec (also known as the Raw codec because it deals with manipulations of uncompressed pixels). The new version provides the following enhancements:
improved quality
increased speed
greater robustness
significantly decreased memory usage, with little increase in code size.
In QuickTime 5.0.x and before, the None codec would always use point sampling. The new version uses point sampling in the fastest, lowest-quality mode, bilinear interpolation in a slower, medium-quality mode, and bicubic anti-aliasing in the slowest, highest-quality mode.
The enhanced None codec introduces two new quality levels beyond the point-sampling quality provided in the previous None codec:
bilinear interpolation
bicubic anti-aliasing
This quality is especially apparent in
(1) rotation,
(2) perspective,
(3) image size reduction, and
(4) image size zooming.
Bilinear interpolation is available with codecHighQuality.
codecMaxQuality yields
either bicubic anti-aliasing or bicubic interpolation, depending
on the complexity of the transformation: anti-aliasing is currently
only available with pure scaling operations, not rotation or perspective.
The anti-aliasing is designed to meet or exceed the quality produced
by Adobe PhotoShop. When specifying codecNormalQuality, point-sampling
is used.
When doing minor size changes or phase changes, there is little apparent difference in quality between bilinear and bicubic interpolation: the primary difference is in sharpness and contrast. This is especially noticeable after multiple generations of processing, where bilinear processing will lose sharpness and contrast, whereas bicubic interpolation tends to preserve it.
When zooming up by a factor of 4 or more, bilinear interpolation suffers from “stellation”: where stars are superimposed on the pixels. Bicubic interpolation yields more natural, rounded, smooth features without artifacts.
When decimating an image (that is, reducing its size), bicubic anti-aliasing produces the best possible quality. Bilinear interpolation can yield acceptable quality if only shrinking a small amount, but decimation by greater than a factor of 2 will cause aliasing, which is manifested as jaggies, disappearing detail, and “popping pixels.”
As expected, higher quality comes at a price. With point-sampling (codecNormalQuality) taking 1 T seconds, the others take approximately:
1 T: codecNormalQuality = point-sampling
3 T: codecHighQuality = bilinear interpolation
10 T: codecMaxQuality = bicubic interpolation or anti-aliasing
Using a higher quality may have a negative effect on frame
rate, especially on older machines. Typically, codecMaxQuality is
to be used for off-line, non-real-time applications, whereas codecHighQuality can
be used successfully for real-time applications on faster machines.
You might want to check the frame rate and throttle the quality
as appropriate. Even faster machines can benefit from this throttling,
because their frame rate can suffer on higher resolution images.
The new enhanced None codec is a complete implementation of its component interface. Complete implementation is defined as:
11 pixel formats for the source
11 pixel formats for the destination
8 transfer modes
3 quality levels
full 3x3 matrix transformations, including rotation and perspective
Pixel formats:
8 bit color mapped
8 bit grayscale
16 bit BE555
16 bit LE555*
16 bit LE565*
24 bit RGB
24 bit BGR*
32 bit ARGB
32 bit ABGR*
32 bit BGRA*
32 bit RGBA*
(Note that formats flagged with an asterisk (*) are only available on Windows).
Transfer modes:
Copy
Dither Copy
Transparent (chroma-key)
Blend
Straight alpha
Alpha premultiplied to black
Alpha premultiplied to white
Straight alpha blend
Alpha-premultiplied-to-black is the fastest of the alpha compositing modes. For example, it is possible to transform a 32 bit ARGB PixMap by a 3x3 perspective transformation, interpolating it with bicubic interpolation, and alpha-compositing it to an 8-bit color-mapped PixMap––directly––one-pass.
More pixel formats (1, 2 and 4 bits) are supported, but in a less than desirable way, by relying on CopyBits and multiple instantiations of the enhanced None codec. Other transfer modes (for example, XOR) are feebly supported in the same manner.
Alpha is a first class component of 32 bit pixels. The previous None codec sometimes behaved badly with the alpha component, but the enhanced None codec preserves it and involves it in computations. The result of an alpha composition has a meaningful alpha component, which can then be used as a source for a subsequent alpha composition; using this, rendering can be optimized by caching partial composites of the static portions of scenes, requiring only the dynamic portions to be composited individually. From an architectural viewpoint, these alpha operations lend themselves then to a composition tree or DAG (directed acyclic graph), rather than a simple composition pipeline as limited in the previous None codec. This comes at no additional computational cost.
The enhanced None codec in QuickTime 6 is typically invoked using:
MakeImageDescriptionForPixMap()DecompressSequenceBegin()SetDSequenceTransferMode()DecompressSequenceFrameS()CDSequenceEnd()
and other calls.
Unlike the previous None codec, there is a negligible penalty for startup, and matrix changes. In particular, the matrix can be changed every frame with no degradation of the frame rate. Thus, it can be used for immersive imaging applications, where a series of images are embedded in 3D.
For more information, see Ice Floe Note #23 at
http://developer.apple.com/quicktime/icefloe/dispatch023.html |
The new enhanced None codec can be used as a general texture-mapped rendering and compositing engine, when accessed directly through the API. However, it is also invoked automatically by the Image Compression Manager (ICM) to assist other codecs, by the Sprite Media to implement animation, and by others.
Additional Still Image Metadata Support in Mac OS 9 and Windows
The JPEG and TIFF graphics exporters should be able to create Exif files containing application-specified metadata and thumbnail images. QuickTime for Mac OS X (10.1) provided this support, which is now also available in Mac OS 9 and Windows.
Indexed Image Types
Several graphics importers support access to individual images
within a multiple-image file. By using the GraphicsImportGetImageCount and GraphicsImportSetImageIndex routines,
you can select an individual layer from a Photoshop file, or an
individual resolution from a multi-resolution FlashPix file, for
example. However, there has not been a way to distinguish between
different types of indexed images: thumbnail, layer, page, resolution, etc.
Although applications can sometimes use the file type to suggest
the interpretation, this inhibits them from being able to take full
advantage of new third-party graphics importers. Furthermore, some
formats, such as TIFF, can support a variety of indexed image types.
The user data type kQTIndexedImageType has
now been defined for graphics importers to indicate what a particular
indexed image is. The following sample code shows how to determine
whether the second image in a file is a thumbnail.
Boolean IsSecondImageThumbnail( GraphicsImportComponent gi ) |
{ |
OSErr err; |
unsigned long saveIndex = 1; |
UserData userData = nil; |
Handle h = nil; |
Boolean isThumbnail = false; |
long count, i; |
GraphicsImportGetImageIndex( gi, &saveIndex ); |
err = GraphicsImportSetImageIndex( gi, 2 ); |
if( err ) goto bail; |
err = NewUserData( &userData ); |
if( err ) goto bail; |
err = GraphicsImportGetMetaData( gi, userData ); |
if( err ) goto bail; |
h = NewHandle( 0 ); |
err = MemError(); |
if( err ) goto bail; |
err = GetUserData( userData, h, kQTIndexedImageType, 1 ); |
if( err ) goto bail; |
// Is kQTIndexedImageIsThumbnail present in the list? |
count = GetHandleSize( h ) / sizeof( OSType ); |
for( i = 0; i < count; i++ ) { |
if( EndianU32_NtoB(kQTIndexedImageIsThumbnail) == ((OSType *)*h)[ i ] ) { |
isThumbnail = true; |
break; |
} |
} |
bail: |
if( userData ) DisposeUserData( userData ); |
if( h ) DisposeHandle( h ); |
GraphicsImportSetImageIndex( gi, saveIndex ); |
return isThumbnail; |
} |
Alpha Modes
The user data type kQTAlphaMode has
been defined to allow graphics importers to indicate the recommended
interpretation of an image’s alpha channel, if known. For example,
a graphics importer could indicate that the image data has been
premultiplied with the alpha channel against a black background
by reporting a metadata item of type kQTAlphaMode and
value graphicsModePreBlackAlpha.
If the image data has not been premultiplied, it would report graphicsModeStraightAlpha.
Image Data |
User Data Type |
|---|---|
Not premultiplied |
|
Premultiplied with alpha channel against black background |
|
Premultiplied with alpha channel against white background |
|
Premultiplied with alpha channel against other color |
|
The depth value of 32 in an image description indicates the presence of an alpha channel.
Extracted TIFF and Exif Metadata
The TIFF graphics importer can extract metadata from a variety of TIFF tags for which QuickTime does not have standard user data type codes. Rather than define an individual code for each TIFF tag imported in this way, the graphics importer constructs user data type codes from the TIFF tags by adding the TIFF tag values (which are unsigned 2-byte integers) to defined prefix values (which fill in the two most significant bytes).
The following fields in the main TIFF directory are translated to standard QuickTime user data types:
TIFF Field |
User Data Type |
|---|---|
DocumentName |
|
ImageDescription |
|
Make |
|
Model |
|
Software |
|
DateTime |
|
Artist |
|
HostComputer |
|
Copyright |
|
IPTC (0x8469) |
|
The following fields in the main TIFF directory are translated
to user data using the prefix value kQTTIFFUserDataPrefix:
Orientation (0x0112)
TransferFunction (0x012D)
WhitePoint (0x013E)
PrimaryChromaticities (0x013F)
ColorMap (0x0140)
TransferRange (0x0156)
YCbCrCoefficients (0x0211)
YCbCrPositioning (0x0213)
ReferenceBlackWhite (0x0214)
ModelPixelScale (0x830E)
ModelTransformation (0x85D8)
ModelTiepoint (0x8482)
GeoKeyDirectory (0x87AF)
GeoDoubleParams (0x87B0)
GeoAsciiParams (0x87B1)
IntergraphMatrix (0x8480)
In Exif TIFF files, all fields in the Exif directory are translated
to user data using the prefix value kQTTIFFExifUserDataPrefix.
All fields in a GPS directory are translated to user data using the
prefix value kQTTIFFExifGPSUserDataPrefix.
The TIFF graphics exporter also supports storing the following user data types in exported TIFF files:
User Data Type TIFF Field
kUserDataTextFullName
DocumentName
kUserDataTextInformation
ImageDescription
kUserDataTextMake
Make
kUserDataTextModel Model
kUserDataTextArtist
Artist
kUserDataTextCopyright
Copyright
Software, DateTime, and HostComputer are written automatically.
In Exif mode, the TIFF graphics exporter will also write tags
defined in the Exif version 2.1 specification by reversing the kQTTIFFExifUserDataPrefix and kQTTIFFExifGPSUserDataPrefix mappings.
In Exif mode, the JPEG graphics exporter supports all the same metadata fields as the TIFF graphics exporter.
Note that UserData item data is always stored big-endian. The TIFF graphics importer and graphics exporter perform whatever translation is necessary.
New APIs For Creating Exif Files
The following are a group of new APIs available on Mac OS X, Mac OS 9, and Windows for creating Exif files.
GraphicsExportSetExifEnabled
Sets whether or not the graphics exporter component should create Exif files.
ComponentResult GraphicsExportSetExifEnabled (GraphicsExportComponent ci,
   Boolean enableExif );
Parameters
- ci
The component instance that identifies your connection to the graphics exporter component.
- enableExif
Indicates whether to turn Exif export on or off.
Discussion
Turning on Exif export disables incompatible settings, such
as grayscale JPEG and compressed TIFF, and enables export of Exif
metadata. Use the GraphicsExportSetMetaData routine
to supply Exif metadata.
This routine is only supported by the TIFF and JPEG graphics exporters.
GraphicsExportGetExifEnabled
Returns the current Exif export setting.
ComponentResult GraphicsExportGetExifEnabled (
   GraphicsExportComponent  ci,
   Boolean * exifEnabled );
Parameters
- ci
The component instance that identifies your connection to the graphics exporter component.
- enableExif
Points to a variable to receive the current Exif export setting.
Discussion
This routine is only supported by the TIFF and JPEG graphics exporters.
GraphicsExportSetThumbnailEnabled
Sets whether or not the graphics exporter component should create an embedded thumbnail inside the exported file.
ComponentResult GraphicsExportSetThumbnailEnabled (
   GraphicsExportComponent  ci,
   Boolean                enableThumbnail,
   long                   maxThumbnailWidth,
   long                   maxThumbnailHeight );
Parameters
- ci
The component instance that identifies your connection to the graphics exporter component.
- enableThumbnail
Indicates whether thumbnail creation should be turned on or off.
- maxThumbnailWidth
The maximum width for created thumbnails.
- maxThumbnailHeight
The maximum height for created thumbnails. If one maximum dimension is zero, only the other will be used. If both maximum dimensions are 0, the graphics exporter will decide for itself.
Discussion
This routine also sets optional maximum dimensions for the thumbnail. The graphics exporter will not change the aspect ratio of the image when creating the thumbnail; nor will it create a thumbnail larger than the image.
This routine is currently only supported by the TIFF and JPEG graphics exporters. The JPEG graphics exporter can only create thumbnails when writing Exif files.
GraphicsExportGetThumbnailEnabled
Returns the current thumbnail export settings.
ComponentResult GraphicsExportGetThumbnailEnabled (
   GraphicsExportComponent  ci,
   Boolean *              thumbnailEnabled,
   long *                 maxThumbnailWidth,
   long *                 maxThumbnailHeight );
Parameters
- ci
The component instance that identifies your connection to the graphics exporter component.
- thumbnailEnabled
Points to a variable to receive the current thumbnail setting. Pass NULL if you do not want to receive this information.
- maxThumbnailWidth
Points to a variable to receive the current maximum thumbnail width. Pass NULL if you do not want to receive this information.
- maxThumbnailHeight
Points to a variable to receive the current maximum thumbnail height. Pass NULL if you do not want to receive this information.
Discussion
This routine is currently only supported by the TIFF and JPEG graphics exporters.
Improved Movie Toolbox Support for Data Handlers
QuickTime 6 enhances the ability of third-party developers to add new types of data references through the introduction of QuickTime data handler components. These are called custom data handlers.
Background
QuickTime has always had two ways to reference storage of media data.
The first is through Mac OS-style file specification records known as FSSpec records. These FSSpec records are used by the Mac OS toolbox to reference files on disk and can describe any file in the file system.
The other type of storage reference is through a QuickTime abstraction known as a data reference. Data references are handles to blocks of data describing the location of data to be either read or written. The type of reference is described by a 4 char code (an OSType) and is used to select the QuickTime component––a data handler component––that performs the actual I/O operations.
The currently defined data handler types available with QuickTime are the following:
rAliasType
     = FOUR_CHAR_CODE(‘alis’)
URLDataHandlerSubType = FOUR_CHAR_CODE('url ')HandleDataHandlerSubType = FOUR_CHAR_CODE('hndl')PointerDataHandlerSubType = FOUR_CHAR_CODE('ptr ')ResourceDataHandlerSubType = FOUR_CHAR_CODE('rsrc')NullDataHandlerSubType = FOUR_CHAR_CODE('null')
Data Handlers and the New QuickTime APIs
Although the QuickTime software architecture provides rich support for both FSSpecs and data references, some APIs have not supported data references as fully as possible. This has meant that certain operations could only be performed on files described by FSSpec records. These operations, then, could not be performed with data handler components, either those provided by QuickTime or those that were custom.
This section discusses a group of new APIs in Movies.h that
accept a data reference where an older call accepted an FSSpec or
a data handler where a file reference.
The goal is twofold: (1) to support the writing of custom data handlers, and (2) to ensure that data references can be used wherever a File Manager API might have only existed before.
Table 1-3 describes the mapping of old calls to new calls:
Old Calls |
New Calls |
|---|---|
|
|
|
|
|
|
|
|
|
|
|
|
|
|
|
|
PutMovieIntoStorage
Writes a movie in a given file managed by the data handler.
OSErr PutMovieIntoStorage ( Movie theMovie,
DataHandler dh,
const wide *offset,
unsigned long maxSize );
Parameters
- theMovie
A movie identifier. Your application obtains this identifier from such functions as
NewMovie(II–1098),NewMovieFromFile(II–1110), andNewMovieFromHandle(II–1113).- dh
A data handler for the data fork of the given storage. You pass in an open write path in the
dhparameter.- offset
A pointer to a value that indicates where the movie should be written.
- maxSize
The largest number of bytes that may be written.
Return Value
You can access Movie
Toolbox error returns through GetMoviesError (I–505) and GetMoviesStickyError (I–506),
as well as in the function result. See “Error Codes” (IV–2718).
Discussion
If you are writing a custom data handler, make sure that the following data handler APIs are implemented:
DataHGetDataRefDataHWrite64DataHWrite, if not support 64-bit offsets
Introduced in QuickTime 6.
C interface file: Movies.h
CreateMovieStorage
Creates an empty storage to hold the movie which references the data reference, and opens a data handler to the movie file with write permission.
CreateMovieStorage (Handle dataRef,
OSType dataRefType,
OSType creator,
ScriptCode scriptTag,
long createMovieFileFlags,
DataHandler * outDataHandler,
Movie * newmovie);
Parameters
- dataRef
A data reference to the storage for the movie file to be created.
- dataRefType
The type of data reference.
- creator
The creator value for the new file.
- scriptTag
The script in which the movie file should be created. Use the Script Manager constant
smSystemScriptto use the system script; use thesmCurrentScriptconstant to use the current script.- createMovieFileFlags
Controls movie file creation flags (see below).
- createMovieFileDeleteCurFile
Indicates whether to delete an existing file. If you set this flag to 1, the Movie Toolbox deletes the file (if it exists) before creating the new movie file. If you set this flag to 0 and the file specified by the
dataRefparameter already exists, the Movie Toolbox uses the existing file.- createMovieFileDontCreateMovie
Controls whether
CreateMovieStoragecreates a new movie in the movie file. If you set this flag to 1, the Movie Toolbox does not create a movie in the new movie file. In this case, the function ignores thenewmovieparameter. If you set this flag to 0, the Movie Toolbox creates a movie and returns the movie identifier in the field referred to by thenewmovieparameter.- createMovieFileDontOpenFile
Controls whether
CreateMovieStorageopens the new movie file. If you set this flag to 1, the Movie Toolbox does not open the new movie file. In this case, the function ignores the outDataHandler parameter. If you set this flag to 0, the Movie Toolbox opens the new movie file and returns an instance of a data handler in theoutDataHandlerparameter.- newMovieActive
Controls whether the new movie is active. Set this flag to 1 to make the new movie active. A movie that does not have any tracks can still be active. When the Movie Toolbox tries to play the movie, no images are displayed, because there is no movie data. You can make a movie active or inactive by calling
SetMovieActive(III–1654).- newMovieDontAutoAlternate
Controls whether the Movie Toolbox automatically selects enabled tracks from alternate track groups. If you set this flag to 1, the Movie Toolbox does not automatically select tracks for the movie; you must enable tracks yourself.
- outDataHandler
A pointer to a field that is to receive the data handler for the opened movie file. Your application must use this value when calling other Movie Toolbox functions that work with movie files. If you set this parameter to NIL, the Movie Toolbox creates the movie file but does not open the file.
- newmovie
A pointer to a field that is to receive the identifier of the new movie.
CreateMovieStoragereturns the identifier of the new movie. If the function could not create a new movie, it sets this returned value to NIL. If you set this parameter to NIL, the Movie Toolbox does not create a movie.You can access Movie Toolbox error returns through
GetMoviesError(I–505) andGetMoviesStickyError(I–506), as well as in the function result. See “Error Codes” (IV–2718).
Discussion
If you are writing a custom data handler, make sure that the following data handler APIs are implemented:
DataHGetDataRefDataHWrite64DataHWrite, if not support 64-bit offsetsDataHDeleteFile, ifcreateMovieFileDeleteCurFileis passedDataHCreateFileWithFlagsorDataHCreateFileDataHOpenForRead/DataHOpenForWriteThe data hanlder must support both
kDataHCanReadandkDataHCanWrite.
Introduced in QuickTime 6.
C interface file: Movies.h
OpenMovieStorage
Opens a data handler that specifies movie storage.
OpenMovieStorage (Handle dataRef,
OSType dataRefType,
long flags,
DataHandler * outDataHandler);
Parameters
- dataRef
A data reference to a handle for the movie to be stored.
- dataRefType
The type of data reference.
- flags
(See below.)- outDataHandler
A pointer to a field that is to receive the data handler for the opened movie file. Your application must use this value when calling other Movie Toolbox functions that work with movie files.
Flags:
kDataHCanReadkDataHCanWrite
Discussion
This routine is rarely used.
Introduced in QuickTime 6.
C interface file: Movies.h
CloseMovieStorage
Closes an open movie storage.
CloseMovieStorage (DataHandler dh);
Parameters
- dh
A data handler.
Discussion
This routine is equivalent to CloseComponent.
Introduced in QuickTime 6.
C interface file: Movies.h
DeleteMovieStorage
Deletes a movie storage.
DeleteMovieStorage (Handle dataRef,
OSType dataRefType);
Parameters
- dataRef
A data reference to the movie storage to be deleted.
- dataRefType
The type of data reference.
Discussion
If you are writing a custom data handler, make sure that the following data handler API is implemented:
DataHDeleteFile
Introduced in QuickTime 6.
C interface file: Movies.h
AddMovieToStorage
???
AddMovieToStorage (Movie theMovie,
DataHandler dh);
Parameters
- theMovie
The movie for this operation.
- dh
A data handler.
AddMovieToStorageinternally usedPutMovieIntoStorage.
DataHScheduleData64andDataHGetFileSize64DataHScheduleDataandDataHGetFileSize, if not supporting 64-bit file offsetsDataHWrite64DataHWrite, if not support 64-bit offsetsDataHGetDataRef
Introduced in QuickTime 6.
C interface file: Movies.h
UpdateMovieInStorage
Replaces the contents of a movie resource in a specified movie storage.
UpdateMovieInStorage (Movie theMovie,
DataHandler dh);
Parameters
- theMovie
The movie for this operation. Your application obtains this movie identifier from such functions as
NewMovie(II–1098),NewMovieFromFile(II–1110), andNewMovieFromHandle(II–1113).- dh
A data handler.
Discussion
This routine, which is similar to OpenMovieStorage, replaces the contents of a movie resource in a specified movie storage.
Introduced in QuickTime 6.
C interface file: Movies.h
FlattenMovieDataToDataRef
Performs a flattening operation to the destination data reference.
Movie FlattenMovieDataToDataRef (Movie theMovie,
long movieFlattenFlags,
Handle dataRef,
OSType dataRefType,
OSType creator,
ScriptCode scriptTag,
long createMovieFileFlags);
Parameters
- theMovie
The movie for this operation. Your application obtains this movie identifier from such functions as as
NewMovie(II–1098),NewMovieFromFile(II–1110), andNewMovieFromHandle(II–1113).- movieFlattenFlags
Contains flags (see below) that control the process of adding movie data to the new movie file. These flags affect how the toolbox adds movies to the new movie file later. Set unused flags to 0.
- flattenAddMovieToDataFork
Causes the movie to be placed in the data fork of the new movie file. You may use this flag to create single-fork movie files, which can be more easily moved to computer systems other than Macintosh.
- flattenDontInterleaveFlatten
Allows you to disable the Movie Toolbox’s data storage optimizations. By default, the Movie Toolbox stores movie data in a format that is optimized for the storage device. Set this flag to 1 to disable these optimizations.
- flattenActiveTracksOnly
Causes the Movie Toolbox to add only enabled movie tracks to the new movie file. Use
SetTrackEnabled(III–1705), to enable and disable movie tracks.- flattenCompressMovieResource
Compresses the movie resource stored in the file’s data fork, but not the movie resource stored in the resource fork on Mac OS systems.
- flattenForceMovieResourceBeforeMovieData
Set this flag when you are creating a fast start movie, to put the movie resource at the front of the resulting movie file.
- dataRef
A data reference to the handle for the movie file to be flattened.
- dataRefType
The type of data reference.
- creator
The creator value for the new file.
- scriptTag
Contains constants (see below) that specify the script in which the movie file should be created.
- smSystemScript
Use the system script.
- smCurrentScript
Use the current script.
- createMovieFileFlags
Contains flags (see below) that control file creation options.
Function result: the identifier of the new movie. If the function could not create the movie, it sets this returned identifier to NIL.
- createMovieFileDeleteCurFile
Indicates whether to delete an existing file. If you set this flag to 1, the Movie Toolbox deletes the file (if it exists) before creating the new movie file. If this flag is set to 0 and the file specified by the
dataRefparameter already exists, the Movie Toolbox uses the existing file. In this case, the toolbox ensures that the file has both a data and a resource fork. If this flag isn’t set, the data is appended to the file.- createMovieFileDontCreateMovie
createMovieFileDontCreateMovie
Controls whether
CreateMovieFilecreates a new movie in the movie file. If you set this flag to 1, the Movie Toolbox does not create a movie in the new movie file. In this case, the function ignores the newmovie parameter. If you set this flag to 0, the Movie Toolbox creates a movie and returns the movie identifier in the field referred to by thenewmovieparameter.- createMovieFileDontOpenFile
Controls whether
CreateMovieFileopens the new movie file. If you set this flag to 1, the Movie Toolbox does not open the new movie file. In this case, the function ignores theresRefNumparameter. If you set this flag to 0, the Movie Toolbox opens the new movie file and returns its reference number into the field referred to by theresRefNumparameter.
Discussion
This routine performs a flattening operation to the destination data reference.
With previous versions of QuickTime, it was possible to flatten
a Movie to a data reference. However, doing so was not necessarily
obvious. It involved calling FlattenMovieData while doing
the following:
(1) Passing the address of a DataReferenceRecord in
place of the address of a file’s FSSpec; and
(2) Including the flattenFSSpecPtrIsDataRefRecordPtr flag
in the movieFlattenFlags parameter.
FlattenMovieDataToDataRef now
performs this same work on the client’s behalf.
Introduced in QuickTime 6.
C interface file: Movies.h
NewMovieFromStorageOffset
???
NewMovieFromStorageOffset (
Movie * theMovie,
DataHandler dh,
const wide * fileOffset,
short newMovieFlags,
Boolean * dataRefWasChanged);
Parameters
- theMovie
A pointer to a field that is to receive the new movie’s identifier. If the function cannot load the movie, the returned identifier is set to NIL.
- dh
A data handler to a file that is already open.
- fileOffset
A pointer to the starting file offset of the atom in the data fork of the file specified by the
dhparameter.- newMovieFlags
Flags (see below) that control characteristics of the new movie.
- newMovieActive
Controls whether the new movie is active. Set this flag to 1 to make the new movie active. A movie that does not have any tracks can still be active. When the Movie Toolbox tries to play the movie, no images are displayed, because there is no movie data. You can make a movie active or inactive by calling the
SetMovieActive(III–1654) function.- newMovieDontAutoAlternate
Controls whether the Movie Toolbox automatically selects enabled tracks from alternate track groups. If you set this flag to 1, the Movie Toolbox does not automatically select tracks for the movie; you must enable tracks yourself.
- newMovieDontResolveDataRefs
Controls how completely the Movie Toolbox resolves data references in the movie resource. If you set this flag to 0, the Movie Toolbox tries to completely resolve all data references in the resource. This may involve searching for files on remote volumes. If you set this flag to 1, the Movie Toolbox only looks in the specified file. If the Movie Toolbox cannot completely resolve all the data references, it still returns a valid movie identifier. In this case, the Movie Toolbox also sets the current error value to
couldNotResolveDataRef.- newMovieDontAskUnresolvedDataRefs
Controls whether the Movie Toolbox asks the user to locate files. If you set this flag to 0, the Movie Toolbox asks the user to locate files that it cannot find on available volumes. If the Movie Toolbox cannot locate a file even with the user’s help, the function returns a valid movie identifier and sets the current error value to
couldNotResolveDataRef.
- dataRefWasChanged
A pointer to a Boolean value. The Movie Toolbox sets the value to
TRUEif any of the movie’s data references were changed. UseUpdateMovieInStorage(page 138) to preserve these changes. If you do not want to receive this information, set thedataRefWasChangedparameter to NIL.If the Movie Toolbox cannot completely resolve all data references, it sets the current error value tocouldNotResolveDataRef. You can access error returns such as this throughGetMoviesError(I–505) andGetMoviesStickyError(I–506), as well as in the function result. See “Error Codes” (IV–2718).
Discussion
This routine serves the same purpose for data handlers as NewMovieFromDataFork64 serves
for movie file references. The API reads the 'moov' resource
found at fileOffset and
creates a Movie. The data handler parameter should be an open data
handler component instance for the storage holding the 'moov' resource.
The newMovieFlags and dataRefWasChanged parameters are
interpreted identically to those same parameters to NewMovieFromDataFork64.
If you are writing a custom data handler, make sure that the following data handler APIs are implemented:
DataHScheduleData64andDataHGetFileSize64DataHScheduleDataandDataHGetFileSize, if not supporting 64-bit file offsetsDataHGetDataRef
Introduced in QuickTime 6.
C interface file: Movies.h
ChooseMovieClock
Provides the client with a way to look through media handlers and find the best clock.
void ChooseMovieClock (Movie m,
   long flags);
Discussion
This routine asks the Movie to find the first media handler
that has a custom Clock (it calls MediaGetClock)
and to start using that as the Movie’s master timebase’s clock
(by using SetMovieMasterClock).
ChooseMovieClock is used to tie the Movie’s master timebase to a sound clock if there is a sound track. If there is no sound track, the microseconds clock is used as the master timebase.
Introduced in QuickTime 6.
Technote 2052 discusses the ChooseMovieClock API
in detail, explaining how this call should be used with Video Output
Components and in instances where SetMovieMasterClock was previously
being used to reset a movie’s clock.
The Technote is focused primarily on developers who are using
Video Output Components or modifying a movie’s master clock by
calling SetMovieMasterClock.
The Note is available at
http://developer.apple.com/technotes/tn/tn2052.html |
DataHGetInfo
Queries the information from a data handler.
ComponentResult DataHGetInfo(DataHandler dh,
OSType what,
void *info);
Parameters
- what
The information you are requesting.
- info
A pointer to the information requested. Currently, no selectors are defined.
Introduced in QuickTime 6.
C interface file: QuickTimeComponents.h
DataHDeleteFile
Deletes the file that the data handler references
ComponentResult DataHDeleteFile(DataHandler dh);
Introduced in QuickTime 6.
C interface file: QuickTimeComponents.h
DataHSetMovieUsageFlags
???
ComponentResult DataHSetMovieUsageFlags(
DataHandler dh,
long flags);
Parameters
- dh
A data handler.
- flags
The following flags are defined:
enum {kDataHMovieUsageDoAppendMDAT = 1L << 0
// if set, the datahandler
// should append wide and mdat atoms in append call.
};
C interface file: QuickTimeComponents.h
OpenADataHandler Extended
Predictably, you cannot use the OpenADataHandler (II-1159)
routine to open data handlers to non-existent files. Attempting
to do results in the function returning the error couldNotResolveDataRef and
setting the returned data handler to NIL.
In QuickTime 6, this is still the case for requests to open
data handlers for read-only access. However, if you make a request
to open a data handler for write access (by passing kDataHCanWrite), OpenADataHandler will
now return a configured data handler instead of NIL and an error,
if the file doesn’t exist.
If you pass a kDataHCanWrite,
a data handler will be created which you can use with DataHCreateFileWithFlags or
with DataHCreateFile.
Advanced APIs
Two additional APIs have been introduced in QuickTime 6. Although their usage by developers may be rare, they are discussed here for the sake of completeness.
PutMovieForDataRefIntoHandle and NewMovieForDataRefFromHandle can
be used by applications that directly read and write 'moov' atoms
(also known as movie resources or public movies) containing data
references that are self-references to the files read or written.
By way of quick review, data references within the media of
movies may refer to either external files through full data references
or to the file containing the ‘moov’ through
a shorthand self-reference technique. This self-reference involves
setting a data reference attribute to include the following flags:
kDataRefIsSelfContained = (1 << 0) |
and not including the full data reference. All such references
are resolved to the file originally containing the 'moov' atom
or public movie.
The already available PutMovieIntoHandle (II-1183)
routine will create public movies but cannot update data references
to be self-references. Also, NewMovieFromHandle can
create a Movie from a public movie but cannot do so for public movie
handles, including self-references. These limitations mean that
these APIs cannot be used by applications that
(1) want to perform the direct reading of 'moov' resources
from a file and then create a Movie or
(2) create a public movie containing self-references and then write that public movie to a file.
PutMovieForDataRefIntoHandle and NewMovieFroDataRefFromHandle accommodate
the passing of the data reference that should be interpreted as
the location of the 'moov' atom.
PutMovieForDataRefIntoHandle
This routine is roughly equivalent to the PutMovieIntoHandle API
(II-1183)––but with one important difference. If the data reference
and data reference type is passed, all media references to the same
storage are converted to self-references in the resulting public
movie handle. This ‘moov’ atom
can be then written to the storage.
OSErr PutMovieForDataRefIntoHandle (
Movie theMovie,
Handle dataRef,
OSType dataRefType,
Handle publicMovie );
Parameters
- theMovie
The movie for this operation. Your application obtains this movie identifier from such functions as
NewMovie(II–1098),NewMovieFromFile(II–1110), andNewMovieFromHandle(II–1113).- dataRef
A data reference to the storage in which the movie will be written.
- dataRefType
The type of data reference.
- publicMovie
The handle that is to receive the new movie resource. The function resizes the handle if necessary.
Return Value
You can access Movie
Toolbox error returns through GetMoviesError (I–505) and GetMoviesStickyError (I–506),
as well as in the function result. See “Error Codes” (IV–2718).
Introduced in QuickTime 6.
C interface file: Movies.h
NewMovieForDataRefFromHandle
This routine creates a Movie from the public movie handle
in the same way as NewMovieFromHandle does––but
with one important difference. If the public handle contains media
data references that are self-references, NewMovieForDataRefFromHandle can
convert self-references to references to the reference specified
by dataRef and dataRefType.
All other data references are not changed.
OSErr NewMovieForDataRefFromHandle ( Movie *theMovie,
Handle h,
short newMovieFlags,
Boolean *dataRefWasChanged,
Handle dataRef,
OSType dataRefType );
Parameters
- theMovie
A pointer to a field that is to receive the new movie’s identifier. If the function cannot load the movie, the returned identifier is set to NIL.
- h
A handle to the movie resource from which the movie is to be loaded.
- newMovieFlags
Flags (see below) that control the operation of NewMovieForDataRefFromHandle. Be sure to set unused flags to 0.
- newMovieActive
Controls whether the new movie is active. Set this flag to 1 to make the new movie active. You can make a movie active or inactive by calling
SetMovieActive(III–1654).- newMovieDontResolveDataRefs
Controls how completely the Movie Toolbox resolves data references in the movie resource. If you set this flag to 0, the toolbox tries to completely resolve all data references in the resource. This may involve searching for files on remote volumes. If you set this flag to 1, the Movie Toolbox only looks in the specified file. If the Movie Toolbox cannot completely resolve all the data references, it still returns a valid movie identifier. In this case, the Movie Toolbox also sets the current error value to
couldNotResolveDataRef.- newMovieDontAskUnresolvedDataRefs
Controls whether the Movie Toolbox asks the user to locate files. If you set this flag to 0, the Movie Toolbox asks the user to locate files that it cannot find on available volumes. If the Movie Toolbox cannot locate a file even with the user’s help, the function returns a valid movie identifier and sets the current error value to
couldNotResolveDataRef.- newMovieDontAutoAlternate
Controls whether the Movie Toolbox automatically selects enabled tracks from alternate track groups. If you set this flag to 1, the Movie Toolbox does not automatically select tracks for the movie; you must enable tracks yourself.
- dataRefWasChanged
A pointer to a Boolean value. The toolbox sets the value to
TRUEif any references were changed. Set thedataRefWasChangedparameter to NIL if you don’t want to receive this information. function result If the Movie Toolbox cannot completely resolve all data references, it sets the current error value tocouldNotResolveDataRef. You can access error returns such as this throughGetMoviesError(I–505) andGetMoviesStickyError(I–506), as well as in the function result. See “Error Codes” (IV–2718).- dataRef
A data reference to the storage from which the movie was retrieved.
- dataRefType
The type of data reference.
Introduced in QuickTime 6.
C interface file: Movies.h
MovieImportSetNewMovieFlags
Implemented by a movie import component to determine the
flags originally passed to NewMovieFromDataRef and
from a file.
ComponentResult MovieImportSetNewMovieFlags(
MovieImportComponent ci,
long newMovieFlags );
Parameters
- ci
A movie import component instance.
- newMovieFlags
Flags (see below) that control the characteristics of the new imported movie.
- newMovieActive
Controls whether the new movie is active. Set this flag to 1 to make the new movie active. You can make a movie active or inactive by calling
SetMovieActive(III–1654).- newMovieDontResolveDataRefs
Controls how completely the Movie Toolbox resolves data references in the movie resource. If you set this flag to 0, the toolbox tries to completely resolve all data references in the resource. This may involve searching for files on remote volumes. If you set this flag to 1, the Movie Toolbox only looks in the specified file. If the Movie Toolbox cannot completely resolve all the data references, it still returns a valid movie identifier. In this case, the Movie Toolbox also sets the current error value to
couldNotResolveDataRef.- newMovieDontAskUnresolvedDataRefs
Controls whether the Movie Toolbox asks the user to locate files. If you set this flag to 0, the Movie Toolbox asks the user to locate files that it cannot find on available volumes. If the Movie Toolbox cannot locate a file even with the user’s help, the function returns a valid movie identifier and sets the current error value to
couldNotResolveDataRef.- newMovieDontAutoAlternate
Controls whether the Movie Toolbox automatically selects enabled tracks from alternate track groups. If you set this flag to 1, the Movie Toolbox does not automatically select tracks for the movie; you must enable tracks yourself.
Introduced in QuickTime 6.
C interface file: QuickTimeComponents.h
New User Data APIs
QuickTime 6 introduces new UserData APIs that can be useful in copying information from one UserData container to another. The operation performed is controlled by a parameter to the APIs that describes one of two different copy rules or dispositions. While there is a routine to copy from one UserData container to another, there are also convenience APIs to copy metadata between the UserData containers at the Movie, Track and Media levels.
The currently supported copy rules are:
kQTCopyUserDataReplaceDelete all user data items from the destination UserData container and then add all source items to the destination.kQTCopyUserDataMergeAppend all source items from the source UserData container to the destination UserData container. Does not delete items from the destination container.
CopyMovieUserData
Performs copying from the source Movie’s UserData to the destination Movie UserData.
OSErr CopyMovieUserData (Movie srcMovie,
   Movie dstMovie,
   OSType copyRule);
Parameters
- srcMovie
Movie containing source UserData.
- dstMovie
Movie containing destination UserData
- copyRule
Specifies one of two different approaches to copying source metadata items to the destination container. The supported rules are:
kQTCopyUserDataReplace
kQTCopyUserDataMerge
Discussion
This routine performs copying from the source Movie’s UserData to the destination Movie UserData.
CopyMovieUserData is
equivalent to the following:
CopyUserData(GetMovieUserData(srcMovie), |
GetMovieUserData(dstMovie), |
copyRule); |
Introduced in QuickTime 6.
C interface file: Movies.h
CopyTrackUserData
Performs copying from the source Track’s UserData to the destination Track’s UserData.
OSErr CopyTrackUserData (Track srcTrack,
   Track dstTrack,
   OSType copyRule);
Parameters
- srcTrack
Track containing source UserData.
- dstTrack
Track containing destination UserData.
- copyRule
Specifies one of two different approaches to copying source metadata items to the destination container. The supported rules are:
kQTCopyUserDataReplace
kQTCopyUserDataMerge
Discussion
This routine performs copying from the source Track’s UserData to the destination Track’s UserData.
Introduced in QuickTime 6.
C interface file: Movies.h
CopyMediaUserData
Performs copying from the source Media’s UserData to the destination Media’s UserData.
OSErr CopyMediaUserData (Media srcMedia,
Media dstMedia,
OSType copyRule);
Parameters
- srcMedia
Media containing source UserData.
- dstMedia
Media containing destination UserData.
- copyRule
Specifies one of two different approaches to copying source metadata items to the destination container. The supported rules are:
kQTCopyUserDataReplace
kQTCopyUserDataMerge
Discussion
This routine performs copying from the source Media’s UserData to the destination Media’s UserData.
CopyMediaUserData is
equivalent to the following:
CopyUserData(GetMediaUserData(srcMedia), |
GetMediaUserData(dstMedia), |
copyRule); |
Introduced in QuickTime 6.
C interface file: Movies.h
CopyUserData
Copies metadata items from the source UserData container to the destination UserData container based on the rule specified.
OSErr CopyUserData (UserData srcUserData,
UserData dstUserData,
OSType copyRule);
Parameters
- srcUserData
UserData container from which to copy metadata items.
- dstUserData
UserData container to which to copy the metadata items.
- copyRule
Specifies one of two different approaches to copying source metadata items to the destination container. The supported rules are:
kQTCopyUserDataReplace
kQTCopyUserDataMerge
Discussion
CopyUserData copies
metadata items from the source UserData container to the destination UserData
container based upon the rule specified. It can perform either total
replacement of all destination items or merge items from the source
into the destination container.
The API detects if the source and destination UserData containers are the same and does nothing in that case.
Introduced in QuickTime 6.
C interface file: Movies.h
QuickTime for Java Enhancements
QuickTime 6 includes support for a number of new features and enhancements in QuickTime for Java. These include
JDK 1.4 support. This is now part of the QTJava.dll. Developers will not need to use the
WinNativeHelper.dllin order for QuickTime for Java to work properly with JDK 1.4 on Windows computers.Introduction of the
JQTCanvasclass, a new lightweight version of theQTCanvasclass which supports scaling of Flash content.A number of new QuickTime VR classes that encapsulate the various VR atom types.
New classes in the
quicktime.std.moviespackage. These include Idle manager bindingsNextTaskNeededSoonerIdleDispatcher
Added support for MovieMedia Handler.
Fixed DataProcs in the Sequence Grabber.
Added a number of new classes that extend the client streaming functionality to include support for stored movies.
New Sprite Media Handler calls for getting and setting sprite variables.
Support for JDK 1.4
QuickTime for Java now includes support for JDK 1.4 (Windows only). These are internal changes that should be transparent to your application.
New JQTCanvas
JQTCanvas, a new
class that has been added to the quicktime.app.display package,
is a lightweight version of the QTCanvas class.
It is intended to behave in exactly the same way as QTCanvas, but
with the following enhancement: the JQTCanvas class
supports scaling of Flash content that is added to it via a moviePlayer.
You may use the setFlashScaling(boolean) method
to turn this feature on and off. If you use this new feature, you
may need to allocate extra memory, since an offscreen buffer must
be created that is the size of the onscreen image.
New QTVR Authoring Classes
A number of new QuickTime VR classes have been added in this release of QuickTime for Java. These classes encapsulate the various VR atom types, and are designed to help developers who are doing QuickTime VR work. They include
QTVRAtomQTVRAngleRangeQTVRCubicFaceQTVRCubicViewQTVRHotSpotInfoQTVRLinkHotSpotQTVRWorldHeaderQTVRNodeHeaderQTVRNodeLocationQTVRObjectSampleQTVRPanoImagingQTVRPanoSampleQTVRStringQTVRTrackRefEntry
For more information on these new VR classes, refer to the JavaDocs accompanying this release.
Improved QuickTime Client Streaming Support
A number of new classes have been added that extend QuickTime for Java client streaming functionality to include support for stored movies. This support is provided via the Sourcer object. These new classes include
SourcerSourcerCallbackParamsSourcerInitParamsSourcerLoopParamsSourcerTrackParamsSourcerTimingParams
Note that the QuickTime for Java Client Streaming API is currently not available on the Windows platform.
For more information on these new classes, refer to the JavaDocs accompanying this release.
New Sprite Handler APIs
The following new sprite handler APIs have been added to this release of QuickTime for Java:
Flashmediahandler.javaprivate static native int FlashMediaGetSupportedSwfVersion (
int mh,
byte[] path);
Movie.javaprivate static native short NewMovieForDataRefFromHandle (
int[] theMovie,
int publicMovieHandle,
short newMovieFlags,
byte[] dataRefWasChanged,
int dataRef,
int dataRefType);
private static native int FlattenMovieDataToDataRef (
int theMovie,
int movieFlattenFlags,
int dataRef,
int dataRefType,
int creator,
short scriptTag,
int createMovieFileFlags);
SpriteMediaHandler.javaprivate static native int SpriteMediaDisposeImage(int mh,
int imageIndex);
private static native int SpriteMediaNewImage (int mh,
byte[] imageURL);
AppleScript Changes
This section discusses the changes to AppleScript in QuickTime 6.
Recordability
QuickTime Player is now a recordable application. To take advantage of this new capability, you must use QuickTime Player in conjunction with an application that supports AppleEvent recording, such as Script Editor.
Using Script Editor to record a script, you need to make sure that both QuickTime Player and Script Editor are running. Then you click the record button in a script window. Any operation you perform in QuickTime Player will be recorded in the open script document.
Most features of QuickTime Player are recordable with the following exceptions:
Import and Export are not recordable
Sprite-related property panels are not recordable
Music Track Instruments property panel is not recordable
Printing operations are not recordable
The result of a AppleEvent recording session is rarely a finished script, but rather more like a summary of the operations you would like performed. A recorded script will have no error checking code nor if/then/else or repeat/until structures. Quite often, a recorded script will merely demonstrate the correct syntax for an operation and little more.
Terminology Changes
QuickTime Player introduces a number of new commands, classes, and properties, and well as modifications to existing terminology elements, discussed in this section.
New Commands
The following new commands are introduced in QuickTime 6:
enter full screen
exit full screen
These two commands make it possible to enter and exit full screen mode independent of movie playback. This means that in QuickTime 6 you can create a script that will put the player in full screen mode and then perform other operations, including opening and playing movies while remaining in full screen mode. Once the script has finished presenting movies, it is necessary to call exit full screen to restore the computer to its normal state.
enter full screen: Enter full screen video mode
enter full screen reference -- display |
[bounds point] -- the desired target dimensions of the display |
(height, width) |
[background color rgb color] -- the background color |
exit full screen: Exit full screen video mode
exit full screen reference -- display |
The following script demonstrates how to use these two commands to enter full screen mode, present a sequence of movies, then exit full screen mode:
tell display 1 to enter full screen |
tell movie 1 to play |
tell movie 2 to play |
tell movie 3 to play |
tell display 1 to exit full screen |
The following commands perform matrix manipulation on tracks and movies. While it is possible to achieve the same results by setting the matrix property directly (see current matrix, below), these commands serve as useful shortcuts and correspond to familiar menu commands and property window operations.
flip horizontal: Flip an object along the horizontal axis |
flip horizontal reference -- the object to flip |
flip vertical: Flip an object along the vertical axis |
flip vertical reference -- the object to flip |
resize: Scale an object |
resize reference -- the object to scale |
[by small real] -- the percent of current size |
[around fixed point] -- the point to resize around |
rotate: Rotate an object by an arbitrary amount |
rotate reference -- the object to rotate |
by small real -- the amount of rotation (in degrees) |
[around fixed point] -- the point to rotate around |
rotate left: Rotate an object 90 left |
rotate left reference -- the object to rotate |
rotate right: Rotate an object 90 right |
rotate right reference -- the object to rotate |
skew: Skew an object by an arbitrary amount |
skew reference -- the object to skew |
by fixed point -- the amount of skew |
[around fixed point] -- the point to skew around |
translate: Translate the object some distance |
translate reference -- the object to translate |
by fixed point -- the distance to translate |
The replace command performs an operation equivalent to the Edit/Replace menu item.
replace: Replace the current selection with an object from the clipboard |
replace reference -- movie |
The invert command inverts an image. This is primarily useful for inverting a bitmap before using it set the new track mask property.
invert: Invert an object |
invert reference -- the object to invert |
The save export settings command is used to save the specified exporter settings to a file. This file can then be used with the export command.
save export settings: Save an exporters settings |
save export settings |
for AVI/BMP/DV stream/Fast Start QTVR Movie/FLC/hinted movie/image sequence/interframe |
compressed VR object movie/MPEG4/picture/QuickTime media link/QuickTime movie/AIFF/System 7 sound/ |
wave/MuLaw/standard MIDI/text file -- the desired file type |
[to alias] -- the destination file |
[replacing boolean] -- should the original file be deleted |
first? |
Enhanced Commands
Command export
The export command has additional export options: Fast Start QTVR Movie, interframe compressed VR object movie, MPEG 4, and QuickTime media link.
An optional parameter using settings preset has also been added that allows the use of an export settings file (see save export settings command, above).
export: Export a movie or track to a file |
export reference -- the movie or track to export |
to alias -- the destination file |
as AVI/BMP/DV stream/Fast Start QTVR Movie/FLC/hinted movie/image sequence/interframe |
compressed VR object movie/MPEG4/picture/QuickTime media link/QuickTime movie/AIFF/System 7 sound/ |
wave/MuLaw/standard MIDI/text file -- the desired file type |
[using default settings/most recent settings] -- the export settings to use |
[using settings preset string] -- the name of the export settings preset to use |
[using settings alias] -- the file containing the export settings |
[replacing boolean] -- should the original file be deleted first? |
Command make
The make command can be used to create movie, track, frame and favorite objects. The syntax for each is shown below:
make new movie with data {frame 6 of track "Video Track" of movie "QuickTime Sample Movie"} |
make new movie with data {track "Video Track" of movie "QuickTime Sample Movie"} |
make new track at first movie with data alias "myharddrive.myimage.jpeg" |
make new favorite with data "http://stream.qtv.apple.com/myevent.mov" |
make new favorite with file "myharddrive:mymovie.mov" |
New Properties
New Application Properties
The following Boolean properties can be set to show or hide the various non-movie windows:
show favorites window boolean -- show the favorites window |
show movie info window boolean -- show the movie info window |
show welcome movie automatically boolean [r/o] -- always show the hot picks movie when the application launches |
New Movie Properties
The following properties control audio playback characteristics:
bass gain small integer -- the bass setting for the track (-256..256) (not saved with the movie) |
sound balance small integer -- the balance of the movie (-128..128), where negative is left, 0 is center, and positive is right |
treble gain small integer -- the treble setting for the movie (-256..256) (not saved with movie) |
preferred audio balance track track [r/o] -- the preferred track to use for balance settings |
preferred audio gain track track [r/o] -- the preferred track to use for bass and treble gain settings |
The color table property allows a scripter to specify a color palette for movies that support palettes:
color table palette -- palette for the movie |
The current chapter track property permits easy access to the current chapter track of the movie:
current chapter track track [r/o] -- the currently active chapter track (may differ by language) |
The current matrix property describes the current transformation applied to the movie:
current matrix matrix -- the matrix of the movie |
The following boolean properties control user interface elements:
show detailed movie info window boolean -- show the movie property window |
show sound controls boolean -- show the sound controls in the LCD |
show video controls boolean -- show the video controls |
The following properties control the visual appearance of the movie and perform actions corresponding to the video controls:
video brightness adjustment small real [r/o] -- the adjustment to the video brightness (range is -1.0 to 1.0) |
video contrast adjustment small real [r/o] -- the adjustment to the video contrast (range is -1.0 to 1.0) |
video tint adjustment small real [r/o] -- the adjustment to the video tint (range is -0.25 to 0.25) |
video color adjustment small real [r/o] -- the adjustment to the video color |
New Track Properties
The alternate track property permits one track to be specified as the alternate of another. This is useful for making multi-language movies that automatically enable a track based on the current system language.
alternate track [r/o] -- the alternate for this track |
The following properties control audio playback characteristics of audio tracks:
bass gain small integer -- the bass setting for the track (-256..256) (not saved with movie) |
treble gain small integer -- the treble setting for the track (-256..256) (not saved with movie) |
The following properties control visual playback characteristics of visual tracks:
mask image -- the mask of the track |
current matrix matrix -- the matrix of the track |
transfer mode transfer mode unknown/dither copy/no dither copy/blend/transparent/straight alpha/premul |
white alpha/premul black alpha/straight alpha blend/composition -- the transfer mode of the track |
New Classes
Class matrix
The matrix class describes a 3 x 3 transformation matrix which can be applied to a movie or track. Commands such as rotate left and flip actually modify the current matrix property of the target object. The contents of a matrix can be set by a list of the following format: “{{1.0, 0.0, 0.0}, {0.0, 1.0, 0.0}, {0.0, 0.0, 1.0}}”. This particular matrix is know as the identity matrix and describes an object in its default state with no transformations applied. Constructing or manipulating a matrix directly requires knowledge of matrix math operations.
Properties
class type class [r/o] -- the class |
contents type class -- the contents of the matrix |
Class Palette
A palette object is a list of rgb colors (see below). Some movies permit specifying a palette which describes the set of colors to be used when displaying the movie.
Elements:
rgb color by numeric index |
Properties
class type class [r/o] -- the class |
contents type class -- the contents of the matrix |
Class rgb color
The class describes a color using three magnitudes: one each for the red, green, and blue color components.
Properties
class type class [r/o] -- the class |
contents type class -- the contents of the rgb color |
red small integer -- the mangnitude of the red component |
green small integer -- the mangnitude of the green component |
blue small integer -- the mangnitude of the blue component |
New Sequence Grabber User Interface
QuickTime 6 provides a new, improved sequence grabber User Interface (UI), which includes new settings that make the UI more resizable on all platforms, thus taking better advantage of available screen space. The new UI also provides better support for multiple camera devices.
The basic change from previous versions of QuickTime is that now the sequence grabber dialog is allowed to grow, and you can switch using tabs instead of drop down for picking the panel, as shown in Figure 1-13.
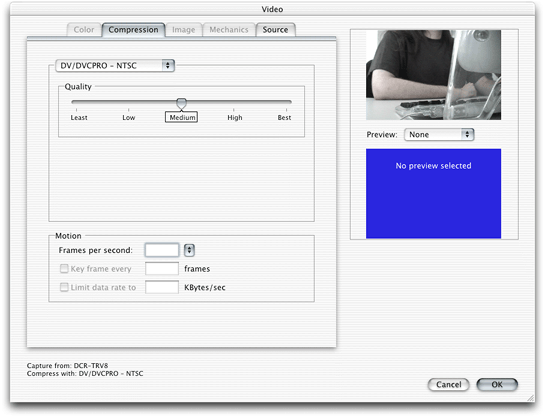
There are also improved source selections in the new UI, as well as other improvements. Among these are
tab-based Audio and Video Settings panels
twist-down, list-based Audio and Video Source tabs
a Video preview panel that now provides preview options, including compressed view, vectorscope, and waveform
growable windows, with split bars
an Image Panel now built dynamically, based on the capabilities of the VDIG
a Preview panel that now idles using the new event loop mechanism (refer to New Carbon Movie Control for more information). This improves performance on Mac OS X.
In addition, a new sequence grabber sound dialog is provided in QuickTime 6, as shown in Figure 1-14.
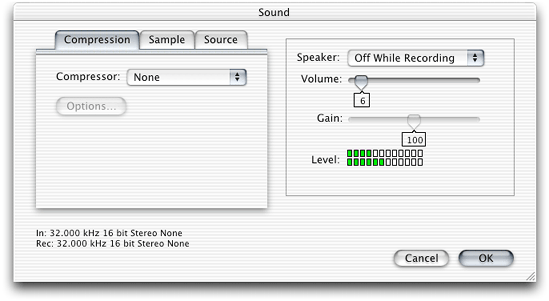
You can now record audio with the number of channels, 8 bit and 16 bit, different from the source. A summary of this information is provided in the lower left corner of the dialog box.
New Sequence Grabber APIs
QuickTime 6 includes a new group of sequence grabber APIs, discussed in this section.
These new APIs are primarily designed to improve communication between the sequence grabber and video digitizer components (VDIGs), and thus provide an improved user experience. High-level users of the sequence grabber will not need to make changes to their code, though passing new hint flags about what they are trying to achieve will help the sequence grabber and VDIGs serve them better.
Types
The SGDeviceInputName structure is defined as follows:
This section describes each new structure that is available in QuickTime 6.
struct SGDeviceInputName { |
Str63 name; |
Handle icon; |
long flags; |
long reserved; /* zero*/ |
}; |
typedef struct SGDeviceInputName SGDeviceInputName; |
enum { |
sgDeviceInputNameFlagInputUnavailable = (1 << 0) |
}; |
struct SGDeviceInputListRecord { |
short count; |
short selectedIndex; |
long reserved; /* zero*/ |
SGDeviceInputName entry[1]; |
}; |
typedef struct SGDeviceInputListRecord SGDeviceInputListRecord; |
typedef SGDeviceInputListRecord * SGDeviceInputListPtr; |
typedef SGDeviceInputListPtr * SGDeviceInputList; |
The SGDeviceName structure is re-defined as follows:
struct SGDeviceName { |
Str63 name; |
Handle icon; |
long flags; |
long refCon; |
SGDeviceInputList inputs; /* list of inputs; formerly |
reserved to 0*/ |
}; |
typedef struct SGDeviceName SGDeviceName; |
enum { |
sgDeviceNameFlagDeviceUnavailable = (1 << 0), |
sgDeviceNameFlagShowInputsAsDevices = (1 << 1) |
}; |
The SGDeviceListRecord structure is defined as follows:
struct SGDeviceListRecord { |
short count; |
short selectedIndex; |
long reserved; /* zero*/ |
SGDeviceName entry[1]; |
}; |
typedef struct SGDeviceListRecord SGDeviceListRecord; |
typedef SGDeviceListRecord * SGDeviceListPtr; |
typedef SGDeviceListPtr * SGDeviceList; |
enum { |
sgDeviceListWithIcons = (1 << 0), |
sgDeviceListDontCheckAvailability = (1 << 1), |
sgDeviceListIncludeInputs = (1 << 2) |
}; |
The new flag sgDeviceListIncludeInputs is
passed to SGGetChannelDeviceList if
the caller desires to get the list of inputs as well as the devices.
If this flag is not passed, the old behavior of just listing devices
is retained.
Two new usage flags have also been defined so that your application can indicate to the sequence grabber (and thus the VDIG) that it is not being used in a conventional recording mode.
enum { |
seqGrabRecord = 1, |
seqGrabPreview = 2, |
seqGrabPlayDuringRecord = 4, |
seqGrabLowLatencyCapture = 8, /* return the freshest frame |
possible, for live work |
(i.e. videoconferencing, live |
broadcast, live image processing) |
*/ |
seqGrabAlwaysUseTimeBase = 16 /* Tell VDIGs to use TimebaseTime |
always, rather than creating |
uniform frame durations, for more |
accurate live sync with audio */ |
}; |
typedef unsigned long SeqGrabUsageEnum; |
SGSetSettingsSummary
Sets what is displayed in the lower left corner of the sequence grabber dialog.
SGSetSettingsSummary (SeqGrabComponent s,
Handle summaryText);
Parameters
- s
A sequence grabber component.
- summaryText
A handle to the summary text.
Discussion
This routine supplies a handle (no length byte) that defines a user-readable summary of the state of the user’s sequence grabber settings.
Introduced in QuickTime 6.
C interface file: QuickTimeComponents.h
SGGetChannelRefCon
Returns a reference constant that was previously set by the corresponding set call.
SGGetChannelRefCon (SGChannel c,
   long * refCon);
Parameters
- c
A sequence grabber channel.
- refCon
A pointer to a long integer.
Discussion
This routine returns the application reference constant set
with SGSetChannelRefCon. Previously,
this was only passed to the BottleProcs.
Introduced in QuickTime 6.
C interface file: QuickTimeComponents.h
SGGetChannelDeviceAndInputNames
Returns the current device and input names.
SGGetChannelDeviceAndInputNames (SGChannel c,
   Str255 outDeviceName,
   Str255 outInputName,
   short * outInputNumber);
Parameters
- c
A sequence grabber channel.
- outDeviceName
The names for display.
- outInputName
The input name for display.
- outInputNumber
A pointer to the number of currently selected inputs.
Discussion
This is a utility call that lets you find out the current
device and input names, instead of having to call GetDeviceList and
walk it yourself. Pass NIL for parameters you are not interested
in.
Introduced in QuickTime 6.
C interface file: QuickTimeComponents.h
SGSetChannelDeviceInputNames
A media format independent call for this. Inputs start at 0 here. (Sound starts at 1, VDIGs at 0 in direct calls.) Previously, you had to make a VDIG or SoundDevice call in order to accomplish this.
ComponentResult SGSetChannelDeviceInputNames (
SGChannel c
short inInputNumber);
Parameters
- c
A sequence grabber channel.
- inInputNumber
An error specifying if it works or not.
Introduced in QuickTime 6.
C interface file: QuickTimeComponents.h
SGSetChannelSettingsStateChanging
This is a call to bracket SetSettings-related calls, and to give downstream components an opportunity to deal with the entire settings change in one go. An application should not normally need to call this because the sequence grabber settings calls will do this.
ComponentResult SGSetChannelSettingsStateChanging(
SGChannel c,
UInt32 inFlags);
Parameters
- c
A sequence grabber channel.
- inFlags
See below.
enum |
{ |
sgSetSettingsBegin = (1<<0), // SGSetSettings related |
// set calls about to start |
sgSetSettingsEnd = (1<<1), // Finished SGSetSettings |
// calls. Get ready to use the new |
// settings |
}; |
Introduced in QuickTime 6.
C interface file: QuickTimeComponents.h
SGPanelGetDITLForSize
Returns user interface elements that fit within a specified size panel.
SGPanelGetDITLForSize (SeqGrabComponent ci,
   Handle * ditl,
   Point * requestedSize);
Parameters
- ci
A component instance.
- ditl
A pointer to a handle provided by the sequence grabber component.
- requestedSize
The size requested.
Discussion
This routine is used to retrieve user interface elements that fit within a specified size panel.
If SGPanelGetDITLForSize is
unimplemented entirely, the panel is assumed to not have resizable User
Interface elements.
The sequence grabber will interpolate the panel elements between these two sizes if just these are returned.
enum { |
kSGSmallestDITLSize = -1, /* requestedSize h and v set to this to |
retrieve small size*/ |
kSGLargestDITLSize = -2 /* requestedSize h and v set to this to |
retrieve large size*/ |
}; |
Introduced in QuickTime 6.
C interface file: QuickTimeComponents.h
SGGrabCompressCompleteBottleProcPtr
Note that UInt8 *queuedFrameCount replaces Boolean
*done. (0 (==false) still means no frames,
and 1 (==true) one, but if more than one are available, the number
should be returned here.
ComponentResult (*SGGrabCompressCompleteBottleProcPtr) (SGChannel c, UInt8 *queuedFrameCount, SGCompressInfo *ci, TimeRecord *t, long refCon);
Parameters
- c
The connection identifier for the channel for this operation. The sequence grabber provides this value to your grab-compress–complete function.
- queuedFrameCount
A pointer to an 8-bit frame count identifier.
- ci
A pointer to a
SGCompressInfo(IV–2488) structure. When the operation is complete, the function fills in this structure with information about the compression operation.- t
A pointer to a
TimeRecord(IV–2542) structure. When the operation is complete, the function uses this structure to indicate when the frame was grabbed.- refCon
A reference constant.
The value 2 previously meant more than one frame, so some VDIGs may return 2 even if more than 2 are available, and some will still return 1 as they are using the original definition.
Introduced in QuickTime 6.
C interface file: QuickTimeComponents.h
SGGrabCompressComplete
Provides the default behavior for your grab-compress-complete function.
SGGrabCompressComplete (SGChannel c, UInt8 * queuedFrameCount, SGCompressInfo * ci, TimeRecord * tr);
Parameters
- c
The connection identifier for the channel for this operation. The sequence grabber provides this value to your grab-compress–complete function.
- queuedFrameCount
A pointer to an 8-bit frame count identifier.
- ci
A pointer to an
SGCompressInfo(IV–2488) structure. When the operation is complete, the function fills in this structure with information about the compression operation.- tr
A pointer to a
TimeRecord(IV–2542) structure. When the operation is complete, the function uses this structure to indicate when the frame was grabbed.
Return Value
See “Error Codes”
(IV–2718). Returns noErr if
there is no error.
Discussion
Note that UInt8 * queuedFrameCount replaces
Boolean
*done
. 0 (==false) still means no frames, and 1 (==true)
one, but if more than one are available the number should be returned
here. The value 2 previously meant more than one frame, so some
VDIGs may return 2 even if more than 2 are available, and some will
still return 1 as they are using the original definition.
The SGGrabCompressCompleteBottleProc definition
has also changed accordingly. By setting this BottleProc,
and calling through to SGGrabCompressComplete,
your application can determine how many frames are currently queued
in the VDIG, which can be useful for real-time processing. Similarly,
the VDCompressDone call
has been re-defined. VDIG writers should update to this new model.
Introduced in QuickTime 6.
C interface file: QuickTimeComponents.h
VDCompressDone
Determines whether the video digitizer has finished digitizing and compressing a frame of image data.
VDCompressDone (VideoDigitizerComponent  ci,
   UInt8 * queuedFrameCount,
   Ptr * theData,
   long * dataSize,
   UInt8 * similarity,
   TimeRecord * t);
Parameters
- ci
The component instance that identifies your connection to the video digitizer component. An application obtains this value from
OpenComponent(II–1161) orOpenDefaultComponent(II–1163).- queuedFrameCount
A pointer to an 8-bit frame count identifier.
- theData
A pointer to a field that is to receive a pointer to the compressed image data. The digitizer returns a pointer that is valid in the application’s current memory mode.
- dataSize
A pointer to a field to receive a value indicating the number of bytes of compressed image data.
- similarity
A pointer to a field to receive an indication of the relative similarity of this image to the previous image in a sequence. A value of 0 indicates that the current frame is a key frame in the sequence. A value of 255 indicates that the current frame is identical to the previous frame. Values from 1 through 254 indicate relative similarity, ranging from very different (1) to very similar (254). This field is only filled in if the temporal quality passed in with
VDSetCompression(III–2090) is not 0; that is, if it is not frame-differenced.- t
A pointer to a
TimeRecord(IV–2542) structure. When the operation is complete, the digitizer fills in this structure with information indicating when the frame was grabbed. The time value stored in this structure is in the time base that the application sets withVDSetTimeBase(III–2111).
Return Value
See “Error Codes”
(IV–2718). Returns noErr if
there is no error.
Discussion
Note that UInt8 * queuedFrameCount replaces Boolean*
done. 0 (==false)
still means no frames, and 1 (==true)
one, but if more than one are available the number should be returned
here. The value 2 previously meant more than one frame, so some
VDIGs may return 2 even if more than 2 are available, and some will
still return 1 as they are using the original definition.
Introduced in QuickTime 6.
C interface file: QuickTimeComponents.h
VDGetDeviceNameAndFlags
Returns the name of the input device.
VDGetDeviceNameAndFlags (VideoDigitizerComponent ci,
   Str255 outName,
   UInt32 * outNameFlags);
Parameters
- ci
The component instance that identifies your connection to the video digitizer component. An application obtains this value from
OpenComponent(II–1161) orOpenDefaultComponent(II–1163).- outName
The name of the display name.
- outNameFlags
A pointer to flags (see below)
Discussion
This routine is designed to give the VDIG more control over
how it is presented to the user, and to clarify the distinction
between devices and inputs. Historically, the assumption has been
that there is one component registered per device and the component
name is displayed. This change lets a component choose its name
after registration. vdDeviceFlagShowInputsAsDevices is
meant for components that register once and support multiple devices.
The User Interface is clearer if these are presented as devices
rather than inputs, and this allows a VDIG to present itself this
way without a huge restructuring. vdDeviceFlagHideDevice is
for the kind of VDIG that registers itself, and then can register
a further VDIG for each device.
If no hardware is available, returning this flag will omit it from the list.
As this call is being made, it is also a good time to check for hardware and register further VDIG components if needed, allowing for lazy initialization when the application needs to find a VDIG rather than on every launch or replug.
enum { |
vdDeviceFlagShowInputsAsDevices = (1 << 0), /* Tell the Panel to |
promote Inputs to Devices*/ |
vdDeviceFlagHideDevice = (1 << 1) /* Omit this Device enitirely from |
the list*/ |
}; |
Introduced in QuickTime 6.
C interface file: QuickTimeComponents.h
VDCaptureStateChanging
Returns a component error.
VDCaptureStateChanging (VideoDigitizerComponent ci,
   UInt32 inStateFlags);
Parameters
- ci
The component instance that identifies your connection to the video digitizer component.
- inStateFlags
See below.
Discussion
It has long been a problem for VDIG writers that the sequence grabber can make a series of calls, and it is not always clear what the intent is at the higher level. This call is designed to provide additional information about what is happening at the sequence grabber level to the VDIG, so it can take this into account. In particular, the settings bracketing calls are designed for the VDIG to update a series of parameters without re-initializing. One point here is that the VDIG can consider the UniqueID call to be more important than the input number, for example.
The sequence grabber is now more careful when there are multiple VDIGs available to try to save and restore more information about which one should be used. It will still pick the closest available VDIG if the exact one is not available, but it will not stop with the first available.
In addition, the old behavior of aborting a Get/Set settings call part of the way through if an error is returned has been changed to leave the sequence grabber in a more predictable state. It also no longer tries to save or restore settings for SGPanels that report that their hardware is unavailable.
enum { |
vdFlagCaptureStarting = (1 << 0), // Capture is about to start; |
allocate bandwidth |
vdFlagCaptureStopping = (1 << 1), // Capture is about to stop; stop |
queuing frames |
vdFlagCaptureIsForPreview = (1 << 2),// Capture is just to screen for |
preview purposes |
vdFlagCaptureIsForRecord = (1 << 3) // Capture is going to be |
recorded |
vdFlagCaptureStarting = (1<<0), // Capture is about to start; |
allocate bandwidth |
vdFlagCaptureStopping = (1<<1), // Capture is about to stop; |
stop queuing frames |
vdFlagCaptureIsForPreview = (1<<2), // Capture is just to |
screen for preview purposes |
vdFlagCaptureIsForRecord = (1<<3), // Capture is going to be recorded |
vdFlagCaptureLowLatency = (1<<4), // Fresh frames are more important |
than delivering every frame -- |
don't queue too much |
vdFlagCaptureAlwaysUseTimeBase = (1<<5),// Use the timebase |
for every frame; |
don't worry about making |
durations uniform |
vdFlagCaptureSetSettingsBegin = (1<<6), // A series of calls |
are about to be made to |
restore settings |
vdFlagCaptureSetSettingsEnd = (1<<7) // Finished restoring settings; |
any set calls after this |
are from the app or UI |
}; |
Introduced in QuickTime 6.
C interface file: QuickTimeComponents.h
VDGetUniqueIDs
Returns a unique identifier for a particular device, which, in the case of a FireWire device, is the FireWire ID.
VDGetUniqueIDs (VideoDigitizerComponent ci,
   UInt64 * outDeviceID,
   UInt64 * outInputID);
Parameters
- ci
The component instance that identifies your connection to the video digitizer component.
- outDeviceID
A pointer to a 64-bit hardware identifier.
- outInputID
A pointer to a 64-bit hardware identifier.
Discussion
These UniqueID calls are provided, so that the VDIG can give the sequence grabber information, enabling it to restore a particular configuration, i.e., choose a particular device and input from those available––for example, if you need to restore a specific camera for a set of several hot-plugged FireWire cameras. The caller can pass NIL if it is not interested in one of the IDs. Returning 0 in an ID means you don’t have one.
Introduced in QuickTime 6.
C interface file: QuickTimeComponents.h
VDSelectUniqueIDs
Selects a particular device––for example, the IDs from the previous call.
VDSelectUniqueIDs (VideoDigitizerComponent ci,
const UInt64 * inDeviceID,
const UInt64 * inInputID);
Parameters
- ci
The component instance that identifies your connection to the video digitizer component.
- inDeviceID
A pointer to 64-bit hardware identifier.
- inInputID
A pointer to 64-bit hardware identifier.
Discussion
Note this is a Select, not a Set. The assumption is that the
Unique ID is a function of the hardware and not modifiable by the
calling application. Either a NIL pointer or 0 in the ID means,
don’t care. This should restore the device and input IDs returned
by VDGetUniqueIDs.
return vdDontHaveThatUniqueIDErr if
your device doesn’t have a match.
Introduced in QuickTime 6.
C interface file: QuickTimeComponents.h
New Image Compression APIs
The following are Image Compression APIs that are new in QuickTime 6. These APIs allow compressors to supply the User Interface for their options within the compression dialog.
ImageCodecGetDITLForSize
Returns DITLs of various size in pixels.
ComponentResult ImageCodecGetDITLForSize (
ComponentInstance ci,
Handle *ditl,
Point *requestedSize);
Parameters
- ci
An image codec component instance. You get the sub-dialog from the component here.
- ditl
A pointer to a handle. Dialog items are returned here.
- requestedSize
The requested size in pixels that fits into the dialog.
Discussion
This routine allows the image codec to return DITLs of various
size in pixels. Two special values for the size, kSGSmallestDITLSize and kSGLargestDITLSize,
request the smallest or largest size of the DITL.
Once you have created the area, you can use the other calls described in this section to handle the dialog items managed by your panel component.
The codec should return badComponentSelector for
sizes it does not implement. The codec must at a minimum support kSGSmallestDITLSize if
it implements this call.
Introduced in QuickTime 6.
C interface file: ImageCodec.h
ImageCodecDITLInstall
Installs added items in an image codec settings dialog box before the dialog box is displayed to the user.
ComponentResult ImageCodecDITLInstall (
ComponentInstance ci,
DialogRef d,
short itemOffset
Parameters
- ci
An image codec component instance.
- d
- itemOffset
The offset to your image codec’s first item.
See “Error Codes” (IV–2718). Returns noErr if
there is no error.
This routine installs added items in an image codec settings dialog box before the dialog box is displayed to the user.
Introduced in QuickTime 6.
C interface file: ImageCodec.h
ImageCodecDITLEvent
Lets a component receive and process dialog events.
ComponentResult ImageCodecDITLEvent (
ComponentInstance ci,
DialogRef d,
short itemOffset,
const EventRecord *theEvent,
short *itemHit,
Boolean *handled);
Parameters
- ci
An image codec component instance.
- d
A dialog reference identifying the settings dialog box.
- itemOffset
The offset to your panel’s first item in the dialog box.
- theEvent
A pointer to an
EventRecord(IV–2302) structure. This structure contains information identifying the nature of the event.- itemHit
A pointer to a field that is to receive the item number in cases where your component handles the event. The number returned is an absolute, not a relative number, so it must be offset by the
itemOffsetparameter. handled- handled
A pointer to a Boolean value. Set this Boolean value to TRUE if you handle the event; set it to FALSE if you do not.
See “Error Codes” (IV–2718). Returns noErr if
there is no error.
This routine allows a component to receive and process dialog events.
Introduced in QuickTime 6.
C interface file: ImageCodec.h
ImageCodecDITLItem
Receives and processes mouse clicks in the image codec settings dialog box.
ComponentResult ImageCodecDITLItem (
ComponentInstance ci,
DialogRef d,
short itemOffset,
short itemNum);
Parameters
- ci
An image codec component instance.
- d
A dialog reference identifying the settings dialog box.
- itemOffset
The offset to your panel’s first item in the dialog box.
- itemNum
The item number of the dialog item selected by the user. The sequence grabber provides an absolute item number. It is your responsibility to adjust this value to account for the offset to your panel’s first item in the dialog box.
Return Value
See “Error Codes”
(IV–2718). Returns noErr if
there is no error.
Discussion
An image codec component calls this function whenever the user clicks an item in the settings dialog box. Your component may then perform whatever processing is appropriate, depending upon the item number.
Introduced in QuickTime 6.
C interface file: ImageCodec.h
ImageCodecDITLRemove
Removes a panel from the image codec settings dialog box.
ComponentResult ImageCodecDITLRemove (
ComponentInstance ci,
DialogRef d,
short itemOffset);
Parameters
- ci
An image codec component instance.
- d
A dialog pointer identifying the settings dialog box.
- itemOffset
The offset to your panel’s first item in the dialog box.
See “Error Codes” (IV–2718). Returns noErr if
there is no error.
An image codec component calls this function just before removing your items from the settings dialog box.
Introduced in QuickTime 6.
C interface file: ImageCodec.h
ImageCodecDITLValidateInput
Validates the contents of the user dialog box for an image codec component.
ComponentResult ImageCodecDITLValidateInput (
ComponentInstance ci,
Boolean *ok);
Parameters
- ci
An image codec component instance.
- ok
A pointer to a Boolean value. Set this value to
TRUEif the settings are OK; otherwise, set it toFALSE.
Return Value
See “Error Codes”
(IV–2718). Returns noErr if
there is no error.
Discussion
The image codec calls this function when the user clicks the
OK button. If the user clicks the Cancel button, the image codec
does not call this function. You indicate whether the settings are
acceptable by setting the Boolean value referred to by the ok parameter.
If you set this value to FALSE,
the sequence grabber component ignores the OK button in the dialog
box.
Introduced in QuickTime 6.
C interface file: ImageCodec.h
New Image Decompression Manager APIs
This section discusses new Image Decompression Manager APIs introduced in QuickTime 6.
QTGetPixelFormatDepthForImageDescription
Returns the corresponding depth value that should be used in image descriptions.
short QTGetPixelFormatDepthForImageDescription (OSType PixelFormat);
Discussion
Given a pixel format, this function returns the corresponding depth value that should be used in image descriptions. Such a value is not the literal number of bits per pixel, but the closest corresponding classic QuickDraw depth:
for any pixel format with an alpha channel, 32
for grayscale pixel formats of 8 or more bits per pixel, 40
for color quantized to 5 or 6 bits per component, 16
for all other color pixel formats, 24
GraphicsImportSetImageIndexToThumbnail
Looks for a subimage that contains a thumbnail.
ComponentResult GraphicsImportSetImageIndexToThumbnail
(GraphicsImportComponent ci);
Discussion
This routine looks for a subimage that contains a thumbnail.
If the function finds one, it sets the image index to that subimage.
If the function does not find one, it returns noThumbnailFoundErr.
The base graphics importer’s implementation of SetImageIndexToThumbnail works
by looking for the first image index that returns a kQTIndexedImageType metadata
item containing the kQTIndexedImageIsThumbnail tag.
Format-specific graphics importers may override this with more efficient
algorithms.
ImageCodecMergeFloatingImageOntoWindow
Draws the current contents of a floating image.
ComponentResult ImageCodecMergeFloatingImageOntoWindow(
ComponentInstance ci,
UInt32 flags );
Discussion
Some hardware acceleration transfer codecs create a “floating
image” in front of the window; when this is deactivated or hidden,
whatever was previously drawn in that section of the window reappears.
Such transfer codecs should implement the MergeFloatingImageOntoWindow call,
which draws the current contents of the floating image onto the
window below, so that the floating image may be deactivated or hidden
without the image changing.
ImageCodecRemoveFloatingImage
Hides the floating image without having to close the component.
ComponentResult ImageCodecRemoveFloatingImage(
ComponentInstance ci,
UInt32 flags );
Some hardware acceleration transfer codecs create a “floating
image” in front of the window; when this is deactivated or hidden,
whatever was previously drawn in that section of the window reappears.
Such transfer codecs should implement the RemoveFloatingImage call,
so that the Image Compression Manager can ask it to hide the floating
image without having to close the component.
The floating image should be shown again on the next call
to DrawBand.
New Media Handler APIs For Keyboard Focus
QuickTime 6 provides three new media handler calls that developers can use to write media handlers that support keyboard focus. These are
MediaRefConSetPropertyMediaRefConGetPropertyMediaNavigateTargetRefCon
If you want to add interactive capabilities to your application, you need to use these media handler calls, discussed in this section.
Adding Keyboard Focus Capabilities
When authoring the movie, you need to make sure that you add
a media property atom of type kTrackFocusCanEditFlag and
set that to TRUE. Then
you should check for the presence of this flag when called via MediaHasCharacteristic checking
on the kCharacteristicProvidesKeyFocus.
You add the kTrackFocusCanEditFlag atom.
If this property has been set to TRUE,
the media handler receives the NavigateRefCon and
Get/SetRefCon calls.
{ |
QTAtomContainer mediaProperties; |
Boolean canEdit = true; |
QTNewAtomContainer(&mediaProperties); |
QTInsertChild(mediaProperties, 0, kTrackFocusCanEditFlag, 1, 1, |
sizeof(canEdit), &canEdit, NULL); |
myErr = SetMediaPropertyAtom(myMedia, mediaProperties); |
QTDisposeAtomContainer(mediaProperties); |
} |
pascal ComponentResult MediaHasCharacteristic( |
MediaHandler mh, |
OSType characteristic, |
Boolean *hasIt) |
{ |
if (kCharacteristicProvidesKeyFocus == characteristic) { |
OSErr err; |
Boolean canEdit = false; |
QTAtomContainer propertyContainer = nil; |
err = GetMediaPropertyAtom (store->media, &propertyContainer); |
if ((noErr == err) && (propertyContainer)) { |
QTAtom canEditAtom = QTFindChildByIndex(propertyContainer, |
kParentAtomIsContainer, kTrackFocusCanEditFlag, 1, nil); |
if (canEditAtom) |
QTCopyAtomDataToPtr(propertyContainer, canEditAtom, |
false, sizeof(Boolean), &canEdit, |
nil); |
} |
if (propertyContainer) (void) QTDisposeAtomContainer |
(propertyContainer); |
*hasIt = canEdit; |
} |
... |
} |
{ |
QTAtomContainer mediaProperties; |
Boolean hasActions = true; |
QTNewAtomContainer(&mediaProperties); |
QTInsertChild(mediaProperties, 0, kMediaPropertyHasActions, 1, 1, |
sizeof(hasActions), &hasActions, NULL); |
myErr = SetMediaPropertyAtom(myMedia, mediaProperties); |
QTDisposeAtomContainer(mediaProperties); |
} |
MediaHitTestForTargetRefCon
Locates the object for hit testing.
ComponentResult MediaHitTestForTargetRefCon (
   MediaHandler    mh,
   long            flags,
   Point           loc,
   long            *targetRefCon );
Parameters
- mh
A media handler. You can obtain this reference from
GetMediaHandler(I-443).- flags
Flags (see below) that define the hit.
- mHitTestBounds
The point may only be within the
targetRefConbounding box.- mHitTestImage
The point must be within the shape of the
targetRefConimage.- mHitTestInvisible
An invisible
targetRefConmay be hit tested, even if the object is invisible.- mHitTestIsClick
The hit is a mouse click for codecs that want mouse events.
- loc
The location of the mouse.
- targetRefCon
Returns a reference constant representing an object you’re interested in. If this reference constant is not 0, your media handler will receive calls to
MediaGetActionsForQTEvent.
Return Value
See “Error Codes”
(IV-2718). Returns noErr if
there is no error.
The following flags are set by the Standard Controller, which
currently sets mHitTestImage and mHitTestInvisible before
it calls you.
This routine is used to locate the object for hit testing.
Introduced in QuickTime 6.
C interface file: MediaHandlers.h
MediaHitTestTargetRefCon
Detects if the mouse click and its release are in the same location, and within the object.
ComponentResult MediaHitTestTargetRefCon (
   MediaHandler    mh,
   long            targetRefCon,
   long            flags,
   Point           loc,
   Boolean         *wasHit );
Parameters
- mh
A media handler. You can obtain this reference from
GetMediaHandler(I-443).- targetRefCon
A reference constant set by the media handler in
MediaHitTestForTargetRefCon.- flags
Flags (see below) that define the hit.
- mHitTestBounds
The point may only be within the
targetRefConbounding box.- mHitTestImage
The point must be within the shape of the
targetRefConimage.- mHitTestInvisible
An invisible
targetRefConmay be hit tested.- mHitTestIsClick
The hit is a mouse click for codecs that want mouse events.
- loc
The location of the mouse.
- wasHit
A pointer to a Boolean; return
TRUEif there was a hit,FALSEotherwise.See “Error Codes” (IV-2718). Returns
noErrif there is no error.
This routine is called after MediaGetActionsForQTEvent if
a reference constant was set in MediaHitTestForTargetRefCon.
Introduced in QuickTime 6.
C interface file: MediaHandlers.h
MediaGetActionsForQTEvent
Returns an Event Handler for your Media Handler.
ComponentResult MediaGetActionsForQTEvent (
   MediaHandler        mh,
   QTEventRecordPtr    event,
   long                targetRefCon,
   QTAtomContainer     *container,
   QTAtom              *atom );
Parameters
- mh
A media handler. You can obtain this reference from
GetMediaHandler(I-443).- event
A pointer to a
QTEventRecord(IV-2409) structure.- targetRefCon
A reference constant set by the media handler in
MediaHitTestForTargetRefCon.- container
An atom container that you can pass back to the standard controller used for implementing sprite actions.
- atom
An atom you can pass back to the standard controller used for implementing sprite actions.
See “Error Codes” (IV-2718). Returns
noErrif there is no error. ReturnsqtEventWasHandledErrif event was handled by the media handlerqtEventWasHandledErr= -2129.
This routine returns an Event Handler for your Media Handler,
and is called with the targetRefcon set
in MediaHitTestForTargetRefCon.
Introduced in QuickTime 6.
C interface file: MediaHandlers.h
MediaDisposeTargetRefCon
Disposes any resources allocated as part of the RefCon.
ComponentResult MediaDisposeTargetRefCon (
   MediaHandler    mh,
   long            targetRefCon );
Parameters
- mh
A media handler. You can obtain this reference from
GetMediaHandler(I-443).- targetRefCon
A reference constant set by the media handler in
MediaHitTestForTargetRefCon.See “Error Codes” (IV-2718). Returns
noErrif there is no error.
This routine disposes any resources that your application has allocated as part of the reference constant.
Introduced in QuickTime 6.
C interface file: MediaHandlers.h
MediaNavigateTargetRefCon
Locates the object for keyboard focus.
ComponentResult MediaNavigateTargetRefCon (
   MediaHandler    mh,
   long            navigation,
   long *          refCon );
Parameters
- mh
A media handler. You can obtain this reference from
GetMediaHandler(I-443).- navigation
Flags (see below) that define the direction.
- refCon
Returns a reference constant representing an object you’re interested in. If this reference constant is not 0, your media handler will receive calls to
MediaRefConSetPropertyandMediaRefConGetProperty.See “Error Codes” (IV-2718). Returns
noErrif there is no error.The following flags are set by the Standard Controller, which is determined by the user’s interaction with the tab and shift keys, and/or mouse.
- kRefConNavigationNext
Tabbing direction is forward. If no item currently selection, then use first.
- kRefConNavigationPrevious
Tabbing direction is backward. If no item currently selection, then use the last.
These constants, which enable navigational direction, are defined as follows:
enum { |
kRefConNavigationNext = 0, |
kRefConNavigationPrevious = 1 |
}; |
This routine is locates the object for keyboard focus.
Introduced in QuickTime 6.
C interface file: MediaHandlers.h
Adding Keyboard Navigation and Editable Text Field Support
The following are reference constant properties for MediaRefConGetProperty and MediaRefConSetProperty calls:
enum { |
kRefConPropertyCanHaveFocus = 1, /* Boolean */ |
kRefConPropertyHasFocus = 2, /* Boolean */ |
}; |
enum { |
kTrackFocusCanEditFlag = 'kedt' |
}; |
MediaRefConSetProperty
Sets a new state based on the property type.
ComponentResult MediaRefConSetProperty (
   MediaHandler        mh,
   long                refCon,
   long                propertyType,
   void *              propertyValue);
Parameters
- mh
A media handler. You can obtain this reference from
GetMediaHandler(I-443).- refCon
A reference constant set by the media handler in
MediaNavigateTargetRefCon.- propertyType
Property type sent from standard controller.
kRefConPropertyHasFocus
= 2,
/* Boolean */
- propertyValue
Pointer to value to assign. The size based on property type.
See “Error Codes” (IV-2718). Returns noErr if
there is no error.
This routine is called with the reference constant is set
in MediaNavigateTargetRefCon to
set new state based on property type.
Introduced in QuickTime 6.
C interface file: MediaHandlers.h
MediaRefConGetProperty
Returns the current state based on the property type.
ComponentResult MediaRefConGetProperty (
   MediaHandler        mh,
   long                refCon,
   long                propertyType,
   void *              propertyValue);
Parameters
- mh
A media handler. You can obtain this reference from
GetMediaHandler(I-443).- refCon
A reference constant set by the media handler in
MediaNavigateTargetRefCon.- propertyType
Property type sent from standard controller.
kRefConPropertyCanHaveFocus
= 1,
/* Boolean */
- propertyValue
A pointer to a value to assign. The size is based on property type.
See “Error Codes” (IV-2718). Returns
noErrif there is no error.
Discussion
This routine is called with the reference constant set in MediaNavigateTargetRefCon to
get the current state based on the property type.
Introduced in QuickTime 6.
C interface file: MediaHandlers.h
New QuickTime Restrictions APIs
QuickTime 6 introduces a group of new APIs that provide a mechanism to preflight operations on content that may be restricted. What this means is that, by utilizing these calls, you can determine which QuickTime functions are restricted for the current movie, that is, which operations will fail.
These calls also allow developers to see what restrictions are enforced for a particular version of QuickTime. Previously, in earlier versions of QuickTime, there was no mechanism in place to report restrictions on no save or kiosk movies. Now in QuickTime 6, you can use these new restriction APIs, discussed in this section.
QTGetMovieRestrictions
Returns the restrictions, if any, specified on a given movie.
OSErr QTGetMovieRestrictions (
   Movie theMovie,
   QTRestrictionSet *outRestrictionSet,
   UInt32 *outSeed);
Parameters
- theMovie
The movie for this operation.
- outRestrictionSet
A pointer to a variable that holds a reference to a restriction set.
- outSeed
A pointer to a long integer. Each change to the restriction set will update this value.
Discussion
If there are no restrictions, this routine returns NIL. You can use seed count to detect changes.
The following is a list of the currently defined restrictions
now available in QTContentRestrictions.h:
enum { |
kQTRestrictionClassSave = 'save', |
kQTRestrictionSaveDontAddMovieResource = (1L << 0), |
kQTRestrictionSaveDontFlatten = (1L << 1), |
kQTRestrictionSaveDontExport = (1L << 2), |
kQTRestrictionSaveDontExtract = (1L << 3), // don't allow any form of // extraction of content |
kQTRestrictionClassEdit = 'edit', |
kQTRestrictionEditDontCopy = (1L << 0), // disable copy |
kQTRestrictionEditDontCut = (1L << 1), // disable cut |
kQTRestrictionEditDontPaste = (1L << 2), // disable paste |
kQTRestrictionEditDontClear = (1L << 3), // disable clear |
kQTRestrictionEditDontModify = (1L << 4), // don't allow modification |
// of content |
kQTRestrictionEditDontExtract = (1L << 5) // don't allow any form of |
// extraction of content |
}; |
There is also an error called qtOperationNotAuthorizedErr that
can be returned if an operation is performed on content that is
restricted. Normally, you should use the QuickTime Restrictions
API described in this section to preflight operations to determine
whether or not to perform the operation. If a restricted operation
is attempted, it will fail and will return this error.
qtOperationNotAuthorizedErr = -2168 |
Introduced in QuickTime 6.
C interface file: Movies.h
QTGetSupportedRestrictions
Use this routine to determine what restrictions are enforced by the currently running version of QuickTime.
QTGetSupportedRestrictions (OSType inRestrictionClass,
UInt32 *  outRestrictionIDs) ;
QTRestrictionsGetInfo
Returns the information about the restrictions designated by the specified restriction set.
OSErr QTRestrictionsGetInfo (
   QTRestrictionSet inRestrictionSet,
   long *outRestrictionClassCount,
   long *outSeed);
Parameters
- inRestrictionSet
The restricted set.
- outRestrictionClassCount
A value holding the number of classes currently in the restriction set.
- outSeed
A pointer to a long integer. Each change to the restriction set will update this value.
Discussion
If you want to determine all of the restrictions, use this routine to determine the count.
Introduced in QuickTime 6.
C interface file: Movies.h
QTRestrictionsGetItem
Returns the restricted items.
OSErr QTRestrictionsGetItem (QTRestrictionSet inRestrictionSet,
   OSType inRestrictionClass,
   UInt32 * outRestrictions);
Parameters
- inRestrictionSet
The restricted set.
- inRestrictionClass
The restricted class.
- outRestrictions
A pointer to a long integer holding flags that indicate individual restrictions.
Discussion
If you have no restrictions, the flags returned will be 0. If class is not available, it won’t return an error, but restrictions will be set to 0.
Introduced in QuickTime 6.
C interface file: Movies.h
QTCreateUUID
Creates a universal unique (UUID)128-bit number.
OSErr QTCreateUUID (
   QTUUID * outUUID,
   long creationFlags);
Parameters
- outUUID
A pointer to the unique universal 128-bit number.
- creationFlags
Discussion
This routine is used to create a universal unique identifier.
Introduced in QuickTime 6.
C interface file: Movies.h
QTEqualUUIDs
Compares two 128-bit numbers.
Boolean QTEqualUUIDs (const QTUUID * uuid1,
   const QTUUID *uuid2);
Parameters
- uuid1
A pointer to the first 128-bit number.
- uuid2
A pointer to the second 128-bit number.
Discussion
This routine is used to compare two universal unique identifiers.
Introduced in QuickTime 6.
C interface file: Movies.h
New APIs For Controlling Memory Usage in Movies
QuickTime 6 introduces new APIs for applications that want to exercise very fine-grained control over how memory is used by movies. Most applications, however, will not need to use these APIs, which were first introduced in Mac OS X 10.1, and only work in Mac OS X.
On Mac OS 9, collections of media data (called chunks) that were recently used are, under certain conditions, allowed to persist in handles in the application heap with the “purgeable” flag set. If the memory manager needs to reclaim their memory for other purposes, those handles are automatically emptied. If QuickTime needs the chunks again before they are emptied, it simply clears the purgeable flag and uses them, avoiding the need to reload the data.
The Mac OS X Carbon Memory Manager does not currently implement
the purgeable flag, relying instead on the virtual memory system.
However, the concept of a “purgeable chunk” is still valuable
for QuickTime, since it identifies chunks that were recently needed and
may be needed again in the near future (perhaps depending on user
action). In Mac OS X 10.1 and later, QuickTime keeps track of purgeable
chunks. If the total amount of memory occupied by them exceeds a
per-application threshold called the purgeable chunk memory allowance,
QuickTime empties chunks until the total size is under it. This behavior
can be turned on and off using the MediaSetChunkManagementFlags function,
and the allowance can be configured using the MediaSetPurgeableChunkMemoryAllowance function.
Should you want to force QuickTime to empty all purgeable chunks,
you can call the MediaEmptyAllPurgeableChunks function.
MediaSetChunkManagementFlags
Sets application-global flags controlling chunk management.
pascal ComponentResult MediaSetChunkManagementFlags (
MediaHandler mh,
UInt32 flags,
UInt32 flagsMask);
Discussion
Currently the only flag is kEmptyPurgableChunksOverAllowance,
which is TRUE by default.
MediaGetChunkManagementFlags
Returns the current settings of chunk management flags.
pascal ComponentResult MediaGetChunkManagementFlags (
MediaHandler mh,
UInt32 *flags);
Version Notes
WARNING - Do not call this function under QuickTime 5.0.x. It could cause a crash.
MediaSetPurgeableChunkMemoryAllowance
Configures the maximum amount of memory that QuickTime will allow purgeable chunks to occupy.
pascal ComponentResult MediaSetPurgeableChunkMemoryAllowance (MediaHandler mh,
Size allowance);
Discussion
This routine configures the maximum amount of memory that QuickTime will allow purgeable chunks to occupy. This is an application-global setting.
MediaGetPurgeableChunkMemoryAllowance
Returns the current purgeable chunk memory allowance.
pascal ComponentResult MediaGetPurgeableChunkMemoryAllowance (MediaHandler mh,
Size *allowance);
Discussion
This routine returns the current purgeable chunk memory allowance.
MediaEmptyAllPurgeableChunks
Forces QuickTime to empty all purgeable chunks in this application.
pascal ComponentResult MediaEmptyAllPurgeableChunks (MediaHandler mh);
Miscellaneous Changes and Enhancements
Change For All Video Output Components
In QuickTime 6 and later, all video output components which
support the SetEchoPort call should
call QTVideoOutputBaseSetEchoPort on
the base video output component to inform it about the change in
echo port.
ComponentResult QTVideoOutputBaseSetEchoPort ( |
QTVideoOutputComponent vo, |
CGrafPtr echoPort); |
QuickTime VR
Two performance enhancements to QuickTime VR:
Cubic previews are generated correctly in Export to Fast Start QTVR.
Preview now comes in faster for cubics.
New QuickTime Menu in Windows
There is a new QuickTime menu in the Windows system tray. The menu includes the following items in QuickTime 6:
About QuickTime -> Opens the About QuickTime control panel
QuickTime Website -> Opens the Apple QuickTime website
QuickTime Preferences -> Opens Browser Plug-in control panel
QuickTime Info -> Launches QTInfo
Open QuickTime Player -> Launches QuickTime Player
Open Picture Viewer -> Opens picture viewer
Check for QuickTime Updates -> Opens Browser Plug-in control panel
Favorites -> Lists a hierarchical menu with your favorites
Open Recent -> Opens recently opened items
Exit QuickTime Task -> Quits qttask
There is also a new item in the control panel: a QuickTime system tray icon. If unchecked, the tray icon will never appear. If you choose to exit from the menu, it will exit, and when you reboot your computer, it will reappear.
New Movie Errors API
New Movie Errors API
Adds orthogonal errors to a list of errors.
   QTAddMovieError(
   Movie addTo,
   Component adder,
   long errorCode,
   QTErrorReplacementPtr stringReplacements);
Parameters
- addTo
The movie to add error to.
- adder
The component which is adding the error.
- errorCode
The error code being added.
- stringReplacements
The list of strings to substitute (in order) for "^1", "^2", etc.
Discussion
This routine is used to add orthogonal errors to a list of
errors that will later be reported (at the end of an import or playback,
for example). Errors are stored in 'qter' resources
within the component.
The 'qter' resource
format is defined as follows:
type 'qter' { |
longint = $$Countof(ErrorSpec); |
wide array ErrorSpec { |
longint; // error code used to find this error |
longint // error type |
kQuickTimeErrorNotice = 1, |
kQuickTimeErrorWarning = 2, |
kQuickTimeErrorError = 3; |
// In the following strings, ^FILENAME, ^APPNAME, ^0, ^1, etc will be |
// replaced as appropriate. |
pstring; // main error string |
pstring; // explanation error string |
pstring; // technical string (not displayed |
// to user except in debug cases) |
align long; |
}; |
}; |
Introduced in QuickTime 6.
MIDI Files Now Imported In Place
QuickTime can now import standard MIDI files “in place.” The user is no longer required to provide a filename and create a movie file when QuickTime opens a movie through QuickTime Player or functions such as NewMovieFromFile. The import options––adding silence to the beginning or end, making the file QuickTime 2 compatible––are no longer available.
Enabling High Quality on MPEG-4 Video Tracks
When High Quality is enabled on a MPEG-4 video track, QuickTime will post-process the decoded frames.
QuickTime XML Importers
QuickTime XML importers create movies based on the contents
of certain kinds of XML files saved with the .mov file
extension. XML files with the .mov file
extension are treated by networks and operating systems as QuickTime
movies. For example, these XML files can be embedded in Web pages
for the QuickTime browser plug-in or double-clicked from the desktop
to invoke QuickTime Player.
Because XML is text-based, these XML files can be created by any application that can output text, such as a text editor or server-side script.
XML importers are invoked automatically when a .mov file
is opened in QuickTime Player, the QuickTime plug-in, or by other
applications (using functions such as NewMovieFromFile or NewMovieFromDataRef).
QuickTime automatically detects the XML header and reads the XML type.
If an importer is available for that XML type, QuickTime attempts
to create a movie from it.
To work with QuickTime XML importers, XML files must have the following initial syntax:
<?xml version="1.0"> |
<?quicktime type="xxxx/xxxx"?> |
where "xxxx/xxxx" is
the XML type, such as "application/smil" or "application/x-quicktime-media-link".
For the movie to open, the XML type must be one for which a QuickTime XML importer is installed.
There are importers for three XML types currently built into QuickTime.
SMIL importer
QuickTime media link importer
Component preflight importer
Note that XML importers were introduced and initially documented as part of QuickTime 5. This section provides more complete information about their use and features.
SMIL Importer
The SMIL importer opens SMIL files (.smil)
that have a .mov file
extension or are delivered over a network with the video/quicktime
MIME type. This allows you to direct SMIL files to QuickTime for
display (files with the .smil extension
are commonly handled by multiple applications, and it is hard to
predict which one will be chosen by a given browser or operating
system). Note that the XML header information must be prepended
to the SMIL file:
<?xml version="1.0"> |
<?quicktime type="application/smil"?> |
For more information about the QuickTime SMIL importer implementation, and the logic behind this implementation, refer to
http://developer.apple.com/techpubs/quicktime/qtdevdocs/REF/QT41_HTML/QT41WhatsNew-13.html |
QuickTime Media Link Importer
The QuickTime media link importer opens media link files (.qtl)
that have a .mov file extension
or video/quicktime MIME type.
QuickTime media link files contain a movie URL and an optional
set of parameters, such as loop and full-screen. When delivered
over a network, these files are normally directed to QuickTime Player,
bypassing the QuickTime browser plug-in because of their file extension
(.smil) and MIME type: "application/x-quicktimeplayer".
Note that their MIME type is different from their XML type, which
is "application/x-quicktime-media-link".
The XML importer for QuickTime media links allows you to open
these files using the QuickTime plug-in, because the file extension
and MIME type are now .mov and "video/quicktime".
This allows you to specify a movie URL for the QuickTime plug-in
as part of an external text file which can be modified independently
of HTML or any movie. This can be a useful alternative to using
alternate movies or SRC= and QTSRC= .
When opened locally from the desktop, rather than over a network
or through a browser, both .mov and .qtl files
should open in QuickTime Player. The .qtl file
extension and MIME type are relatively new, however, and not all
Windows or Mac OS systems know what to do with a .qtl file.
Changing a file extension from .qtl to .mov can
solve this problem by way of the XML importer.
The syntax of QuickTime media link files is always:
<?xml version="1.0"> |
<?quicktime type="application/x-quicktime-media-link"?> |
<embed src="URL" /> |
The embed tag in a .qtl file
can contain additional parameters, such as loop and autoplay. It supports
only a few of the parameters that can be specified in the HTML embed
tag, however. If you are targeting the QuickTime plug-in, check
to be sure you haven’t included unsupported attributes, such as
volume.
Two supported .qtl parameters, fullscreen and quitwhendone,
are applicable only to QuickTime Player. The QuickTime plug-in ignores
them.
For more about QuickTime media links, refer to
http://developer.apple.com/techpubs/quicktime/qtdevdocs/REF/whatsnewqt5/Max.2b.htm |
Component Preflight Importer
The component preflight importer works with files of XML type "application/x-qtpreflight".
A component preflight XML file should always have the .mov file
extension and "video/quicktime" MIME
type.
You can use the component preflight importer to test for the presence of specific QuickTime components. QuickTime will offer to automatically download and install any that are needed. This can be a useful filter if your website includes movies that use components not included in the mimimal QuickTime installation or components introduced in a recent release of QuickTime.
The syntax for a component preflight XML file is:
<?xml version="1.0"?> |
<?quicktime type="application/x-qtpreflight"?> |
<qtpreflight> |
<component type="ctyp" subtype="subt"/> |
</qtpreflight> |
where "ctyp" and "subt" are the actual four-character codes for a component’s type and subtype.
The first three lines are always the same. They let QuickTime
know that this is an XML file of type qtpreflight.
The last line is always the same. It closes the <qtpreflight> element.
In between is the list of components to check for. You can have
multiple <component /> elements
in your file, and QuickTime will test for all of them.
For example, here’s an XML file that checks for the Sorenson 3 video decompressor and the QuickTime for Java component:
<?xml version="1.0"?> |
<?quicktime type="application/x-qtpreflight"?> |
<qtpreflight> |
<component type="imdc" subtype="SVQ3"/> |
<component type="null" subtype="qtj "/> |
</qtpreflight> |
Note that the type and subtype are four-character codes. They are case-sensitive and a blank space is a significant character. These values must be exactly four characters long, including any spaces.
If any specified components are missing, QuickTime will check to see if they are available for download on Apple’s servers. QuickTime will then open a dialog box, either offering to download and install the missing components or informing the user that the software QuickTime needs in order to play this movie is not available.
All Apple-supplied components, and all approved third-party download components, are available on the Apple servers. An “unavailable software” dialog box is normally the result of an incorrect type or subtype code, or use of a third-party component not registered with Apple.
Components are typically packaged in groups for download. If a component is needed, its parent package is downloaded and installed. For example, the text importer is currently part of the authoring package, so all the authoring components are downloaded and installed if the text importer is needed. While you need to be aware of this, you should not assume that any particular component will be downloaded because another is. The organization and content of download packages is subject to periodic change. It’s a good idea to test for all the components that you need. Don’t worry; if you specify several components in the same package, the package downloads only once.
Typical content creators and website developers have no easy way to determine which components their movies rely on. An application that took a movie or folder of movies as input, and produced a list of required components as an output, would be useful for this purpose, but as of this writing no such application is available.
Following is a list of some components that you might want
to check for. Note that the type field identifies the kind of operation
the component performs, and the subtype generally identifies the
kind of data it operates on. For example, all image decompressors
are of type "imdc",
and all image compressors are of type "imco".
A JPEG compressor or decompressor is of subtype "jpeg",
while a Sorenson 3 compressor or decompressor is of subtype "SVQ3".
Component |
Type |
Subtype |
|---|---|---|
Sorenson 3 video |
|
|
QDesign Music 2 audio |
|
|
MPEG-4 video |
|
|
Lens Flare effect |
|
|
Blur effect (effects generally)* |
|
|
Text importer* |
|
|
MIDI or QuickTime Music* |
|
|
ZyGoVideo video* |
|
|
QuickTime for Java* |
|
|
*Not in minimum installation
The component preflight importer opens an empty movie. The user is unlikely to know what to do with this, so it’s best to open it in an unobtrusive place. One good solution is to embed it in a Web page in a 2-pixel by 2-pixel rectangle, which is effectively invisible.
Writing XML Importers
It is certainly possible to write your own XML import components. Documentation on this is forthcoming.
New XML Exporter
QuickTime 6 introduces a new XML exporter––Export to QuickTime Media Link––which creates a small XML file that contains the URL of a movie. The file may also contain additional user settings.
XML exporters create various kinds of XML files based on the contents of a movie. The XML file created may also contain information specific that is to the exporter or to user settings obtained through a dialog.
The XML file created by the exporter can be treated as a QuickTime movie. When the file is opened by QuickTime, QuickTime parses the XML, attempts to open the movie specified in the src field, then play it using the specified settings.
How It Works
The QuickTime media link exporter creates an XML file of type "application/x-quicktime-media-link".
This is a .qtl file of
MIME type "application/x-quicktimeplayer".
Note that the XML type and the MIME type are not the same. The MIME
type and file extension are used by browsers and operating systems
to determine what application or plug-in should be used to handle
a file. The XML type tells QuickTime what kind of data the file
contains.
You can rename a QuickTime media link file by changing the
file extension from .qtl to .mov. This
changes the MIME and file types, but not the XML type.
For more information about .qtl files,
see “What’s New in QuickTime 5” available at
http://developer.apple.com/techpubs/quicktime/qtdevdocs/REF/whatsnewqt5/Max.htm |
and “New QuickTime Media Links XML Importer” at
http://developer.apple.com/techpubs/quicktime/qtdevdocs/REF/whatsnewqt5/Max.2b.htm#pgfId=93760. |
Media Link Exporter Settings
The QuickTime media link exporter includes the following settings:
src (movie URL or path and filename)
movie name
movie ID
sound volume
full-screen mode
looping
autoplay
play every frame
kiosk mode (disallow saving)
controller
quit when done (exits QuickTime Player)
qtnext (the movie to play next)
href (URL to open if a user clicks the movie)
Using the Media Link Exporter
You can access the media link exporter by choosing Export from the File menu in QuickTime Player, then choosing Movie to QuickTime Media Link. You can either click Save, which creates an XML file with the default settings, or click the Options button to specify the settings yourself. (Note that Export from QuickTime Player requires QuickTime Pro.)
The QuickTime Media Link Settings dialog is shown in Figure 1-15.
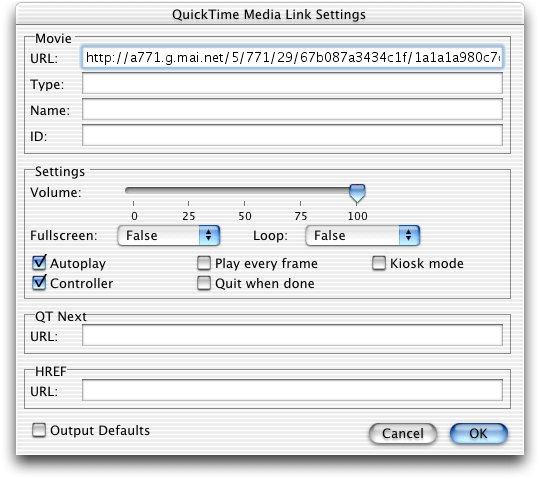
URL field. You can change the URL if you plan to put the movie on a different server or if you want the XML file to specify a different movie.
Type field. This allows you to override the XML type. You might do this if you were writing your own XML importer, but ordinarily this field should be left blank.
Name and ID fields. These allow you to specify a movie name and movie id. Note that the movie name is not the filename of the movie.
Volume slider. This allows you to set the movie sound volume, from 0 to 100%.
Fullscreen. This pop-up menu lets you set any of the full-screen modes: half, normal, double, current, and full.
Loop. This pop-up menu lets you set the looping mode.
There are checkboxes for Autoplay, Play every frame, Kiosk mode, Controller, and Quit when done.
You can enter URLs in the text fields provided for QT Next (the movie to play after this one) and HREF (the URL to load if a user clicks the movie).
URLs are relative to the movie specified in the src field.
The Output Defaults checkbox writes the values of all settings to the XML file, even if they are the same as the system defaults. In most cases, however, this has no effect, because not specifying a setting results in the system default.
The notable exception is the autoplay setting. A movie with
no autoplay setting may or may not autoplay, depending on the user
selection in the QuickTime Settings panel. If you want to be sure
that a movie will never autoplay, you should select Output Defaults
so that autoplay="false" will
be set explicitly in the XML file. If you set autoplay="true" it
will be set in the XML file regardless of the Output Defaults setting.
Default Settings
By default the src field is set to either the URL or the path and filename of the current movie. If you open a movie using a URL data reference (“Open URL” in QuickTime Player), the XML file contains the movie URL. If you open a movie using a file data reference (“Open” in QuickTime Player), the URL contains a path and filename.
The XML user settings default to the settings currently stored in the movie, which may not correspond to the current selections in a running application. An application may maintain user settings in transient memory, storing them in the movie only when saving. For example, changing the loop setting in QuickTime Player will not change the exported loop setting unless you save the movie before exporting.
Applications developers may want to copy all user settings into the movie’s user data atom before performing an export. All the settings except qtnext can be set by applications using the QuickTime API. See The QuickTime File Format for additional information about Movie User Data, available at
http://developer.apple.com/techpubs/quicktime/qtdevdocs/QTFF/qtff.html |
Some settings can also be stored using QuickTime Player (volume, loop, autoplay, and play every frame).
By default, the XML file contains only user settings that have a value different from QuickTime’s defaults. For example, a movie with no specified user settings has a controller and a volume of 100%. By default, settings matching these defaults are not included in the XML file. The XML file would specify the controller only if it were false and volume only if it were not 100%.
By default, the following settings are not included in the XML file if their values are as shown:
autoplay="false" |
controller="true" |
kioskmode="false" |
loop="false" |
playeveryframe="false" |
quitwhendone=false" |
volume="100" |
MovieQTList Embed Tag Attribute
QuickTime movies can contain structured data in QTList format. A QTList has a user-defined structure, much like a database or an XML file. QuickTime 5 and later include wired actions that allow a movie to parse a QTList and take actions based on the contents. For example, a QTList can contain a list of audio files, and the movie can load and play songs from the list based on user selections.
QuickTime movies can read a properly structured XML file into a QTList, or exchange XML-structured data between a QTList and a server. This enables a QuickTime movie to act as the front end of a database, for example, allowing the user to view or modify records stored on a remote server.
A QuickTime movie can have one QTList for the movie as a whole, as well as one for each track in the movie.
QuickTime 6 adds a MovieQTList parameter
that allows you to pass data into the movie-level QTList directly
from HTML. This lets you specify the default contents of the movie
QTList as part of your Web page. Combined with either JavaScript
or a server-side script, this enables you to dynamically pass data
into a movie when it is opened in a browser.
The MovieQTList parameter
is used in the EMBED and OBJECT tags
of your Web pages. For example:
<OBJECT CLASSID="clsid:02BF25D5-8C17-4B23-BC80-D3488ABDDC6B" |
CODEBASE="http://www.apple.com/qtactivex/qtplugin.cab" |
WIDTH="xx" HEIGHT="yy" > |
<PARAM NAME="src" VALUE="my.mov" /> |
<PARAM NAME="MovieQTList" VALUE= |
"<myDataBase> |
<myRecord> |
<lastname>Bailey</lastname> |
<firstname>Bill</firstname> |
<phone>555-1212</phone> |
</myRecord> |
</myDataBase>" |
/> |
<Embed src=my.mov |
height=yy width=xx |
MovieQTList= |
"<myDataBase> |
<myRecord> |
<lastname>Bailey</lastname> |
<firstname>Bill</firstname> |
<phone>555-1212</phone> |
</myRecord> |
</myDataBase>" |
/> |
</OBJECT> |
Note that the XML data is just data––there is no XML header or meta-information.
Most recent browsers can handle the HTML in the example above,
ignoring all the angle brackets and forward slashes because they
occur between quotes. Some older browsers may become confused, however,
and terminate the PARAM or EMBED tag
at the first ">" in the MovieQTList parameter
value. You can prevent this by constructing the QTList data using JavaScript.
For example:
<script language="JavaScript"> |
embedTag = ' <embed' |
+ ' src=\"my.mov\"' |
+ ' height=yy width=xx' |
+ ' MovieQTList=' |
+ ' \"<myDataBase>' |
+ ' <myRecord>' |
+ ' <lastname>Bailey</' + 'lastname>' |
+ ' <firstname>Bill</' + 'firstname>' |
+ ' <phone>555-1212</' + 'phone>' |
+ ' </' + 'myRecord>' |
+ ' </' + 'myDataBase>\"' |
+ ' /' + '>; |
document.writeln(embedTag); |
</script> |
To use the MovieQTList parameter,
you typically add a set of wired actions to your movie (using either
the QuickTime API or a QuickTime editing program such as LiveStage
Pro) that use properties of a QTList. An example would be loading
a child movie using a URL from the movie QTList. You would then
format the data you wish to pass in your HTML so that it conforms
both to proper XML syntax and to the structure of your QTList.
The MovieQTList parameter
creates a movie QTList if the movie does not contain one already. If
the movie does contain a movie QTList, the MovieQTList parameter
values overwrite the existing list. This allows you to create a
movie that contains a default list to be used when the movie is
viewed outside your Web pages.
SMIL Meta Tag Support in QuickTime
SMIL meta tag support was introduced and initially documented as part of QuickTime 5. This section provides more complete information about the properties defined in the SMIL 1.0 specification and those defined by QuickTime.
In a SMIL document, a set of meta elements can be used to define properties of the document, such as author, expiration date, a list of keywords, and so on, and assign values to those properties. Each meta element specifies a single property/value pair.
The following is an example of a meta element:
<meta name= "foo" content="35"/> |
The name attribute identifies the property defined in this meta element. The content attribute specifies the value of the property. These two attributes are required. The id and the skip-content attributes are also allowed in a meta element. (For more details on these attributes, you should refer to the SMIL 1.0 specification.)
When a SMIL document is imported into QuickTime, properties defined through the meta elements are converted into movie user data items some of which are accessible through the movie property window in QuickTime Player. The properties defined in the SMIL 1.0 and those QuickTime defines are listed below.
Properties defined in SMIL 1.0:
base
The value of this property determines the base URI for all
relative URIs used in the document. The value given to this element
becomes a ‘burl’ user
data item in the imported movie. QuickTime uses the value as the
base URL in resolving relative URLs it encounters in the movie.
pics-label or PICS-Label
The value of this property specifies a valid rating label for the document as defined by PICS. QuickTime currently does not support this property.
title
The value of this property contains the title of the presentation.
The value of this property becomes kUserDataName
(‘name’) user data item in the imported
movie.
Properties QuickTime defines:
name
The value of this property contains the name of the presentation.
The value of this property becomes kUserDataName
(‘name’) user data item in the imported
movie. Note that both the name meta data and the title meta data
map into the same user data item.
full-name
The value of this property contains the title of the presentation.
The value of this property becomes kUserDataTextFullName(‘©nam’) user
data item in the imported movie. Note the value of this user data
item is displayed in the movie property window of QuickTime Player.
author
The value of this property contains the author of the presentation.
The value of this property becomes kUserDataTextAuthor
(‘©aut’) user data item in the imported
movie. Note the value of this user data item is displayed in the
movie property window of QuickTime Player.
copyright
The value of this property contains the author of the presentation.
The value of this property becomes kUserDataTextCopyright
(‘©cpy’) user data item in the imported
movie. Note the value of this user data item is displayed in the
movie property window of QuickTime Player.
information
The value of this property contains the author of the presentation.
The value of this property becomes kUserDataTextInformation
(‘©inf’) user data item in the imported
movie. Note the value of this user data item is displayed in the
movie property window of QuickTime Player.
qt-userdata-xxx
where xxx is appended
to a ‘©’ character
and interpreted as an annotation user data tag (or a user data text
tag). For example, qt-userdata-swr becomes
the ‘©swr’ user
data text item. The value of this property contains a piece of annotation
of the presentation.
For more details on user data text items, refer to
http://developer.apple.com/techpubs/quicktime/qtdevdocs/APIREF/SOURCESV/workingwithmovieuserdata.htm |
A list of user data tags can be found at
http://developer.apple.com/techpubs/quicktime/qtdevdocs/APIREF/SOURCESIV/userdataidentifiers.htm |
JavaScript Support for ActiveX, Netscape 6 and Mozilla
New in QuickTime 6, the QuickTime ActiveX control for Windows is fully scriptable using JavaScript.
This means you can now use JavaScript to control QuickTime when Web pages are viewed using Internet Explorer for Windows, or any other browser that supports the COM interface to ActiveX controls.
Also new in QuickTime 6, the QuickTime browser plug-in is scriptable using the XPCOM interface supported by Netscape 6 and later and Mozilla 1.0.
This means you can now use JavaScript to control QuickTime when Web pages are viewed using Netscape 6 or later, or browsers based on Mozilla 1.0, on both Mac OS and Windows.
QuickTime is now scriptable from Web pages viewed using any browser that supports JavaScript and any of the LiveConnect, XPCOM, or COM interfaces. This includes most current browsers for Windows and Macintosh, with the notable exception of Internet Explorer for Macintosh, which does not allow scripting of plug-ins.
In summary:
QuickTime 4.1 is scriptable using Netscape 4 or 5 on Macintosh or Windows.
QuickTime 6 adds scriptability using most current browsers on Windows and Macintosh, including:
Netscape 4 and later (including Netscape 6) on Macintosh and Windows
Mozilla 1.0 on Macintosh and Windows
Internet Explorer for Windows
AOL 5 and later for Windows
MSN 6
Plug-ins are not scriptable using Internet Explorer for Macintosh.
To control a movie through the QuickTime plug-in using JavaScript,
you must include the parameter EnableJavaSript="true" in
the movie’s EMBED tag (this parameter is not needed in the OBJECT
tag, but it does no harm there).
JavaScript treats each embedded QuickTime movie in a Web page as a separately addressable object. Movies can be identified by name if there is a NAME parameter in the movie’s EMBED tag and an ID attribute in the movie’s OBJECT tag. Internet Explorer for Windows uses the ID attribute. Other browsers use the NAME parameter. Both NAME and ID should be set to the same value.
For example, to create a movie that can be addressed in JavaScript as "Movie1", your OBJECT and EMBED tags would look something like this:
<OBJECT classid="clsid:02BF25D5-8C17-4B23-BC80-D3488ABDDC6B" |
codebase="http://www.apple.com/qtactivex/qtplugin.cab" |
width="180" height="160" |
id="movie1" > |
<PARAM name="src" value="My.mov"> |
<EMBED width="180" height="160" |
src="My.mov" |
name="movie1" |
enablejavascript="true"> |
</EMBED> |
</OBJECT> |
Movies can also be identified by their ordinal number in the
JavaScript embeds[] array.
An example of usage and syntax, showing JavaScript control of multiple QuickTime movies using different methods of addressing, can be found in the “Sample JavaScript Usage” section of “What’s New in QuickTime 4.1” at:
http://developer.apple.com/documentation/quicktime/REF/QT41_HTML/QT41WhatsNew-80.html |
QuickTime exposes dozens of methods to JavaScript, allowing you to control not only the standard user interface actions, such as playing and stopping a movie, but also more complex actions, such as layering and compositing. You can use JavaScript, for example, to enable and disable alternate audio, text, or video tracks, or change a video track’s graphics mode or a sprite's current image.
Detailed descriptions of the QuickTime methods and properties available to JavaScript can be found in the “JavaScript Support” section of “What’s New in QuickTime 4.1” at:
http://developer.apple.com/documentation/quicktime/REF/QT41_HTML/QT41WhatsNew-72.html |
This bug is marked as fixed for the next release of Netscape and Mozilla.
Playing Shoutcast or Icecast Streams in QuickTime
QuickTime 6 allows you to play current Shoutcast or Icecast streams that use MP3 compression. This section discusses the various features of Shoutcast and Icecast streams, as well as what you need to know in order to deliver these streams in real-time over a network. If you are a content author, multimedia producer, or Webmaster, you should read this section.
Background
Shoutcast and Icecast use a modified form of http to deliver MP3 audio in real-time over a network. This is a popular and inexpensive way to deliver radio over the Internet. It is especially popular with small broadcasters, as it does not require the server to have a registered domain name, just an IP address. It can deliver a live stream or a playlist of recordings. On a Macintosh, you can tune into hundreds of these streams by clicking the radio tower button in iTunes. There are also several Shoutcast players for Windows, such as WinAmp.
Shoutcast and Icecast in QuickTime
QuickTime 4 introduced support for playing Shoutcast and Icecast
streams from QuickTime Player, the QuickTime browser plug-in, and
QuickTime applications programs. Support for .pls playlists
was added as part of QuickTime 5. These features were never fully
documented, however, and recent changes to the Shoutcast/Icecast
protocol make current streams unplayable by these earlier versions
of QuickTime.
There are three ways to open an Icecast or Shoutcast stream using QuickTime:
Use QuickTime Player to open a URL or a playlist.
Embed the URL of a stream or playlist in a Web page.
Open a URL or playlist from your application.
Opening Icecast or Shoutcast URLs
Whether you are using QuickTime Player, the QuickTime browser plug-in, or application code, you need to understand how QuickTime handles Icecast and Shoutcast URLs.
The URL of a typical Icecast or Shoutcast stream takes the form:
http://Server[/path] [/file]:port |
or
http://Server/path/file.pls |
Many Shoutcast and Icecast servers do not have their own domain names. Consequently, the URL is commonly in the form:
http://nnn.nnn.nnn.nnn:XXXX |
where nnn.nnn.nnn.nnn is
the IP address of the server, and XXXX is
the port number.
If the URL ends in a .pls filename,
you can open the stream using QuickTime just as you would for any
non-movie file that QuickTime can play (such as an .aiff file,
for example).
If the URL does not end in a .pls filename, you must change the protocol from http:// to icy:// for QuickTime to recognize it as an Icecast or Shoutcast stream.
For example, to access
http://ItsReggae.com:8004 |
tell QuickTime to open
icy://ItsReggae.com:8004 |
whereas to access
http://www.ItsReggae.com/listen.pls |
just use the unmodified URL.
As an alternative to changing URLs to icy:// protocol, you
can create a local .pls playlist that lists one or more stream URLs.
These URLs do not need to be changed from http:// to icy://. The
fact that they reside in a .pls file
tells QuickTime all it needs to know.
Playlists take the format:
[playlist] |
numberofentries=<n> |
File1=<uri> |
Title1=<title> |
Length1=<length or -1> |
File2=<uri> |
Title2=<title> |
Length2=<length or -1> |
... |
The Title field is optional.
The Length field is either the length of the recording in seconds or -1 (unspecified or live stream).
For example, for a single live stream, the .pls file
might look like this:
[playlist] |
NumberOfEntries=1 |
File1=http://itsreggae.com:8004/ |
length=-1 |
Playing Icecast or Shoutcast Streams in QuickTime Player
Use the Open URL menu command to open a stream directly. Be sure to change the URL protocol from http:// to icy:// as described previously.
You can open a .pls file
from QuickTime player using the Open menu command, the Open URL
menu command, or by dragging and dropping.
Playing Icecast or Shoutcast Streams in the QuickTime Browser Plug-in
The QuickTime plug-in is not normally registered to handle
the icy:// protocol or .pls file type.
To direct a Shoutcast or Icecast stream to the QuickTime plug-in,
you must use the QTSRC parameter
in your EMBED tag. The SRC parameter
should point to a file that QuickTime is always registered for,
such as a .qtif (QuickTime
image) or .mov (QuickTime movie).
This file is downloaded by the browser, so it should be small, but
it is not displayed by QuickTime. QuickTime knows by the QTSRC parameter
that you want to play something else.
Here is an example of the HTML you would use to play a Shoutcast or Icecast stream from a Web page using the QuickTime browser plug-in, assuming the URL of the stream is "http://itsreggae.com:8004/"
<OBJECT CLASSID="clsid:02BF25D5-8C17-4B23-BC80-D3488ABDDC6B" |
CODEBASE="http://www.apple.com/qtactivex/qtplugin.cab" |
WIDTH="320" HEIGHT="16" > |
<PARAM NAME="src" VALUE="icy://itsreggae.com:8004" > |
<PARAM NAME="autoplay" VALUE="true" > |
<EMBED PLUGINSPAGE="http://www.apple.com/quicktime/download/" |
SRC="UNeedQT.qtif" TYPE="image/x-quicktime" |
WIDTH="320" HEIGHT="16" |
QTSRC="icy://itsreggae.com:8004" |
AUTOPLAY="true" > |
</EMBED> |
</OBJECT> |
As described previously, you must substitute the icy:// protocol identifier for the http:// protocol in the URL of a Shoutcast or Icecast stream.
No such substitution is required for (or inside) .pls files,
but you must still use the EMBED’s SRC parameter to direct the
browser to a QuickTime file, and the QTSRC parameter to pass the
actual file to QuickTime. The HTML is essentially identical to the
example just shown, substituting
http://www.ItsReggae.com/listen.pls |
for
icy://itsreggae.com:8004 |
Playing Icecast or Shoutcast Streams Using the QuickTime API
You can open an Icecast or Shoutcast stream, or a .pls playlist
file, from within QuickTime applications. The simplest method is
to use NewMovieFromFile or NewMovieFromDataRef to
create a playable movie from the file or stream. In the case of
a .pls file, the data
reference might be a file alias or a URL. In the case of a stream,
the data reference will normally be a URL.
Again, as described previously, you must substitute "icy://"
for "http://" in the URL of a stream. Do this only for
streams, not for .pls files.
This creates a movie with a streaming track. Play it as you would any streaming movie.
Copyright © 2002 Apple Computer, Inc. All Rights Reserved. Terms of Use | Privacy Policy | Updated: 2002-07-01