Drawing Shapes Using Bézier Paths
In iOS 3.2 and later, you can use the UIBezierPath class to create vector-based paths. The UIBezierPath class is an Objective-C wrapper for the path-related features in the Core Graphics framework. You can use this class to define simple shapes, such as ovals and rectangles, as well as complex shapes that incorporate multiple straight and curved line segments.
You can use path objects to draw shapes in your app’s user interface. You can draw the path’s outline, fill the space it encloses, or both. You can also use paths to define a clipping region for the current graphics context, which you can then use to modify subsequent drawing operations in that context.
Bézier Path Basics
A UIBezierPath object is a wrapper for a CGPathRef data type. Paths are vector-based shapes that are built using line and curve segments. You can use line segments to create rectangles and polygons, and you can use curve segments to create arcs, circles, and complex curved shapes. Each segment consists of one or more points (in the current coordinate system) and a drawing command that defines how those points are interpreted.
Each set of connected line and curve segments form what is referred to as a subpath. The end of one line or curve segment in a subpath defines the beginning of the next. A single UIBezierPath object may contain one or more subpaths that define the overall path, separated by moveToPoint: commands that effectively raise the drawing pen and move it to a new location.
The processes for building and using a path object are separate. Building the path is the first process and involves the following steps:
Create the path object.
Set any relevant drawing attributes of your
UIBezierPathobject, such as thelineWidthorlineJoinStyleproperties for stroked paths or theusesEvenOddFillRuleproperty for filled paths. These drawing attributes apply to the entire path.Set the starting point of the initial segment using the
moveToPoint:method.Add line and curve segments to define a subpath.
Optionally, close the subpath by calling
closePath, which draws a straight line segment from the end of the last segment to the beginning of the first.Optionally, repeat the steps 3, 4, and 5 to define additional subpaths.
When building your path, you should arrange the points of your path relative to the origin point (0, 0). Doing so makes it easier to move the path around later. During drawing, the points of your path are applied as-is to the coordinate system of the current graphics context. If your path is oriented relative to the origin, all you have to do to reposition it is apply an affine transform with a translation factor to the current graphics context. The advantage of modifying the graphics context (as opposed to the path object itself) is that you can easily undo the transformation by saving and restoring the graphics state.
To draw your path object, you use the stroke and fill methods. These methods render the line and curve segments of your path in the current graphics context. The rendering process involves rasterizing the line and curve segments using the attributes of the path object. The rasterization process does not modify the path object itself. As a result, you can render the same path object multiple times in the current context or in another context.
Adding Lines and Polygons to Your Path
Lines and polygons are simple shapes that you build point-by-point using the moveToPoint: and addLineToPoint: methods. The moveToPoint: method sets the starting point of the shape you want to create. From that point, you create the lines of the shape using the addLineToPoint: method. You create the lines in succession, with each line being formed between the previous point and the new point you specify.
Listing 2-1 shows the code needed to create a pentagon shape using individual line segments. (Figure 2-1 shows the result of drawing this shape with appropriate stroke and fill color settings, as described in Rendering the Contents of a Bézier Path Object.) This code sets the initial point of the shape and then adds four connected line segments. The fifth segment is added by the call to the closePath method, which connects the last point (0, 40) with the first point (100, 0).
Listing 2-1 Creating a pentagon shape
UIBezierPath *aPath = [UIBezierPath bezierPath]; |
// Set the starting point of the shape. |
[aPath moveToPoint:CGPointMake(100.0, 0.0)]; |
// Draw the lines. |
[aPath addLineToPoint:CGPointMake(200.0, 40.0)]; |
[aPath addLineToPoint:CGPointMake(160, 140)]; |
[aPath addLineToPoint:CGPointMake(40.0, 140)]; |
[aPath addLineToPoint:CGPointMake(0.0, 40.0)]; |
[aPath closePath]; |
UIBezierPath class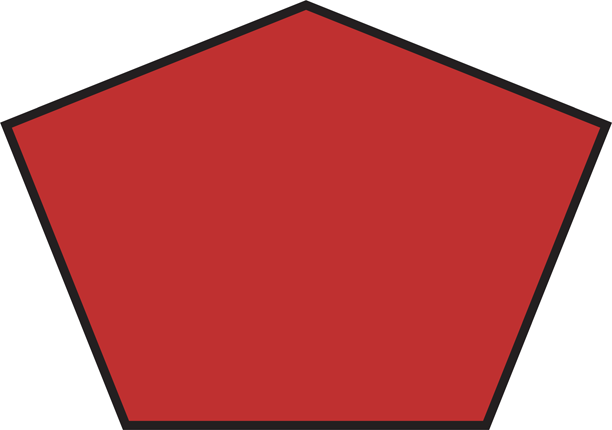
Using the closePath method not only ends the subpath describing the shape, it also draws a line segment between the first and last points. This is a convenient way to finish a polygon without having to draw the final line.
Adding Arcs to Your Path
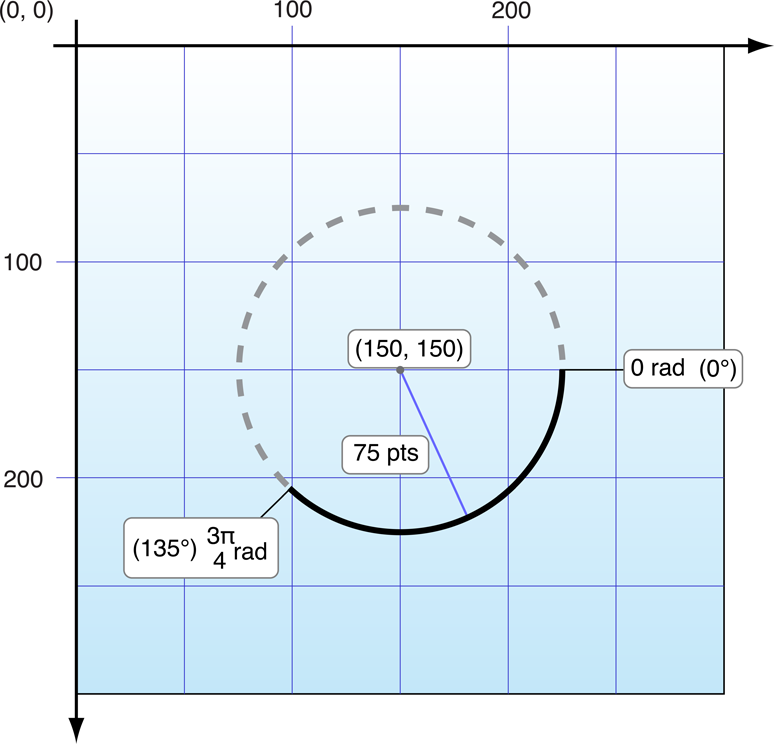
The UIBezierPath class provides support for initializing a new path object with an arc segment. The parameters of the bezierPathWithArcCenter:radius:startAngle:endAngle:clockwise: method define the circle that contains the desired arc and the start and end points of the arc itself. Figure 2-2 shows the components that go into creating an arc, including the circle that defines the arc and the angle measurements used to specify it. In this case, the arc is created in the clockwise direction. (Drawing the arc in the counterclockwise direction would paint the dashed portion of the circle instead.) The code for creating this arc is shown in Listing 2-2.
Listing 2-2 Creating a new arc path
// pi is approximately equal to 3.14159265359. |
#define DEGREES_TO_RADIANS(degrees) ((pi * degrees)/ 180) |
- (UIBezierPath *)createArcPath |
{ |
UIBezierPath *aPath = [UIBezierPath bezierPathWithArcCenter:CGPointMake(150, 150) |
radius:75 |
startAngle:0 |
endAngle:DEGREES_TO_RADIANS(135) |
clockwise:YES]; |
return aPath; |
} |
If you want to incorporate an arc segment into the middle of a path, you must modify the path object’s CGPathRef data type directly. For more information about modifying the path using Core Graphics functions, see Modifying the Path Using Core Graphics Functions.
Adding Curves to Your Path
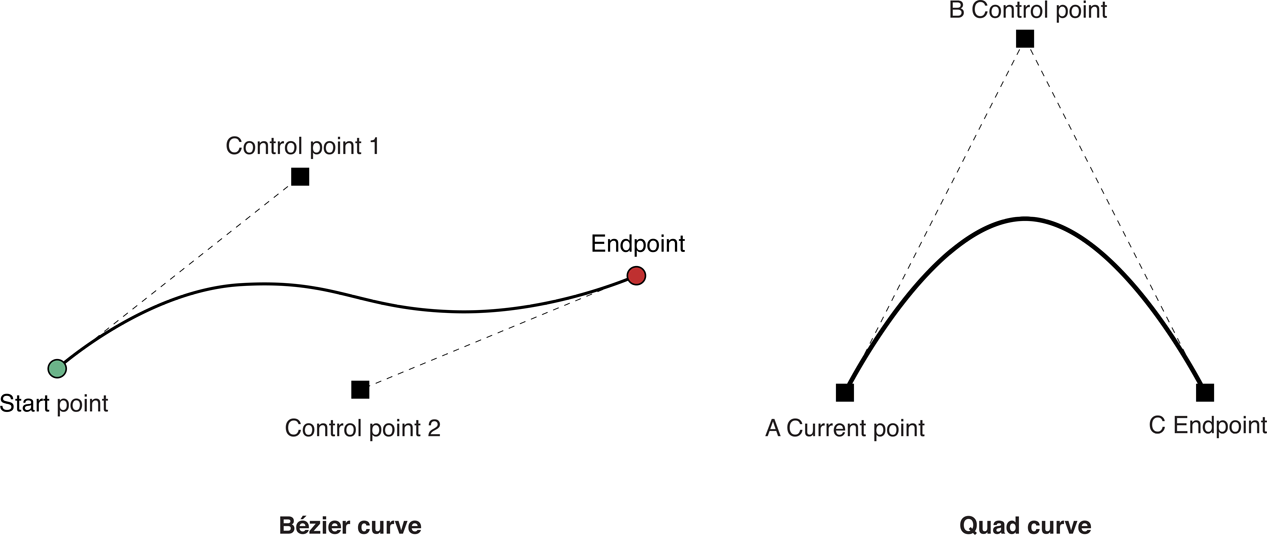
The UIBezierPath class provides support for adding cubic and quadratic Bézier curves to a path. Curve segments start at the current point and end at the point you specify. The shape of the curve is defined using tangent lines between the start and end points and one or more control points. Figure 2-3 shows approximations of both types of curve and the relationship between the control points and the shape of the curve. The exact curvature of each segment involves a complex mathematical relationship between all of the points and is well documented online and at Wikipedia.
To add curves to a path, you use the following methods:
Cubic curve:
addCurveToPoint:controlPoint1:controlPoint2:Quadratic curve:
addQuadCurveToPoint:controlPoint:
Because curves rely on the current point of the path, you must set the current point before calling either of the preceding methods. Upon completion of the curve, the current point is updated to the new end point you specified.
Creating Oval and Rectangular Paths
Ovals and rectangles are common types of paths that are built using a combination of curve and line segments. The UIBezierPath class includes the bezierPathWithRect: and bezierPathWithOvalInRect: convenience methods for creating paths with oval or rectangular shapes. Both of these methods create a new path object and initialize it with the specified shape. You can use the returned path object right away or add more shapes to it as needed.
If you want to add a rectangle to an existing path object, you must do so using the moveToPoint:, addLineToPoint:, and closePath methods as you would for any other polygon. Using the closePath method for the final side of the rectangle is a convenient way to add the final line of the path and also mark the end of the rectangle subpath.
If you want to add an oval to an existing path, the simplest way to do so is to use Core Graphics. Although you can use the addQuadCurveToPoint:controlPoint: to approximate an oval surface, the CGPathAddEllipseInRect function is much simpler to use and more accurate. For more information, see Modifying the Path Using Core Graphics Functions.
Modifying the Path Using Core Graphics Functions
The UIBezierPath class is really just a wrapper for a CGPathRef data type and the drawing attributes associated with that path. Although you normally add line and curve segments using the methods of the UIBezierPath class, the class also exposes a CGPath property that you can use to modify the underlying path data type directly. You can use this property when you would prefer to build your path using the functions of the Core Graphics framework.
There are two ways to modify the path associated with a UIBezierPath object. You can modify the path entirely using Core Graphics functions, or you can use a mixture of Core Graphics functions and UIBezierPath methods. Modifying the path entirely using Core Graphics calls is easier in some ways. You create a mutable CGPathRef data type and call whatever functions you need to modify its path information. When you are done you assign your path object to the corresponding UIBezierPath object, as shown in Listing 2-3.
Listing 2-3 Assigning a new CGPathRef to a UIBezierPath object
// Create the path data. |
CGMutablePathRef cgPath = CGPathCreateMutable(); |
CGPathAddEllipseInRect(cgPath, NULL, CGRectMake(0, 0, 300, 300)); |
CGPathAddEllipseInRect(cgPath, NULL, CGRectMake(50, 50, 200, 200)); |
// Now create the UIBezierPath object. |
UIBezierPath *aPath = [UIBezierPath bezierPath]; |
aPath.CGPath = cgPath; |
aPath.usesEvenOddFillRule = YES; |
// After assigning it to the UIBezierPath object, you can release |
// your CGPathRef data type safely. |
CGPathRelease(cgPath); |
If you choose to use a mixture of Core Graphics functions and UIBezierPath methods, you must carefully move the path information back and forth between the two. Because a UIBezierPath object owns its underlying CGPathRef data type, you cannot simply retrieve that type and modify it directly. Instead, you must make a mutable copy, modify the copy, and then assign the copy back to the CGPath property as shown in Listing 2-4.
Listing 2-4 Mixing Core Graphics and UIBezierPath calls
UIBezierPath *aPath = [UIBezierPath bezierPathWithOvalInRect:CGRectMake(0, 0, 300, 300)]; |
// Get the CGPathRef and create a mutable version. |
CGPathRef cgPath = aPath.CGPath; |
CGMutablePathRef mutablePath = CGPathCreateMutableCopy(cgPath); |
// Modify the path and assign it back to the UIBezierPath object. |
CGPathAddEllipseInRect(mutablePath, NULL, CGRectMake(50, 50, 200, 200)); |
aPath.CGPath = mutablePath; |
// Release both the mutable copy of the path. |
CGPathRelease(mutablePath); |
Rendering the Contents of a Bézier Path Object
After creating a UIBezierPath object, you can render it in the current graphics context using its stroke and fill methods. Before you call these methods, though, there are usually a few other tasks to perform to ensure your path is drawn correctly:
Set the desired stroke and fill colors using the methods of the
UIColorclass.Position the shape where you want it in the target view.
If you created your path relative to the point (0, 0), you can apply an appropriate affine transform to the current drawing context. For example, to draw your shape starting at the point (10, 10), you would call the
CGContextTranslateCTMfunction and specify10for both the horizontal and vertical translation values. Adjusting the graphics context (as opposed to the points in the path object) is preferred because you can undo the change more easily by saving and restoring the previous graphics state.Update the drawing attributes of the path object. The drawing attributes of your
UIBezierPathinstance override the values associated with the graphics context when rendering the path.
Listing 2-5 shows a sample implementation of a drawRect: method that draws an oval in a custom view. The upper-left corner of the oval’s bounding rectangle is located at the point (50, 50) in the view’s coordinate system. Because fill operations paint right up to the path boundary, this method fills the path before stroking it. This prevents the fill color from obscuring half of the stroked line.
Listing 2-5 Drawing a path in a view
- (void)drawRect:(CGRect)rect |
{ |
// Create an oval shape to draw. |
UIBezierPath *aPath = [UIBezierPath bezierPathWithOvalInRect: |
CGRectMake(0, 0, 200, 100)]; |
// Set the render colors. |
[[UIColor blackColor] setStroke]; |
[[UIColor redColor] setFill]; |
CGContextRef aRef = UIGraphicsGetCurrentContext(); |
// If you have content to draw after the shape, |
// save the current state before changing the transform. |
//CGContextSaveGState(aRef); |
// Adjust the view's origin temporarily. The oval is |
// now drawn relative to the new origin point. |
CGContextTranslateCTM(aRef, 50, 50); |
// Adjust the drawing options as needed. |
aPath.lineWidth = 5; |
// Fill the path before stroking it so that the fill |
// color does not obscure the stroked line. |
[aPath fill]; |
[aPath stroke]; |
// Restore the graphics state before drawing any other content. |
//CGContextRestoreGState(aRef); |
} |
Doing Hit-Detection on a Path
To determine whether a touch event occurred on the filled portion of a path, you can use the containsPoint: method of UIBezierPath. This method tests the specified point against all closed subpaths in the path object and returns YES if it lies on or inside any of those subpaths.
If you want to do hit-testing on the stroked portion of the path (instead of the fill area), you must use Core Graphics. The CGContextPathContainsPoint function lets you test points on either the fill or stroke portion of the path currently assigned to the graphics context. Listing 2-6 shows a method that tests to see whether the specified point intersects the specified path. The inFill parameter lets the caller specify whether the point should be tested against the filled or stroked portion of the path. The path passed in by the caller must contain one or more closed subpaths for the hit detection to succeed.
Listing 2-6 Testing points against a path object
- (BOOL)containsPoint:(CGPoint)point onPath:(UIBezierPath *)path inFillArea:(BOOL)inFill |
{ |
CGContextRef context = UIGraphicsGetCurrentContext(); |
CGPathRef cgPath = path.CGPath; |
BOOL isHit = NO; |
// Determine the drawing mode to use. Default to |
// detecting hits on the stroked portion of the path. |
CGPathDrawingMode mode = kCGPathStroke; |
if (inFill) |
{ |
// Look for hits in the fill area of the path instead. |
if (path.usesEvenOddFillRule) |
mode = kCGPathEOFill; |
else |
mode = kCGPathFill; |
} |
// Save the graphics state so that the path can be |
// removed later. |
CGContextSaveGState(context); |
CGContextAddPath(context, cgPath); |
// Do the hit detection. |
isHit = CGContextPathContainsPoint(context, point, mode); |
CGContextRestoreGState(context); |
return isHit; |
} |
Copyright © 2012 Apple Inc. All Rights Reserved. Terms of Use | Privacy Policy | Updated: 2012-09-19