Retired Document
Important: This document describes an older version of Objective-C and has not been updated to the current version. Developers learning Objective-C should instead refer to Programming with Objective-C.
Defining a Class
Much of object-oriented programming consists of writing the code for new objects—defining new classes. In Objective-C, classes are defined in two parts:
An interface that declares the methods and properties of the class and names its superclass
An implementation that actually defines the class (contains the code that implements its methods)
Each of these parts is typically in its own file. Sometimes, however, a class definition spans several files through the use of a feature called a category. Categories can compartmentalize a class definition or extend an existing one. Categories are described in Categories and Extensions.
Source Files
Although the compiler doesn’t require it, class interface and implementation are usually in two different files. The interface file must be made available to anyone who uses the class.
A single file can declare or implement more than one class. Nevertheless, it’s customary to have a separate interface file for each class, if not also a separate implementation file. Keeping class interfaces separate better reflects their status as independent entities.
Interface and implementation files typically are named after the class. The name of the implementation file has the .m extension, indicating that it contains Objective-C source code. The interface file can be assigned any other extension. Because it’s included in other source files, the name of the interface file usually has the .h extension typical of header files. For example, the Rectangle class would be declared in Rectangle.h and defined in Rectangle.m.
Separating an object’s interface from its implementation fits well with the design of object-oriented programs. An object is a self-contained entity that can be viewed from the outside almost as a black box. Once you’ve determined how an object interacts with other elements in your program—that is, once you’ve declared its interface—you can freely alter its implementation without affecting any other part of the application.
Class Interface
The declaration of a class interface begins with the compiler directive @interface and ends with the directive @end. (All Objective-C directives to the compiler begin with “@”.)
@interface ClassName : ItsSuperclass |
// Method and property declarations. |
@end |
The first line of the declaration presents the new class name and links it to its superclass. The superclass defines the position of the new class in the inheritance hierarchy, as discussed under Inheritance.
Methods and properties for the class are declared next, before the end of the class declaration. The names of methods that can be used by class objects, class methods, are preceded by a plus sign:
+ alloc; |
The methods that instances of a class can use, instance methods, are marked with a minus sign:
- (void)display; |
Although it’s not a common practice, you can define a class method and an instance method with the same name. A method can also have the same name as an instance variable, which is more common, especially if the method returns the value in the variable. For example, Circle has a radius method that could match a radius instance variable.
Method return types are declared using the standard C syntax for casting one type to another:
- (float)radius; |
Parameter types are declared in the same way:
- (void)setRadius:(float)aRadius; |
If a return or parameter type isn’t explicitly declared, it’s assumed to be the default type for methods and messages—an id. The alloc method illustrated earlier returns id.
When there’s more than one parameter, the parameters are declared within the method name after the colons. Parameters break the name apart in the declaration, just as in a message. For example:
- (void)setWidth:(float)width height:(float)height; |
Methods that take a variable number of parameters declare them using a comma and ellipsis points, just as a function would:
- makeGroup:group, ...; |
Property declarations take the form:
@property (attributes) Type propertyName; |
Properties are discussed in more detail in Declared Properties.
Importing the Interface
The interface file must be included in any source module that depends on the class interface—that includes any module that creates an instance of the class, sends a message to invoke a method declared for the class, or mentions an instance variable declared in the class. The interface is usually included with the #import directive:
#import "Rectangle.h" |
This directive is identical to #include, except that it makes sure that the same file is never included more than once. It’s therefore preferred and is used in place of #include in code examples throughout Objective-C–based documentation.
To reflect the fact that a class definition builds on the definitions of inherited classes, an interface file begins by importing the interface for its superclass:
#import "ItsSuperclass.h" |
@interface ClassName : ItsSuperclass |
// Method and property declarations. |
@end |
This convention means that every interface file includes, indirectly, the interface files for all inherited classes. When a source module imports a class interface, it gets interfaces for the entire inheritance hierarchy that the class is built upon.
Note that if there is a precomp—a precompiled header—that supports the superclass, you may prefer to import the precomp instead.
Referring to Other Classes
An interface file declares a class and, by importing its superclass, implicitly contains declarations for all inherited classes, from NSObject on down through its superclass. If the interface mentions classes not in this hierarchy, it must import them explicitly or declare them with the @class directive:
@class Rectangle, Circle; |
This directive simply informs the compiler that “Rectangle” and “Circle” are class names. It doesn’t import their interface files.
An interface file mentions class names when it statically types instance variables, return values, and parameters. For example, this declaration
- (void)setPrimaryColor:(NSColor *)aColor; |
mentions the NSColor class.
Because declarations like this simply use the class name as a type and don’t depend on any details of the class interface (its methods and instance variables), the @class directive gives the compiler sufficient forewarning of what to expect. However, when the interface to a class is actually used (instances created, messages sent), the class interface must be imported. Typically, an interface file uses @class to declare classes, and the corresponding implementation file imports their interfaces (since it needs to create instances of those classes or send them messages).
The @class directive minimizes the amount of code seen by the compiler and linker, and is therefore the simplest way to give a forward declaration of a class name. Being simple, it avoids potential problems that may come with importing files that import still other files. For example, if one class declares a statically typed instance variable of another class, and their two interface files import each other, neither class may compile correctly.
The Role of the Interface
The purpose of the interface file is to declare the new class to other source modules (and to other programmers). It contains information they need to work with the class (programmers might also appreciate a little documentation).
The interface file tells users how the class is connected into the inheritance hierarchy and what other classes—inherited or simply referred to somewhere in the class—are needed.
Through its list of method declarations, the interface file lets other modules know what messages can be sent to the class object and instances of the class. Every method that can be used outside the class definition is declared in the interface file; methods that are internal to the class implementation can be omitted.
Class Implementation
The definition of a class is structured very much like its declaration. It begins with an @implementation directive and ends with the @end directive. In addition, the class may declare instance variables in braces after the @implementation directive:
@implementation ClassName |
{ |
// Instance variable declarations. |
} |
// Method definitions. |
@end |
Instance variables are often specified by declared properties (see Declared Properties). If you don’t declare additional instance variables, you can omit the braces:
@implementation ClassName |
// Method definitions. |
@end |
Methods for a class are defined, like C functions, within a pair of braces. Before the braces, they’re declared in the same manner as in the interface file, but without the semicolon. For example:
+ (id)alloc { |
... |
} |
- (BOOL)isFilled { |
... |
} |
- (void)setFilled:(BOOL)flag { |
... |
} |
Methods that take a variable number of parameters handle them just as a function would:
#import <stdarg.h> |
... |
- getGroup:group, ... { |
va_list ap; |
va_start(ap, group); |
... |
} |
Referring to Instance Variables
By default, the definition of an instance method has all the instance variables of the object within its scope. It can refer to them simply by name. Although the compiler creates the equivalent of C structures to store instance variables, the exact nature of the structure is hidden. You don’t need either of the structure operators (. or ->) to refer to an object’s data. For example, this method definition refers to the receiver’s filled instance variable:
- (void)setFilled:(BOOL)flag |
{ |
filled = flag; |
... |
} |
Neither the receiving object nor its filled instance variable is declared as a parameter to this method, yet the instance variable falls within its scope. This simplification of method syntax is a significant shorthand in the writing of Objective-C code.
When the instance variable belongs to an object that’s not the receiver, the object’s type must be made explicit to the compiler through static typing. In referring to the instance variable of a statically typed object, the structure pointer operator (->) is used.
Suppose, for example, that the Sibling class declares a statically typed object, twin, as an instance variable:
@interface Sibling : NSObject |
{ |
Sibling *twin; |
int gender; |
struct features *appearance; |
} |
As long as the instance variables of the statically typed object are within the scope of the class (as they are here because twin is typed to the same class), a Sibling method can set them directly:
- makeIdenticalTwin |
{ |
if ( !twin ) { |
twin = [[Sibling alloc] init]; |
twin->gender = gender; |
twin->appearance = appearance; |
} |
return twin; |
} |
The Scope of Instance Variables
To enforce the ability of an object to hide its data, the compiler limits the scope of instance variables—that is, limits their visibility within the program. But to provide flexibility, it also lets you explicitly set the scope at four levels. Each level is marked by a compiler directive:
Figure 2-1 illustrates the levels of scoping.
@package scope not shown)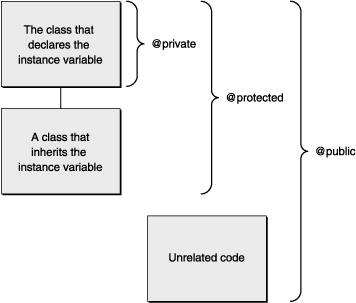
A scoping directive applies to all the instance variables listed after it, up to the next directive or the end of the list. In the following example, the age and evaluation instance variables are private; name, job, and wage are protected; and boss is public.
@interface Worker : NSObject |
{ |
char *name; |
@private |
int age; |
char *evaluation; |
@protected |
id job; |
float wage; |
@public |
id boss; |
} |
By default, all unmarked instance variables (like name above) are @protected.
All instance variables that a class declares, no matter how they’re marked, are within the scope of the class definition. For example, a class that declares a job instance variable, such as the Worker class shown above, can refer to it in a method definition:
- promoteTo:newPosition |
{ |
id old = job; |
job = newPosition; |
return old; |
} |
Obviously, if a class couldn’t access its own instance variables, the instance variables would be of no use whatsoever.
Normally, a class also has access to the instance variables it inherits. The ability to refer to an instance variable is usually inherited along with the variable. It makes sense for classes to have their entire data structures within their scope, especially if you think of a class definition as merely an elaboration of the classes it inherits from. The promoteTo: method illustrated earlier could just as well have been defined in any class that inherits the job instance variable from the Worker class.
However, there are reasons why you might want to restrict inheriting classes from directly accessing an instance variable:
Once a subclass accesses an inherited instance variable, the class that declares the variable is tied to that part of its implementation. In later versions, it can’t eliminate the variable or alter the role it plays without inadvertently breaking the subclass.
Moreover, if a subclass accesses an inherited instance variable and alters its value, it may inadvertently introduce bugs in the class that declares the variable, especially if the variable is involved in class-internal dependencies.
To limit an instance variable’s scope to just the class that declares it, you must mark it @private. Instance variables marked @private are only available to subclasses by calling public accessor methods, if they exist.
At the other extreme, marking a variable @public makes it generally available, even outside of class definitions that inherit or declare the variable. Normally, to get information stored in an instance variable, other objects must send a message requesting it. However, a public instance variable can be accessed anywhere as if it were a field in a C structure. For example:
Worker *ceo = [[Worker alloc] init]; |
ceo->boss = nil; |
Note that the object must be statically typed.
Marking instance variables @public defeats the ability of an object to hide its data. It runs counter to a fundamental principle of object-oriented programming—the encapsulation of data within objects where it’s protected from view and inadvertent error. Public instance variables should therefore be avoided except in extraordinary cases.
Messages to self and super
Objective-C provides two terms that can be used within a method definition to refer to the object that performs the method—self and super.
Suppose, for example, that you define a reposition method that needs to change the coordinates of whatever object it acts on. It can invoke the setOrigin:: method to make the change. All it needs to do is send a setOrigin:: message to the same object that the reposition message itself was sent to. When you’re writing the reposition code, you can refer to that object as either self or super. The reposition method could read either:
- reposition |
{ |
... |
[self setOrigin:someX :someY]; |
... |
} |
or:
- reposition |
{ |
... |
[super setOrigin:someX :someY]; |
... |
} |
Here, self and super both refer to the object receiving a reposition message, whatever object that may happen to be. The two terms are quite different, however. self is one of the hidden parameters that the messaging routine passes to every method; it’s a local variable that can be used freely within a method implementation, just as the names of instance variables can be. super is a term that substitutes for self only as the receiver in a message expression. As receivers, the two terms differ principally in how they affect the messaging process:
selfsearches for the method implementation in the usual manner, starting in the dispatch table of the receiving object’s class. In the example above, it would begin with the class of the object receiving the reposition message.superis a flag that tells the compiler to search for the method implementation in a very different place. It begins in the superclass of the class that defines the method wheresuperappears. In the example above, it would begin with the superclass of the class where reposition is defined.
Wherever super receives a message, the compiler substitutes another messaging routine for the objc_msgSend function. The substitute routine looks directly to the superclass of the defining class—that is, to the superclass of the class sending the message to super—rather than to the class of the object receiving the message.
An Example: Using self and super
The difference between self and super becomes clear when using a hierarchy of three classes. Suppose, for example, that we create an object belonging to a class called Low. The superclass of Low is Mid; the superclass of Mid is High. All three classes define a method called negotiate, which each class uses for its own purpose. In addition, Mid defines an ambitious method called makeLastingPeace, which itself employs the negotiate method. The classes and those methods are illustrated in Figure 2-2.
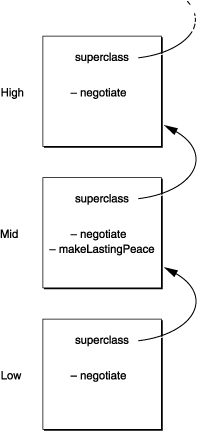
Suppose that the implementation of makeLastingPeace (in the Mid class) uses self to indicate the object to send the negotiate message to:
- makeLastingPeace |
{ |
[self negotiate]; |
... |
} |
When a message is sent to a Low object to perform the makeLastingPeace method, makeLastingPeace sends a negotiate message to the same Low object. The messaging routine finds the version of negotiate defined in Low, the class of self.
However, if the implementation of makeLastingPeace instead uses super as the receiver,
- makeLastingPeace |
{ |
[super negotiate]; |
... |
} |
the messaging routine finds the version of negotiate defined in High. It ignores the class (Low) of the object that received the makeLastingPeace message and skips to the superclass of Mid, because Mid is where makeLastingPeace is defined. Neither implementation finds the Mid version of negotiate.
As this example illustrates, super provides a way to bypass a method that overrides another method. Here, the use of super enabled makeLastingPeace to bypass the Mid version of negotiate that redefined the High version of that method.
Not being able to reach the Mid version of negotiate, as just described, may seem like a flaw, but under the circumstances it’s intentional:
The author of the
Lowclass intentionally overrode theMidversion ofnegotiateso that instances ofLow(and its subclasses) would invoke the redefined version of the method instead. The designer ofLowdidn’t wantLowobjects to perform the inherited method.The author of the
MidmethodmakeLastingPeace, in sending thenegotiatemessage tosuper(as shown in the second implementation), intentionally skipped over theMidversion ofnegotiate(and over any versions that might be defined in classes likeLowthat inherit fromMid) to perform the version defined in theHighclass. The designer of the second implementation ofmakeLastingPeacewanted to use theHighversion ofnegotiateand no other.
The Mid version of negotiate could still be used, but it would take a direct message to a Mid instance to do so.
Using super
Messages to super allow method implementations to be distributed over more than one class. You can override an existing method to modify or add to it and still incorporate the original method in the modification:
- negotiate |
{ |
... |
return [super negotiate]; |
} |
For some tasks, each class in the inheritance hierarchy can implement a method that does part of the job and passes the message on to super for the rest. The init method, which initializes a newly allocated instance, is designed to work like this. Each init method has responsibility for initializing the instance variables defined in its class. But before doing so, it sends an init message to super to have the classes it inherits from initialize their instance variables. Each version of init follows this procedure, so classes initialize their instance variables in the order of inheritance:
- (id)init |
{ |
self = [super init]; |
if (self) { |
... |
} |
} |
It’s also possible to concentrate core functionality in one method defined in a superclass and have subclasses incorporate the method through messages to super. For example, every class method that creates an instance must allocate storage for the new object and initialize its isa variable to the class structure. Allocation is typically left to the alloc and allocWithZone: methods defined in the NSObject class. If another class overrides these methods (a rare case), it can still get the basic functionality by sending a message to super.
Redefining self
super is simply a flag to the compiler telling it where to begin searching for the method to perform; it’s used only as the receiver of a message. But self is a variable name that can be used in any number of ways, even assigned a new value.
There’s a tendency to do just that in definitions of class methods. Class methods are often concerned not with the class object, but with instances of the class. For example, many class methods combine allocation and initialization of an instance, often setting up instance variable values at the same time. In such a method, it might be tempting to send messages to the newly allocated instance and to call the instance self, just as in an instance method. But that would be an error. self and super both refer to the receiving object—the object that gets a message telling it to perform the method. Inside an instance method, self refers to the instance; but inside a class method, self refers to the class object. This is an example of what not to do:
+ (Rectangle *)rectangleOfColor:(NSColor *) color |
{ |
self = [[Rectangle alloc] init]; // BAD |
[self setColor:color]; |
return self; |
} |
To avoid confusion, it’s usually better to use a variable other than self to refer to an instance inside a class method:
+ (id)rectangleOfColor:(NSColor *)color |
{ |
id newInstance = [[Rectangle alloc] init]; // GOOD |
[newInstance setColor:color]; |
return newInstance; |
} |
In fact, rather than sending the alloc message to the class in a class method, it’s often better to send alloc to self. This way, if the class is subclassed, and the rectangleOfColor: message is received by a subclass, the instance returned is the same type as the subclass (for example, the array method of NSArray is inherited by NSMutableArray).
+ (id)rectangleOfColor:(NSColor *)color |
{ |
id newInstance = [[self alloc] init]; // EXCELLENT |
[newInstance setColor:color]; |
return newInstance; |
} |
See Creating and Initializing Objects for more information about implementing initializer and related methods.
Copyright © 2013 Apple Inc. All Rights Reserved. Terms of Use | Privacy Policy | Updated: 2013-04-23