Document-Based Application Preflight
For most developers, making a document-based application doesn’t require much more effort than making an application that isn’t document based. The basic difference is that you must create a custom subclass of UIDocument and then manage a document through the phases of its runtime life, including its integration with iCloud storage. This chapter outlines those document-specific tasks performed by most applications and describes the general steps for creating and configuring a document-based application project in iOS.
What You Must Do to Make a Document-Based Application
To create a document-based application, you should complete the following tasks:
Create a custom subclass of
UIDocumentthat provides the UIKit framework with a snapshot of document data and that initializes the document’s model objects from the contents of the document file.Creating a Custom Document Object describes the required method overrides and, if document data is to be stored as a file package, explains how to go about using
NSFileWrapperobjects for document data.Allow users to create new documents and select and open existing ones. You should also implement the complementary tasks of closing documents and deleting selected documents.
Note that the follow-on task to creating or opening a document is displaying the document’s content in a view.
Creating a New Document, Opening and Closing a Document, and Deleting a Document describe the requirements and procedures for these tasks. These discussions also include examples of managing the display of document data.
Implement undo management or change tracking to enable the automatic saving of document data (saveless model).
See Change Tracking and Undo Operations for details.
Put documents—typically those selected by users—into iCloud storage. Also remove documents from iCloud storage when users request this.
Moving Documents to and from iCloud Storage discusses these procedures.
Observe notifications of changes in document state and, if an error occurs, respond appropriately.
Monitoring Document-State Changes and Handling Errors describes the general procedure for doing this.
If conflicts between different versions of a document occur, notify the user and offer ways to resolve the conflicts.
Resolving Document Version Conflicts describes how to notify users of version conflicts and discusses strategies for resolving these conflicts.
You can also add extra features to your document-based application, such as the capability for printing the document, spell-checking it, or emailing it to others.
If your application has advanced requirements—for example, incremental reading and writing of large document files or dealing with document-data formats other than the supported ones—see UIDocument Class Reference. All of these advanced tasks involve overriding UIDocument methods.
Creating and Configuring the Project
When you create the Xcode project for your document-based application, choose a suitable template. (Note that there is no template specifically for document-based applications.) Generally, you want the first view of the application to be one in which users can choose existing documents and create new ones. Because the Master-Detail Xcode template is suitable for this purpose, it is used in the code examples throughout this document. This template gives you an initial table view for the iPhone and a split view for the iPad. Your project should use a storyboard, so be sure to select this option.
Based on the design for your application (see Designing a Document-Based Application), create the view-controller subclasses that your application requires. All you need are minimally declared header and source files at this point. Then, create the user interface of your application in the project storyboard (or storyboards, if yours is a universal application); associate your custom view controllers with the view-controller placeholders in the storyboard.
Next, you need to configure the project for documents by specifying, in the Xcode target settings, the type or types of the documents that the application knows about.
How iOS Identifies Your Application’s Documents
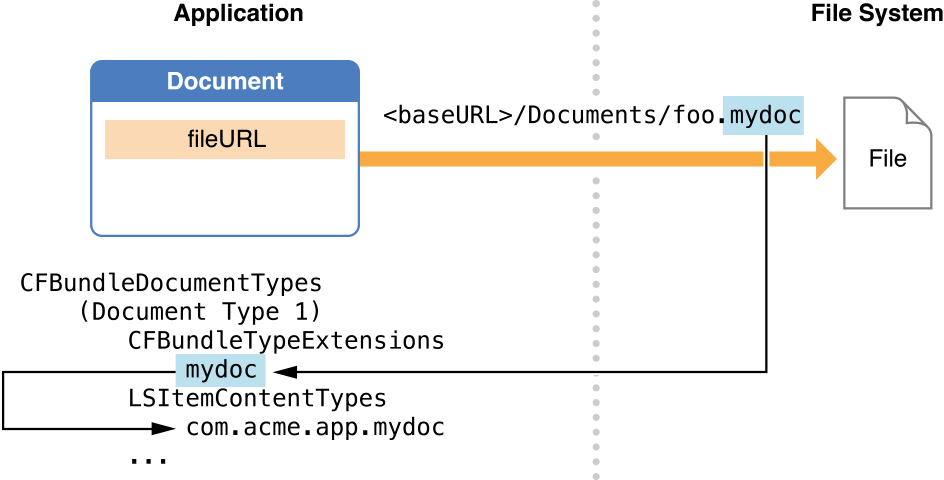
The most important attribute of a document object in iOS is its file URL (fileURL). The file URL is important, among other reasons, because it tells iOS which applications understand the document’s format. The file URL ends with an extension (for example, html) and this extension is matched with a Uniform Type Identifier (for example, public.html). The Uniform Type Identifier (UTI) is the principal identifier of document type. Using the extension, UIDocument looks up the document-type UTI (as shown in Figure 2-1) and assigns it to the fileType property. Unlike document-based applications in OSX, those in iOS don’t need to associate the UIDocument subclass with the document type.
A document-type UTI can be defined by the system; see System-Declared Uniform Type Identifiers in Uniform Type Identifiers Reference for a list of these common identifiers. A document-based application can also define its own proprietary UTI for its documents (and often does). If it does declare a custom UTI, it must also export that UTI to make the operating system aware of it.
Declare a Document Type
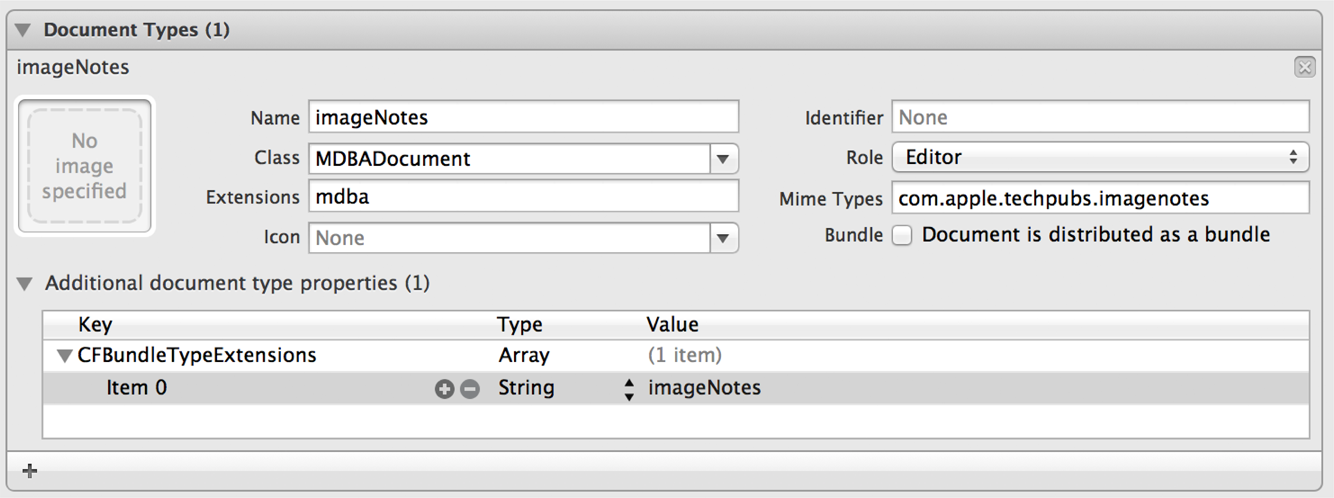
To declare a document type in Xcode, start by clicking the Add button in the target’s Info settings and choose Add Document Type from the pop-up menu. Click the triangle next to Untitled to disclose the property fields and add the properties in Table 2-1.
Key | Xcode field | Value and comments |
|---|---|---|
| Types | An array of UTI strings. Only one is typically specified per document type. |
| Name | An optional name for the document type. |
| Icon | An array of paths to icon image files in the application bundle. |
| In “Additional document type properties” table. | An array of filename extensions paired with the document UTI. |
| In “Additional document type properties” table. |
|
| In “Additional document type properties” table. | If document data is stored in a file package, set this property to |
For more information about these keys, see CFBundleDocumentTypes in Information Property List Key Reference.
When you have finished entering the properties for a document type, The Document Types area of Xcode should look similar to the example in Figure 2-2.
An application could have multiple types of documents—for example, a word-processing application could have a type for regular (blank) documents and another type for pre-formatted documents. For each type, you need to go through the procedure given above .
Exporting the Document UTI
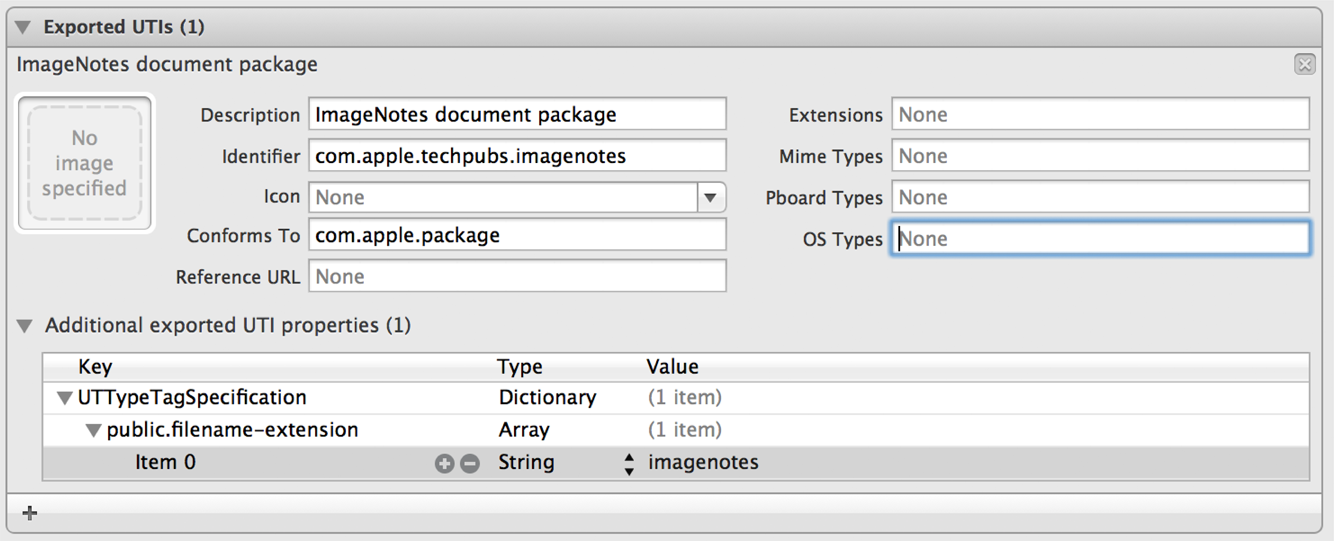
If you define a custom UTI for your documents, you must also export it. To export a document type in Xcode, start by clicking the Add button in the target’s Info settings and choose Add Exported UTI from the pop-up menu. Click the triangle next to Untitled to disclose the property fields and add the properties in Table 2-2.
Key | Xcode field | Value and comments |
|---|---|---|
| Identifier | The custom document UTI, a string. |
| Conforms to | The UTI that the custom document UTI conforms to. If the data representation is a file package, specify |
| Description | Description of the exported type (optional). |
| In “Additional exported UTI properties” table. | Create an array named |
For more information about these keys, see CFBundleDocumentTypes in Information Property List Key Reference.
When you have finished entering the properties for a document type, The Exported UTIs area of Xcode should look similar to the example in Figure 2-3.
Copyright © 2012 Apple Inc. All Rights Reserved. Terms of Use | Privacy Policy | Updated: 2012-09-19