Providing Directions
Using Map Kit support for map-based directions, an app can:
Ask the Maps app to display directions to the user
Register as a routing app and provide point-to-point, turn-based directions to Maps and other apps on the user’s device (iOS only)
Get general-purpose directions information
In OS X v10.9 and iOS 7.0 and later, Map Kit includes the MKDirections API, which provides route-based directions data from Apple servers. An app can use the MKDirections API to enhance its route or directions information by adding step-by-step walking or driving directions, travel time estimates, alternate routes, and other information.
To use the features of the Map Kit framework, you must turn on the Maps capability in the Xcode Scheme Editor.
Asking the Maps App to Display Directions
Map Kit enables you to display specific map locations or turn-by-turn directions using the Maps app. This support allows apps to use the Maps app in situations where you might not want to display the map data yourself. For example, if your app doesn’t have its own turn-by-turn navigation services, you can ask Maps to provide the information for you.
To generate a direction request, use the openMapsWithItems:launchOptions: or openInMapsWithLaunchOptions: method of MKMapItem. These methods let you send map items to the Maps app so that it can display them. If you include the MKLaunchOptionsDirectionsModeKey key with the launch options you pass to these methods, Maps displays directions between the start and end map items you provide.
Listing 7-1 shows a method that opens the specified region in the Maps app and centers the map on its location. You use the launchOptions parameter of the openMapsWithItems:launchOptions: method to specify the map region you want to display.
Listing 7-1 Displaying a location in the Maps app
- (void)displayRegionCenteredOnMapItem:(MKMapItem*)from { |
CLLocation* fromLocation = from.placemark.location; |
// Create a region centered on the starting point with a 10km span |
MKCoordinateRegion region = MKCoordinateRegionMakeWithDistance(fromLocation.coordinate, 10000, 10000); |
// Open the item in Maps, specifying the map region to display. |
[MKMapItem openMapsWithItems:[NSArray arrayWithObject:from] |
launchOptions:[NSDictionary dictionaryWithObjectsAndKeys: |
[NSValue valueWithMKCoordinate:region.center], MKLaunchOptionsMapCenterKey, |
[NSValue valueWithMKCoordinateSpan:region.span], MKLaunchOptionsMapSpanKey, nil]]; |
} |
For information about how to open the Maps app programmatically, see MKMapItem Class Reference.
Registering as a Routing App (iOS Only)
An app that is able to display point-to-point directions can register as a routing app and make those directions available to the Maps app and to all other apps on a user’s device. Registering as a routing app improves the user experience by giving other apps a means to access routing information from your app, thus avoiding the need for every app to provide its own routing directions. It’s also a great way to get your app in front of the user because Maps displays appropriate suggestions from the App Store as options for displaying directions.
To register your app as a directions provider:
Configure your app to accept directions requests and declare a document type to handle incoming routing requests.
Declare the map regions that your app supports using a geographic coverage file (specified using a GeoJSON file).
Process direction request URLs when they are sent to your app.
Configuring Your App to Accept Directions Requests
To enable directions support for your app, configure the following support for your app target in Xcode:
Enable routing requests and specify the types of directions your app is capable of providing.
Configure a special document type to handle incoming routing requests.
App Store Connect requires both items for all routing apps.
You enable routing request support by choosing the appropriate Routing checkboxes in the Maps section of your target’s Capabilities pane in Xcode. (To learn more about the configuration process, see “Configuring an iOS Routing App” in App Distribution Guide.) Enabling directions support adds the MKDirectionsApplicationSupportedModes key to your app’s Info.plist file and sets the value of that key to the transportation modes you select. You must also provide a GeoJSON file containing the regions for which your app is capable of providing directions. (For information about specifying the GeoJSON file, see Declaring the Supported Geographic Coverage for Directions.)
In addition to declaring the types of directions your app supports, you need to add to your project a document type whose purpose is to handle incoming routing requests. To add the document type, use the Xcode document type editor, located in the Info tab of your target. Create the new type and use the information in Table 7-1 to set the values for the type. You should use the values in the table exactly as they appear here.
Xcode field | Value | Description |
|---|---|---|
Name |
| The value in this field can be anything you want, but you are encouraged to use the suggested value. |
Types |
| The value of this key is a custom UTI type used to identify direction requests. The value of this key must be exactly as shown here. |
The changes you make in the document types editor cause Xcode to add a corresponding entry to the CFBundleDocumentTypes key in your app’s Info.plist file. For more information about your app’s Info.plist file and the keys you put into it, see Information Property List Key Reference.
Declaring the Supported Geographic Coverage for Directions
Apps must declare the geographic regions for which they are capable of providing directions. Declaring the supported regions prevents the system from sending requests that your app is unable to handle. For example, if your app provides subway route information only for New York, you would not want it to receive requests to provide directions in London.
To declare your app’s supported regions, create a GeoJSON file, which is a type of JavaScript Object Notation (JSON) file. This is your app’s geographic coverage file and it contains a set of map coordinates that define the boundaries of one or more geographic regions. The format of this file is part of a public specification, the details of which you can obtain at http://geojson.org/geojson-spec.html.
Your geographic coverage file is used by the Maps app and the App Store, but not by your app. Uploading it to App Store Connect makes it possible for Maps to look up apps on the App Store that are capable of providing directions in the target region. The geographic coverage file can then provide the user with that information in case the user wants to download one of those apps. Because you upload the geographic coverage file to App Store Connect, you can also update the file at any time without submitting a new version of your app.
Specifying the Geographic Coverage File Contents
The geographic coverage file must contain a single MultiPolygon shape that defines the boundaries of the supported geographic regions. A single multi polygon may contain multiple child polygons, each of which defines the boundaries around a single geographic region. Each child polygon contains four or more coordinate values that define the boundaries of the polygon. Per the GeoJSON specification, every child polygon must represent a closed region—that is, the first and last coordinate values must always be identical. Therefore, you must specify at least four points to define a triangular region, which is the simplest possible shape. Of course, you use more points to define more complex polygons.
Listing 7-2 shows an example of a geographic coverage file that specifies two separate regions: one around San Francisco and one around Chicago. Note that the coordinates for each region are surrounded by what seem to be an extra set of brackets. In each case, the first open bracket marks the beginning of the overall polygon shape, the second open bracket defines the beginning of the exterior bounding polygon, and the third open bracket marks the beginning of the first coordinate.
Listing 7-2 A sample GeoJSON file
{ "type": "MultiPolygon", |
"coordinates": [ |
[[[-122.7, 37.3], [-121.9, 37.3], [-121.9, 37.9], [-122.7, 37.9], [-122.7, 37.3]]], |
[[[-87.9, 41.5], [-87.3, 41.5], [-87.3, 42.1], [-87.9, 42.1], [-87.9, 41.5]]] |
] |
} |
Use the following guidelines to help you define the regions for your app:
Define as specific a region as possible. For example, if your app provides subway route information only for New York, you don’t want it to receive requests to provide directions in London. The more specific the region you define, the more likely your app will appear in the search results.
Keep your regions simple and don’t try to trace precise routes around a given geographic area. It’s recommended that each polygon contain no more than 20 points. Using more coordinates to define a region is possible but is inefficient and usually unnecessary. The system has to determine whether a given point is inside one of your polygons, and it’s cheaper to make that determination against a rectangle or other simple shape than it is against a shape with hundreds of points.
Limit the number of child polygons in your
MultiPolygonshape to 20 or fewer.Use only
MultiPolygonshapes in your app’s coverage file. Although the GeoJSON specification supports other types of shapes, onlyMultiPolygonshapes are supported for routing apps.Don’t include comments in your coverage file.
Specify all coordinates as a longitude value followed by a latitude value.
Don’t include holes in the polygons in your coverage files. Although holes are supported by the GeoJSON specification, they are not supported in Apple’s maps implementation.
Uploading Your GeoJSON File to App Store Connect
When you upload your app to App Store Connect, the server checks your app’s Info.plist file for the presence of the MKDirectionsApplicationSupportedModes key. If that key is present, the App Store Connect page for your app includes a space for uploading your geographic coverage file. You must upload the file before your app can be approved.
Debugging Your App’s Geographic Coverage File
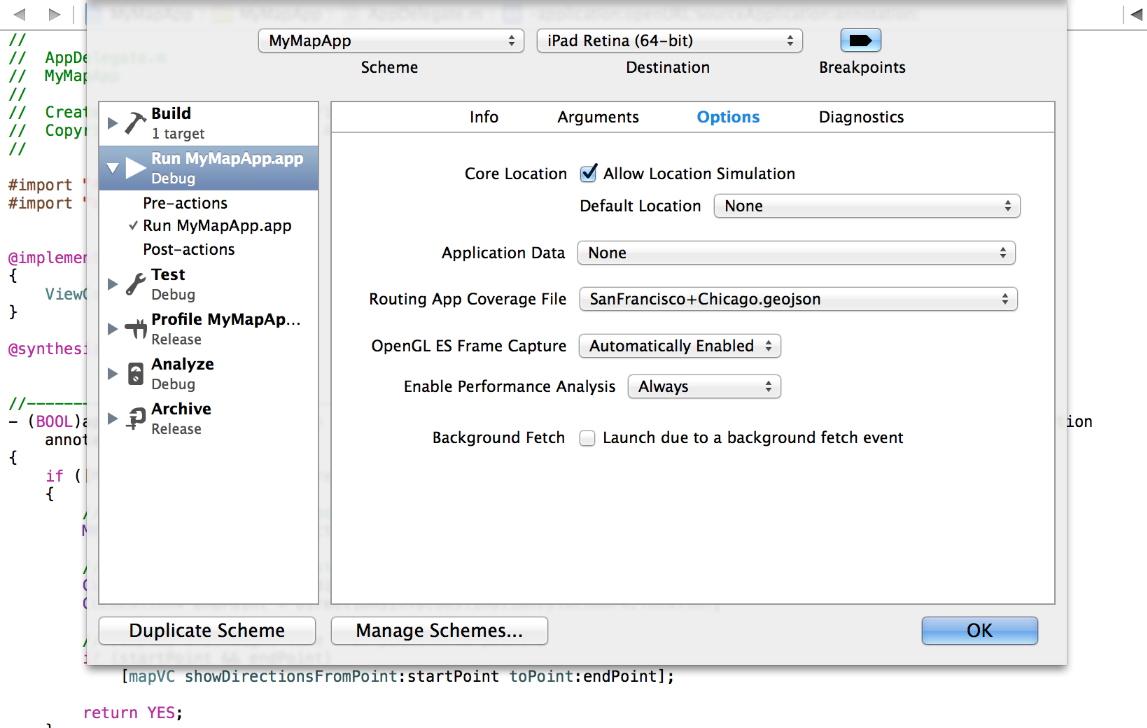
It’s a good idea to test your GeoJSON file before uploading it to App Store Connect. During development, use the scheme options of your Xcode project to specify a geographic coverage file to test. When you run your app in the simulator, Xcode transfers this file to the simulator or device so that the Maps app knows about the regions your app supports.
To specify the geographic coverage file for testing:
Open the scheme editor for your project.
Select the Run (Debug) scheme for your project.
In the Options tab, select your coverage file from the Routing App Coverage File popup menu.
The scheme editor should appear, similar to Figure 7-1.
After installing your app on the device or simulator, exit your app and launch the Maps app to specify the start and end points for directions. Your app should appear if its geographic coverage file is valid and contains the two specified points. If it doesn’t appear, check the points for your geographical regions to make sure they are correct.
Handling URL Directions Requests
The system sends directions requests to a routing or other app using URLs. For example, when a user asks the Maps app for directions and chooses your app, Maps creates a URL with the start and end points and asks your app to open it. You handle the opening of this URL in your app’s application:openURL:sourceApplication:annotation: method, just like you would for other URLs. But the steps you take to process the URL are a little more prescribed.
When your app receives a URL to open, perform the following steps in the application:openURL:sourceApplication:annotation: method:
Call the
isDirectionsRequestURL:class method ofMKDirectionsRequestto check whether the URL contains a directions request. If the URL contains a directions request, proceed with the remaining steps.Create an
MKDirectionsRequestobject using the provided URL.Obtain the start and end points of the route from the
MKDirectionsRequestobject.The start and end points are specified as
MKMapItemobjects, which contain the geographic coordinate of the location and possibly additional information. If theMKMapItemobject represents the user’s current location, use Core Location to retrieve the actual coordinate location data yourself.Compute and display the route using your custom logic.
Because the preceding steps are the same for every app, you can include code in your application:openURL:sourceApplication:annotation: method similar to that shown in Listing 7-3. The most important addition you must make is to compute the route information and display it in your app. If your app handles other URL types, you would also include code for processing those URLs separately.
Listing 7-3 Handling a directions request URL
- (BOOL)application:(UIApplication *)application |
openURL:(NSURL *)url |
sourceApplication:(NSString *)sourceApplication |
annotation:(id)annotation { |
if ([MKDirectionsRequest isDirectionsRequestURL:url]) { |
MKDirectionsRequest* directionsInfo = [[MKDirectionsRequest alloc] initWithContentsOfURL:url]; |
// TO DO: Plot and display the route using the |
// source and destination properties of directionsInfo. |
return YES; |
} |
else { |
// Handle other URL types... |
} |
return NO; |
} |
You also use the MKDirectionsRequest class to create requests for the MKDirections API. To learn more about how to use this API, see Getting General-Purpose Directions Information.
Getting General-Purpose Directions Information
Apps can use the MKDirections API to get information about a route, such as distance, expected travel time, localized advisory notices, and the set of individual steps that make up the route. For example, a routing app that displays train routes could request route information to display walking routes to and from train stations.
To get general-purpose directions information:
Create an
MKDirectionsRequestobject and configure it with theMKMapItemobjects that represent the start and end points of the route. If you need to specify a transportation type, such as walking or driving, set the request object’stransportTypeproperty.Create an
MKDirectionsobject and initialize it with the request object you created in step 1.Start the route-finding process by calling
calculateDirectionsWithCompletionHandler:and providing a block that handles the results.Handle the route information contained in the
MKDirectionsResponseobject passed to your completion handler. (The response object holds an array ofMKRouteobjects, each of which represents one alternative route between the start and end points of the request.)
Listing 7-4 shows one way to create a directions request, calculate a single route, and handle the results.
Listing 7-4 Requesting directions
MKDirectionsRequest *walkingRouteRequest = [[MKDirectionsRequest alloc] init]; |
walkingRouteRequest.transportType = MKDirectionsTransportTypeWalking; |
[walkingRouteRequest setSource:[startPoint mapItem]]; |
[walkingRouteRequest setDestination :[endPoint mapItem]]; |
MKDirections *walkingRouteDirections = [[MKDirections alloc] initWithRequest:walkingRouteRequest]; |
[walkingRouteDirections calculateDirectionsWithCompletionHandler:^(MKDirectionsResponse * walkingRouteResponse, NSError *walkingRouteError) { |
if (walkingRouteError) { |
[self handleDirectionsError:walkingRouteError]; |
} else { |
// The code doesn't request alternate routes, so add the single calculated route to |
// a previously declared MKRoute property called walkingRoute. |
self.walkingRoute = walkingRouteResponse.routes[0]; |
} |
}]; |
A route object defines the geometry for one route and includes a polyline object that you can use as an overlay to show the route on a map. If you requested alternate routes, the response object that gets passed to your completion handler can contain multiple route objects in its routes array. Listing 7-5 shows one way to iterate over an array of routes and display the polyline associated with each alternate route.
Listing 7-5 Displaying alternate routes
- (void) myShowDirections:(MKDirectionsResponse *)response { |
self.response = response; |
for (MKRoute *route in self.response.routes) { |
[self.mapView addOverlay:route.polyline level:MKOverlayLevelAboveRoads]; |
} |
} |
Copyright © 2016 Apple Inc. All Rights Reserved. Terms of Use | Privacy Policy | Updated: 2016-03-21