Core App Behaviors
The Cocoa document architecture, and NSDocument in particular, provide support for many core behaviors of Mac apps.
Documents Are Automatically Saved
In OS X v10.7 and later, users don’t need to save documents explicitly or be concerned about losing unsaved changes. Instead, the system automatically writes document data to disk as necessary. Your NSDocument subclass opts into this behavior by overriding the autosavesInPlace class method to return YES. The ideal baseline for save-less documents is this: The document data that users see in an app window is identical to the document data on disk at all times. For practical reasons, the system does not attempt to save every change immediately, but it saves documents often enough and at the correct times to ensure that the document in memory and the one on disk are effectively the same.
Part of the implementation of save-less documents is file coordination, a mechanism that serializes access to files among processes to prevent inconsistencies due to non-sequential reading and writing. Apps use file coordination so that users don’t need to remember to save document changes before causing the document’s file to be read by another app. Document-based Cocoa apps use file coordination automatically.
Autosaving in Place Differs From Autosaving Elsewhere
Automatic document saving is supported by the implementation of autosaving in place. Autosaving in place and autosaving elsewhere both protect against the user losing work due to app crashes, kernel panics, and power failures. However, autosaving in place differs from autosaving elsewhere in that it overwrites the actual document file rather than writing a new file next to it containing the autosaved document contents. (Autosaving in place performs a safe save by writing to a new file first, then moving it into the place of the document file when done.) Autosaving in place is illustrated in Figure 5-1.
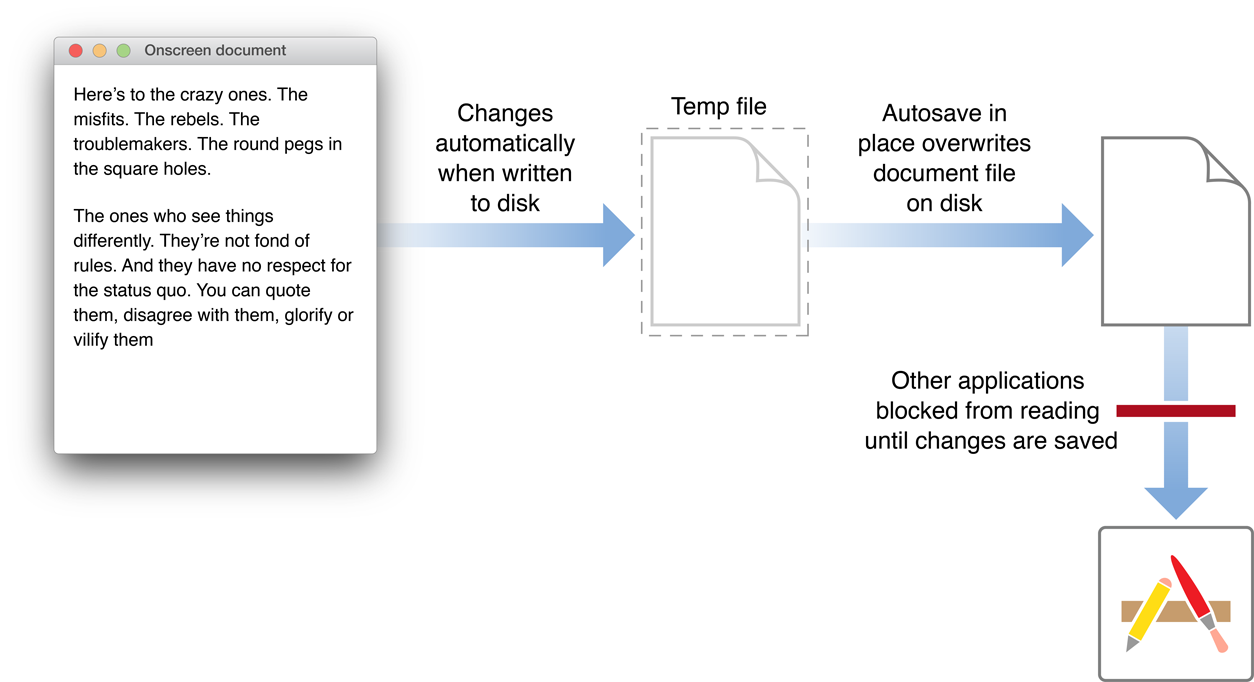
The document architecture still uses autosaving elsewhere to save untitled documents that have content but have not been explicitly saved and named by the user. In this case, untitled documents are autosaved in ~/Library/Autosave Information. In addition, NSDocument saves earlier revisions of documents elsewhere, giving the user access to previous versions.
The saveless-documents model automates crash protection but preserves the ability for users to save documents explicitly. It also automates maintenance of multiple older versions. Users can save immediately in the traditional way (by choosing File > Save a Version or pressing Command-S). For an untitled document, an explicit Save command presents a dialog enabling the user to name the document and specify the location where it is to be written to disk.
You should not invoke the autosavesInPlace method to find out whether autosaving is being done. Instead, the document architecture passes one of two new autosaving-related enumerators as an NSSaveOperationType parameter to your overrides of the NSDocument methods beginning with save... and write..., and you can examine those values. The autosave enumerators are NSAutosaveInPlaceOperation and NSAutosaveElsewhereOperation. The old NSAutosaveOperation enumerator is equivalent to NSAutosaveElsewhereOperation and is deprecated in OS X v10.7.
Consider Autosaving Performance
Before you enable autosaving, consider the saving performance of your app. If your app saves quickly, there is little reason not to enable it. But if your app saves slowly, enabling autosaving could cause periodic blocking of your user interface while saving is happening. So, for example, if you have already implemented the autosaving behavior introduced in OS X v10.4 (sending setAutosavingDelay: to the NSDocumentController object with a nonzero value), then your app’s saving performance is probably acceptable, and opting into autosaving in place is as simple as overriding autosavesInPlace to return YES. Otherwise, you may first need to address any issues with your document model or saving logic that could hinder saving performance.
Safety Checking Prevents Unintentional Edits
When saving happens without user knowledge, it becomes easier for unintentional edits to get saved to disk, resulting in potential data loss. To help prevent autosaving unintentional edits, NSDocument performs safety checking to determine when a user has opened a document to read it, but not edit it. For example, if the document has not been edited for some period of time, it is locked for editing and opened only for reading. (The period after editing when the document is locked is an option in the Time Machine system preference.) NSDocument also checks for documents that are in folders where the user typically does not edit documents, such as the ~/Downloads folder.
When an edit is made to the document, NSDocument offers the user the choice of canceling the change, creating a new document with the change, or allowing editing. A document that is preventing edits displays Locked in the title bar. The user can explicitly enable editing of the document by clicking on the Locked label and choosing Unlock in the pop-up menu. A document that has been changed since it was last opened and is therefore being actively autosaved in place displays Edited in the titlebar instead of Locked.
An app can programmatically determine when a document is locked in read-only “viewing mode” by sending it the isInViewingMode message. You can use this information to prevent certain kinds of user actions or changes when the user is viewing an old document revision. Another useful feature for managing locked documents is NSChangeDiscardable. You can use this constant to specify that a particular editing change is non-critical and can be thrown away instead of prompting the user. For example, changing the slide in a Keynote document would normally cause some data to be saved in the document, but Keynote declares that change to be discardable, so the user viewing a locked document can change slides without being prompted to unlock it.
Document Saving Can Be Asynchronous
In OS X v10.7 and later, NSDocument can save asynchronously, so that document data is written to a file on a background thread. In this way, even if writing is slow, the app’s user interface remains responsive. You can override the method canAsynchronouslyWriteToURL:ofType:forSaveOperation: to return YES to enable asynchronous saving. In this case, NSDocument creates a separate writing thread and invokes writeSafelyToURL:ofType:forSaveOperation:error: on it. However, the main thread remains blocked until an object on the writing thread invokes the unblockUserInteraction method.
When unblockUserInteraction is invoked, the app resumes dequeueing user interface events and the user is able to continue editing the document, even if the writing of document data takes some time. The right moment to invoke unblockUserInteraction is when an immutable snapshot of the document’s contents has been taken, so that writing out the snapshot of the document’s contents can continue safely on the writing thread while the user continues to edit the document on the main thread.
Some Autosaves Can Be Cancelled
For various reasons, an app may not be able to implement asynchronous autosaving, or it may be unable to take a snapshot of the document’s contents quickly enough to avoid interrupting the user’s workflow with autosaves. In that case, the app needs to use a different strategy to remain responsive. The document architecture supports the concept of cancellable autosaves for this purpose, which the app can implement instead of asynchronous saving. At various times during an autosave operation, the app can check to see if the user is trying to edit the document, usually by checking the event queue. If an event is detected, and if the actual write to file has not yet begun, the app can cancel the save operation and simply return an NSUserCancelledError error.
Some types of autosaves can be safely cancelled to unblock user interaction, while some should be allowed to continue, even though they cause a noticeable delay. You can determine whether a given autosave can be safely cancelled by sending the document an autosavingIsImplicitlyCancellable message. This method returns YES when periodic autosaving is being done for crash protection, for example, in which case you can safely cancel the save operation. It returns NO when you should not cancel the save, as when the document is being closed, for example.
Users Can Browse Document Versions
The document architecture implements the Versions feature of OS X v10.7 in the behavior of NSDocument. An NSDocument subclass adopts autosaving in place by returning YES from autosavesInPlace, as described in Documents Are Automatically Saved, and adopting autosaving in turn enables version browsing.
After a document has been named and saved, the Save menu item is replaced by the “Save a Version” menu item. This command saves a version of the document identified by date and time. And NSDocument sometimes creates a version automatically during autosaving. The user can choose File > Revert Document, or choose Browse All Revisions from the pop-up menu at the right of the title bar, to display a dialog enabling the user to choose between the last saved version or an older version. Choosing an older version displays a Time Machine–like user interface that selects among all of the document’s versions.
If the user chooses to restore a previous version, the current document contents are preserved on disk, if necessary, and the file's contents are replaced with those of the selected version. Holding down the Option key while browsing versions gives the user the option to restore a copy of a previous version, which does not affect the current document contents. The user can also select and copy contents from a version and paste them into the current document.
Windows Are Restored Automatically
The document architecture implements the Resume feature of OS X v10.7, so that individual apps need to encode only information that is peculiar to them and necessary to restore the state of their windows.
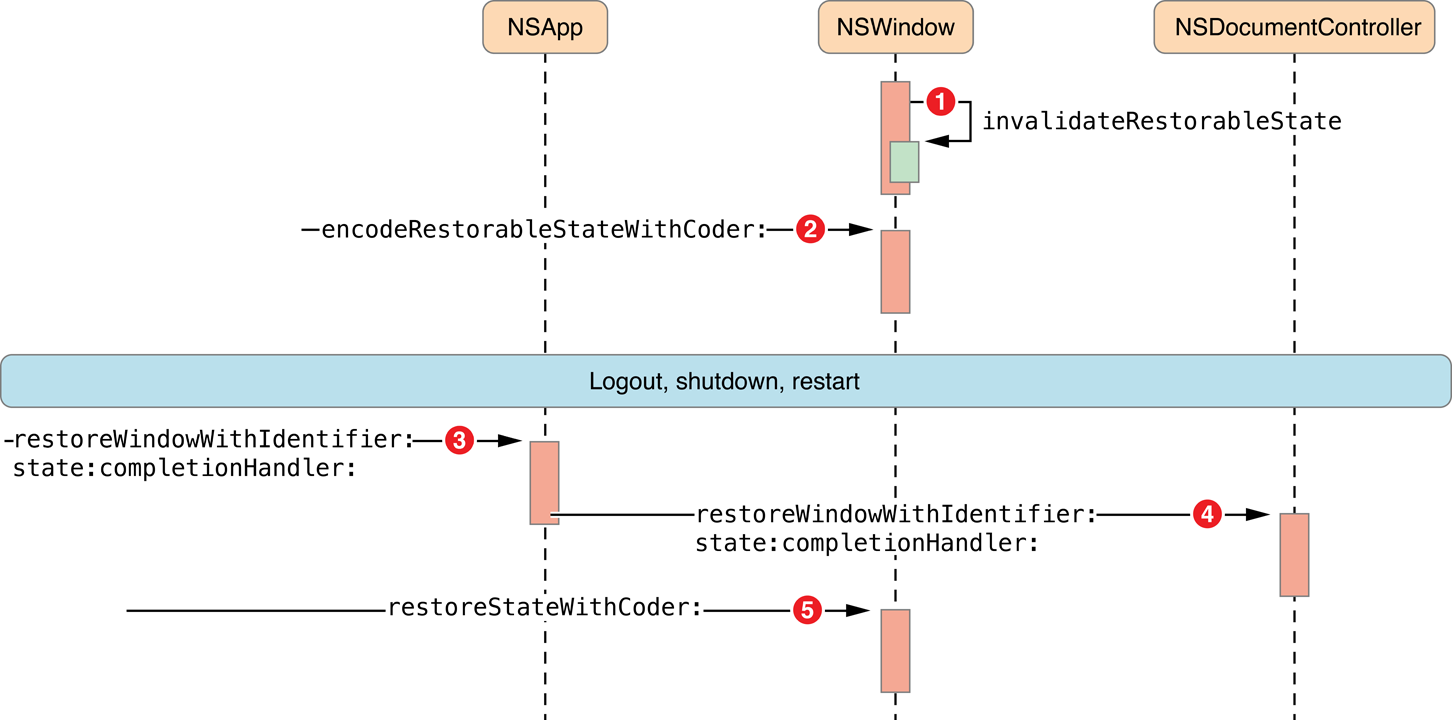
The document architecture implements the following steps in the window restoration process; the steps correlate to the numbers shown in Figure 5-2:
The
NSWindowControllermethodsetDocument:sets the restoration class of document windows to the class of the sharedNSDocumentControllerobject. TheNSWindowobject invalidates its restorable state whenever its state changes by sendinginvalidateRestorableStateto itself.At the next appropriate time, Cocoa sends the window an
encodeRestorableStateWithCoder:message, and the window encodes identification and status information into the passed-in encoder.When the system restarts, Cocoa relaunches the app and sends the
restoreWindowWithIdentifier:state:completionHandler:message to theNSAppobject.Apps can override this method to do any general work needed for window restoration, such as substituting a new restoration class or loading it from a separate bundle.
NSAppdecodes the restoration class for the window, sends therestoreWindowWithIdentifier:state:completionHandler:message to the restoration class object, and returnsYES.The restoration class reopens the document and locates its window. Then it invokes the passed-in completion handler with the window as a parameter.
Cocoa sends the
restoreStateWithCoder:message to the window, which decodes its restorable state from the passed-inNSCoderobject and restores the details of its content.
Although the preceding steps describe only window restoration, in fact every object inheriting from NSResponder has its own restorable state. For example, an NSTextView object stores the selected range (or ranges) of text in its restorable state. Likewise, an NSTabView object records its selected tab, an NSSearchField object records the search term, an NSScrollView object records its scroll position, and an NSApplication object records the z-order of its windows. An NSDocument object has state as well. Although NSDocument does not inherit from NSResponder, it implements many NSResponder methods, including the restoration methods shown in Figure 5-2.
When the app is relaunched, Cocoa sends the restoreStateWithCoder: message to the relevant objects in turn: first to the NSApplication object, then to each NSWindow object, then to the NSWindowController object, then to the NSDocument object, and then to each view that has saved state.
The Document Architecture Provides Undo Support for Free
Undo support in the document architecture is built-in and straightforward to implement. By default, an NSDocument object has its own NSUndoManager object. The NSUndoManager class enables you to construct invocations that do the opposite of a previous action.
Implementing Undo
The key to implementing undo properly is to have well-defined primitives for changing your document. Each model object, plus the NSDocument subclass itself, should define the set of primitive methods that can change it. Each primitive method is then responsible for using the undo manager to enqueue invocations that undo the action of the primitive method. For example, if you decide that setColor: is a primitive method for one of your model objects, then inside of setColor: your object would do something like the following:
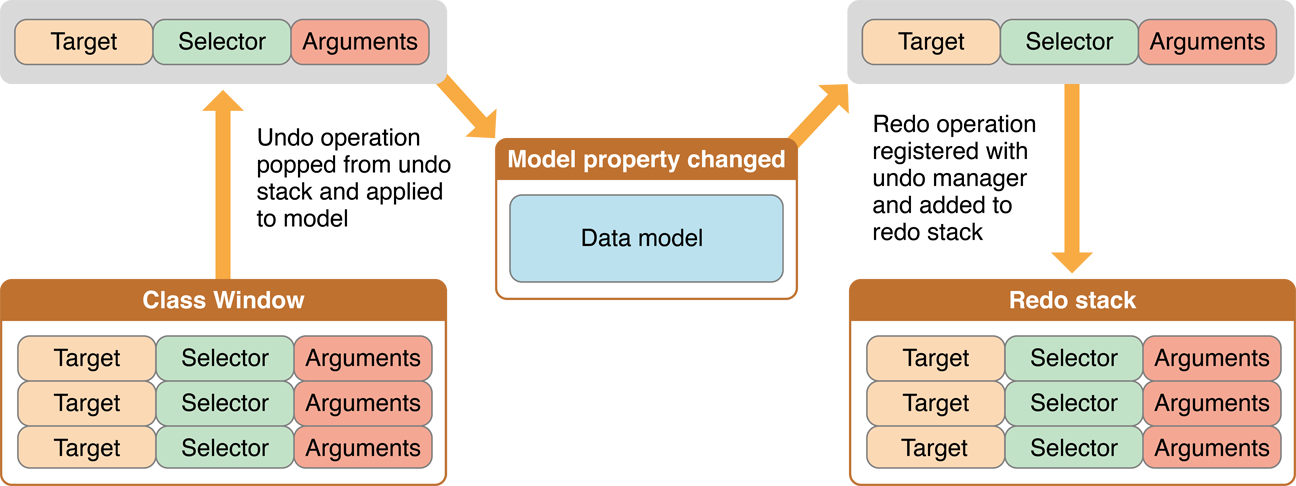
[[[myDocument undoManager] prepareWithInvocationTarget:self] setColor:oldColor] |
This message causes the undo manager to construct and save an invocation. If the user later chooses Undo, the saved invocation is invoked and your model object receives another setColor: message, this time with the old color. You don’t have to keep track of whether commands are being undone to support redo. In fact, the way redo works is by watching what invocations get registered as the undo is happening and recording them on the redo stack.
You can use the setUndoManager: method if you need to use a subclass or otherwise need to change the undo manager used by the document.
Because many discrete changes might be involved in a user-level action, all the undo registrations that happen during a single cycle of the event loop are usually grouped together and are undone all at once. NSUndoManager has methods that allow you to control the grouping behavior further if you need to.
Another aspect of good undo implementation is to provide action names so that the Undo and Redo menu items can have more descriptive titles. Undo action names are best set in action methods instead of the change primitives in your model objects because many primitive changes might go into one user action, or different user actions might result in the same primitives being called in different ways. The Sketch example app implements undo in action methods.
Implementing Partial Undo
Because the undo manager does multiple-level undo, do not implement undo for only a subset of the possible changes to your document. The undo manager relies on being able to reliably take the document back through history with repeated undos. If some changes get skipped, the undo stack state is no longer synchronized with the contents of the document. Depending on your architecture, that situation can cause problems that range from merely annoying to fatal.
For example, imagine that you have a drawing program that is able to undo a resize, but not a delete operation. If the user selects a graphic and resizes it, the undo manager gets an invocation that can undo that resize operation. Now the user deletes that graphic (which is not recorded for undo). If the user now tries to undo, nothing happens (at the very least), because the graphic that was resized is no longer there and undoing the resize can’t have any visual effect. At worst, the app might crash trying to send a message to a freed object. So when you implement undo, remember that everything that causes a change to the document should be undoable.
If there are some changes that you cannot undo, there are two ways to handle the situation when a user makes such a change. If you can be absolutely sure that the change has no relationship to any other changes that can happen to the document (that is, something totally independent of all the rest of the contents of the document has changed), then you do not register any undo action for that change. On the other hand, if the change does have some relationship to the rest of the document contents, remove all actions from the undo manager when such a change takes place. Such changes then mark points of no return in your user experience. When designing your app and document format, you should strive to avoid the need for these “point of no return” operations.
Managing the Change Count
Because of undo support, the document must keep more information than just whether the document is dirty or clean. If a user opens a file, makes five changes, and then chooses Undo five times, the document should once again be clean. But if the user chooses Undo only four times, the document is still dirty.
The NSDocument object keeps a change count to deal with this. The change count can be modified by sending an updateChangeCount: message with one of the supported change types. The supported change types are NSChangeDone, NSChangeUndone, and NSChangeCleared. The NSDocument object itself clears the change count whenever the user saves or reverts the document. If the document has an undo manager, it observes the undo manager and automatically updates the change count when changes are done, undone, or redone.
Not Supporting Undo
If you don't want to support undo at all, first send the setHasUndoManager: message with a parameter value of NO to your document. This message causes the document never to get an undo manager.
Without an undo manager (and without undo support from your model objects), the document cannot automatically track its dirty state. So, if you aren't implementing undo, you need to send an updateChangeCount: message explicitly whenever your document is edited.
The Document Architecture Supports Robust Error Handling
Many NSDocument and NSDocumentController methods include as their last parameter an indirect reference to an NSError object. These are methods that create a document, write a file, access a resource, or perform a similar operation.
An example of an NSDocumentController method that takes an error parameter is openUntitledDocumentAndDisplay:error:, which creates a new untitled document. In case of failure, this method directly returns nil and, in the last parameter, indirectly returns an NSError object that describes the error. Before calling such a method, client code that is interested in a possible error declares an NSError object variable and passes the address of the variable in the error parameter. If the clients are not interested in the error, they pass NULL in the error parameter.
Using NSError objects gives Cocoa apps the capability to present much more useful error messages to the user, including detailed reasons for the error condition, suggestions for recovery, and even a mechanism for attempting programmatic recovery. In addition, AppKit handles presenting the error to the user.
If you override a method that takes an error parameter and you call the superclass implementation, you don’t need to set outError yourself. Pass it the error argument that your override received when invoked.
If you override such a method to prevent some action but you don’t want an error alert to be presented to the user, return an error object whose domain is NSCocoaErrorDomain and whose code is NSUserCancelledError. The AppKit framework presents errors through the NSApplication implementations of the presentError: and presentError:modalForWindow:delegate:didPresentSelector:contextInfo: methods declared by NSResponder. Those implementations silently ignore errors whose domain is NSCocoaErrorDomain and whose code is NSUserCancelledError. So, for example, if your override wanted to avoid presenting an error to the user, it could set an error object as shown in the following fragment:
if (outError) { |
*outError = [NSError errorWithDomain:NSCocoaErrorDomain |
code:NSUserCancelledError userInfo:nil]; |
} |
For detailed information about NSError handling see Error Handling Programming Guide.
Copyright © 2012 Apple Inc. All Rights Reserved. Terms of Use | Privacy Policy | Updated: 2012-12-13