Retired Document
Important: OpenCL was deprecated in macOS 10.14. To create high-performance code on GPUs, use the Metal framework instead. See Metal.
Hello World!
Support built into Xcode in OS X v10.7 and later makes developing OpenCL applications much easier than it used to be. This chapter describes how to create an OpenCL project in Xcode. (You don’t have to regenerate OpenCL projects that are already working.)
Creating An Application That Uses OpenCL In Xcode
To create a project that uses OpenCL in OS X v10.7 or later:
-
Create your OpenCL project in Xcode as a new OS X project (empty is fine).
-
Place your kernel code in one or more .cl files in your Xcode project. You can place all your kernels into a single .cl file, or you can separate them as you choose. You can also include non-kernel code that will run on the same OpenCL device as the kernel in each .cl file.
Each .cl file is compiled by default into three files containing bitcode for i386, x86_64, and gpu_32 architectures. (You can change which bitcodes are generated using the OpenCL Architectures build setting.)
At runtime your host application discovers the available devices and determines which of the compiled kernels to enqueue and execute. Figure 1-1 shows a very simple OpenCL project in Xcode.
Figure 1-1 A simple OpenCL kernel in Xcode 
-
You can set the following build settings for your OpenCL apps:
-
OpenCL—Build
OpenCL Architectures. The default is that the product is built for all three architectures. The dropdown allows you to choose up to three of
-triple i386-applecl-darwin,-triple x86_64-applecl-darwin, and-triple gpu_32-applecl-darwin.OpenCL Compiler Version. The default is OpenCL C 1.1.
-
OpenCL—Code Generation
Auto-vectorizer. Choose
Yesto turn the autovectorizer on orNoto turn the autovectorizer off. This setting takes effect only for the CPU.Double as single. If you set this parameter to
Yes, the compiler treats double-precision floating-point expressions as single-precision floating-point expressions. This option is available for GPUs only. The default isNo.Flush denorms to zero. This Boolean controls how single- and double-precision denormalized numbers are handled. If you set this parameter to
Yes, the compiler may flush single-precision denormalized numbers to zero; it may also flush double-precision denormalized numbers to zero if the optional extension for double-precision is supported. This is intended to be a performance hint and the OpenCL compiler can choose not to flush denorms to zero if the device supports single-precision (or double-precision) denormalized numbers (that is, if theCL_FP_DENORMbit is not set inCL_DEVICE_SINGLE_FP_CONFIG). This flag only applies for scalar and vector single-precision floating-point variables and computations on these floating-point variables inside a program. It does not apply to reading from or writing to image objects. The default isNo.Optimization Level. You can choose between several types of optimization from fastest performance to smallest code size. The default is to optimize for fastest performance.
Relax IEEE Compliance. If you set this parameter to
Yes, the compiler allows optimizations for floating-point arithmetic that may violate the IEEE 754 standard and the OpenCL numerical compliance requirements defined in section 7.4 for single-precision floating-point, section 9.3.9 for double-precision floating-point, and edge case behavior as defined in section 7.5 of the OpenCL 1.1 specification. This is intended to be a performance optimization. This option causes the preprocessor macro__FAST_RELAXED_MATH__to be defined in the OpenCL program. The default isNo.Use MAD. If you set this parameter to
Yes, you allow expressions of the typea * b + cto be replaced by a Multiply-Add (MAD) instruction. If MAD is enabled, multistep instructions in the forma * b + care performed in a single step, but the accuracy of the results may be compromised. For example, to optimize performance, some OpenCL devices implement MAD by truncating the result of thea * boperation before adding it toc. The default for this parameter isNo.
OpenCL—Preprocessing
You can enter a space-separated list of preprocessor macros of the form
“foo”or“foo=bar”here if you wish.
-
-
Place your host code in one or more .c files in your Xcode project. Compiling From the Command Line shows host code in an Xcode project.
Figure 1-2 OpenCL host code in Xcode 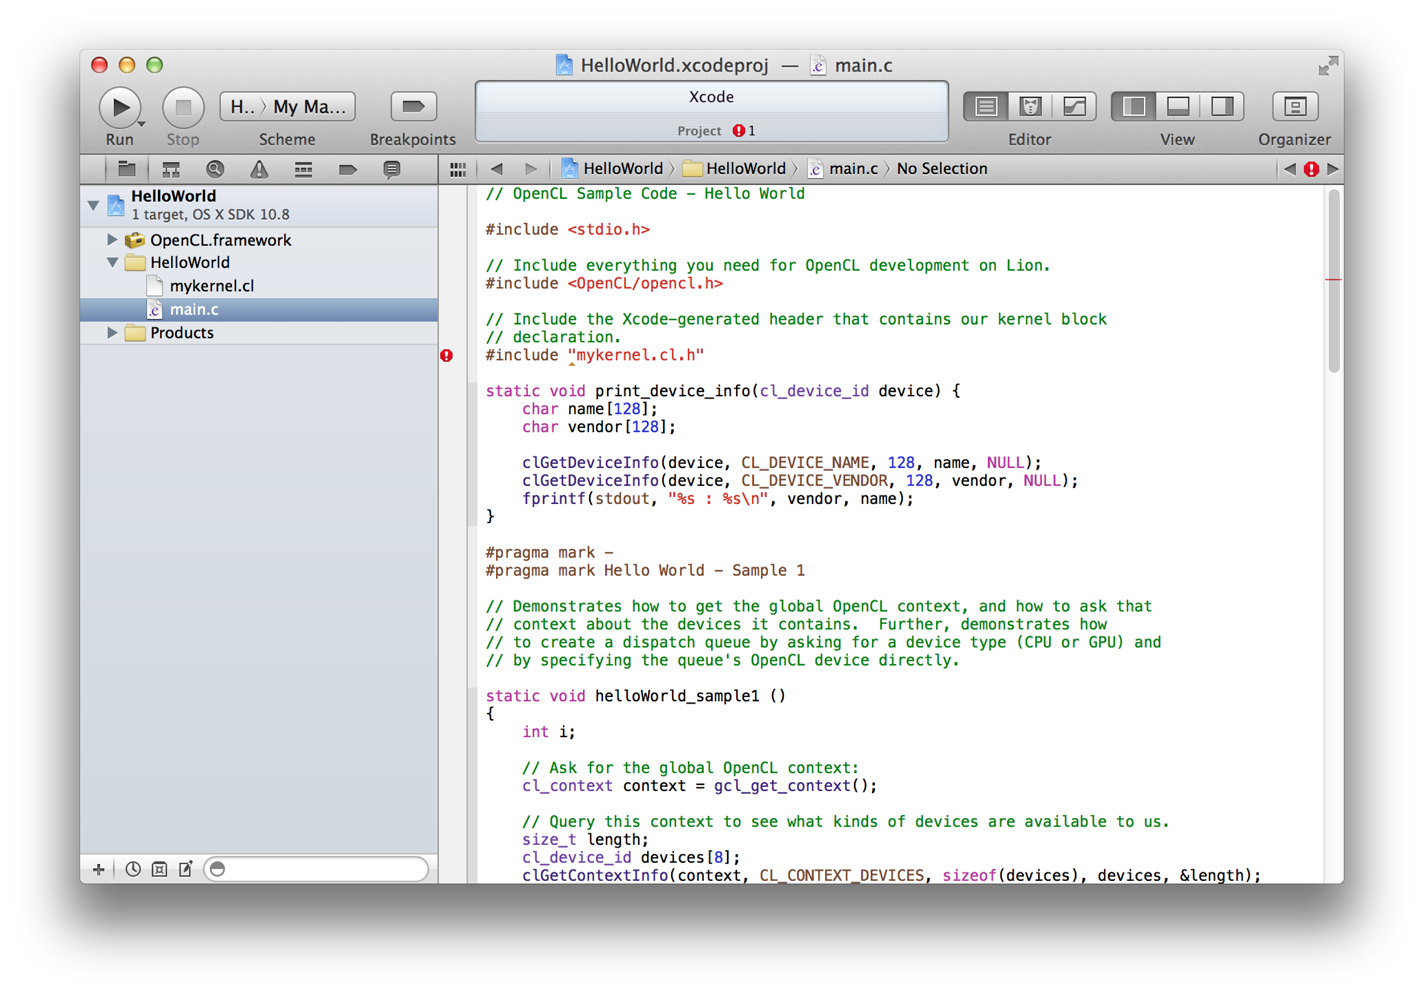
Link to the OpenCL framework in your project. See Adding an Existing Framework to a Project.
-
Build.
Because you are compiling your host and your kernel code before you run them, you can see compiler errors and warnings before you run your application.
-
Run.
Results are shown in the Xcode output pane as shown in Figure 1-3.
Figure 1-3 Results 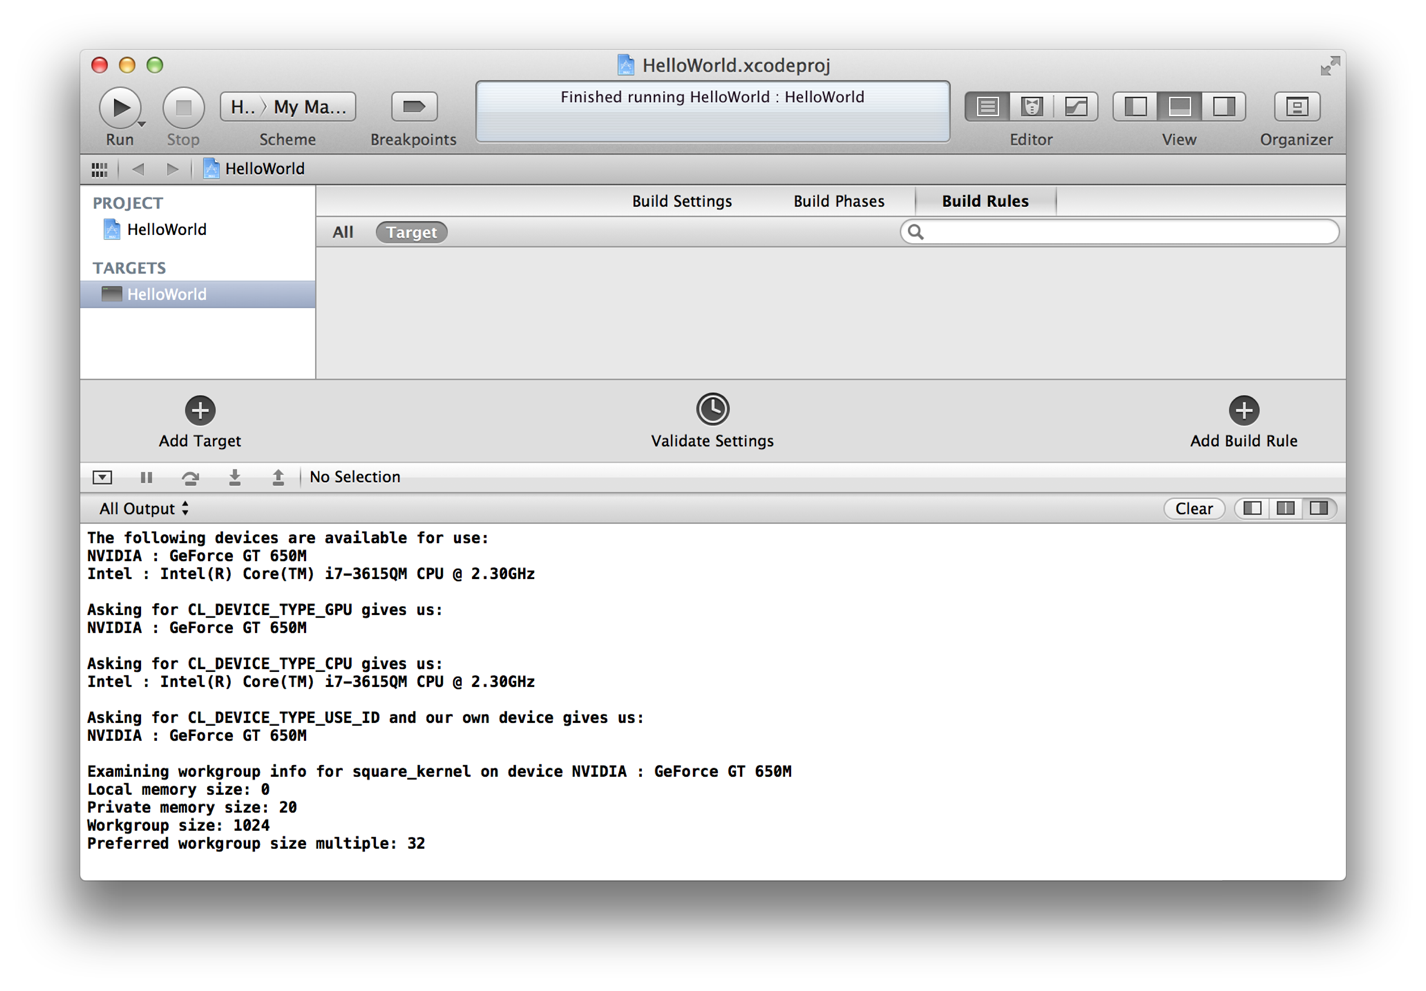
See Basic Programming Sample for a line-by-line description of the host and kernel code in the Hello World sample project.
Debugging
Here are a few hints to help you debug your OpenCL application:
-
Run your kernel on the CPU first. There is no memory protection on some GPUs. If an index goes out of bounds on the GPU, it is likely to take the whole system down. If an index goes out of bounds on the CPU, it may crash the program that’s running, but it will not take the whole system down.
-
You can use the
printffunction from within your kernel. -
You can use the gdb debugger to look at the assembly code once you’ve built your program. See GDB website.
-
On the GPU, use explicit address range checks to look for out-of-range address accesses. (Remember: there is no memory protection on some GPUs.)
Compiling From the Command Line
You can also compile and run your OpenCL application outside of Xcode.
To compile from the command line, call openclc.
You can set the following compile line parameters:
OpenCL Compiler Version
The OpenCL C compiler version supported by the platform. To set this parameter from the command line, use:
-cl-std=CL1.1The default is OpenCL C 1.1.
OpenCL—Architectures
A
StringListspecifying the list of the architectures for which the product will be built. This is usually set to a predefined build setting provided by the platform. To set this parameter from the command line, list up to three of the following, separated by whitespace:-triple i386-applecl-darwin-triple x86_64-applecl-darwin-triple gpu_32-applecl-darwin
For example, to compile for i386 and x86_64, your list would look like this:
-triple i386-applecl-darwin-triple x86_64-applecl-darwinThe default is that the product is built for all three architectures.
Auto-vectorizer
This switch enables or disables autovectorization of OpenCL kernels compiled for the CPU. To set this parameter from the command line, use:
-cl-auto-vectorize-enableto enable the autovectorizer.-cl-autovectorize-disableto disable the autovectorizer.
The default is
-cl-auto-vectorize-enable.Double as single
If enabled, double-precision floating-point expressions are treated as single-precision floating-point expressions. This option is available for GPUs only. To enable this parameter from the command line, use:
-cl-double-as-singleBy default, this parameter is disabled.
Flush denorms to zero
This Boolean controls how single- and double-precision denormalized numbers are handled. If specified as a build option, the single-precision denormalized numbers may be flushed to zero; double-precision denormalized numbers may also be flushed to zero if the optional extension for double-precision is supported. This is intended to be a performance hint and the OpenCL compiler can choose not to flush denorms to zero if the device supports single-precision (or double-precision) denormalized numbers (that is, if the
CL_FP_DENORMbit is not set inCL_DEVICE_SINGLE_FP_CONFIG). This flag only applies for scalar and vector single-precision floating-point variables and computations on these floating-point variables inside a program. It does not apply to reading from or writing to image objects.To enable this parameter from the command line, use:
-cl-denorms-are-zeroBy default, this parameter is disabled.
Optimization Level
Specifies whether to optimize for fastest performance or smallest code size.
To set this parameter from the command line, use:
-Os- optimize for smallest code size-O1- optimize for fast performance-O2- optimize for faster performance-O3- optimize for fastest performance-O0- do not optimize
The default is fast
-O1optimization.Relax IEEE Compliance
If enabled, allows optimizations for floating-point arithmetic that may violate the IEEE 754 standard and the OpenCL numerical compliance requirements defined in section 7.4 for single-precision floating-point, section 9.3.9 for double-precision floating-point, and edge case behavior in section 7.5 of the OpenCL 1.1 specification. This is intended to be a performance optimization. This option causes the preprocessor macro
__FAST_RELAXED_MATH__to be defined in the OpenCL program.To enable this parameter from the command line, use:
-cl-fast-relaxed-mathBy default, this parameter is disabled.
Use MAD
If enabled, allows expressions of the type
a * b + cto be replaced by a Multiply-Add (MAD) instruction. If MAD is enabled, multistep instructions in the forma * b + care performed in a single step, but the accuracy of the results may be compromised. For example, to optimize performance, some OpenCL devices implement MAD by truncating the result of thea * boperation before adding it toc.To enable this parameter from the command line, use:
-cl-mad-enableBy default, this parameter is disabled.
OpenCL—Preprocessing
Space-separated list of preprocessor macros of the form
“foo”or“foo=bar”. To specify preprocessor macros from the command line, prefix the string of macros with:-D
Copyright © 2018 Apple Inc. All Rights Reserved. Terms of Use | Privacy Policy | Updated: 2018-06-04