Retired Document
Important: This document contains legacy content. Apple recommends that developers explore AV Foundation and Core Video for new development in this technology area. See AV Foundation Framework Reference for Mac and Core Video Programming Guide for more information.
Creating Movies
This chapter describes QuickTime movies and shows you how to create a new movie using the QuickTime Movie Toolbox. A sample program is given, detailing the necessary steps: creating and opening a file to hold the movie, creating the tracks and media structures for audio and video, adding sample data, and adding movie resources to the file. Read this section to see a sample program that will step you through the procedure in tutorial fashion.
Movie Structures
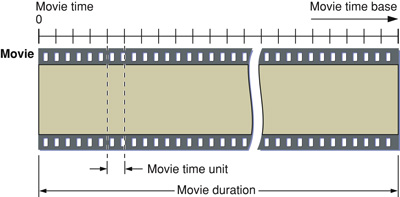
QuickTime movies have a time dimension defined by a time scale and a duration, which are specified by a time coordinate system. Figure 1-1 illustrates a movie’s time coordinate system. A movie always starts at time 0. The time scale defines the unit of measure for the movie’s time values. The duration specifies how long the movie lasts.
A movie can contain one or more tracks. Each track refers to media data that can be interpreted within the movie’s time coordinate system. Each track begins at the beginning of the movie; however, a track can end at any time. In addition, the actual data in the track may be offset from the beginning of the movie. Tracks with data that does not commence at the beginning of a movie contain empty space that precedes the track data.
At any given point in time, one or more tracks may or may not be enabled.
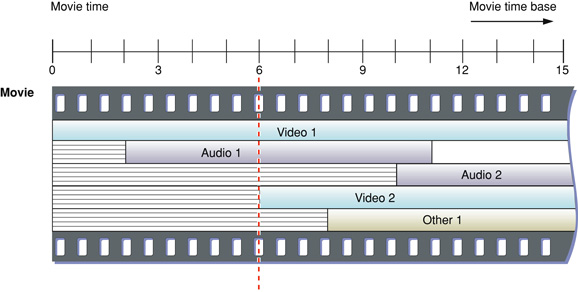
However, no single track needs to be enabled during the entire movie. As you move through a movie, you gain access to the data that is described by each of the enabled tracks. Figure 1-2 shows a movie that contains five tracks. The lighter shading in each track represents the time offset between the beginning of the movie and the start of the track’s data (this lighter shading corresponds to empty space at the beginning of these tracks). When the movie’s time value is 6, there are three enabled tracks: Video 1 and Audio 1, and Video 2, which is just being enabled. The Other 1 track does not become enabled until the time value reaches 8. The Audio 2 track becomes enabled at time value 10.
A movie can contain one or more layers. Each layer contains one or more tracks that may be related to one another. The Movie Toolbox builds up a movie’s visual representation layer by layer. In Figure 1-2, for example, if the images contained in the Video 1 and Video 2 tracks overlap spatially, the user sees the image that is stored in the front layer. You can assign individual tracks to movie layers using Movie Toolbox functions that are described in QuickTime Movie Internals Guide.
The Movie Toolbox allows you to define both a movie preview and a movie poster for a QuickTime movie. A movie preview is a short dynamic representation of a movie. Movie previews typically last no more than 3 to 5 seconds, and they should give the user some idea of what the movie contains. (An example of a movie preview is a narrative track.) You define a movie preview by specifying its start time, its duration, and its tracks. A movie may contain tracks that are used only in its preview.
A movie poster is a single visual image representing the movie. You specify a poster as a point in time in the movie. As with the movie itself and the movie preview, you define which tracks are enabled in the movie poster.
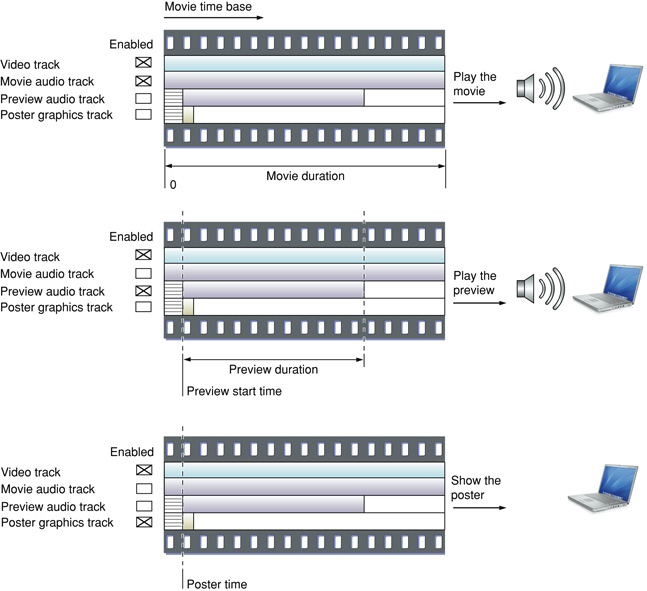
Figure 1-3 shows an example of a movie’s tracks. The video track is used for the movie, the preview, and the poster. The movie audio track is used only for the movie. The preview audio track is used only for the preview. The poster graphic track is used only for the poster.
Tracks
A movie can contain one or more tracks. Each track represents a single stream of data in a movie and is associated with a single media. The media has control information that refers to the actual movie data.
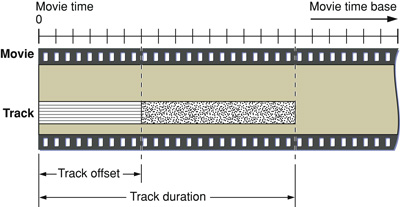
All of the tracks in a movie use the movie’s time coordinate system. That is, the movie’s time scale defines the basic time unit for each of the movie’s tracks. Each track begins at the beginning of the movie, but the track’s data might not begin until some time value other than 0. This intervening time is represented by blank space. In an audio track the blank space translates to silence; in a video track the blank space generates no visual image. Each track has its own duration. This duration need not correspond to the duration of the movie. Movie duration always equals the maximum duration of all the tracks. An example of this is shown in Figure 1-4.
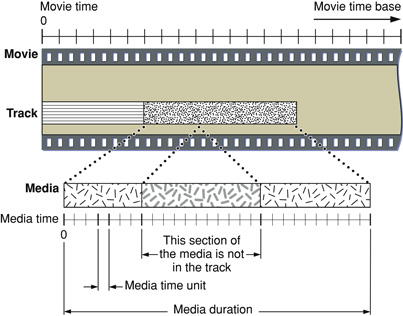
A track is always associated with one media. The media contains control information that refers to the data that constitutes the track. The track contains a list of references that identify portions of the media that are used in the track. In essence, these references are an edit list of the media. Consequently, a track can play the data in its media in any order and any number of times. Figure 1-5 shows how a track maps data from a media into a movie.
Media Structures
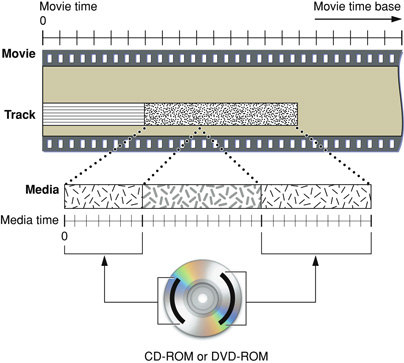
A media describes the data for a track. The data is not actually stored in the media. Rather, the media contains references to its media data, which may be stored in disk files, on CD-ROM discs, or other appropriate storage devices. Note that the data referred to by one media may be used by more than one movie, though the media itself is not reused.
Each media has its own time coordinate system, which defines the media’s time scale and duration. A media’s time coordinate system always starts at time 0, and it is independent of the time coordinate system of the movie that uses its data. Tracks map data from the movie’s time coordinate system to the media’s time coordinate system. Figure 1-6 shows how tracks perform this mapping.
Each supported data type has its own media handler. The media handler interprets the media’s data. The media handler must be able to randomly access the data and play segments at rates specified by the movie. The track determines the order in which the media is played in the movie and maps movie time values to media time values.
Figure 1-6 shows the final link to the data. The media in the figure references digital video frames on a CD-ROM disc.
QuickTime Movie Characteristics
This section discusses the characteristics that govern playing and storing movies, tracks, and media structures. This section has been divided into the following topics:
Movie Characteristics discusses the time, display, and sound characteristics of a QuickTime movie.
Track Characteristics describes the characteristics of a movie track.
Media Characteristics discusses the characteristics of a media.
Spatial Properties describes how the Movie Toolbox displays a movie, including how the data from each media is collected and transformed prior to display.
The Transformation Matrix describes how matrix operations transform visual elements prior to display.
Audio Properties describes how the Movie Toolbox works with a movie’s sound tracks.
Movie Characteristics
A QuickTime movie is represented as a private data structure. Your application never works with individual fields in that data structure. Rather, the Movie Toolbox provides functions that allow you to work with a movie’s characteristics. Figure 1-7 shows some of the characteristics of a QuickTime movie.
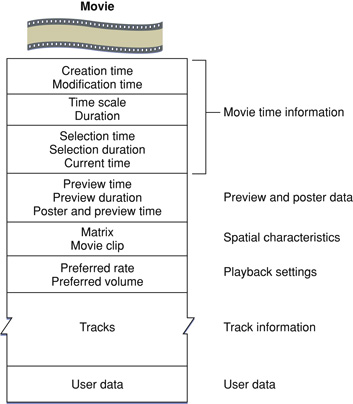
Every QuickTime movie has some state information, including a creation time and a modification time. These times are expressed in standard Macintosh time format, representing the number of seconds since midnight, January 1, 1904. The creation time indicates when the movie was created. The modification time indicates when the movie was last modified and saved.
Each movie has its own time coordinate system and time scale. Any time values that relate to the movie must be defined using this time scale and must be between 0 and the movie’s duration.
A movie’s preview is defined by its starting time and duration. Both of these time values are expressed in terms of the movie’s time scale. A movie’s poster is defined by its time value, which is in terms of the movie’s time scale. You assign tracks to the movie preview and the movie poster by calling the Movie Toolbox functions that are described later in this chapter.
Your current position in a movie is defined by the movie’s current time. If the movie is currently playing, this time value is changing. When you save a movie in a movie file, the Movie Toolbox updates the movie’s current time to reflect its current position. When you load a movie from a movie file, the Movie Toolbox sets the movie’s current time to the value found in the movie file.
The Movie Toolbox provides high-level editing functions that work with a movie’s current selection. The current selection defines a segment of the movie by specifying a start time, referred to as the selection time, and a duration, called the selection duration. These time values are expressed using the movie’s time scale.
For each movie currently in use, the Movie Toolbox maintains an active movie segment. The active movie segment is the part of the movie that your application is interested in playing. By default, the active movie segment is set to be the entire movie. You may wish to change this to be some segment of the movie; for example, if you wish to play a user’s selection repeatedly. By setting the active movie segment, you guarantee that the Movie Toolbox uses no samples from outside of that range while playing the movie.
A movie’s display characteristics are specified by a number of elements. The movie has a movie clipping region and a 3-by-3 transformation matrix. The Movie Toolbox uses these elements to determine the spatial characteristics of the movie. See Spatial Properties for a complete description of these elements and how they are used by the Movie Toolbox.
When you save a movie, you can establish preferred settings for playback rate and volume. The preferred playback rate is called the preferred rate. The preferred playback volume is called the preferred volume. These settings represent the most natural values for these movie characteristics. When the Movie Toolbox loads a movie from a movie file, it sets the movie’s volume to this preferred value. When you start playing the movie, the Movie Toolbox uses the preferred rate. You can then use Movie Toolbox functions to change the rate and volume during playback.
The Movie Toolbox allows your application to store its own data along with a movie. You define the format and content of these data objects. This application-specific data is called user data. You can use these data objects to store both text and binary data. For example, you can use text user data items to store a movie’s copyright and credit information. The Movie Toolbox provides functions that allow you to set and retrieve a movie’s user data. This data is saved with the movie when you save the movie.
Track Characteristics
A QuickTime track is represented as a private data structure. Your application never works with individual fields in that data structure. Rather, the Movie Toolbox provides functions that allow you to work with a track’s characteristics. Figure 1-8 shows the characteristics of a QuickTime track.
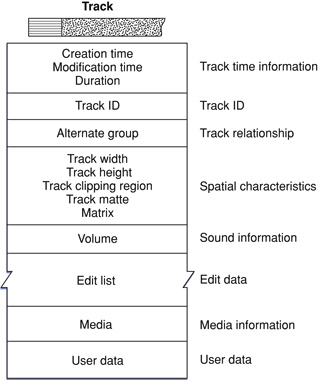
As with movies, each track has some state information, including a creation time and a modification time. These times are expressed in standard Macintosh time format, representing the number of seconds since midnight, January 1, 1904. The creation time indicates when the track was created. The modification time indicates when the track was last modified and saved.
Each track has its own duration value, which is expressed in the time scale of the movie that contains the track.
As has been discussed, movies can contain more than one track. In fact, a movie can contain more than one track of a given type. You might want to create a movie with several sound tracks, each in a different language, and then activate the sound track that is appropriate to the user’s native language. Your application can manage these collections of tracks by assigning each track of a given type to an alternate group. You can then choose one track from that group to be enabled at any given time. You can select a track from an alternate group based on its language or its playback quality. A track’s playback quality indicates its suitability for playback in a given environment. All tracks in an alternate group should refer to the same type of data.
A track’s display characteristics are specified by a number of elements, including track width, track height, a transformation matrix, and a clipping region. See Spatial Properties for a complete description of these elements and how they are used by the Movie Toolbox.
Each track has a current volume setting. This value controls how loudly the track plays relative to the movie volume.
Each track contains a media edit list. The edit list contains entries that define how the track’s media is to be used in the movie that contains the track. Each entry in the edit list indicates the starting time and duration of the media segment, along with the playback rate for that segment.
Each track has an associated media. See the next section for more information about media structures and their characteristics.
The Movie Toolbox allows your application to store its own user data along with a track. You define the format and content of these data objects. The Movie Toolbox provides functions that allow you to set and retrieve a track’s user data. This data is saved with the track when you save the movie.
Media Characteristics
As is the case with movies and tracks, a QuickTime media is represented as a private data structure. Your application never works with individual fields in that data structure. Rather, the Movie Toolbox provides functions that allow you to work with a media’s characteristics. Figure 1-9 shows the characteristics of a QuickTime media.
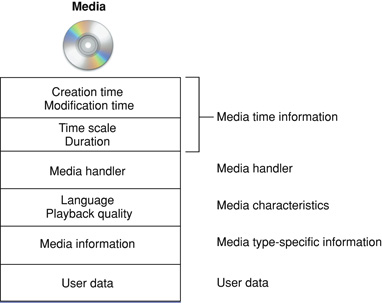
Each QuickTime media has some state information, including a creation time and a modification time. These times are expressed in standard Macintosh time format, representing the number of seconds since midnight, January 1, 1904. The creation time indicates when the media was created. The modification time indicates when the media was last modified and saved.
Each media has its own time coordinate system, which is defined by its time scale and duration. Any time values that relate to the media must be defined in terms of this time scale and must be between 0 and the media’s duration.
A media contains information that identifies its language and playback quality. These values are used when selecting one track to present from the tracks in an alternate group.
The media specifies a media handler, which is responsible for the details of loading, storing, and playing media data. The media handler can store state information in the media. This information is referred to as media information. The media information identifies where the media’s data is stored and how to interpret that data. Typically, this data is stored in a data reference, which identifies the file that contains the data and the type of data that is stored in the file.
The Movie Toolbox allows your application to store its own user data along with a media. You define the format and content of these data objects. The Movie Toolbox provides functions that allow you to set and retrieve a media’s user data. This data is saved with the media when you save the movie.
Spatial Properties
When you play a movie that contains visual data, the Movie Toolbox gathers the movie’s data from the appropriate tracks and media structures, transforms the data as appropriate, and displays the results in a window. The Movie Toolbox uses only those tracks that
are not empty
contain media structures that reference data at a specified time
are enabled in the current movie mode (standard playback, poster mode, or preview mode)
Consequently, the size, shape, and location of many of these regions may change during movie playback. This process is quite complicated and involves several phases of clipping and resizing.
The Movie Toolbox shields you from the intricacies of this process by providing two high-level functions, GetMovieBox and SetMovieBox, which allow you to place a movie box at a specific location in the display coordinate system. When you use these functions, the Movie Toolbox automatically adjusts the contents of the movie’s matrix to satisfy your request.
Figure 1-10 provides an overview of the entire process of gathering, transforming, and displaying visual data. Each track defines its own spatial characteristics, which are then interpreted within the context of the movie’s spatial characteristics.
This section describes the process that the Movie Toolbox uses to display a movie. The process begins with the movie data and ends with the final movie display. The phases, which are described in this section, include
the creation of a track rectangle (see Figure 1-11)
the clipping of a track’s image (see Figure 1-12)
the transformation of a track into the movie coordinate system (see Figure 1-13)
the clipping of a movie image (see Figure 1-14)
the transformation of a movie into the display coordinate system (see Figure 1-15)
the clipping of a movie for final display (see Figure 1-16)
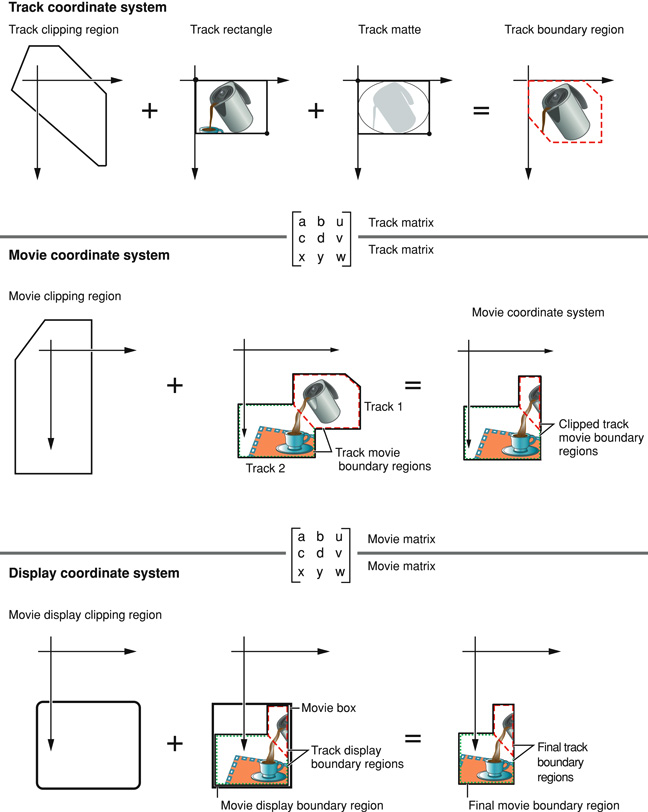
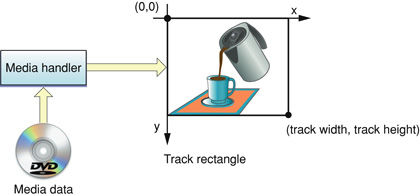
Each track defines a rectangle into which its media is displayed. This rectangle is referred to as the track rectangle, and it is defined by the track width and track height values assigned to the track. The upper-left corner of this rectangle defines the origin point of the track’s coordinate system.
The media handler associated with the track’s media is responsible for displaying an image into this rectangle. This process is shown in Figure 1-11.
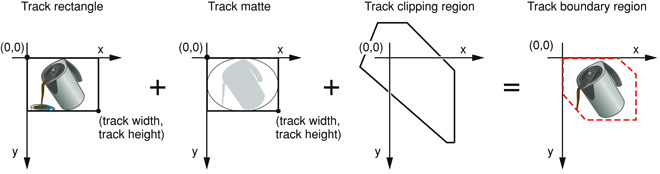
The Movie Toolbox next mattes the image in the track rectangle by applying the track matte and the track clipping region. This does not affect the shape of the image; only the display. Both the track matte and the track clipping region are optional.
A track matte provides a mechanism for mixing images. Mattes contain several bits per pixel and are defined in the track’s coordinate system. The matte can be used to perform a deep-mask operation on the image in the track rectangle. The Movie Toolbox displays the weighted average of the track and its destination based on the corresponding pixel value in the matte.
The track clipping region is a QuickDraw region that defines a portion of the track rectangle to retain. The track clipping region is defined in the track’s coordinate system. This clipping operation creates the track boundary region, which is the intersection of the track rectangle and the track clipping region.
This process and its results are shown in Figure 1-12.
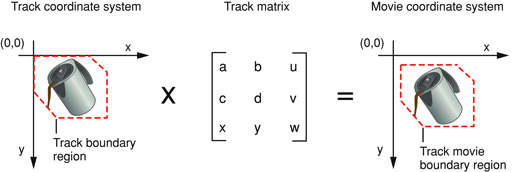
After clipping and matting the track’s image, the Movie Toolbox transforms the resulting image into the movie’s coordinate system. The Movie Toolbox uses a 3-by-3 transformation matrix to accomplish this operation (see The Transformation Matrix for a discussion of matrix operations in the Movie Toolbox). The image inside the track boundary region is transformed by the track’s matrix into the movie coordinate system. The resulting area is bounded by the track movie boundary region. Figure 1-13 shows the results of this transformation operation.
The Movie Toolbox performs this portion of the process for each track in the movie. Once all of the movie’s tracks have been processed, the Movie Toolbox proceeds to transform the complete movie image for display.
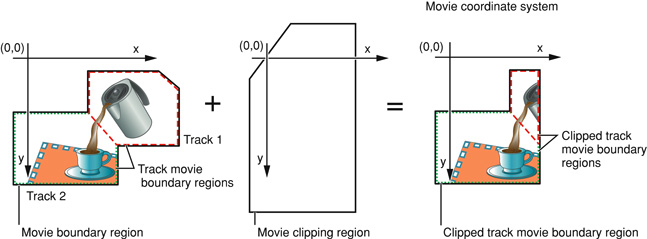
The union of all track movie boundary regions for a movie defines the movie’s movie boundary region. The Movie Toolbox combines a movie’s tracks into this single region where layers are applied. Therefore, tracks in back layers may be partially or completely obscured by tracks in front layers. The Movie Toolbox clips this region to obtain the clipped movie boundary region. The movie’s movie clipping region defines the portion of the movie boundary region that is to be used. Figure 1-14 shows the process by which a movie is clipped and the resulting clipped movie boundary region.
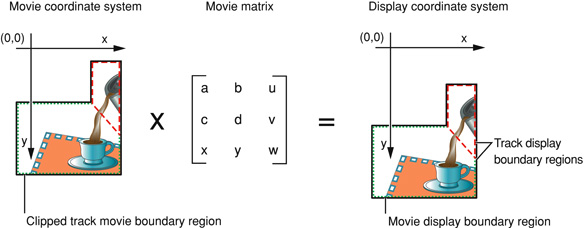
After clipping the movie’s image, the Movie Toolbox transforms the resulting image into the display coordinate system. The Movie Toolbox uses a 3-by-3 transformation matrix to accomplish this operation (see The Transformation Matrix for a complete discussion of matrix operations in the Movie Toolbox). The image inside the clipped movie boundary region is transformed by the movie’s matrix into the display coordinate system. The resulting area is bounded by the movie display boundary region. Figure 1-15 shows the results of this step.
The rectangle that encloses the movie display boundary region is called the movie box, as shown in Figure 1-16. You can control the location of a movie’s movie box by adjusting the movie’s transformation matrix.
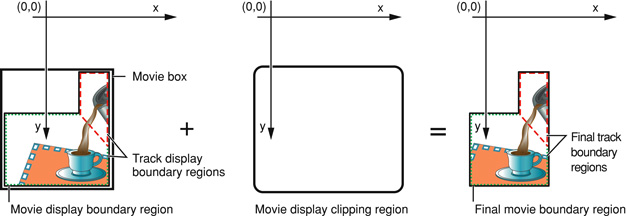
Once the movie is in the display coordinate system (that is, the QuickDraw graphics world), the Movie Toolbox performs a final clipping operation to generate the image that is displayed. The movie is clipped with the movie display clipping region. When a movie is displayed, the Movie Toolbox ignores the graphics port’s clipping region; this is why there is a movie display clipping region. Figure 1-16 shows this operation.
The Transformation Matrix
The Movie Toolbox makes extensive use of transformation matrices to define graphical operations that are performed on movies when they are displayed. A transformation matrix defines how to map points from one coordinate space into another coordinate space. By modifying the contents of a transformation matrix, you can perform several standard graphical display operations, including translation, rotation, and scaling. The Movie Toolbox provides a set of functions that make it easy for you to manipulate translation matrices. Those functions are discussed in QuickTime Movie Internals Guide. The remainder of this section provides an introduction to matrix operations in a graphical environment.
The matrix used to accomplish two-dimensional transformations is described mathematically by a 3-by-3 matrix. Figure 1-17 shows a sample 3-by-3 matrix. Note that QuickTime assumes that the values of the matrix elements u and v are always 0.0, and the value of matrix element w is always 1.0.
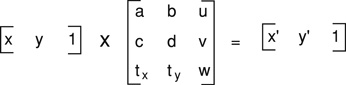
During display operations, the contents of a 3-by-3 matrix transform a point (x,y) into a point (x',y') by means of the following equations:
x' = ax + cy + t(x)
y' = bx + dy + t(y)
For example, the matrix shown in Figure 1-18 performs no transformation. It is referred to as the identity matrix.

Using the formulas discussed earlier, you can see that this matrix would generate a new point (x',y') that is the same as the old point (x,y):
x' = 1x + 0y + 0
y' = 0x + 1y + 0
x' = y and y' = y
In order to move an image by a specified displacement, you perform a translation operation. This operation modifies the x and y coordinates of each point by a specified amount. The matrix shown in Figure 1-19 describes a translation operation.

You can stretch or shrink an image by performing a scaling operation. This operation modifies the x and y coordinates by some factor. The magnitude of the x and y factors governs whether the new image is larger or smaller than the original. In addition, by making the x factor negative, you can flip the image about the x-axis; similarly, you can flip the image horizontally, about the y-axis, by making the y factor negative. The matrix shown in Figure 1-20 describes a scaling operation.

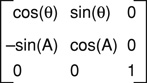
Finally, you can rotate an image by a specified angle by performing a rotation operation. You specify the magnitude and direction of the rotation by specifying factors for both x and y. The matrix shown in Figure 1-21 rotates an image counterclockwise by an angle q.
You can combine matrices that define different transformations into a single matrix. The resulting matrix retains the attributes of both transformations. For example, you can both scale and translate an image by defining a matrix similar to that shown in Figure 1-22.
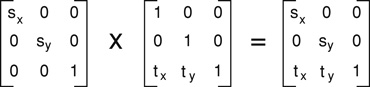
You combine two matrices by concatenating them. Mathematically, the two matrices are combined by matrix multiplication. Note that the order in which you concatenate matrices is important; matrix operations are not commutative.
Transformation matrices used by the Movie Toolbox contain the following data types:
[0] [0] Fixed [1] [0] Fixed [2] [0] Fract |
[0] [1] Fixed [1] [1] Fixed [2] [1] Fract |
[0] [2] Fixed [1] [2] Fixed [2] [2] Fract |
Each cell in this table represents the data type of the corresponding element of a 3-by-3 matrix. All of the elements in the first two columns of a matrix are represented by Fixed values. Values in the third column are represented as Fract values. The Fract data type specifies a 32-bit, fixed-point value that contains 2 integer bits and 30 fractional bits. This data type is useful for accurately representing numbers in the range from -2 to 2.
Audio Properties
This section discusses the sound capabilities of QuickTime and the Movie Toolbox. It has been divided into the following topics:
Sound Playback discusses the playback capabilities of the Movie Toolbox
Adding Sound to Video discusses several issues you should consider when creating movies that contain both sound and video
Sound Data Formats describes the formats the Movie Toolbox uses to store sound information
Sound Playback
As is the case with video data, QuickTime movies store sound information in tracks. QuickTime movies may have one or more sound tracks. The Movie Toolbox can play more than one sound at a time by mixing the enabled sound tracks together during playback. This allows you to put together movies with separate music and voice tracks. You can then manipulate the tracks separately but play them together. You can also use multiple sound tracks to store different languages.
There are two main attributes of sound in QuickTime movies: volume and balance. You can control these attributes using the facilities of the Movie Toolbox.
Every QuickTime movie has a current volume setting. This volume setting controls the loudness of the movie’s sound. You can adjust a movie’s current volume by calling the SetMovieVolume function. In addition, you can set a preferred volume setting for a movie. This value represents the best volume for the movie. The Movie Toolbox saves this value when you store a movie into a movie file. The value of the current volume is lost. You can set a movie’s preferred volume by calling the SetMoviePreferredVolume function. When you load a movie from a movie file, the Movie Toolbox sets the movie’s current volume to the value of its preferred volume.
Each track in a movie also has a volume setting. A track’s volume governs its loudness relative to other tracks in the movie. You can set a track’s volume by calling the SetTrackVolume function.
In the Movie Toolbox, movie and track volumes are represented as 16-bit, fixed-point numbers that range from -1.0 to +1.0. The high-order 8 bits contain the integer portion of the value; the low-order 8 bits contain the fractional part. Positive values denote volume settings, with 1.0 corresponding to the maximum volume on the user’s computer. Negative values are muted, but retain the magnitude of the volume setting so that, by toggling the sign of a volume setting, you can turn off the sound and then turn it back on at the previous level (something like pressing the mute button on a radio).
A track’s volume is scaled to a movie’s volume, and the movie’s volume is scaled to the value the user specifies for speaker volume using the Sound control panel. That is, a movie’s volume setting represents the maximum loudness of any track in the movie. If you set a track’s volume to a value less than 1.0, that track plays proportionally quieter, relative to the loudness of other tracks in the movie.
Each track in a movie has its own balance setting. The balance setting controls the mix of sound between a computer’s two speakers. If the source sound is monaural, the balance setting controls the relative loudness of each speaker. If the source sound is stereo, the balance setting governs the mix of the right and left channels. You can set the balance for a track’s media by calling the SetSoundMediaBalance function. When you save the movie, the balance setting is stored in the movie file.
In the Movie Toolbox, balance values are represented as 16-bit, fixed-point numbers that range from -1.0 to +1.0. The high-order 8 bits contain the integer portion of the value; the low-order 8 bits contain the fractional part. Negative values weight the balance toward the left speaker; positive values emphasize the left channel. Setting the balance to 0 corresponds to a neutral setting.
Adding Sound to Video
Most QuickTime movies contain both sound data and video data. If you are creating an application that plays movies, you do not need to worry about the details of how sound is stored in a movie. However, if you are developing an application that creates movies, you need to consider how you store the sound and video data.
There are two ways to store sound data in a QuickTime movie. The simplest method is to store the sound track as a continuous stream. When you play a movie that has its sound in this form, the Movie Toolbox loads the entire sound track into memory, and then reads the video frames when they are needed for display. While this technique is very efficient, it requires a large amount of memory to store the entire sound, which limits the length of the movie. This technique also requires a large amount of time to read in the entire sound track before the movie can start playing. For this reason, this technique is only recommended when the sound for a movie is fairly small (less than 64 KB).
For larger movies, a technique called interleaving must be used so that the sound and video data may be alternated in small pieces, and the data can be read off disk as it is needed. Interleaving allows for movies of almost any length with little delay on startup. However, you must tune the storage parameters to avoid a lower video frame rate and breaks in the sound that result when sound data is read from slow storage devices. In general, the Movie Toolbox hides the details of interleaving from your application. The FlattenMovie and FlattenMovieData functions allow you to enable and disable interleaving when you create a movie. These functions then interact with the appropriate media handler to correctly interleave the sound and video data for your movie.
Sound Data Formats
The Movie Toolbox stores sound data in sound tracks as a series of digital samples. Each sample specifies the amplitude of the sound at a given point in time, a format commonly known as linear pulse-code modulation (linear PCM). The Movie Toolbox supports both monaural and stereo sound. For monaural sounds, the samples are stored sequentially, one after another. For stereo sounds, the samples are stored interleaved in a left/right/left/right fashion.
In order to support a broad range of audio data formats, the Movie Toolbox can accommodate a number of different sample encoding formats, sample sizes, sample rates, and compression algorithms. The following paragraphs discuss the details of each of these attributes of movie sound data.
The Movie Toolbox supports two techniques for encoding the amplitude values in a sample: offset-binary and twos-complement. Offset-binary encoding represents the range of amplitude values as an unsigned number, with the midpoint of the range representing silence. For example, an 8-bit sample stored in offset-binary format would contain sample values ranging from 0 to 255, with a value of 128 specifying silence (no amplitude). Samples in Macintosh sound resources are stored in offset-binary form.
Twos-complement encoding stores the amplitude values as a signed number; in this case silence is represented by a sample value of 0. Using the same 8-bit example, twos-complement values would range from -128 to 127, with 0 meaning silence. The Audio Interchange File Format (AIFF) used by the Sound Manager stores samples in twos-complement form, so it is common to see this type of sound in QuickTime movies.
The Movie Toolbox allows you to store information about the sound data in the sound description. See Creating a Sound Description Structure for details of the sound description structure. Sample size indicates the number of bits used to encode the amplitude value for each sample. The size of a sample determines the quality of the sound, since more bits can represent more amplitude values. The basic Macintosh sound hardware supports only 8-bit samples, but the Sound Manager also supports 16-bit and 32-bit sample sizes. The Movie Toolbox plays these larger samples on 8-bit Macintosh hardware by converting the samples to 8-bit format before playing them.
Sample rate indicates the number of samples captured per second. The sample rate also influences the sound quality, because higher rates can more accurately capture the original sound waveform. The basic Macintosh hardware supports an output sampling rate of 22.254 kHz. The Movie Toolbox can support any rate up to 65.535 kHz; as with sample size, the Movie Toolbox converts higher sample rates to rates that can be accommodated by the Macintosh hardware when it plays the sound.
In addition to these sample encoding formats, the Movie Toolbox also supports the Macintosh Audio Compression and Expansion ( MACE) capability of the Sound Manager. This allows compression of the sound data at ratios of 3 to 1 or 6 to 1. Compressing a movie’s sound can yield significant savings in storage and RAM space, at the cost of somewhat lower quality and higher CPU overhead on playback.
Sample Programs
Creating a movie involves several steps. You must first create and open the movie file that is to contain the movie. You then create the tracks and media structures for the movie. You then add samples to the media structures. Finally, you add the movie resource to the movie file. The sample program in this section, CreateWayCoolMovie, demonstrates this process.
This program has been divided into several segments. The main segment, CreateMyCoolMovieMovie Toolbox, creates and opens the movie file, then invokes other functions to create the movie itself. Once the data has been added to the movie, this function saves the movie in its movie file and closes the file.
The CreateMyCoolMovie function uses the CreateMyVideoTrack and CreateMySoundTrack functions to create the movie’s tracks. The CreateMyVideoTrack function creates the video track and the media that contains the track’s data. It then collects sample data in the media by calling the AddVideoSamplesToMedia function. Note that this function uses the Image Compression Manager. The CreateMySoundTrack function creates the sound track and the media that contains the sound. It then collects sample data by calling the AddSoundSamplesToMedia function.
Main Function
The CreateWayCoolMovie program consists of a number of segments, many of which are not included in this sample. Omitted segments deal with general initialization logic and other common aspects of Macintosh programming. The main function, shown in Listing 1-1, shows you how to initialize various parts of the Movie Toolbox and call the EnterMovies function.
Listing 1-1 Creating a movie: the main program
#include <Types.h> |
#include <Traps.h> |
#include <Menus.h> |
#include |
#include <Memory.h> |
#include <Errors.h> |
#include <Fonts.h> |
#include <QuickDraw.h> |
#include <Resources.h> |
#include <GestaltEqu.h> |
#include <FixMath.h> |
#include <Sound.h> |
#include <string.h> |
#include "Movies.h" |
#include "ImageCompression.h" |
void CheckError(OSErr error, Str255 displayString) |
{ |
if (error == noErr) return; |
if (displayString[0] > 0) |
DebugStr(displayString); |
ExitToShell(); |
} |
void InitMovieToolbox (void) |
{ |
OSErr err; |
InitGraf (&qd.thePort); |
InitFonts (); |
InitWindows (); |
InitMenus (); |
TEInit (); |
InitDialogs (nil); |
err = EnterMovies (); |
CheckError (err, "\pEnterMovies" ); |
} |
void main( void ) |
{ |
InitMovieToolbox (); |
CreateMyCoolMovie (); |
} |
Creating and Opening a Movie File
The CreateMyCoolMovie function, shown in Listing 1-2, contains the main logic for this program. This function creates and opens a movie file for the new movie. It then establishes a data reference for the movie’s data (note that, if your movie’s data is stored in the same file as the movie itself, you do not have to create a data reference; set the data reference to 0). This function then calls two other functions, CreateMyVideoTrack and CreateMySoundTrack, to create the tracks for the new movie. Once the tracks have been created, CreateMyCoolMovie adds the new resource to the movie file and closes the movie file.
Listing 1-2 Creating and opening a movie file
#define kMyCreatorType 'TVOD' /* Sample Player's creator type, the |
movie player of choice. You can |
also use your own creator type. */ |
#define kPrompt "\pEnter movie file name" |
void CreateMyCoolMovie (void) |
{ |
Point where = {100,100}; |
SFReply theSFReply; |
Movie theMovie = nil; |
FSSpec mySpec; |
short resRefNum = 0; |
short resId = 0; |
OSErr err = noErr; |
SFPutFile (where, "\pEnter movie file name", |
"\pMovie File", nil, &theSFReply); |
if (!theSFReply.good) return; |
FSMakeFSSpec(theSFReply.vRefNum, 0, |
theSFReply.fName, &mySpec); |
err = CreateMovieFile (&mySpec, |
'TVOD', |
smCurrentScript, |
createMovieFileDeleteCurFile, |
&resRefNum, |
&theMovie ); |
CheckError(err, "\pCreateMovieFile"); |
CreateMyVideoTrack (theMovie); |
CreateMySoundTrack (theMovie); |
err = AddMovieResource (theMovie, resRefNum, &resId, |
theSFReply.fName); |
CheckError(err, "\pAddMovieResource"); |
if (resRefNum) CloseMovieFile (resRefNum); |
DisposeMovie (theMovie); |
} |
The code listing above adds the movie to the resource fork of the file that it creates. It is possible to create a movie file with no resource fork, and to store the movie in the file’s data fork.
To create a movie file with no resource fork, pass the createMovieFileDontCreateResFile flag when you call CreateMovieFile. To store the movie into the file’s data fork, call AddMovieResource as shown, but pass kResFileNotOpened as the resRefNum parameter, and pass movieInDataForkResID in the ResID parameter.
Creating a Video Track in a New Movie
The CreateMyVideoTrack function, shown in Listing 1-3, creates a video track in the new movie. This function creates the track and its media by calling the NewMovieTrack and NewTrackMedia functions, respectively. This function then establishes a media-editing session and adds the movie’s data to the media. The bulk of this work is done by the AddVideoSamplesToMedia subroutine. Once the data has been added to the media, this function adds the media to the track by calling the Movie Toolbox’s InsertMediaIntoTrack function.
Listing 1-3 Creating a video track
#define kVideoTimeScale 600 |
#define kTrackStart 0 |
#define kMediaStart 0 |
#define kFix1 0x00010000 |
void CreateMyVideoTrack (Movie theMovie) |
{ |
Track theTrack; |
Media theMedia; |
OSErr err = noErr; |
Rect trackFrame = {0,0,100,320}; |
theTrack = NewMovieTrack (theMovie, |
FixRatio(trackFrame.right,1), |
FixRatio(trackFrame.bottom,1), |
kNoVolume); |
CheckError( GetMoviesError(), "\pNewMovieTrack" ); |
theMedia = NewTrackMedia (theTrack, VideoMediaType, |
600, // Video Time Scale |
nil, 0); |
CheckError( GetMoviesError(), "\pNewTrackMedia" ); |
err = BeginMediaEdits (theMedia); |
CheckError( err, "\pBeginMediaEdits" ); |
AddVideoSamplesToMedia (theMedia, &trackFrame); |
err = EndMediaEdits (theMedia); |
CheckError( err, "\pEndMediaEdits" ); |
err = InsertMediaIntoTrack (theTrack, 0, /* track start time */ |
0, /* media start time */ |
GetMediaDuration (theMedia), |
kFix1); |
CheckError( err, "\pInsertMediaIntoTrack" ); |
} |
Adding Video Samples to a Media
The AddVideoSamplesToMedia function, shown in Listing 1-4, creates video data frames, compresses each frame, and adds the frames to the media. This function creates its own video data by calling the DrawAFrame function. Note that this function does not temporally compress the image sequence; rather, the function only spatially compresses each frame individually.
Listing 1-4 Adding video samples to a media
#define kSampleDuration 240 |
/* video frames last 240 * 1/600th of a second */ |
#define kNumVideoFrames 29 |
#define kNoOffset 0 |
#define kMgrChoose 0 |
#define kSyncSample 0 |
#define kAddOneVideoSample 1 |
#define kPixelDepth 16 |
void AddVideoSamplesToMedia (Media theMedia, |
const Rect *trackFrame) |
{ |
long maxCompressedSize; |
GWorldPtr theGWorld = nil; |
long curSample; |
Handle compressedData = nil; |
Ptr compressedDataPtr; |
ImageDescriptionHandle imageDesc = nil; |
CGrafPtr oldPort; |
GDHandle oldGDeviceH; |
OSErr err = noErr; |
err = NewGWorld (&theGWorld, |
16, /* pixel depth */ |
trackFrame, |
nil, |
nil, |
(GWorldFlags) 0 ); |
CheckError (err, "\pNewGWorld"); |
LockPixels (theGWorld->portPixMap); |
err = GetMaxCompressionSize (theGWorld->portPixMap, |
trackFrame, |
0, /* let ICM choose depth */ |
codecNormalQuality, |
'rle ', |
(CompressorComponent) anyCodec, |
&maxCompressedSize); |
CheckError (err, "\pGetMaxCompressionSize" ); |
compressedData = NewHandle(maxCompressedSize); |
CheckError( MemError(), "\pNewHandle" ); |
MoveHHi( compressedData ); |
HLock( compressedData ); |
compressedDataPtr = StripAddress( *compressedData ); |
imageDesc = (ImageDescriptionHandle)NewHandle(4); |
CheckError( MemError(), "\pNewHandle" ); |
GetGWorld (&oldPort, &oldGDeviceH); |
SetGWorld (theGWorld, nil); |
for (curSample = 1; curSample < 30; curSample++) |
{ |
EraseRect (trackFrame); |
DrawFrame(trackFrame, curSample); |
err = CompressImage (theGWorld->portPixMap, |
trackFrame, |
codecNormalQuality, |
'rle ', |
imageDesc, |
compressedDataPtr ); |
CheckError( err, "\pCompressImage" ); |
err = AddMediaSample(theMedia, |
compressedData, |
0, /* no offset in data */ |
(**imageDesc).dataSize, |
60, /* frame duration = 1/10 sec */ |
(SampleDescriptionHandle)imageDesc, |
1, /* one sample */ |
0, /* self-contained samples */ |
nil); |
CheckError( err, "\pAddMediaSample" ); |
} |
SetGWorld (oldPort, oldGDeviceH); |
if (imageDesc) DisposeHandle ((Handle)imageDesc); |
if (compressedData) DisposeHandle (compressedData); |
if (theGWorld) DisposeGWorld (theGWorld); |
} |
Creating Video Data for a Movie
The DrawAFrame function, shown in Listing 1-5, creates video data for this movie. This function draws a different frame each time it is invoked, based on the sample number, which is passed as a parameter.
Listing 1-5 Creating video data
void DrawFrame (const Rect *trackFrame, long curSample) |
{ |
Str255 numStr; |
ForeColor( redColor ); |
PaintRect( trackFrame ); |
ForeColor( blueColor ); |
NumToString (curSample, numStr); |
MoveTo ( trackFrame->right / 2, trackFrame->bottom / 2); |
TextSize ( trackFrame->bottom / 3); |
DrawString (numStr); |
} |
Creating a Sound Track
The CreateMySoundTrack function, shown in Listing 1-6, creates the movie’s sound track. This sound track is not synchronized to the video frames of the movie; rather, it is just a separate sound track that accompanies the video data. This function relies upon an 'snd ' resource for its source sound. The CreateMySoundTrack function uses the CreateSoundDescription function to create the sound description structure for these samples.
As with the CreateMyVideoTrack function discussed earlier, this function creates the track and its media by calling the NewMovieTrack and NewTrackMedia functions, respectively. This function then establishes a media-editing session and adds the movie’s data to the media. This function adds the sound samples using a single invocation of the AddMediaSample function. This is possible because all the sound samples are the same size and rely on the same sample description (the SoundDescription structure). If you use this approach, it is often advisable to break up the sound data in the movie, so that the movie plays smoothly. After you create the movie, you can call the FlattenMovie function to create an interleaved version of the movie. Another approach is to call AddMediaSample multiple times, breaking the sound into multiple chunks at that point.
Once the data has been added to the media, this function adds the media to the track by calling the Movie Toolbox’s InsertMediaIntoTrack function.
Listing 1-6 Creating a sound track
#define kSoundSampleDuration 1 |
#define kSyncSample 0 |
#define kTrackStart 0 |
#define kMediaStart 0 |
#define kFix1 0x00010000 |
void CreateMySoundTrack (Movie theMovie) |
{ |
Track theTrack; |
Media theMedia; |
Handle sndHandle = nil; |
SoundDescriptionHandle sndDesc = nil; |
long sndDataOffset; |
long sndDataSize; |
long numSamples; |
OSErr err = noErr; |
sndHandle = GetResource ('snd ', 128); |
CheckError (ResError(), "\pGetResource" ); |
if (sndHandle == nil) return; |
sndDesc = (SoundDescriptionHandle) NewHandle(4); |
CheckError (MemError(), "\pNewHandle" ); |
CreateSoundDescription (sndHandle, |
sndDesc, |
&sndDataOffset, |
&numSamples, |
&sndDataSize ); |
theTrack = NewMovieTrack (theMovie, 0, 0, kFullVolume); |
CheckError (GetMoviesError(), "\pNewMovieTrack" ); |
theMedia = NewTrackMedia (theTrack, SoundMediaType, |
FixRound ((**sndDesc).sampleRate), |
nil, 0); |
CheckError (GetMoviesError(), "\pNewTrackMedia" ); |
err = BeginMediaEdits (theMedia); |
CheckError( err, "\pBeginMediaEdits" ); |
err = AddMediaSample(theMedia, |
sndHandle, |
sndDataOffset, /* offset in data */ |
sndDataSize, |
1, /* duration of each sound sample */ |
(SampleDescriptionHandle) sndDesc, |
numSamples, |
0, /* self-contained samples */ |
nil ); |
CheckError( err, "\pAddMediaSample" ); |
err = EndMediaEdits (theMedia); |
CheckError( err, "\pEndMediaEdits" ); |
err = InsertMediaIntoTrack (theTrack, |
0, /* track start time */ |
0, /* media start time */ |
GetMediaDuration (theMedia), |
kFix1); |
CheckError( err, "\pInsertMediaIntoTrack" ); |
if (sndDesc != nil) DisposeHandle( (Handle)sndDesc); |
} |
Creating a Sound Description Structure
The CreateSoundDescription function, shown in Listing 1-7, creates a sound description structure that correctly describes the sound samples obtained from the 'snd ' resource. This function can handle all the sound data formats that are possible in the sound resource. This function uses the GetSndHdrOffset function to locate the sound data in the sound resource.
Listing 1-7 Creating a sound description
/* Constant definitions */ |
#define kMACEBeginningNumberOfBytes 6 |
#define kMACE31MonoPacketSize 2 |
#define kMACE31StereoPacketSize 4 |
#define kMACE61MonoPacketSize 1 |
#define kMACE61StereoPacketSize 2 |
void CreateSoundDescription (Handle sndHandle, |
SoundDescriptionHandlesndDesc, |
long *sndDataOffset, |
long *numSamples, |
long *sndDataSize ) |
{ |
long sndHdrOffset = 0; |
long sampleDataOffset; |
SoundHeaderPtr sndHdrPtr = nil; |
long numFrames; |
long samplesPerFrame; |
long bytesPerFrame; |
SignedByte sndHState; |
SoundDescriptionPtr sndDescPtr; |
*sndDataOffset = 0; |
*numSamples = 0; |
*sndDataSize = 0; |
SetHandleSize( (Handle)sndDesc, sizeof(SoundDescription) ); |
CheckError(MemError(),"\pSetHandleSize"); |
sndHdrOffset = GetSndHdrOffset (sndHandle); |
if (sndHdrOffset == 0) CheckError(-1, "\pGetSndHdrOffset "); |
/* we can use pointers since we don't move memory */ |
sndHdrPtr = (SoundHeaderPtr) (*sndHandle + sndHdrOffset); |
sndDescPtr = *sndDesc; |
sndDescPtr->descSize = sizeof (SoundDescription); |
/* total size of sound description structure */ |
sndDescPtr->resvd1 = 0; |
sndDescPtr->resvd2 = 0; |
sndDescPtr->dataRefIndex = 1; |
sndDescPtr->compressionID = 0; |
sndDescPtr->packetSize = 0; |
sndDescPtr->version = 0; |
sndDescPtr->revlevel = 0; |
sndDescPtr->vendor = 0; |
switch (sndHdrPtr->encode) |
{ |
case stdSH: |
sndDescPtr->dataFormat = 'raw '; |
/* uncompressed offset-binary data */ |
sndDescPtr->numChannels = 1; |
/* number of channels of sound */ |
sndDescPtr->sampleSize = 8; |
/* number of bits per sample */ |
sndDescPtr->sampleRate = sndHdrPtr->sampleRate; |
/* sample rate */ |
*numSamples = sndHdrPtr->length; |
*sndDataSize = *numSamples; |
bytesPerFrame = 1; |
samplesPerFrame = 1; |
sampleDataOffset = (Ptr)&sndHdrPtr->sampleArea - (Ptr)sndHdrPtr; |
break; |
case extSH: |
{ |
ExtSoundHeaderPtr extSndHdrP; |
extSndHdrP = (ExtSoundHeaderPtr)sndHdrPtr; |
sndDescPtr->dataFormat = 'raw '; |
/* uncompressed offset-binary data */ |
sndDescPtr->numChannels = extSndHdrP->numChannels; |
/* number of channels of sound */ |
sndDescPtr->sampleSize = extSndHdrP->sampleSize; |
/* number of bits per sample */ |
sndDescPtr->sampleRate = extSndHdrP->sampleRate; |
/* sample rate */ |
numFrames = extSndHdrP->numFrames; |
*numSamples = numFrames; |
bytesPerFrame = extSndHdrP->numChannels * |
(extSndHdrP->sampleSize / 8); |
samplesPerFrame = 1; |
*sndDataSize = numFrames * bytesPerFrame; |
sampleDataOffset = (Ptr)(&extSndHdrP->sampleArea) |
- (Ptr)extSndHdrP; |
} |
break; |
case cmpSH: |
{ |
CmpSoundHeaderPtr cmpSndHdrP; |
cmpSndHdrP = (CmpSoundHeaderPtr)sndHdrPtr; |
sndDescPtr->numChannels = cmpSndHdrP->numChannels; |
/* number of channels of sound */ |
sndDescPtr->sampleSize = cmpSndHdrP->sampleSize; |
/* number of bits per sample before compression */ |
sndDescPtr->sampleRate = cmpSndHdrP->sampleRate; |
/* sample rate */ |
numFrames = cmpSndHdrP->numFrames; |
sampleDataOffset =(Ptr)(&cmpSndHdrP->sampleArea) |
- (Ptr)cmpSndHdrP; |
switch (cmpSndHdrP->compressionID) |
{ |
case threeToOne: |
sndDescPtr->dataFormat = 'MAC3'; |
/* compressed 3:1 data */ |
samplesPerFrame = kMACEBeginningNumberOfBytes; |
*numSamples = numFrames * samplesPerFrame; |
switch (cmpSndHdrP->numChannels) |
{ |
case 1: |
bytesPerFrame = cmpSndHdrP->numChannels |
* kMACE31MonoPacketSize; |
break; |
case 2: |
bytesPerFrame = cmpSndHdrP->numChannels |
* kMACE31StereoPacketSize; |
break; |
default: |
CheckError(-1, "\pCorrupt sound data" ); |
break; |
} |
*sndDataSize = numFrames * bytesPerFrame; |
break; |
case sixToOne: |
sndDescPtr->dataFormat = 'MAC6'; |
/* compressed 6:1 data */ |
samplesPerFrame = kMACEBeginningNumberOfBytes; |
*numSamples = numFrames * samplesPerFrame; |
switch (cmpSndHdrP->numChannels) |
{ |
case 1: |
bytesPerFrame = cmpSndHdrP->numChannels |
* kMACE61MonoPacketSize; |
break; |
case 2: |
bytesPerFrame = cmpSndHdrP->numChannels |
* kMACE61StereoPacketSize; |
break; |
default: |
CheckError(-1, "\pCorrupt sound data" ); |
break; |
} |
*sndDataSize = (*numSamples) * bytesPerFrame; |
break; |
default: |
CheckError(-1, "\pCorrupt sound data" ); |
break; |
} |
} /* switch cmpSndHdrP->compressionID:*/ |
break; /* of cmpSH: */ |
default: |
CheckError(-1, "\pCorrupt sound data" ); |
break; |
} /* switch sndHdrPtr->encode */ |
*sndDataOffset = sndHdrOffset + sampleDataOffset; |
} |
Parsing a Sound Resource
The GetSndHdrOffset function, shown in Listing 1-8, parses the specified sound resource and locates the sound data stored in the resource. The GetSndHdrOffset function cruises through a specified 'snd ' resource. It locates the sound data, if any, and returns its type, offset, and size into the resource.
The GetSndHdrOffset function returns an offset instead of a pointer so that the data is not locked in memory. By returning an offset, the calling function can decide when and if it wants the resource locked down to access the sound data.
The first step in finding this data is to determine if the 'snd ' resource is format (type) 1 or format (type) 2. A type 2 is easy, but a type 1 requires that you find the number of 'snth' resource types specified and then skip over each one, including the init option. Once you do this, you have a pointer to the number of commands in the 'snd ' resource. When the function finds the first one, it examines the command to find out if it is a sound data command. Since it is a sound resource, the command also has its dataPointerFlag parameter set to 1. When the function finds a sound data command, it returns its offset and type and exits.
Listing 1-8 Parsing a sound resource
typedef SndCommand *SndCmdPtr; |
typedef struct |
{ |
short format; |
short numSynths; |
} Snd1Header, *Snd1HdrPtr, **Snd1HdrHndl; |
typedef struct |
{ |
short format; |
short refCount; |
} Snd2Header, *Snd2HdrPtr, **Snd2HdrHndl; |
typedef struct |
{ |
short synthID; |
long initOption; |
} SynthInfo, *SynthInfoPtr; |
long GetSndHdrOffset (Handle sndHandle) |
{ |
short howManyCmds; |
long sndOffset = 0; |
Ptr sndPtr; |
if (sndHandle == nil) return 0; |
sndPtr = *sndHandle; |
if (sndPtr == nil) return 0; |
if ((*(Snd1HdrPtr)sndPtr).format == firstSoundFormat) |
{ |
short synths = ((Snd1HdrPtr)sndPtr)->numSynths; |
sndPtr += sizeof(Snd1Header) + (sizeof(SynthInfo) * synths); |
} else |
{ |
sndPtr += sizeof(Snd2Header); |
} |
howManyCmds = *(short *)sndPtr; |
sndPtr += sizeof(howManyCmds); |
/* |
sndPtr is now at the first sound command -- cruise all |
commands and find the first soundCmd or bufferCmd |
*/ |
while (howManyCmds > 0) |
{ |
switch (((SndCmdPtr)sndPtr)->cmd) |
{ |
case (soundCmd + dataOffsetFlag): |
case (bufferCmd + dataOffsetFlag): |
sndOffset = ((SndCmdPtr)sndPtr)->param2; |
howManyCmds = 0;/* done, get out of loop */ |
break; |
default: /* catch any other type of commands */ |
sndPtr += sizeof(SndCommand); |
howManyCmds--; |
break; |
} |
} /* done with all commands */ |
return sndOffset; |
} /* of GetSndHdrOffset */ |
Copyright © 2005, 2009 Apple Inc. All Rights Reserved. Terms of Use | Privacy Policy | Updated: 2009-06-01