Gradients and Patterns
When you stroke or fill something on the canvas, it’s drawn using the current stroke or fill style. The stroke or fill style can be set to a color, a pattern, or a gradient.
Gradients
A gradient specifies a starting color, an ending color, and an area over which color changes. A single gradient can encompass more than one color change.
The 2D canvas drawing context supports two kinds of gradients: linear and radial.
Linear Gradients
A linear gradient defines color change along a line between two points. You create a linear gradient by calling createLinearGradient() and passing in two points.
var grad = ctx.createLinearGradient(x1, y1, x2, y2);
The next step in defining a gradient is to add at least two color stops. A color stop consists of a color and a position between 0 and 1, inclusive, where 0 is the beginning of the gradient and 1 is the end.
grad.addColorStop(0, 'black');
grad.addColorStop(1, 'white');
The color changes from one color stop to the next, at the defined intervals along the gradient.
Defining a linear gradient is like creating a virtual rectangle on the canvas, but it doesn’t display anything. To let the gradient “show through,” you need to set the fill style or stroke style to the gradient and draw something on top of the gradient. Note that if the thing you are drawing extends beyond the endpoints of the gradient, the fill or stroke color is the nearest color stop.
The example in Listing 3-1 defines a gradient that goes from black to white from the point 0,0 to the point 50,0, then fills a rectangle with the gradient. The rectangle extends 25 pixels beyond the gradient’s endpoints. The result is shown in Figure 3-1.
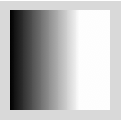
Listing 3-1 Creating a linear gradient
<html> |
<head> |
<title>Simple gradient example</title> |
<script type="text/javascript"> |
var can, ctx; |
function init() { |
can = document.getElementById("can"); |
ctx = can.getContext("2d"); |
drawGradient(); |
} |
function drawGradient() { |
var grad = ctx.createLinearGradient(10, 0, 80, 0); |
grad.addColorStop(0, 'black'); |
grad.addColorStop(1, 'white'); |
ctx.fillStyle = grad; |
ctx.fillRect(10, 10, 100, 100); |
} |
</script> |
</head> |
<body onload="init()" style="background-color:#e0e0e0"> |
<canvas id="can" height="200" width="400"> |
</canvas> |
</body> |
</html> |
The gradient in the example above blends horizontally—the y-coordinate of the second point is the same as that of the first point.
By creating a gradient with the second point above or below the first point, you can create a gradient that blends up or down. If the second point is above or below the first point, and to the left or right as well, you create a gradient that blends diagonally to the left or right.
By specifying a color stop with an RGBa color value, you can create a gradient that includes degrees of transparency.
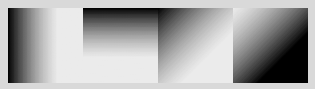
The following snippet redefines drawGradients() to draw four rectangles, each with a gradient going in a different direction, all going from black to 50% transparent white. Since the webpage has a light grey background, it shows through where the gradient is partly transparent. The output of the snippet is shown in Figure 3-2.
function drawGradients() { |
var grad = ctx.createLinearGradient(0, 0, 50, 0); |
grad.addColorStop(0, 'black'); |
grad.addColorStop(1, 'rgba(255, 255, 255, 0.5)'); |
ctx.fillStyle = grad; |
ctx.fillRect(0, 0, 75, 75); |
var g2 = ctx.createLinearGradient(0, 0, 0, 50); |
g2.addColorStop(0, 'black'); |
g2.addColorStop(1, 'rgba(255, 255, 255, 0.5)'); |
ctx.fillStyle = g2; |
ctx.fillRect(75, 0, 75, 75); |
var g3 = ctx.createLinearGradient(150, 0, 200, 50); |
g3.addColorStop(0, 'black'); |
g3.addColorStop(1, 'rgba(255, 255, 255, 0.5)'); |
ctx.fillStyle = g3; |
ctx.fillRect(150, 0, 75, 75); |
var g4 = ctx.createLinearGradient(275, 50, 225, 0); |
g4.addColorStop(0, 'black'); |
g4.addColorStop(1, 'rgba(255, 255, 255, 0.5)'); |
ctx.fillStyle = g4; |
ctx.fillRect(225, 0, 75, 75); |
} |
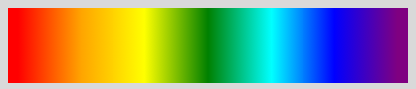
Of course, you can use colors other than black and white, and you can have more than one color stop. The following snippet redefines drawGradients() to create a rainbow gradient with seven color stops, each 1/6th of the distance along the gradient, as shown in Figure 3-3.
function drawGradients() { |
var grad = ctx.createLinearGradient(10, 0, 390, 0); |
grad.addColorStop(0, 'red'); |
grad.addColorStop(1 / 6, 'orange'); |
grad.addColorStop(2 / 6, 'yellow'); |
grad.addColorStop(3 / 6, 'green') |
grad.addColorStop(4 / 6, 'aqua'); |
grad.addColorStop(5 / 6, 'blue'); |
grad.addColorStop(1, 'purple'); |
ctx.fillStyle = grad; |
ctx.fillRect(0, 0, 400, 75); |
} |
Note that the rectangle extends a little beyond the ends of the gradient to display bands of pure red and purple.
Radial Gradients
A radial gradient defines a color change along a cone between two circles. You create a radial gradient by calling createRadialGradient() and passing in two circles, each defined by a center point and a radius. It’s common to use the same center point and different radii.
var grad = ctx.createRadialGradient(x, y, rad, x1, y1, rad1);
The next step is to add at least two color stops. A color stop consists of a color and a position between zero and one, inclusive, where zero is the beginning of the gradient and one is the end.
grad.addColorStop(0, 'black');
grad.addColorStop(1, 'white');
The color change goes from the first color stop to the last, at the defined intervals along the gradient.
The example in Listing 3-2 defines a radial gradient then uses it to fill a circle. The result is shown in Figure 3-4.
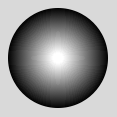
Listing 3-2 Creating a radial gradient
<html> |
<head> |
<title>Radial Gradient</title> |
<script type="text/javascript"> |
var can, ctx; |
function init() { |
can = document.getElementById("can"); |
ctx = can.getContext("2d"); |
drawGradients(); |
} |
function drawGradients() { |
var grad = ctx.createRadialGradient(50, 50, 5, 50, 50, 50); |
grad.addColorStop(0, 'white'); |
grad.addColorStop(1, 'black'); |
ctx.fillStyle = grad; |
ctx.arc(50, 50, 50, 0, 2 * Math.PI); |
ctx.fill(); |
} |
</script> |
</head> |
<body onload="init()" style="background-color:#e0e0e0"> |
<h2>Radial Gradient</h2> |
<canvas id="can" height="200" width="400"> |
</canvas> |
</body> |
</html> |
A radial gradient is commonly used to create a 3D lighting effect. The following snippet draws a blue-filled circle, then superimposes a gradient that goes from white at 90% opacity to black at 60% opacity. The center of the gradient is offset 10 pixels upward, to simulate a light source from above. The result is shown in Figure 3-5.
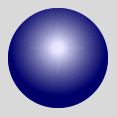
function drawGradients() { |
ctx.fillStyle = "blue"; |
ctx.beginPath; |
ctx.arc(50, 50, 50, 0, 2 * Math.PI); |
ctx.fill(); |
var grad = ctx.createRadialGradient(50,4 0, 5, 50, 40, 50); |
grad.addColorStop(0, 'rgba(255, 255, 255, 0.9)'); |
grad.addColorStop(1, 'rgba(0, 0, 0, 0.6)'); |
ctx.beginPath; |
ctx.fillStyle = grad; |
ctx.arc(50, 50, 50, 0, 2 * Math.PI); |
ctx.fill(); |
} |
Animating Gradients
You can’t change the existing color stops in a gradient after it’s created. To animate a gradient, you need to either create multiple gradients in advance and replace one with another, or generate new gradients on the fly.
The example in Listing 3-3 creates an endlessly repeating animated sequence of gradients, illustrated in Figure 3-6.
Listing 3-3 Animating a gradient
<html> |
<head> |
<title>Animated Gradient</title> |
<script type="text/javascript"> |
var can, ctx, angle = 0; |
function init() { |
can = document.getElementById("can"); |
ctx = can.getContext("2d"); |
var t = setInterval(animate, 50); |
} |
// animate() is called every 50 msec |
function animate() { |
// create a variable that cycles from -1 to 1 |
angle += 0.03; |
var scalar = Math.sin(angle); |
// create gradient that goes from bottom to top of canvas |
var grad = ctx.createLinearGradient(0, can.height, 0, 0); |
// start gradient at blue |
grad.addColorStop(0, 'blue'); |
// create rgb color value that goes from black to white |
// as the variable goes from -1 to 1 |
var r = parseInt(128 + 128 * scalar); |
var g = parseInt(128 + 128 * scalar); |
var b = parseInt(128 + 128 * scalar); |
// add color stop with new rgb color |
grad.addColorStop(1, "rgb(" + r + "," + g + "," + b + ")"); |
// clear canvas, fill canvas with gradient |
ctx.clearRect(0, 0, can.width, can.height); |
ctx.save(); |
ctx.fillStyle = grad; |
ctx.fillRect(0, 0, can.width, can.height); |
ctx.restore(); |
} |
</script> |
</head> |
<body onload="init()" style="background-color:#e0e0e0"> |
<h2>Animated Gradient</h2> |
<canvas id="can" height="250" width="500"> |
</canvas> |
</body> |
</html> |
Patterns
Patterns let you use small images in place of much larger graphics. A pattern can be made from a small, naturally repetitive image of sand, grass, or wood grain, for example, and used like a 2D texture map to generate photo-realistic landscapes or interiors.
You can choose a pattern to use as a stroke or fill style. A pattern consists of an image source—such as a JPG, GIF, PNG, SVG, or the currently playing frame of a video—and a repetition setting, to create a pattern from tiles of the image.
To create a pattern, you first need to create an image source, such as an img or video element, then get the element into a JavaScript object.
You create a pattern using the context’s createPattern() method, passing in the image object and a "repeat" parameter.
var dot = document.getElementById("dot");
var pat = ctx.createPattern(dot, "repeat");
The "repeat" string repeats the image both horizontally and vertically, but you can specify "repeat-x", "repeat-y", or "repeat-none" to cause the pattern to be repeat horizontally only, vertically only, or not at all.
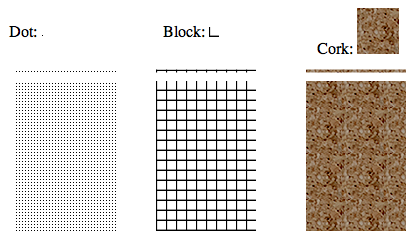
The example in Listing 3-4 loads three images—dot.png, block.png, and cork.png—and makes them into patterns that are each used to stroke a line and fill a rectangle. The result is shown in Figure 3-7.
Listing 3-4 Creating patterns
<html> |
<head> |
<title>Patterns</title> |
<script type="text/javascript"> |
function init() { |
var can = document.getElementById("can"); |
var ctx = can.getContext("2d"); |
// get images into objects |
var dot = document.getElementById("dot"); |
var block = document.getElementById("block"); |
var cork = document.getElementById("cork"); |
// create patterns from images |
var pat = ctx.createPattern(dot, "repeat"); |
var pat2 = ctx.createPattern(block, "repeat"); |
var pat3 = ctx.createPattern(cork, "repeat"); |
// make line thicker so pattern shows |
ctx.lineWidth = 3; |
// stroke line and fill rect with dot pattern |
ctx.beginPath(); |
ctx.moveTo(10, 10); |
ctx.lineTo(100, 10); |
ctx.strokeStyle=pat; |
ctx.stroke(); |
ctx.fillStyle = pat; |
ctx.fillRect(10, 20, 100, 150); |
// stroke line and fill rect with block pattern |
ctx.beginPath(); |
ctx.moveTo(150, 10); |
ctx.lineTo(250, 10); |
ctx.strokeStyle = pat2; |
ctx.stroke(); |
ctx.fillStyle = pat2; |
ctx.fillRect(150, 20, 100, 150); |
// stroke line and fill rect with cork pattern |
ctx.beginPath(); |
ctx.moveTo(300, 10); |
ctx.lineTo(400, 10); |
ctx.strokeStyle = pat3; |
ctx.stroke(); |
ctx.fillStyle = pat3; |
ctx.fillRect(300, 20, 100, 150); |
} |
</script> |
</head> |
<body onload="init()"> |
Dot: <img id="dot" src="dot.png" /><br /> |
Block: <img id="block" src="block.png" /><br /> |
Cork: <img id="cork" src="block.png" /><br /> |
<canvas id="can" height="200" width="300"> |
</canvas> |
</body> |
</html> |
Copyright © 2013 Apple Inc. All Rights Reserved. Terms of Use | Privacy Policy | Updated: 2013-09-18