Retired Document
Important: This document may not represent best practices for current development. Links to downloads and other resources may no longer be valid.
XMEML Topics
This chapter details information about selected Final Cut Pro XML topics, including
Notes on the XML Interchange Format
Timing Values
Managing Project Components
Managing QuickTime Metadata
Speed XML
Notes on the XML Interchange Format
Here are some additional details about the Interchange Format.
You cannot encode user interface information such as the size and position of a window, the source and destination settings for a track, or the height of a sequence track in an XML interchange format document.
Transitions or filters in the Browser are not included in an XML export.
Custom names for columns in the Browser are not included in an XML export. Exporting a project with custom column names and then reimporting it causes loss of data.
The drop/non-drop character of a timecode value is not included in an XML export.
Third party effects and custom master templates are not exported with the XML. If you export a sequence using one and then import the sequence on a machine where the effect or template is not available, the system replaces it with a default effect or default master template.
If you create a transition between two clips in a sequence, export the sequence, and then import it into the same project, the icon on the transition in the original sequence may lose its name.
The volume level for the audio track of a clip is encoded by the
Audio Levelseffect. The parameterLevelexpresses linear gain rather than decibels. To convert gain to decibels, use the formuladecibels = 20 * log10(Level). Conversely, to convert decibels to gain, useLevel = 10 ^ (decibels / 20).
For a summary description of changes to the Final Cut Pro XML Interchange Format and Final Cut, see Versions of XMEML and Final Cut.
Timing Values
Figure 4-1 illustrates the timing elements that encode the relation between clips, subclips and media.
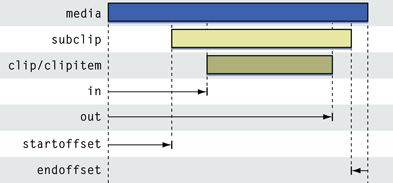
The elements in and out encode the initial and final points that specify the media content associated with a clip or clipitem. (In contrast, the elements start and end illustrated below specify the placement of a clipitem in a sequence.) The elements startoffset and endoffset encode the offset values specifying a subclip.
To convert in and out to timecode values, use the starting timecode in the media, if there is one. For media without timecodes, the default starting timecode is 00:00:00:00. For media with more than one timecode (such as media with source, aux1, aux2, sound), look for the primarytimecode subelement and use that value.
Figure 4-2 illustrates the elements that encode timing values for a clipitem in a sequence.
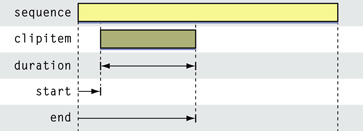
The elements start and end encode the start and end of a clipitem in an enclosing sequence. The element duration encodes the length of a clipitem. Note that the duration value for a clipitem may not match the duration value of the corresponding media, even when the clipitem and the media file are perfectly aligned. Applying speed to a clipitem, changing its framerate, or other edits can alter the duration of the clipitem.
To convert start and end to timecode values, use the timecode in the containing sequence, or, for Browser clips, the timecode on the file of the containing clip.
Figure 4-3 illustrates the relationships of timing elements for a multiclip and multiclip angles.
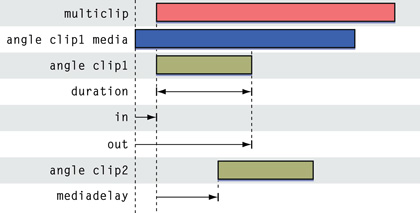
The angle encoding for clip 1 shows that an angle clip can use in and out encoding to indicate which portion of the media should be used for the clip.
Syncing by in point (synctype 1) means that all the in points for each angle clip are lined up at the beginning of the multiclip. In that case no mediadelay is required.
The simplified angle encoding for clip 2 shows how you can line up angle clips in a multiclip. The second angle will be black from the beginning of the multiclip for the duration specified in mediadelay. Then the second angle clip is displayed. (Note that it doesn't make sense for the mediadelay to be negative since you can simply mark a later in on the clip to achieve the same result.)
A good way to understand these timing values is to create the desired multiclip alignment in Final Cut Pro, then modify something (like the in point for one clip) and make another multiclip, then compare the XML for the multiclips and see where they differ.
Speed and Special Keyframes
Final Cut encodes speed on a clipitem with an array of special keyframes.
The specification of a special keyframe includes the elements when and value, where when is the position of the keyframe in the clipitem and value is the corresponding position in the underlying media. The element when is always integral; value may be fractional, which indicates that it will be blended into the next frame.
The first keyframe always has a value of 0 for when, and the last keyframe always has the duration of the clipitem as the value for when
Speed can be either constant or variable.
If speed is constant, a graph of the
when-valuepairs is linear.If speed is variable, the values of the
when-valuepairs are arbitrary and the resulting graph is non-linear.
Special and Virtual Keyframes
Final Cut exports four special keyframes for a clipitem with speed. They are:
speedkfstart—the first keyframe. Not present ifspeedkfinis on the first frame.speedkfin—the keyframe at the in point.speedkfout—the keyframe at the out point.speedkfend—the last keyframe. Not present ifspeedkfoutis at the end.
At times, Final Cut writes out a speed keyframe in the XML that is not actually on the clipitem. These “virtual” keyframes are flagged with the Boolean element speedvirtualkf set to TRUE.
Final Cut ignores virtual keyframes on import unless they are on the first or last keyframe.
The anchoroffset Element
The anchoroffset element is new in version 5 of the Final Cut Pro XML Interchange Format (xmeml). It is an optional value that describes an offset from a keyframe for playback. Final Cut Pro uses it to preserve accuracy over speed changes.
For example, if you apply 200% speed to a clipitem, the frames would play back at: 0, 2, 4, ... But if speedkfin is set at 3, playback would start from a frame that is no longer available. To adjust, Final Cut adds an anchoroffset of 1.0 so that the fames would play back at 1, 3, 5, 7, ... starting correctly from the frame specified by speedkfin .
Keyframe Adjustments
For historical reasons, there are two modifications you should keep in mind when reading or writing special keyframes for speed.
Last Frame Adjustment—Final Cut increments
whenandvaluein the last keyframe by 1.Constant Reverse Adjustment—For constant reverse keyframes, Final Cut increments all
valuesettings by 1, except forvaluein the last keyframe if it has already been incremented by a Last Frame adjustment.
Importing Speed Keyframes
Final Cut interprets speed keyframes at import differently for variable and constant speed.
For variable speed, Final Cut interprets speed keyframes as specified.
For constant speed, Final Cut constructs its speed graph by:
Reading the
valuespecification of the first keyframe.Determining the number of frames used by reading the
valuespecification of the last keyframe and subtractingvaluespecification of the first keyframe.Setting the
durationof the speed graph as thewhenspecification of the last keyframe.Adjusting the speed graph as required to ensure that the graph's setting at the in point matches the
speedkfinspecification. Note that if a keyframe is flagged as virtual and is not the first or last keyframe, Final Cut ignores that keyframe.
Exporting Speed Keyframes
Final Cut writes keyframes for speed following these conventions:
If a keyframe does not exist at
speedkfnorspeedkfout, Final Cut adds one and marks it as virtual.Final Cut applies the adjustments mentioned in the “Keyframe Adjustments” section above. Note these points:
The setting for
whenin the last keyframe must agree with thedurationof theclipitem.If speed is constant and if the keyframe settings do not produce a linear graph, Final Cut adjusts the settings to produce a linear graph, while maintaining the settings for
speedkfin.
Identifying Media
One common reason for reading speed keyframes is to identify the media frames used at speedkfin, or at speedkfout, or between speedkfin and speedkfout.
For the in point in the media, use the setting of
valuein thespeedkfinkeyframe.For the out point in the media, start with the setting of
valuein thespeedkfoutkeyframe. Subtract from this the slope between thespeedkfoutkeyframe and the preceding keyframe. This calculation is required becausespeedkfoutuses 1-based ordering—see Note.For the extent of the media used when speed is contstant, inspect the
valuesettings atspeedkfinandspeedkfout; for variable speed, inspect the keyframes betweenspeedkfinandspeedkfout.
Managing Project Components
The Final Cut Pro XML Interchange Format lets you modify or update open projects using the elements uuid and updatebehavior. As well, you can use the itemhistory element to track the edit history of a clipitem.
The uuid and updatebehavior Elements
The uuid element uniquely and persistently identifies individual components (clips, bins, and sequences) in a project. Since it is saved with the project file, you can use it to track detailed changes during your workflow.
The updatebehavior element allows you to modify UUID-identified components in an open project. The target component in a project can be a clip, bin, or sequence. As well, you can use updatebehavior to modify metadata in a QuickTime file. (See About master clips)
A target component is identified by its uuid entry. For example, here is a XML snippet that replaces a clip in the Browser:
Listing 4-1 Replacing a Clip in the Browser
<?xml version="1.0" encoding="UTF-8"?> |
<!DOCTYPE xmeml> |
<xmeml version="5"> |
<clip id="clip2 "> |
<uuid>7ACBD5FC-C166-40F9-AE36-55B39476D8E6</uuid> |
<updatebehavior>replaceiffound</updatebehavior> |
<!--Information about the replacement clip --> |
</clip> |
When this snippet is imported, Final Cut Pro looks for a component in the project with a matching UUID. If it finds one, it replaces the component with the clip specified in the interchange format document. (In this case, the replacement clip appears at the topmost level of the Browser.) If it doesn’t find the target clip, nothing happens.
To replace a clip in a bin, you have to specify the bin and all its contents. For example, Listing 4-2 replaces a clip in Bin 1.
Listing 4-2 Replacing a Clip in a Bin
<?xml version="1.0" encoding="UTF-8"?> |
<!DOCTYPE xmeml> |
<xmeml version="5"> |
<bin> |
<uuid>4FDDECFA-D312-4272-8DE8-BE98E4BA5F92</uuid> |
<updatebehavior>replaceiffound</updatebehavior> |
<name>Bin 1</name> |
<children> |
<clip id="clip2 "> |
<uuid>7ACBD5FC-C166-40F9-AE36-55B39476D8E6</uuid> |
<updatebehavior>add</updatebehavior> |
<!-- Information about the replacement clip --> |
</clip> |
</bin> |
Similarly, to replace a particular clipitem in a sequence, you must replace the entire sequence.
The way you specify the location of the replacement component in the import document has precedence. For example, if the target clip is in Bin 1 and if you import a snippet such as Listing 4-1 Final Cut Pro removes the clip from Bin 1 and puts the replacement clip at the top level of the Browser.
The desired behavior at the time of import is specified by the entry for updatebehavior. The valid entries are:
replaceiffound- Replaces the target component if found. If not found, does nothing.
replaceoradd- Replaces the target component if found. If not found, adds the imported component to the project.
addifnotfound- Adds the imported component to the project if the target component is not found. If the target component is found and if the target component is a bin, the attributes of the bin are ignored and the children of the bin are processed according to their
updatebehaviorsettings. add- Adds the imported component to the project. If a component with the same
uuidentry is present, changes theuuidentry of the imported object. remove- Removes the target object if found. If not found, does nothing.
The itemhistory Element
The first time you export the XML for a clipitem, Final Cut creates a UUID for the item. If you modify the clipitem and export it again, Final Cut generates a new UUID for the item. The element itemhistory encodes a list of the UUIDs associated with a particular clipitem. The top UUID in the list is the current UUID for the item and is guaranteed to be unique. The rest of the list is a historical record of the UUIDs associated with the item. (The bottom UUID item in the list is the initial UUID generated for the clipitem or the UUID of the original item from which the current item was derived.)
For example, suppose you export a clipitem for the first time. It is assigned an initial UUID:
<itemhistory> |
<uuid>3510A3C8-5C79-4AA4-9A81-38B40397C0DC </uuid> |
</itemhistory> |
You then blade the clipitem and export both items. The XML for the first item is:
<itemhistory> |
<uuid>CC70F2BC-1777-4FF6-8846-58A8A3D2DA0E</uuid> |
<uuid>3510A3C8-5C79-4AA4-9A81-38B40397C0DC</uuid> |
</itemhistory> |
The XML for the second item is:
<itemhistory> |
<uuid>DD30375E-5CF3-4EB7-B209-36624768C4BB</uuid> |
<uuid>3510A3C8-5C79-4AA4-9A81-38B40397C0DC</uuid> |
</itemhistory> |
The common final UUID for the two items shows that they have a common origin.
Managing QuickTime Metadata
Final Cut Pro 5.1.2 supports metadata in QuickTime files. When Final Cut Pro opens or re-reads a QuickTime file with metadata, it caches a copy of the metadata in the project. (The file is the authoritative source of the metadata; if the file changes, the cached copy changes.)
To manage QuickTime metadata, version 3 of the Final Cut Pro XML Interchange Format provides the element metadata and its subelements. (See QuickTime Metadata) With these new elements, you can display the metadata in a project by exporting an interchange format document. In additionl, you can actually modify the metadata in a QuickTime file by importing an interchange format document with appropriately specified elements.
In Final Cut Pro, QuickTime metadata appears at the movie or track levels; that is, the parents of metadata can be file, video, or audio. Here is an XML fragment that displays some metadata at the movie level.
Listing 4-3 Sample Metadata
<file id="clouds"> |
<name>clouds</name> |
<pathurl>file://localhost/Users/. . .</pathurl> |
<rate> |
<timebase>8</timebase> |
</rate> |
<duration>91</duration> |
<metadata> |
<storage>QuickTime</storage> |
<key>com.mycompany.myapp.myid.mymd</key> |
<size>11</size> |
<type>UTF8</type> |
<value>My metadata</value> |
</metadata> |
<media> |
. . . |
When you import interchange format documents with metadata information, Final Cut Pro caches the imported metadata. However, when Final Cut Pro reconnects referenced QuickTime files to the project, the metadata in these files replaces the metadata you imported.
You can permanently alter the metadata in a QuickTime file by using the element updatebehavior as a subelement of metadata. In this context, updatebehavior has two valid entries: add or remove. Here is an XML fragment using add.
Listing 4-4 Adding Metadata
<metadata> |
<updatebehavior>add</updatebehavior> |
<storage>QuickTime</storage> |
<key>com.mycompany.myapp.myid.mymd</key> |
<size>22</size> |
<type>UTF8</type> |
<value>My additional metadata</value> |
</metadata> |
Metadata in QuickTime files is stored as a key-value pair. In Listing 4-4 the value and the key are added to the metadata in the file. If the file already has an identical key, the imported value does not replace any existing values. Instead, the new value is stored alongside the existing values for that key. Note that a key is specified with a reverse-dns string to help ensure uniqueness.
Using remove, on the other hand, does affect existing metadata in a file. Here is an example:
Listing 4-5 Removing Metadata
<metadata> |
<updatebehavior>remove</updatebehavior> |
<storage>QuickTime</storage> |
<key>com.mycompany.myapp.myid.mymd</key> |
</metadata> |
This removes the specified key and all its associated values from the file. (Note that it is not necessary to specify the subelements type, size, or value.)
When you import an interchange format document with metadata specifications, Final Cut Pro first processes the specifications with remove, and then those with add. (This allows you to easily replace values for a particular key from a single import document.)
Copyright © 2003, 2017 Apple Inc. All Rights Reserved. Terms of Use | Privacy Policy | Updated: 2017-03-27