Retired Document
Important: This document may not represent best practices for current development. Links to downloads and other resources may no longer be valid.
Defining a Managed Install
With a set of component packages, you have the essential ingredients for developing an install experience for the users of your product. There are two mechanisms for creating an install experience: using metapackages and using distribution packages, described in Overview of Software Delivery.
Distribution packages are a major improvement over metapackages because, using distribution packages, you can separate the configuration of a package’s payload from the definition of the install experience it provides.
To support Jaguar and Panther users while at the same time providing Tiger uses the enhanced install experience distribution packages offer, you can create hybrid metapackages. These are metapackages into which you copy the distribution script from a corresponding distribution package.
As described in What Is a Package?, an installation process is defined through four aspects of installation packages: product information, package properties, installation properties (which include system and volume requirements), and install operations. Metapackages and distribution packages add an additional aspect: install choices. Install choices allow users to customize an install to, for example, prevent the installation of a product’s tutorial component.
The following sections describe in detail how to create compelling install experiences using metapackages, distribution packages, and hybrid metapackages.
Creating a Metapackage
To create a metapackage, you perform the following tasks:
Create the metapackage project directory.
Create the metapackage file.
The following sections describe these tasks in detail.
Create the Metapackage Project Directory
To facilitate the creation of an installation package, you should create a metapackage project directory to store all the files you need in the process. The metapackage project directory contains directories that hold the product’s component packages, product information files, executable-based installation requirements, and install-operation files. Listing 6-1 shows a metapackage project directory.
Listing 6-1 A metapackage project directory
LevonMeta-1.0.0/ |
packages/ |
Levon.pkg |
LevonDoc.pkg |
SharedServices.pkg |
product_info/ |
Welcome.rtf |
ReadMe.rtf |
License.rtf |
Conclusion.rtf |
extras/ |
InstallationCheck |
VolumeCheck |
preflight |
postinstall |
postupgrade |
Create the Metapackage File
A metapackage project specifies the following items:
Title: The name used to identify this metapackage to the user during installation.
Description: This package’s description, displayed by the Installer application in the Customization pane for an enclosing metapackage when the user highlights this metapackage.
Packages directory: The directory that contains the packages this metapackage contains.
The directory may reside inside or outside the generated metapackage, depending on whether you want to discourage users from installing packages individually. If the directory resides inside the metapackage, you must copy the component packages from the packages directory in the metapackage project directory to the directory you designated as the package holder in the metapackage.
Extras directory: The directory that contains executable files that specify installation requirements and install operations.
To define a metapackage-based installation process, use PackageMaker to:
Create a metapackage project.
Add product information files to the project by using Installer Interface Editor.
In the metapackage project directory, identify the subdirectory that contains executable files specifying installation requirements and install operations.
Add install choices by adding the packages in the
packagessubdirectory of the project directory to the metapackage project’s packages list.Specify the initial selection state of each choice. Choices you identify as required are selected in the Installer Custom Install pane, but the user cannot deselect them.
Build the metapackage.
If you choose to place the metapackage’s packages inside the metapackage itself (mainly to discourage the individual installation of product components), copy the packages to the appropriate directory in the generated metapackage file. (You can reveal the contents of the metapackage in the Finder using the Show Package Contents command.)
Creating a Distribution Package
Distribution packages provide a more direct, JavaScript-based mechanism for developing an install experience. One of the benefits a JavaScript-based install experience provides is the ability to update install choices dynamically, in response to a user’s choice selection. In addition, system and volume requirements are also specified using JavaScript code. Other benefits of using distribution packages are that:
Users can specify custom installation destinations for relocatable choices individually, rather than as a group.
Using JavaScript code virtually eliminates the need for the Installer application to display a dialog informing users that it needs to run an external program as part of the installation process.
You specify the installation requirements for a product in one place instead of across its component packages. This centralization makes it easier to set up and change a product’s requirements.
To create a distribution package, you perform the following tasks:
Create the distribution package project directory.
Create the distribution package file.
These tasks are described in the following sections.
Create the Distribution Package Project Directory
The distribution package project directory contains directories that hold the product’s component packages and product information files (background image, Read Me file, and so on). Listing 6-2 shows a distribution package project directory.
Listing 6-2 Distribution package project directory
LevonDist-1.0.0./ |
packages/ |
Levon.pkg |
LevonDoc.pkg |
SharedServices.pkg |
product_info/ |
Welcome.rtf |
ReadMe.rtf |
License.rtf |
Conclusion.rtf |
Create the Distribution Package File
PackageMaker allows you to specify the product information, installation properties, and install choices that define a product’s installation process. Package properties and install operations are specified by each package contained in a distribution package.
As you do with metapackages, you use Installer Interface Editor to specify product information. The Requirements Editor window allows you to specify JavaScript-based installation requirements.
You create install choices using a hierarchical interface. Each install choice can have one or more packages associated with it. To create choice groups, you add choices to an existing choice.
Just as when the Installer application processes a metapackage-based custom install, when the user selects a choice in a custom install, the packages the choice represents are installed. The packages of unselected choices are not installed. However, distribution packages provide additional granularity by allowing you to specify disabled unselected choices (which the user cannot select). You can also define invisible choices (whose existence is not revealed to the user). Three attributes specify the selection and visibility state of an install choice:
Selected: Determines whether the choice is selected.
Enabled: Determines whether the choice’s selected state is modifiable by the user.
Visible: Determines whether the choice appears in the Installer Custom Install pane.
You can specify initial values for each of the selection and appearance attributes. But you can also use JavaScript code to compute the initial values before Installer displays the Custom Install pane (see The User Install Experience for more information). For example, if a component requires the presence of software that is unavailable in the installation host, you can make the install choice for that component invisible. You can also specify dynamic values for the choice attributes. This capability allows you to, for example, select or deselect options in response to the user’s actions. You can take advantage of this flexibility in products with interrelated components in which option groups provide no appropriate selection mechanism. For example, a product with a plug-in component that requires a font component could be automatically deselected when the user deselects the option that installs the font package.
These are the tasks you perform to create a distribution package:
Create a distribution project.
Add product information files to the project.
Specify system and volume requirements.
Configure install choices.
In PackageMaker, create a distribution project and perform the tasks described in the following sections.
Add Product Information Files
Use Installer Interface Editor to add project information files to the package. These files may include a background image and a Read Me file.
Specify System and Volume Requirements
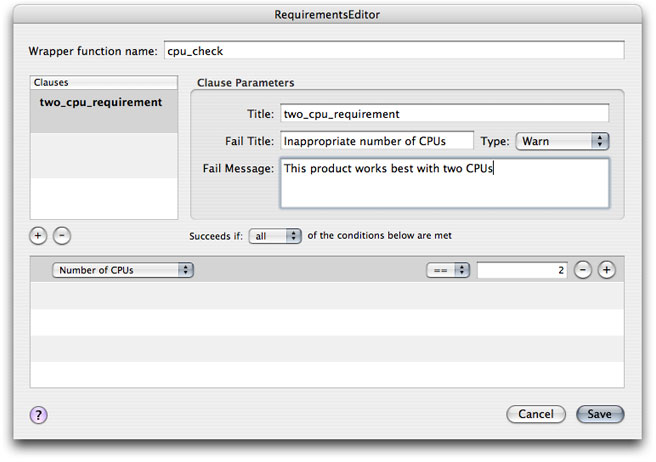
You can specify system and volume requirements using the requirements editor. You first need to add a global function to the project. When editing the function, use the requirements editor to specify an installation requirement. For example, Figure 6-1 shows the definition of a system requirement.
The requirements editor provides access to several system and volume properties. For example, Figure 6-2 shows the specification for a volume requirement.
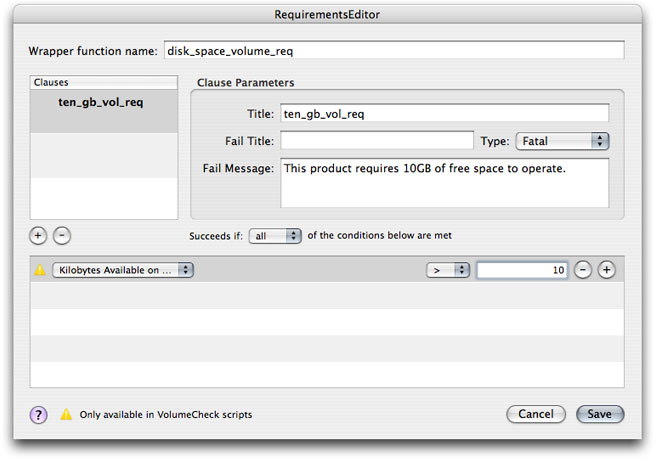
Before this volume requirement can work, however, you need to modify the JavaScript code generated by the requirements editor. Modify the code as indicated in Listing 6-3.
Listing 6-3 JavaScript code for a volume requirement
/* js:pkmk:start */ |
function disk_space_volume_req() { |
return ten() ; |
} |
/* js:pkmk:end */ |
/* js:pkmk:start */ |
function ten() { |
var result = false; |
try { |
result = my.target.kilobytesAvailable > 10; // Remove |
result = my.target.availableKilobytes > 10*1024*1024*1024; // Add |
} catch (e) {} |
if(!result) { |
my.result.type = 'Fatal'; |
my.result.title = ''; |
my.result.message = 'This product requires 10GB of free space to operate.'; |
} |
return result; |
} |
/* js:pkmk:end */ |
After the functions are defined, choose them as the system requirement and volume requirement scripts in the distribution package project.
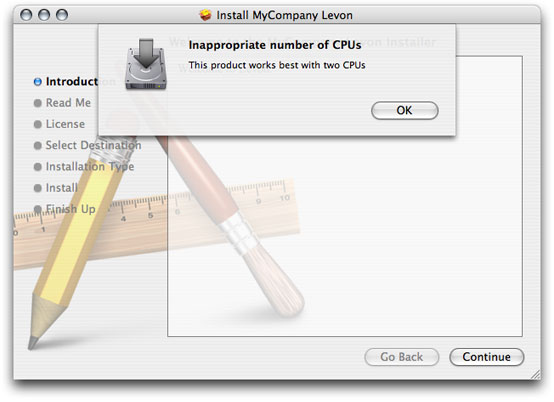
Installer checks system requirements as soon as it opens a distribution package. Figure 6-3 shows what users see when their systems don’t meet that requirement.
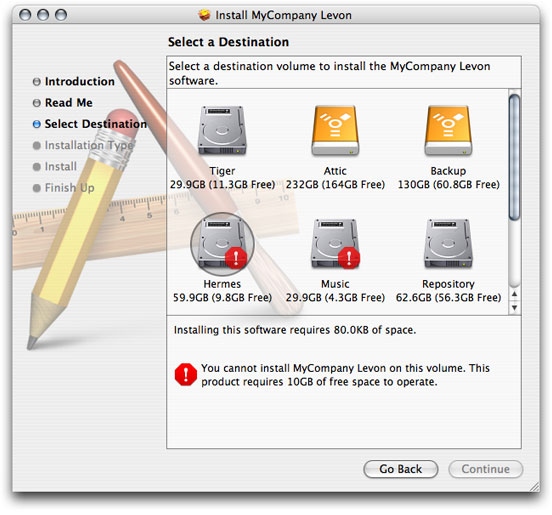
If any package in the distribution package does not specify that it’s a boot-volume-only install, Installer displays the Select Destination page. Just before displaying this page, however, Installer runs the volume requirement script against all the available volumes in the system. Volumes that do not meet the requirement are badged. When the user selects such a volume, Installer displays the failure message in the volume requirement specification, as shown in Figure 6-4. The user can continue only after selecting a volume that meets the requirements.
Configure Install Choices
When Installer first displays the Custom Install pane, it uses the attributes that specify the initial state of each option. As the user selects or deselects choices, Installer applies the attributes that specify dynamic state to each choice.
Attribute clauses are JavaScript Boolean expressions. You can use true, false, or a Boolean expression that may include function invocations. You specify such functions as a global script of the project, similar to the way you specify installation requirements. If you use the requirements editor to generate the JavaScript code for such functions, the type of the requirement must be None.
In addition to the visibility attributes, each choice has the following properties:
Title
Users see this title in the Custom Install pane.
Identifier
You use this identifier to access a choice’s attributes.
Description
Users see this description when they highlight an option in the Custom Install pane.
Custom Location
The initial installation destination of the choice’s packages if you want users to be able to specify a custom installation destination. Leave empty if you don’t want users to choose a different installation destination for the choice’s packages.
Allow Alternate Volumes
Specifies whether users can choose a volume other than the boot volume for the install.
After adding an install choice to the distribution project, you associate one or more packages with it. The Installer application installs these packages if the choice is selected in the Custom Install pane when the user clicks Install. Otherwise, these packages are not installed. To associate a package with a choice, drag the package from a Finder window to the choice in the distribution project window, or select the choice in the project and use the Add Package command.
Figure 6-5 shows the definition of the “Levon application” install choice for the Levon product.
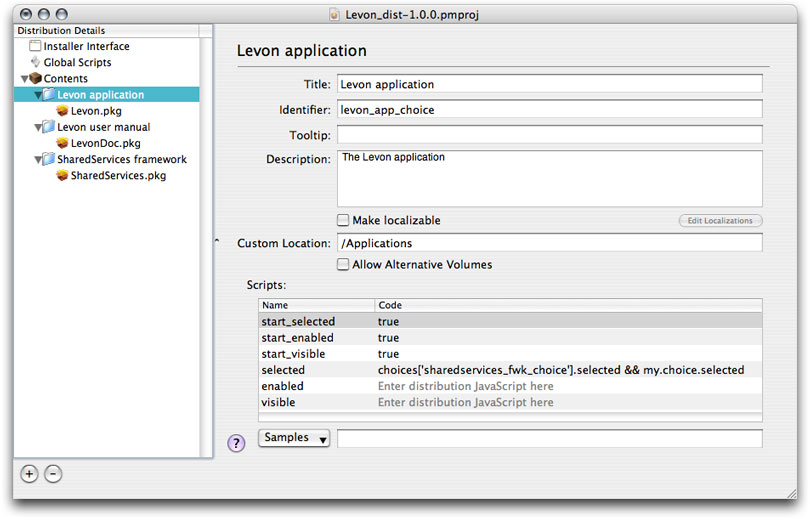
The user can choose to install the choice’s package in a location other than Applications on a volume other than the boot volume. This choice is also selected the first time the user sees the customization pane. However, its selection state is tied to the selection state of the “SharedServices framework” choice. If the user deselects the framework choice, the application choice becomes deselected.
You use the expression choices['<choice_identifier>'].<attribute> to access the attributes of other choices. Therefore, the first part of the clause for selected attribute of the “Levon application” choice evaluates to true if the user selects the “SharedServices framework” choice. That is, choices['sharedservices_fwk_choice'].selected evaluates to true. The second part of the clause, my.choice.selected, is needed because Installer—when the user selects or deselects a choice—evaluates the attributes of all install choices except the choice the user changed.
For each of a choice’s packages, you can specify its authentication requirement and postinstall action.
After you’ve configured the install choices, build the distribution package using the PackageMaker Build command.
Creating a Hybrid Metapackage
Although distribution packages are supported only on Mac OS X v10.4 and later, if your product supports Mac OS X v10.2 and v10.3, you can create a single delivery solution that works on Tiger and pre-Tiger systems. Such a solution is called a hybrid metapackage.
To create a hybrid metapackage, follow these steps:
Create component packages for your product’s components, as described in Packaging Product Components.
Create a metapackage for your product, as described in Creating a Metapackage.
Place the component packages inside the metapackage file at
./Contents/Packages.Create a distribution package using the same packages you used in step 1, as described in Creating a Distribution Package.
Copy the
distribution.distfile from the distribution package file to theContentsdirectory of the metapackage file.
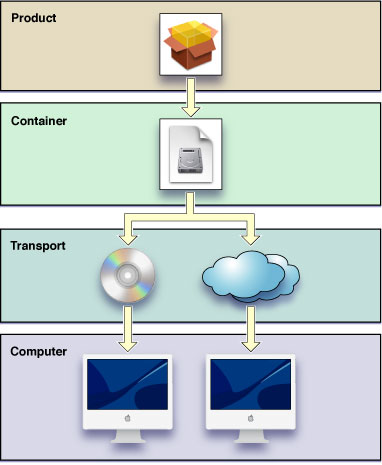
Placing a Packaged Product in a Container
If you do not have access to the computers of your product’s users, you must place your packaged product in a container to facilitate its delivery to your customers, as illustrated in Figure 6-6. Product Containers provides information on how to place products in containers.
Testing the Install Experience
Before shipping a product to users, you should ensure that the install experience is what you expect and that the product’s files are installed correctly. You should perform this test in systems that represent the systems your customers use while logged in as a nonadministrative user. In this way, you can make sure that the Installer application asks for authentication when a package requires it and that the installed component files have the appropriate ownership and access-permissions settings.
Copyright © 2010 Apple Inc. All Rights Reserved. Terms of Use | Privacy Policy | Updated: 2010-09-15