Retired Document
Important: This document may not represent best practices for current development. Links to downloads and other resources may no longer be valid.
Finding Information in a Project
Being able to find information—both knowing how to leverage the user interface to locate items in a project, as well as knowing how to find information about your project—is critical to working effectively in Xcode.
The Xcode user interface gives you many different ways to location project information and items. The Project Window describes the common paradigms of the Xcode user interface that let you find and manage project contents, including the Groups & Files list, which lets you organize and access the items in your project in an outline view, and the detail view, which lets you quickly filter your project contents. In addition, the Activity Viewer window lets you see additional information on Xcode operations, while the Info and inspector windows let you examine and modify items in your project.
Xcode also maintains a great deal of information about your project’s contents, which it uses to assist you in the development process. The Xcode feature called Code Sense maintains an index that contains symbolic information for your project; Xcode uses this information as the basis for a number of features that let you browse the symbols in your project, view the class hierarchy of projects that use an object-oriented programming language, and search your project for symbol definitions.
As you are working on your software product, you often need to find information on system technologies. Xcode also includes a full-featured documentation viewer and installs a comprehensive suite of technical documentation. Using Xcode’s documentation lookup features, you can quickly and easily search all or part of Apple’s technical documentation for questions, keywords, or symbols.
This chapter describes how to use Xcode to find information about your project’s contents and about Apple technologies. It covers:
Searching your project for text, symbols, or using regular expressions.
Using the Project Symbols smart group to find information on the symbols in your project.
Viewing classes and class members for projects that include object-oriented code, using the class browser.
Using the documentation window to browse Apple’s technical documentation and search the Reference Library for keywords or symbols.
Searching in a Project
Xcode provides a number of ways to search for information in your project. You can search for text, regular expressions, or symbol definitions in a single file or across multiple files in your project. You can also easily substitute replacement text for one or more instances of matching text or symbols, either within a file or throughout the entire project.
This section describes how to use Xcode’s project-wide search features to search through multiple files in your project and its included frameworks for text, regular expressions, and symbol definitions. This section also describes how to view search results. The single-file find is discussed further in Searching in a Single File. In addition, shortcuts for performing searches from an Xcode editor window are described in Shortcuts for Finding Text and Symbol Definitions From an Editor Window.
For more information on Code Sense, the technology that provides symbol definition searches, see Code Sense.
The Project Find Window
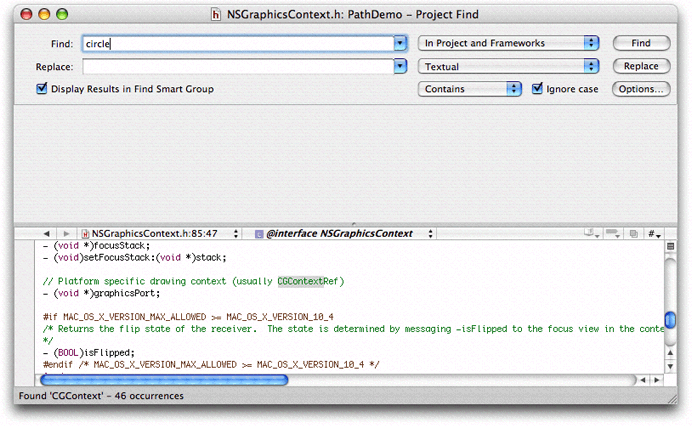
The Project Find window allows you to search for information in some or all of the files included in your project. Using the Project Find window, you can search your project for text, symbol definitions, or regular expressions. To open the Project Find window, choose Find > Find In Project. A window similar to the following appears.

Choosing What to Search For
Using the fields and menus at the top of the Project Find window, you can control what Xcode searches for.
The Find field specifies what to find. Xcode interprets this field differently, depending on the value of the pop-up menu to the right of the Replace field.
The pop-up menu to the right of the Replace field specifies the type of search; it contains the following options:
Textual finds any text that matches the text in the Find field.
Regular Expression finds any text that matches the regular expression in the Find field.
Definitions finds any symbol definition matching the symbol name in the Find field.
The pop-up menu to the right of the Display Results in Find Smart Group option controls how Xcode determines a match to the contents of the Find field. The available options are:
Contains. Choose this option to find text or symbol definitions that contain what is in the Find field.
Starts with. Choose this option to find text or symbol definitions that begin with the contents of the Find field.
Whole words. Choose this option to find text or symbol definitions that contain only what is in the Find field.
Ends with. Choose this option to find text or symbol definitions that end with the contents of the Find field.
The “Ignore case” option specifies whether or not the search is case sensitive.
As a shortcut, you can also perform a quick search of selected text or regular expressions in an editor window, as described in Shortcuts for Finding Text and Symbol Definitions From an Editor Window.
Specifying Which Files to Search
To control the scope of a search, use the pop-up menu to the right of the Find field in the Project Find window. This menu contains sets of search options that specify which projects and frameworks to search in. Xcode provides the following default sets of search options:
In Project. Choose this option to search the files that are directly included in your project.
In Project and Frameworks. Choose this option to search both the files and the frameworks included in your project.
In Frameworks. Choose this option to search files that are in the frameworks included by your project.
In All Open Files. Choose this option to search all open files.
In Selected Project Items. Choose this option to search only in the currently selected project items.
You can further tailor these default sets of search options or define your own sets with the Batch Find Options window, described in Creating Sets of Search Options.
Viewing Search Results
When you perform a project-wide find, the results of the search are collected in the find results pane of the Project Find window; results are organized according to the file in which they appear, as shown in the figure below. You can view a particular search result by selecting it in the Project Find window; Xcode opens the file to the matching text and displays it in the attached editor. Double-click a search result to open it in a separate editor window.
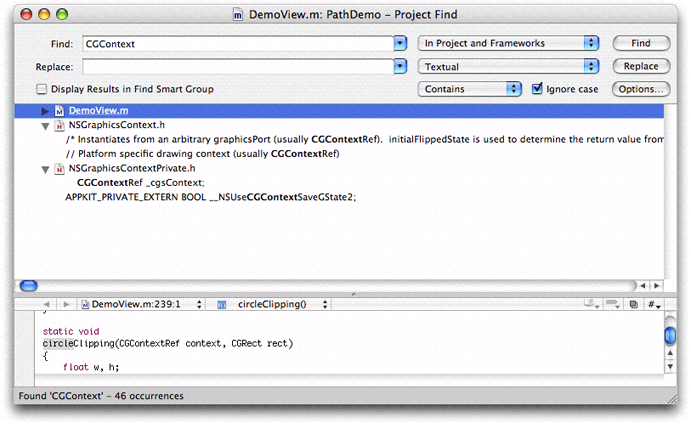

Each search, and its results, is also collected in the Find Results smart group that appears in the Groups & Files list of the project window. If you select the Display Results in Find Smart Group option, Xcode automatically brings the project window to the front and discloses the contents of the Find Results smart group when you perform a search, instead of showing the results in the Project Find window.
You can see all the searches you have performed by clicking the disclosure triangle next to the Find Results smart group in the Groups & Files list. To view the results of a given search, select that search in the Groups & Files list and, if necessary, open a detail view. The detail view shows all of the results for the selected search, as shown below. You can view the combined results of several searches by selecting those searches in the Groups & Files list. Double-clicking an item in the Find Results group in the Groups & Files list opens a Project Find window with the corresponding search specification as well as a detailed find results list. This allows you to rerun previous searches.
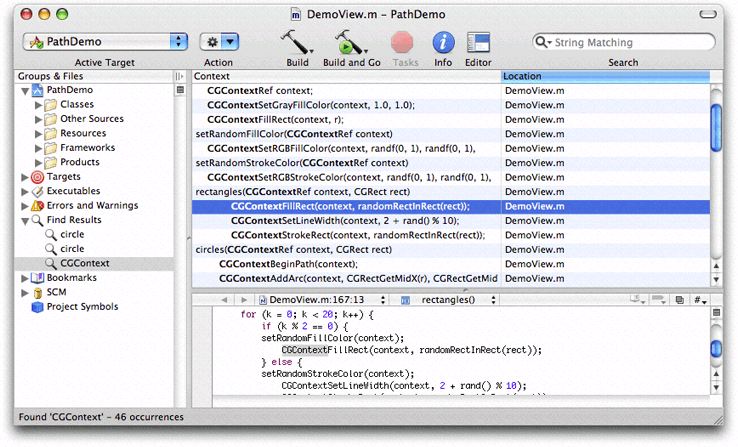

The detail view shows the context for each search result and the file in which the match occurs. The context of a search result is the surrounding text in which it appears for text searches, and the type and name of the matching symbol for a symbol definition search. To show or hide either of these two columns, use the View > Detail View Columns menu items or Control-click in any column header and choose the desired column from the contextual menu.
To view the source for a particular result, select the result in the detail view. If the project window or detail view has an attached editor, selecting a search result displays the source in the editor. You can double-click a search result to open the source for the result in a separate window.
You can sort the results of a search according to the file in which they occur. Click the Location column heading to sort the detail view by location. You can also filter the search results using the Search field in the project window toolbar. Using the location of the search result as an example again, you can type all or part of a filename to see only those results that occur in the file of that name.
Creating Sets of Search Options
The Batch Find Options window lets you modify Xcode’s default sets of search options, or define your own sets. This is particularly useful if you find yourself searching the same set of files over and over again. Instead of configuring the set of files to search each time, simply configure it once and save it as a search option set. To reuse the search option set, simply select it from the pop-up menu next to the Find button in the Project Find window.
To open the Batch Find Options window, click the Options button in the Project Find window. You should see a window similar to the following:
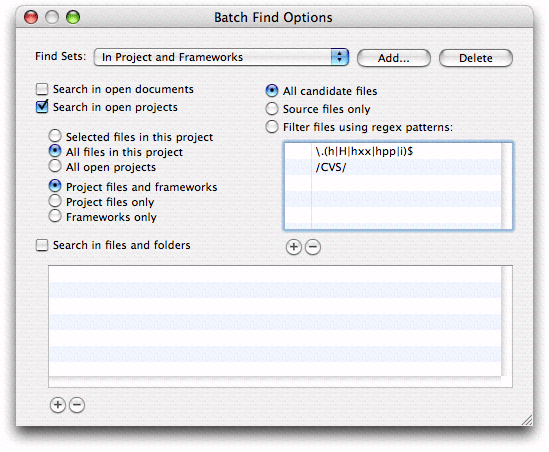
The Find Sets menu at the top of the Batch Find Options windows lists the available search option sets. To create a new set, click Add. Specify a name for the new set in the dialog that appears. Xcode creates a new set of search options with default values. To delete a set of search options, choose that set from the Find Sets menu and click Delete.
To edit a search option set, choose that set from the Find Sets menu and set the search options you wish to include. The Batch Find Options window provides the following options to control which files Xcode searches:
“Search in open documents” includes all files that are open in an editor in the search.
“Search in open projects” includes open projects in the search. You can further control which files in those projects are searched using the radio buttons below the “Search in open projects” option.
The top set of radio buttons controls which projects are searched:
“Selected files in this project” searches the selected files in the current project.
“All files in this project” searches all files in the current project.
“All open projects” searches all files in all open projects.
The bottom set of radio buttons lets you specify whether to include project or framework files in the search:
“Project files and frameworks” searches both the project’s files and the files of any frameworks included in the project.
“Project files only” confines the search to project files.
“Frameworks only” confines the search to the frameworks included in the project.
“Search in files and folders” allows you to add specific files or directories to the search. Any files or directories listed in the table below this option are included in the search. To add an entry to this table, click the plus (+) button and choose a file or directory from the dialog that appears; or drag the file or directory from the Finder. You can also click in the table and press Return. To delete a file or directory from this table, select the entry and click the minus (-) button.
You can further restrict the files that are searched by a search option set using the radio buttons on the right side of the Batch Find Options window, next to the “Search in open documents” and “Search in open projects” options. You have the following options:
“All candidate files” does not limit the searched files further. This searches all of the files in the search scope specified by the other options in the Batch Find Options window.
“Source files only” limits the search to files containing source code.
“Filter files using regex patterns” lets you filter the files to search using one or more regular expressions. These regular expressions are specified in the table beneath this radio button. To add an expression to this list, click the plus (+) button.
Use the first column in this table to specify whether Xcode returns only those files that match a given regular expression or returns only files that do not match the regular expression. If this column is blank, Xcode does not use the regular expression. This column is blank by default for all regular expressions that you add; click in the column next to the regular expression to choose a different value.
Replacing Text in Multiple Files
You can use the Project Find window to replace some or all occurrences of the search string specified in the Find field. To replace text in multiple files:
Type the substitution text in the Replace field
Select one or more entries to replace. To choose which occurrences of the given search string to replace, do either of the following:
Select one or more entries to replace in the find results pane of the Project Find window.
Choose a search from the Find Results smart group in the project window. In the detail view, select one or more occurrences of the search string to replace.
Click the Replace button in the Project Find window.
If the contents of the Project Find window’s find results pane are disclosed, Xcode uses the selection in the Project Find window to determine which occurrences to replace. If the find results group is closed, Xcode uses the selection in the detail view of the project window.
Viewing Project Symbols and Classes
Xcode includes a technology, called Code Sense, that maintains detailed information about the symbols in and utilized by your project to assist you in the development process. Code Sense uses the information in this symbol index, allowing you to browse the symbols and classes in your project, and perform symbol definition searches. It also uses this information to provide completion suggestions when editing source code, as described in Code Completion.
This section introduces Code Sense and discusses two of the features that it enables: the Project Symbols smart group and the class browser. In this chapter you will learn how you can use the Project Symbols smart group to view symbols and how you can take advantage of the class browser to find information on the classes defined in your project and its included frameworks. The other features provided by Code Sense are described in other parts of this document.
Code Sense
Code Sense makes it simple to find and view information about your code and to gain easy access to project symbols. Code Sense maintains detailed information about the code in your project and in libraries used by your project; this information is stored in a project index. Using this project index, Code Sense provides support for features such as the following:
Code completion. Code completion, described in Code Completion, assists you in writing code by providing API suggestions from within the editor. Code completion uses the stored information about the symbols, as well as the contextual information from your source code, to offer a list of classes, methods, functions, or other appropriate symbols for the code you are working on.
Class browser. Using the class browser, you can view the classes in your project and its included frameworks. From the class browser, you can easily access declarations, source code, and documentation for these classes and their members. The class browser is discussed in the section Viewing Your Class Hierarchy.
Project Symbol smart group. The Project Symbol smart group allows you to view all of the symbols in your project directly in the project window. You can search these symbols or sort them according to type or name to quickly find the symbols you need. The Project Symbols smart group also gives you easy access to a symbol’s definition. The Project Symbols smart group is described in Viewing the Symbols in Your Project.
Searching. Xcode offers numerous ways to search for symbols and other information in your project. For instance, you can perform a project-wide search for symbol definitions, or you can select an identifier in an editor window and jump to its definition. These and other search features are described in Searching in a Project.
The project index used by Code Sense is created the first time you open a project. Thereafter, the index is updated in the background as you make changes to your project. Indexing occurs on a background thread, to keep it from interfering with other operations in Xcode. The index can be completely rebuilt, if necessary, by opening the General pane in the project inspector and clicking the Rebuild Code Sense Index button.
Indexing is enabled by default. You can disable indexing for all projects that you open. To do so, choose Xcode > Preferences, click Code Sense, and deselect the “Enable for all projects” checkbox in the Indexing section.
Note that if you turn off indexing, you will be unable to use those features that rely on the project index, such as code completion, the class browser, and the other features mentioned in this section. You can specify whether Xcode includes a particular file in the project index using the “Include in index” checkbox in the file inspector, described in Inspecting File, Folder, and Framework References.
Viewing the Symbols in Your Project
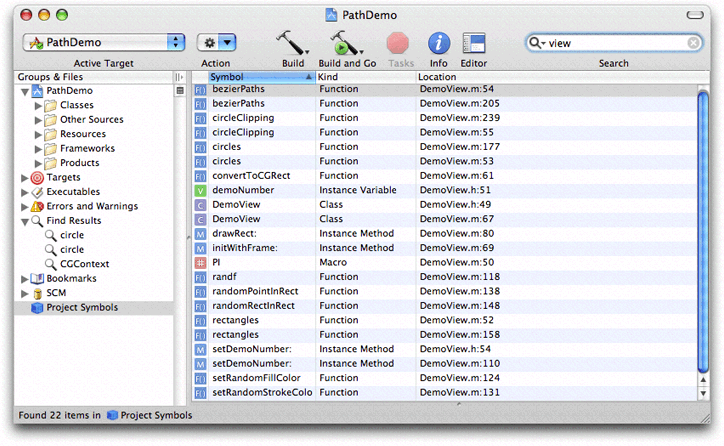
The Project Symbols smart group, one of the built-in smart groups provided by Xcode, allows you to view all of the symbols defined in your project. You can sort symbols by type, name, file, and file path, and you can search for symbols that match a string. To see the symbols defined in your project, select the Project Symbols smart group in the Groups & Files list. The detail view displays the symbols in your project. Here is what you see when you select the Project Symbols group for a project:


The detail view shows the following information for each symbol:
An icon indicating the symbol type, such as structure, function, method, and so on. The icon is a visual cue that allows you to glance at a group of symbols and easily discern the type. The letter in the icon reflects the symbol type; for example, “M” for method, or “V” for variable. The color of the icon indicates the relative grouping of the symbols. For instance, purple icons indicate top-level elements such as Classes or Categories while orange icons represent basic types like structures, unions, typedefs and others.
The symbol name.
The symbol type. While the symbol type icon provides a handy visual cue as to the symbol type, the Kind column states the type explicitly.
The file containing the symbol definition or declaration, and the line number at which the symbol appears.
To sort the symbols listed in the project window according to any of these categories, simply click the appropriate category heading. In addition, you can use the Search field in the project window toolbar to narrow the list of symbols to those matching a string or keyword. You can search the contents of any one of the categories—symbol name, symbol kind, or location—or you can search them all. In the PathDemo project, for example, you can search for all symbols declared in files pertaining to views by selecting “Search By Location” from the pop-up menu in the search field and typing “view.” The symbols listed in the detail view are narrowed to include only those symbols defined in files whose names contain the word “view,” as shown in the following figure. By default, the search field searches the content of all categories in the detail view.

You can configure which information is displayed in the detail view, as described in The Detail View.
To view the symbol definition, select the symbol in the detail view. If you have an editor open in the project window or detail view, the symbol definition appears there. If you prefer a separate editor window, double-click the symbol to open the file containing the symbol definition in a separate editor.
If you Control-click a symbol in the detail view, Xcode displays a menu that contains a number of useful commands. The commands available to you are:
Reveal in Class Browser. If the selected symbol can be displayed in a class browser—for example, a class or a method—choosing this menu item opens the class browser window and selects the symbol in the browser. You can also reveal the selected symbol by choosing View > Reveal in Class Browser.
Find Symbol Name in Project. When you choose this item, Xcode searches your project for the selected symbol name. It performs a textual search, just as if you had typed the symbol name into the Project Find window and selected “Textual” from the search type menu. The results of the search are displayed in the Find Results smart group.
Copy Declaration for Method/Function. This command copies the declaration for the selected symbol to the pasteboard; you can then paste this declaration into any text field or editor using Command-V. This command only works for functions and methods.
Copy Invocation for Method/Function. This command copies the invocation string for the selected symbol to the pasteboard, which you can then paste into any text field or editor. The invocation string is the same string that is inserted into your code when you select a code completion option. This command works only for functions and methods.
You can also reveal the file in which the selected symbol is defined in the Groups & Files list by choosing View > Reveal in Group Tree.
Viewing Your Class Hierarchy
If you are programming in an object-oriented language, you can view the class hierarchy of your project using the Xcode class browser. To open the class browser, choose Project > Class Browser. You can also open the class browser by selecting a symbol in the Project Symbols smart group and choosing View > Reveal in Class Browser. The following figure shows the class browser for a sample Cocoa application.
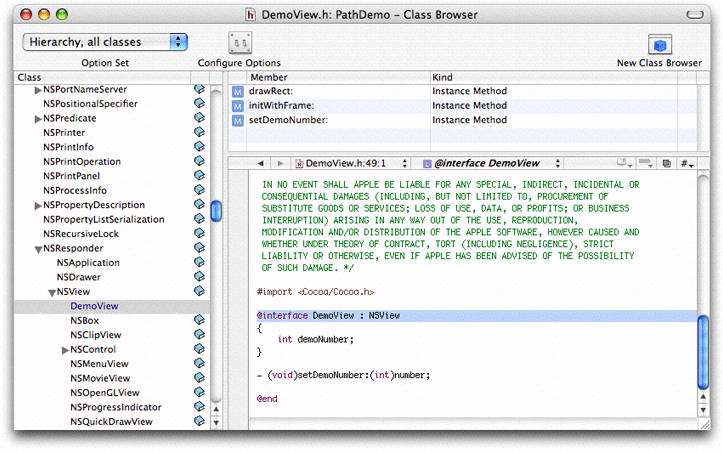

Classes and other top-level symbols—protocols, interfaces, and categories—are listed in the Class pane on the left side of the Class Browser window. When you select a class from this list, Xcode displays the members of that class in the table to the right of the Class pane. When you select a member name from this table, the declaration of that member item is displayed in the editor pane below. To see the item’s definition, Option-click its name.
If the class browser does not list any classes, your project may not be indexed. To rebuild the index, select your project and open the inspector. Open the General pane and click Rebuild Code Sense Index.
A book icon beside a class or member’s name indicates that documentation is available for that member. You can view this documentation by clicking the book icon.
The class browser uses fonts to distinguish between different types of classes and class members:
Classes defined in your project’s source code are in blue. Classes defined in a framework are in black.
Members defined in the class are black. Inherited members are gray.
The Option Set pop-up menu and Configure Options button in the toolbar of the class browser window control which classes and class members are displayed in the browser. The New Class Browser button allows you to open additional class browser windows.
To see the file that a class or member in your project is declared in, select the class or member in the class browser and choose View > Reveal in Group Tree. This option is also available in the contextual menu for classes and class members. Xcode reveals the file in the Groups & Files list in the project window.
You can bookmark a class or class member by selecting it in the class browser and choosing Find > Add to Bookmarks or by choosing Add to Bookmarks from the contextual menu. Xcode creates a bookmark to the class or member’s definition.
Choosing What the Class Browser Displays
You choose which information Xcode displays in the class browser using the Option Set pop-up menu at the top of the browser window. This menu lets you switch between sets of display options. Xcode provides a few sets of predefined display options that allow you to choose:
Whether to view all classes included in your project, or just those defined in your project
Whether to view classes as a flat list or a hierarchical list
When you view classes as a hierarchical list, you can see the subclasses of a class by clicking the disclosure triangle next to that class.
To create your own set of display options or to make changes to an existing set, click the “Configure options” button. Xcode displays a dialog that lets you further refine which information is displayed in the class browser. The Class List Display Settings group, on the left half of the dialog, controls what is displayed in the Class list. The Member List Display Settings group, on the right, controls what is displayed in the members list.
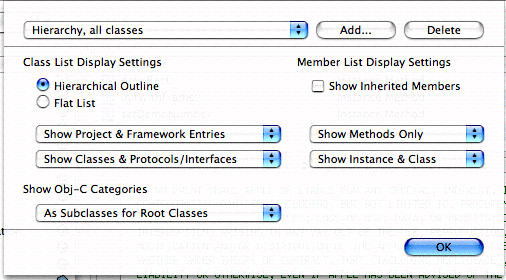
To choose how to display classes, use the radio buttons under Class List Display Settings:
Choose Hierarchical Outline to view a hierarchical list of classes, where subclasses are listed under their superclasses.
Choose Flat List to view an alphabetical list of classes, where all classes are at the same level and sorted alphabetically.
The pop-up menus under the Class List Display Settings options let you choose which items the class browser displays in the Class list. The first pop-up menu determines which classes the class browser shows:
Show Project Entries Only. Shows only those classes defined in your project.
Show Framework Entries Only. Shows only those classes defined in the frameworks that your project includes.
Show Project & Framework Entries. Shows all of the classes defined in your project and in the frameworks that your project includes.
The second pop-up menu determines whether to show only classes, only protocols and interfaces, or classes, protocols and interfaces.
If you are programming in Objective-C, the Show Obj-C Categories menu lets you choose how Xcode displays Objective-C categories in the Class list:
As Subclasses. The class browser lists categories under the classes that they extend.
As Subclasses for Root Classes. The class browser lists categories under the root class of the classes that they extend.
Always Merged into Class. The class browser lists all members of a class and any categories that extend that class together. The category does not appear as a separate entry in the Class list.
The Member List Display Settings let you control which items are included in the class members table in the class browser. You can choose the following:
Whether to display members inherited from the class’s superclass. To display inherited members, select the Show Inherited Members option.
The inherited members that the class browser shows are limited by the scope of the selection in the first pop-up menu under Class List Display Settings. For example, if you have Show Project Entries Only selected, the class browser displays only inherited members from inherited classes in the project. To see all inherited members from all classes, choose Show Project & Framework Entries from the first pop-up menu in the Class List Display Settings group.
Whether to display only methods, only data members, or both methods and data members, using the first pop-up menu in the section.
Whether to display only instance members, only class members, or both instance and class members, using the second pop-up menu in the section.
Saving and Reusing Class Browser Options
You can save and reuse sets of class browser options. To reuse an existing set, choose it from the Options Set pop-up menu above the Class list. To create and delete sets, click the Configure Options button next to this pop-up menu.
To create a new set of search options, click the Configure Options button, click Add, enter a name for your options set, and configure your options.
To remove a set of search options, click the Configure Options button, choose the options set from the pop-up menu, and click Delete.
Viewing Documentation
Technical documentation is an important part of the software development process. As you develop a Mac OS X software product with Xcode, you’re likely to use documentation to learn about the operating system and the technologies it supports, read about system frameworks, and look up individual API definitions.
Xcode includes its own documentation window, which you can use to view the technical documentation and other resources distributed as part of the ADC Reference Library. Xcode’s documentation window gives you several ways to find documentation: you can browse documentation by title and category, search for symbol names, or perform a full-text search for a word or phrase. In addition, Xcode gives you access to the latest documentation available from Apple with downloadable documentation updates.
This section describes the documentation window and the ADC Reference Library content that is distributed with the Xcode Tools. It shows you how to use the API lookup and full-text search features to find Reference Library information, and how to obtain documentation updates.
Using the ADC Reference Library
Apple's ADC Reference Library is a complete collection of technical resources for developers, including documentation, sample code, release notes, technical notes, and technical Q&As. Xcode integrates this content into your development environment, letting you browse or search the ADC Reference Library from the documentation window.
Obtaining ADC Reference Library Content
The ADC Reference Library is available on Apple's developer website and as part of the Xcode Tools installation. You can automatically detect and download updates to the installed ADC Reference Library content through Xcode's documentation update mechanism, described in Obtaining Documentation Updates, or you can subscribe to the Developer Connection mailing to receive the entire ADC Reference Library on DVD each quarter. The Developer Connection mailing and Developer DVD Series are described further on the ADC website.
The Documentation package included with the Xcode Developer
Tools installs a subset of the ADC Reference Library content on
your local volume, at /Developer/ADC Reference Library. This
content includes:
HTML versions of technical documentation, release notes, and API reference.
Category pages that let you browse documents by subject.
Full-text and symbol indexes that let you search all ADC Reference Library content.
This core documentation installation does not include PDF,
sample code, technical notes, or technical Q&As. However, you
can still access this content, referred to as “extended documentation,”
from Xcode. You can also find additional sample code, in the form
of sample Xcode projects, at /Developer/Examples on
your local volume.
Extended Documentation Locations
When you click a documentation link or search result in the
Xcode documentation window, Xcode first looks for that content at /Developer/ADC
Reference Library. If it does not find the requested
content there, Xcode then looks at the extended documentation locations defined
in Xcode's documentation preferences. If Xcode cannot find the requested
content after checking the extended locations, it notifies you that
it was unable to locate the specified documentation.
Xcode's default extended documentation location points to the full ADC Reference Library on Apple's developer website. You can see where Xcode looks for additional documentation in Xcode's preferences, in the Extended Locations table. You can also add your own locations. For example, if you have the full ADC Reference Library content on DVD, you can add a new location specifying that Xcode look for additional content on that DVD volume.
To add an alternative location for locating extended documentation:
Open Xcode Preferences by choosing Xcode > Preferences or typing Command-comma. Open the Documentation pane.
Under Extended Locations, click the '+' button.
Navigate to the volume or folder where the documentation is located and select the ADC Reference Library folder.
Click Add or press Return to add the new location to the Extended Locations table. Xcode adds the new documentation location to the list and makes it active. Click Apply or OK to apply your changes.
Xcode looks for content at the extended locations in the order in which they appear in the table, looking at the top entry first. You can change the order of a location by dragging its entry to the appropriate spot in the table. For example, if you want Xcode to look at the DVD copy of the ADC Reference Library before going to the web, add the DVD as an extended location and drag that entry to the top of the list.
If you don't want Xcode to look for documentation at a location that appears in the Extended Locations table, you can either remove the entry from the list or disable the location. To remove a location from the list, select the entry for that location and click the '-' button. To disable a location, deselect the checkbox in the On column next to the location. You cannot remove the default Web location, although you can disable it.
Browsing ADC Reference Library Content
Xcode has its own built-in documentation viewer, shown below, which allows you to find documentation quickly and easily. To open the documentation window you can:
Select an item from the Help menu.
Option–double-click a symbol name in an editor.
Click a book icon next to a symbol name in the class browser.
Select text in an editor window and choose Help > Find Selected Text in API Reference or Help > Find Selected Text in Documentation.
Control-click the selected text in an editor window and choose Find Selected Text in API Reference or Find Selected Text in Documentation from the contextual menu.
Reference Library content is organized by category; you can see these categories in the Search Groups list in the documentation window, shown in Figure 8-9. Many of these categories have additional subcategories, which you can see by clicking the turn-down arrow next to the category name. When you select a category or subcategory in the Search Groups list, Xcode displays its contents in the documentation pane. Selecting the top-level Reference Library group, or a group with additional subcategories, displays a navigation page such as the one below that shows you the categories in this group with a brief description. From there you can further narrow the subject matter to look for specific documents.
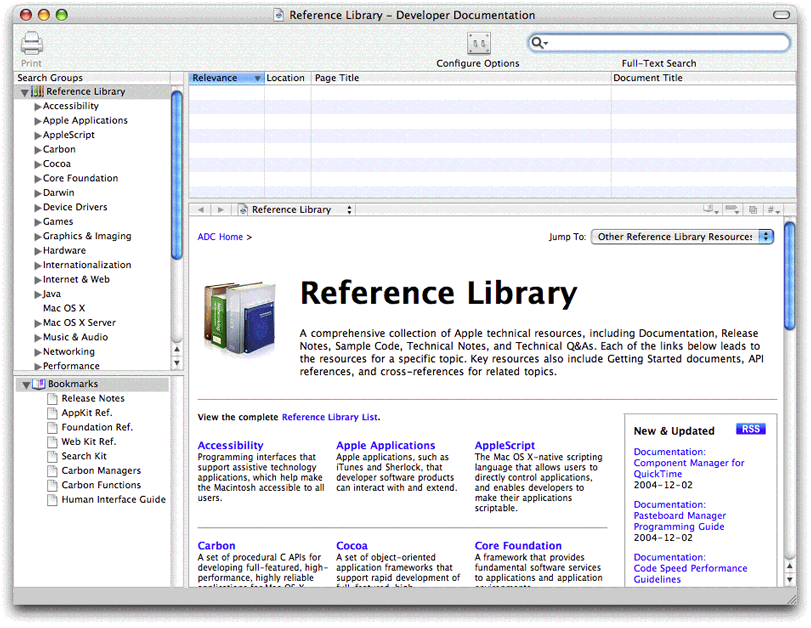

When you perform a full-text or API reference search in Xcode, Xcode searches only in documents in the currently selected group and any groups it might contain. To search all of the ADC Reference Library content, select the Reference Library group in the Search Groups list.
If you prefer to have more than one document open and visible at a time, the documentation window lets you open a document in the documentation window, in a separate Xcode window, or in your preferred browser.
To open the current document in a separate Xcode window, Control-click in the content area of the document and choose Open Page in New Window or Open Frame in New Window.
To open the current document in your preferred browser, Control-click in the content area of the document and choose Open Page in Browser.
When following links that appear in the documentation, you can choose to open those links in the documentation window, in a separate editor window, or in your preferred browser.
To open a link in the documentation window, click the link.
To open a link in a separate Xcode window, you can either Control-click the link and choose Open Link in New Window from the contextual menu or simply Command-click the link.
To open a link in your preferred browser, Control-click the link and choose Open Link in Browser or simply Option-click the link.
You can also copy a link or an image to the clipboard by Control-clicking the link or image and choosing Copy Link from the contextual menu.
Searching for Documentation
When you know the term you're looking for, searching is often the fastest way to find documentation. Xcode's documentation window supports two search modes:
API reference search. This lets you quickly search the available reference documents for a symbol name.
Full-text search. This lets you search the available documentation for a word or phrase. Xcode's full-text search supports simple search term matches, as well as more complex queries using Boolean operators and wildcard searches.
The current selection in the Search Groups list determines the scope of both API-reference and full-text searches. For full-text searches, the selection in the Search Groups list determines the documentation set that Xcode searches. For example, if you search for the term “button” with the Cocoa category selected in the Search Groups list, Xcode returns only documents from the Cocoa category that contain the word “button.”
For API-Reference searches, the selection in the Search Group list determines the programming languages for which Xcode returns results. To search all available documentation, select Reference Library in the Search Groups list.
API Reference Search
When you are writing code, you often need to find documentation for a function, method, data type, or other symbol. Xcode's API reference search lets you quickly find the information you need.
To perform an API reference search in Xcode's documentation window, select API Search from the pull-down menu of the Search field and begin typing the name of the symbol. Xcode's API lookup supports type-ahead; as you type, the detail view displays all of the symbols whose names start with the string in the Search field, as shown in Figure 8-10. As a shortcut, you can also Option–double-click a symbol’s name in any Xcode editor window to open the documentation for that symbol in the documentation window.
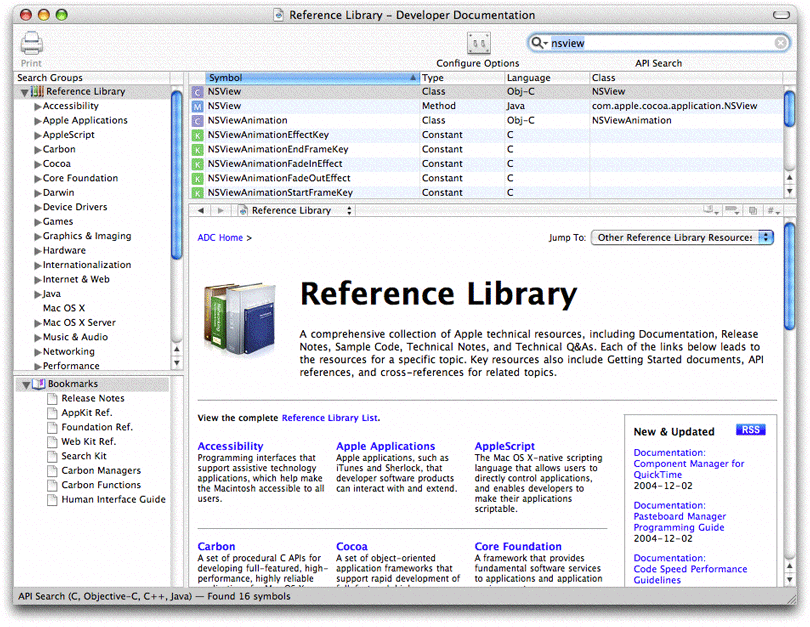

The current selection in the Search Group list determines the programming languages for which Xcode returns results. For example, if you select “Reference Library,” Xcode returns all matching symbols, regardless of the type or language. If you select Carbon in the Search Groups list and perform an API lookup, Xcode returns only matching C and C++ symbols.
You can also specify additional language filters for Xcode's API-reference search by clicking the Configure Options button in the documentation window toolbar. In the dialog that Xcode displays, choose which languages Xcode includes in API-reference searches. To include a language in the API search, select the checkbox in the On column next to that language. If you don't want Xcode to return results for a particular language, deselect the checkbox next to that language. These filters are applied to all API-reference searches regardless of the current selection in the Search Groups list. By default, all of the languages are enabled. Xcode supports API lookup for C, C++, Java, and Objective-C.
To view the documentation associated with one of the symbols returned in a search, select its name from the table. The documentation is displayed in the pane below the table view.
Full-Text Search
Xcode's full-text search lets you search the installed documentation for a word or phrase. You can enter a simple search term, such as “button,” or create more advanced queries using Boolean operators and wildcard characters. Xcode's full-text search uses Apple's Search Kit technology, described in SearchKit Programming Guide
To perform a full-text search choose Full-Text Search from the pull-down menu in the Search field of the documentation window. Type your query and press Return. Xcode searches the installed documentation for the given term or terms and displays the results in the documentation window, as shown in Figure 8-11. The table view displays the relevance, location, page title, and document title for each page returned by the search. To view a page returned as a search result, select that page in the search results table. The scope of the search is determined by the selection in the Search Groups list.
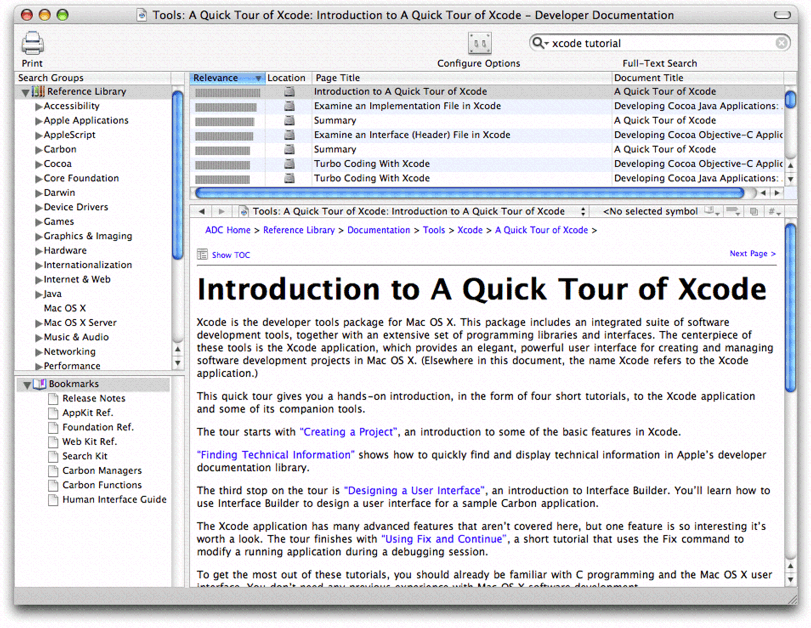

By default, Xcode performs an exact-match search. That is, when you enter a search term, Xcode returns only those documents that contain the entire term. For example, searching for “button” returns documents containing the word “button,” but not documents containing only the word “buttons.” If you type a phrase, such as “bevel button,” Xcode returns those documents that contain both the word “bevel” and the word “button.”
As a shortcut, you can also search the installed documentation for text in an editor window. Select the text to search for and choose Help > Find Selected Text in Documentation. Xcode performs a full-text search and returns all documents containing that text.
You can further refine your search by combining search terms using Boolean operators, searching for required terms, or using a wildcard search. The following sections describe the various queries you can construct for searching the developer documentation.
Constructing Queries Using Boolean Operators
If you wish to further restrict the parameters of your search, you can combine search terms using Boolean operators. You can create arbitrarily complex queries to narrow your search to fit your particular criteria.
Xcode supports the following Boolean operators, listed in order of precedence from highest to lowest:
() |
logical grouping |
! |
NOT |
& |
AND |
| |
OR |
For example, to find documents about the font panel in Mac OS X, you want to find documents that contain the phrase “font panel.” Just to be safe, you also want to catch any documents that don't contain the exact phrase “font panel,” but do contain both search terms “font” and “panel.” You can do that with the following query:
"font panel" | (font &
panel)
Required Terms Search
Simpler than a Boolean query, a required-terms search lets you search for terms that must or must not appear in documents returned as a search result. A required terms search uses the following operators:
+ |
Indicates a term that must appear in any document returned |
- |
Indicates a term that must NOT appear in any document returned |
For example, entering +window returns
all documents containing the word “window,” similar to the behavior
you get by simply entering “window” as a search term. However, if
you enter +window -dialog,
you will get all documents containing the word “window,” but NOT
the word “dialog.”
Using Boolean operators to construct the previous query, you would write:
window & (!dialog)
Wildcard Search
If you are not sure exactly how a particular term appears in the documentation, you can use a wildcard search to include all variations of a search term in the search results. For example, if you are looking for all documentation about buttons in Mac OS X, you probably really want to see all documentation containing either the word “button” or the word “buttons.” Rather than have to specify each of these as separate terms, you can simply use the wildcard character to construct the following query, which returns all documents containing the word “button” or any word with the prefix “button.”
button*
You can use the wildcard character anywhere within a search string. Using a wildcard character at a location other than at the end of a search term may result in longer search times.
Finding Documentation for Command-Line Tools
To find documentation on a command-line tool, choose Help
> Open man page. Use the “man page name” option to display
documentation on a command-line tool. You can optionally specify
a man page section; for example, access(5).
Use the “search string” option to find commands that are related
to a keyword.
Working With Documentation Bookmarks
The Xcode documentation window also supports bookmarks, to provide easy access to documentation that you use frequently. To view the available bookmarks in the documentation window, click the disclosure triangle next to the Bookmarks group in the Search Groups list of the documentation window. Xcode includes a default set of bookmarks, but you can delete any of these default bookmarks or create your own.
To add a bookmark, choose Find > Add to Bookmarks. This bookmarks the page currently open in the documentation window and adds the bookmark to the Bookmarks group. You can also add a bookmark by dragging the document proxy icon in the titlebar of the documentation window to the Bookmarks group in the Search Groups list.
To open a bookmarked location, select the bookmark in the Search Groups list. To rename a bookmark, Option-click the name of the bookmark in the Search Groups list and type the new name.
Obtaining Documentation Updates
In addition to the full ADC Reference Library content available
with the Xcode Tools DVD and Developer DVD Series, Apple also provides
downloadable packages of the documentation installed on your local
computer at /Developer/ADC Reference Library.
Xcode automatically detects these updates as they become available.
Documentation updates are released more frequently than the full
Xcode Tools package, so this is a quick and easy way to stay up-to-date
with the latest technical information from Apple.
Checking for Updates
Xcode automatically checks for a documentation update the first time you launch Xcode after installing a new version of the Xcode tools. Any time you access the documentation after the initial check, Xcode checks for an update if the interval specified in Xcode's Documentation preferences has passed since the last check. By default, Xcode checks for updates on a weekly basis, but you can choose a different interval.
To change the interval at which Xcode checks for documentation updates:
Open the Documentation pane of Xcode Preferences.
Choose an interval from the “Check for documentation updates” pop-up menu that appears in the Updates settings group. You can choose to have Xcode check for updates on a daily, weekly, or monthly basis. Click Apply or OK to apply your changes.
If you don't want Xcode to automatically check for updates at all—for example, if you use Xcode on a computer that does not usually have an internet connection—deselect the checkbox next to the “Check for documentation updates” menu.
To check for a documentation update immediately, click the Check Now button. The “Last check” field shows the date and time at which Xcode last successfully checked for updated documentation.
Installing an Update
When it checks for a documentation update, Xcode compares the version of the documentation on Apple's server to the version installed on your computer. If the documentation on the server is newer, Xcode notifies you that updated documentation is available. To download the documentation package, click Download.
Xcode launches your default browser application to download
the documentation package. When the download is complete, the disk
image automatically mounts. Double-click the documentation package
to launch the Installer. The installer updates the local installation
of the ADC Reference Library at /Developer/ADC Reference
Library.
If Xcode is running when the installation is successfully completed, Xcode notifies you that the documentation has been updated. Click OK to reload the Search Groups and ADC Reference Library entry page in the documentation window. Otherwise, Xcode loads the new documentation when it next launches.
Controlling the Appearance of the Documentation Viewer
You can change the minimum font size used for viewing documentation. To do so, open the Documentation pane of the Xcode Preferences window. To enforce a minimum font size for documents displayed in the documentation window:
Under Universal Access, select the “Never use font sizes smaller than” option.
Choose a font size from the corresponding pop-up menu.
You can temporarily change the font size used to display an HTML file—even if its font size is controlled by a CSS file—by choosing Format > Font > Bigger or Format > Font > Smaller.
Copyright © 2004, 2006 Apple Computer, Inc. All Rights Reserved. Terms of Use | Privacy Policy | Updated: 2006-11-07