 Table of Contents
  Previous Section
Adding a Second Component
In this section, you'll create a new component. Instead of Java, you'll implement its code using WebScript.
- In Project Builder's browser, click Web Components in the first column.
- Choose File
 New in Project.
- Type GuestList as the name of the new component. Then click OK.
- Choose None for Available Assistance and WebScript for Component Language.
- Click Finish.
- In the second column of the browser, click GuestList.wo.
- Double-click GuestList.wo to bring up the component window in WebObjects Builder.
- Create a heading for this page, as you did for the Main component. Call it "Guest List" (or something else of your choosing). Then press Enter twice.
- Add a WOString below the heading. Then type the text " guests have signed this guestbook."
- In the object browser, click application.
- Click count and drag to the center rectangle to bind it to the WOString's value attribute.

- Save the GuestList component.
- Go back to Project Builder and view the source code for Main.java. Replace the return statement in the submit method with the following code:
- Save Main.java.
- Build and run your application.
Note that the Web Components suitcase is selected.
The WebObjects Component Wizard appears.
Note that there is an additional file you didn't have with your Java component. GuestList.wos is your script file, the WebScript equivalent of Main.java in the Main component. For WebScript components, the script files are stored under the component, rather than in the Classes bucket. You'll add code to your script file in a later step.
You're going to bind this WOString so that it reflects the number of guests who have submitted this form.
There is an entry in the second column for the allGuests application variable you created. This entry appears in the Main component as well, since application variables are accessible from anywhere in the code.
If you click allGuests, you'll see in the third column an entry for count. This is a standard method that returns the number of objects in the array.
You need to do one more thing so that the GuestList page now displays when the user submits the form.
return application().pageWithName("GuestList");
pageWithName is a standard WebObjects method (defined in the WebApplication class) that allows you to specify a new page to display.
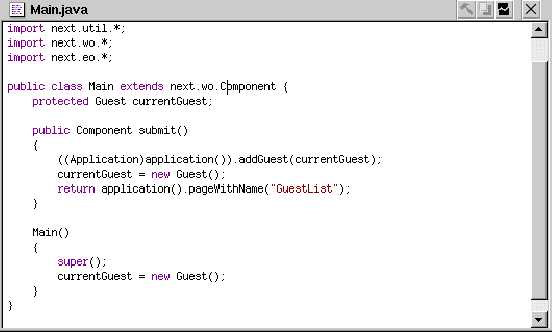
At this point, the code for Main.java looks like this:

Each time you submit the form, the number of guests displayed in the WOString should increase.
To return to the Main page, you'll have to use your browser's backtrack button. Later in the tutorial, you'll add a hyperlink to return to the Main page.
 Table of Contents
  Next Section