Source View
When you choose the source view, the text of your HTML template (ComponentName .html ) appears. When you add elements in the layout view, their corresponding HTML tags appear in this file.
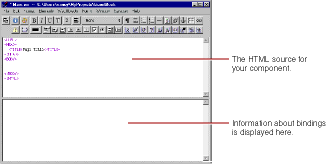
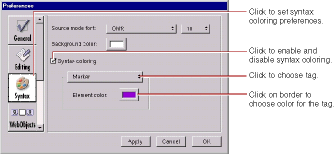
As you can see, when you begin with a blank page, WebObjects Builder automatically inserts the necessary elements such as <HTML>, <HEAD>, and <BODY> for you. The tags and text display in different colors according to their type: errors are red, markers are purple, comments are grey, WebObjects are blue, and text is black. You can change these colors using the Preferences panel. Choose Edit ![]() Preferences (Edit
Preferences (Edit ![]() Options on Windows NT) to bring up the panel and click Syntax to set the syntax coloring preferences.
Options on Windows NT) to bring up the panel and click Syntax to set the syntax coloring preferences.
You select text elements as you would in most text-editing applications: by dragging, or by double-clicking words, or by Shift-clicking. The selected text appears shaded. When you triple-click on a tag, you select the tag, the matching tag, and the HTML in between. For example, if you triple-click on <TITLE> in a new page, WebObjects Builder selects <TITLE>, </TITLE>, and the "Page Title" text. You can also drag the mouse after you triple-click, which selects the matching tag and the HTML in between for the tag the mouse is on as you drag it.
The bottom pane of the source editing window shows your declarations (Main.wod ) file. When you bind variables and methods to your dynamic elements, this file stores the binding information. Normally, you don't edit this file directly. Chapter 3 , Working With Dynamic Elements shows how you use WebObjects Builder to create bindings. Refer to the WebObjects Developer's Guide for more information on working with the declarations file.
© 1999 Apple Computer, Inc. – (Last Updated July 27 99)
![]()
![]()
![]()