Web Assistant Overview
When the Web Assistant applet is launched, it appears in a window whose title indicates the current page and entity:
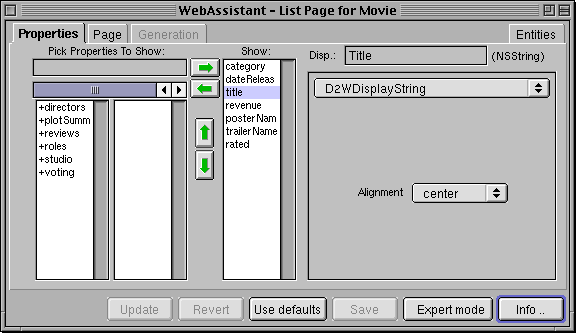
The Web Assistant has four displays, each selectable by clicking a tab:
- Properties . Allows you to set which properties of an entity are shown in a page, the order in which they're displayed, and the display characteristics of properties (for example, color and alignment).
- Page . Allows you to customize global page properties, such as template, overall style, color, and border thickness.
- Generation. Only available in expert mode, this display allows you to generate templates and "freeze" customized pages as reusable components.
- Entities . Allows you to select which entities of the model are hidden, which are shown, and which are read-only.
The Web Assistant has two modes, Standard mode and Expert mode. By default the Web Assistant opens in Standard mode, which lets you customize the current page in your application. When you customize a page in Standard mode, the changes apply to all occurrences of that page, and that page only. For example, if you change the order of properties in an edit page for the Movie entity, then any time a Movie edit page is displayed, those changes are in effect (provided you have clicked Update or Save). However, the changes don't apply to a Movie query, list, or inspect page; if you want to customize those in the same way, you must do so explicitly.
Using Web Assistant's Expert mode, you can customize any page in the application, regardless of whether it is currently displayed. Thus, by specifying the "*all*" setting in Expert mode, you could change all pages of a given entity at once. In addition, you can generate a template or "freeze" a page as a reusable component. For more information, see Web Assistant Expert Mode .
When you've made changes to a page, you can use the buttons at the bottom of the Web Assistant to apply them:
- Update: Sends your changes to the server. On some systems this causes the page to be refreshed in your browser.
- Revert: Causes all settings to revert to their last saved values.
- Use Defaults: reverts all settings to the values they had when the project was created.
- Save: Saves the changes to disk. You need to save your changes in order for them to persist beyond the current session.
© 1999 Apple Computer, Inc. – (Last Updated July 27 99)
![]()
![]()
![]()