Retired Document
Important: This document may not represent best practices for current development. Links to downloads and other resources may no longer be valid.
Overriding the Job Specification Function
The easiest way to create an Xgrid client application is to override the job specification function in the GridSample sample code. This chapter shows you how to accomplish this.
How the GridSample Code Is Organized
The GridSample application is organized into several modules. All the modules are part of the GridSample project, found in your Developer/Examples/Xgrid/GridSample/ directory.
Some modules consist entirely of .nib files that open in Interface Builder. Most of the modules are paired .h and .m files that open in the code editor—GridSampleApplicationDelegate.h and GridSampleApplicationDelegat.m, for example.
The GridSample modules form an outline of the main tasks any Xgrid client must perform:
Identify a controller—You need to locate a controller, typically by opening a service browser window.
See the
GridSampleConnectionControllerandGridSampleServiceBrowsermodules.Authenticate and connect—You need to connect to the controller, which is typically password protected.
See the
GridSampleLoginControllermodule.Submit the job—You need to assemble the tasks into a job and submit the job to the controller, specifying a grid.
See the
GridSampleNewJobWindowControllerandNewJob.nibmodules.Monitor status and retrieve job ID—When you submit a job, an action monitor object is returned. You need to check the status of the action monitor to see if your job was submitted successfully. If it was, you can obtain a job ID.
See the
GridSampleNewJobWindowControllermodule.Set callback for notifications—Using the job ID, you can register to be notified when the job completes or when errors occur.
See the
GridSampleNewJobWindowControllermodule.Collect data—When the job completes, you need to collect the returned data and deal with it appropriately.
See the
GridSampleResultsWindowControllermodule.Housekeeping—As always, there are error handling routines and basic housekeeping tasks, such as deleting the job.
See the
deallocfunction in theGridSampleResultsWindowControllermodule.
The GridSample application is general purpose. In addition to modifying the job submission module, you may want to streamline other behaviors. For example:
You may want to connect to a specific controller every time. To modify this behavior, refer to the GridSampleConnectionController and GridSampleServiceBrowser modules.
You may want to use only your chosen method of authentication. To modify this behavior, refer to the GridSampleLoginController module.
You may want to direct the collected data to another application for postprocessing. To modify this behavior, refer to the GridSampleJobResultsWindowController module.
Most of these modifications are fairly straightforward. Examining the source code of the appropriate module should provide you with much of the information you need, and referring the XgridFoundation Reference should answer remaining questions. The job submission module deserves special attention, however.
Changing the Job Specification
To override the job specification function in Grid Sample, you need to make modifications in four places:
NewJob.nibNewJobWindowController(.mand.h)ApplicationDelegate(.mand.h)MainMenu.nib
For example, if you examine the GridCalendar sample code, found at http://developer.apple.com/samplecode/GridCalendar/, you will see that it is a copy of the GridSample application, with the following modifications:
A new
NewJob.nibfile has been created, with a new UI for job specification.The
jobSpecificationfunction has been subclassed to create a window controller that builds a job specification based on the new UI.A new application delegate has been created, subclassing
classForNewJobWindowControllerto point to the new window controller.The application delegate has been subclassed in
MainMenu.nibto specify the new application delegate.
Here are the steps in more detail:
NewJob.nibhas been changed to provide a new job submission user interface. (The.nibfile is created using Interface Builder without actually writing any code.)GridSample
NewJobWindowControllerhas been supplemented with GridCalendarNewJobWindowController, which contains the support code to process the UI state returned fromNewJob.nibinto a properly formatted job submission. The new support code is encapsulated as a subclass ofjobSpecification, overriding the job specification code inGridSampleNewJobWindowController.GridSample
ApplicationDelegatehas been supplemented with GridCalendarApplicationDelegate, which overrides-classForNewJobWindowControllerto point toGridCalendarNewJobWindowController.In
Mainmenu.nib, the application delegate object’s class has been subclassed toGridCalendarApplicationDelegate.
You should proceed in a similar manner, using the code in GridCalendar as a guide. The process is broken down into four steps:
Step One: Create a New Job Submission UI
Create a new job submission UI by modifying and saving NewJob.nib.
Note that the GridSample project contains three NewJob.nib files, one for each target: GridSample, GridFeeder, and GridMPI. Open the .nib file GridSample > Sample > Resources > Nibs, as shown in Figure 5-1.
NewJob.nib file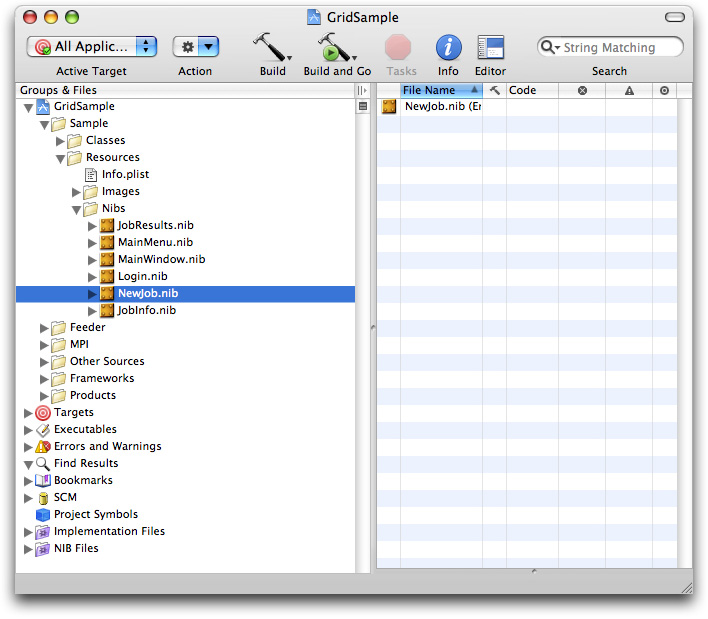
Figure 5-2 and Figure 5-3show the NewJob.nib file from GridSample and the modified NewJob.nib file for GridCalendar. Since GridCalendar always uses the same command, the command field and job name field have been removed, and a date selector field has been added for the cal command.
.nib file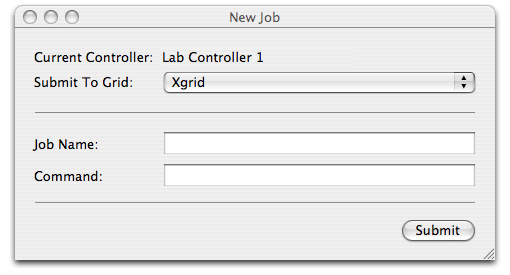
.nib file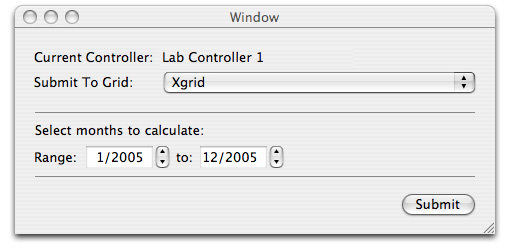
Assuming your application always submits the same type of job to Xgrid, you should make similar changes to the user interface: keep the pop-up window to select the grid, but replace the job name and command fields with input fields that allow the user to set the parameters for each instance of your particular job.
Step Two: Add the Support Code
Create a new file that contains the support logic to create a job specification based on the returned state from your UI. Override jobSpecification, as defined in GridSampleNewJobWindowController.m, by creating a new class of the same name, encapsulating your code. This file supplements GridSampleNewJobWindowController, so name it appropriately (in GridCalendar, it’s named GridCalendarNewJobWindowController).
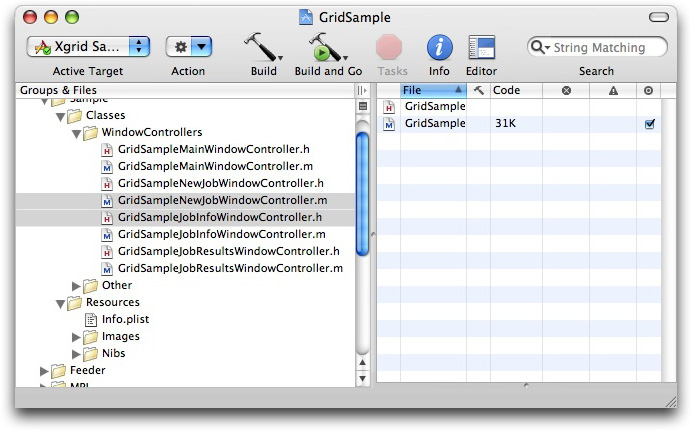
To see how this is done, compare GridSampleNewJobWindowController.m and with GridCalendarNewJobWindowController.m. Notice that GridCalendarNewJobWindowController.m contains only the modified job specification code, and that the main function is named jobSpecification, overriding the jobSpecification defined in GridSampleNewJobWindowController.m. This way, the new window controller inherits all the functionality of the old window controller, such as selecting a grid, submitting the job, retrieving the action monitor, and setting up callbacks for status. Only the job specification function is overridden.
Step Three: Create an Application Delegate
Supplement GridSampleApplicationDelegate.m with your own application delegate that sublasses classForNewJobWindowController to point to your new window controller, thereby overriding GridSampleNewJobWindowController with your own window controller.
Listing 5-1 shows the contents of the GridCalendarApplicationDelegate.m file in its entirety.
Listing 5-1 GridCalendarApplicationDelegate
#import "GridCalendarApplicationDelegate.h" |
#import "GridCalendarNewJobWindowController.h" |
@implementation GridCalendarApplicationDelegate |
#pragma mark *** Accessor methods *** |
- (Class)classForNewJobWindowController; |
{ |
return [GridCalendarNewJobWindowController self]; |
} |
@end |
As you can see, the code is quite simple. As the implementation of your application delegate, define classForNewJobWindowController to return an instance of the window controller you added in step 2.
Step Four: Change the Application Delegate’s Class in MainMenu.nib
Finally, change the application delegate’s class in MainMenu.nib to point to the new application delegate you added in step 3.
Open
MainMenu.nib(There are three.nibfiles by this name in GridSample—one for each target. Open theMainMenu.nibfile for GridSample.)Select the Classes tab and highlight
GridSampleApplicationDelegate, as shown in Figure 5-5.Figure 5-5 Classes tab in MainMenu.nib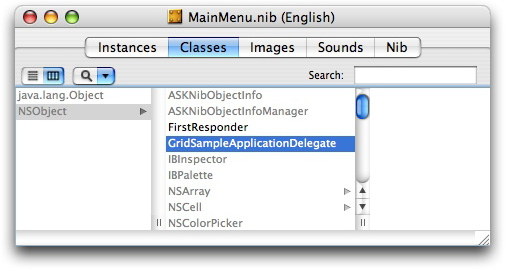
Press the Return key. This creates a new subclass,
MyGridSampleApplicationDelegate. Double-click the new entry to select it, then type the name of your application delegate from step 3. You will see your new application delegate subclass, similar to Figure 5-6.Figure 5-6 GridCalendarApplicationDelegatesubclass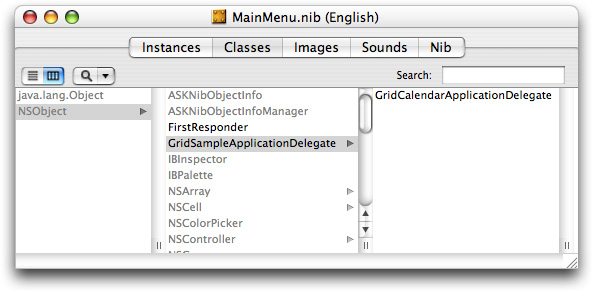
Save your changes, then click the Build and Go icon to compile and run your application. You should have a customized Xgrid client application that submits your job to Xgrid.
Summary
To summarize: you have created a .nib file with a new UI for job specification; you have subclassed jobSpecification to create a window controller that builds a job specification based on your UI; you have created an application delegate and subclassed classForNewJobWindowController to point to your window controller; and you have subclassed the application delegate in the MainMenu.nib file to use your new application delegate.
Congratulations. Unless you need to further customize the look and feel of your application, you’re done. If you do need to go further, see Writing a Cocoa Xgrid Client.
Copyright © 2007 Apple Inc. All Rights Reserved. Terms of Use | Privacy Policy | Updated: 2007-10-31