Retired Document
Important: Apple recommends that developers explore QTKit and Core Video for new development in this technology area. See QTKit Framework Reference and Core Video Programming Guide for more information.
QuickTime VR Programming
This chapter discusses how you can add support to your application for playing QuickTime VR movies. The chapter is aimed at programmers and tool developers who want to incorporate QTVR movies in their applications, both on the Web and as standalone programs. Because QuickTime VR allows users to interactively explore and examine photorealistic, three-dimensional virtual worlds, it provides users with a content-rich, immersive experience. This offers QuickTime VR programmers and tool developers an opportunity to enhance their products by incorporating QTVR movies.
As discussed in Chapter 3, Creating QuickTime VR Panoramas and Object Movies, the images displayed in QuickTime VR movies can be captured either photographically or rendered on a computer using a 3D graphics package. That chapter explains some of the equipment and tools you use to capture images that you want to display in QuickTime VR movies.
This chapter is divided into the following major sections:
Displaying QuickTime VR Movies describes how you can add support to your application for playing QuickTime VR movies.
Defining the QTVR Movie Controller discusses the QuickTime VR movie controller, which is a movie controller component that manages the interface for presenting QuickTime VR movies to users and allows them to navigate and explore in those movies.
Using the QuickTime VR Movie Controller illustrates basic ways of interacting with the QuickTime VR movie controller. In particular, it provides source code examples that show how you can hide the control bar, hide and show buttons in the control bar, and disable the automatic cursor tracking and shape changing provided by the QuickTime VR movie controller.
QuickTime VR Authoring Components discusses the QTVR Flattener, the Multinode Splitter, and the QTVR Object Movie Compressor.
QuickTime VR Manager discusses the QuickTime VR Manager, which is the part of QuickTime that your application can use to interact with QuickTime VR.
Using the QuickTime VR Manager discusses some of the basic ways of using the QuickTime VR Manager. Source code examples are provided that show how you can determine whether the QuickTime VR Manager is available in the current operating environment, how you initialize the QuickTime VR Manager or display a QuickTime VR movie in a window, and how you can create QuickTime VR movie instances.
Displaying QuickTime VR Movies
QuickTime VR movies, as discussed in Chapter 2, QuickTime VR Panoramas and Object Movies, are simply a special kind of QuickTime movie, which means that you can add support to your application for playing QuickTime VR movies easily and with a minimum of effort.
If the QuickTime VR Manager (and hence the QuickTime VR movie controller) is available, you simply open a movie using standard QuickTime functions, call NewMovieController to associate the movie with the QuickTime VR movie controller, and make the appropriate call to MCIsPlayerEvent in your main event loop. You follow exactly these same steps to open and manage any QuickTime movie.
Listing 4-1shows a typical way to open a QuickTime VR movie.
Listing 4-1 Opening a QuickTime VR movie
Movie MyGetMovie (void) |
{ |
OSErr myErr; |
SFTypeList myTypes = {MovieFileType, 0, 0, 0}; |
StandardFileReply myReply; |
Movie myMovie = nil; |
short myResFile; |
StandardGetFilePreview(nil, 1, myTypes, &myReply); |
if (myReply.sfGood) { |
myErr = OpenMovieFile(&myReply.sfFile, &myResFile, |
fsRdPerm); |
if (myErr == noErr) { |
short myResID = 0; //We want the first movie. |
Str255 myName; |
Boolean wasChanged; |
myErr = NewMovieFromFile(&myMovie, myResFile, |
&myResID, myName, |
newMovieActive, |
&wasChanged); |
CloseMovieFile(myResFile); |
} |
} |
return(myMovie); |
} |
Note that Listing 4-1 does not use the QuickTime VR Manager at all. Instead, it relies entirely on QuickTime’s Movie Toolbox and other Macintosh system software managers. Refer to the QuickTime API Reference for a complete description of the Movie Toolbox and all QuickTime functions supported by the QuickTime API.
Once you’ve opened a file containing a QuickTime VR movie, you need to call NewMovieController to obtain the standard user interface for playing QuickTime VR movies. It’s particularly important that you call NewMovieController (rather than call the Component Manager directly) for QuickTime VR movies, because QuickTime VR movies contain special information that lets QuickTime know which movie controller to load.
In your main event loop, you should pass all events to the MCIsPlayerEvent function, which passes user events (such as mouse movements and button clicks) to the QuickTime VR movie controller. QuickTime VR automatically changes the cursor’s shape when it is inside the movie’s boundary. As a result, your application should relinquish control of the cursor for as long as it remains in the movie’s boundary and then reset the cursor’s shape as necessary when it is moved outside the movie.
To allow the QuickTime VR movie controller to update the shape of the cursor in a timely manner, your application should pass all events, even idle events, to the MCIsPlayerEvent function. Alternatively, you can call the MCIdle function frequently.
If you want to disable the automatic cursor tracking and shape changing provided by the QuickTime VR movie controller, you can execute the following line of code, where myMC is an identifier for a movie controller returned by NewMovieController:
MCDoAction(myMC, mcActionSetCursorSettingEnabled, (void*) false); |
The mcActionSetCursorSettingEnabled movie controller action was introduced in QuickTime version 2.1. This chapter provides a description of how the QuickTime VR movie controller handles this and other movie controller actions.
Defining the QTVR Movie Controller
The QuickTime VR movie controller is a movie controller component that manages the interface for presenting QuickTime VR movies to users and allowing them to navigate and explore in those movies. You can use standard QuickTime movie controller functions to configure and manipulate the QuickTime VR movie controller.
If you want to customize the interface presented by the QuickTime VR movie controller (for example, to hide the control bar), you should read this section. You might also need to read this section to learn how the QuickTime VR movie controller handles movie controller actions. Your application can issue actions to access certain movie controller capabilities; your application can also install an action filter function to intercept and possibly also override movie controller actions.
This section begins by describing the appearance and behavior of the QuickTime VR movie controller. Then it describes the movie controller actions and the ways in which your application might need to issue or respond to them. The next major section Using the QuickTime VR Movie Controller, briefly illustrates how to issue a movie controller action and perform other operations on the QuickTime VR movie controller.
User Controls For Easy Navigation
When QuickTime plug-in displays a QuickTime VR movie, it provides users with a set of controls shown in Figure 4-1 to manipulate VR objects and panoramas.
A VR panorama lets the user stand in a virtual reality space, such as the view of the Eiffel Tower illustrated in Figure 4-2, and explore immersively the dimensions of a full 360 degree panorama––panning across, as well as zooming in and out of the panorama.
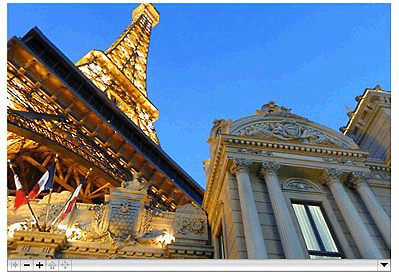
In QuickTime, authors can create VR panoramas in which users also have the ability to tilt up and down a full 180 degrees, so that you can see the ceiling of the cathedral as well as the floor in Figure 4-2. The actual horizontal and vertical range is determined by the panorama itself. To look left, right, up and down, you drag with the mouse across the panorama.
Figure 4-2 shows an illustration of a QuickTime VR panoramic movie in Mac OS X, with various controls to manipulate the panorama.
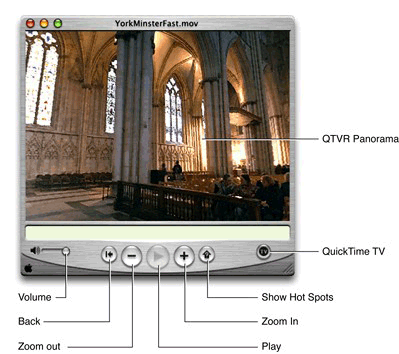
The user can navigate in a movie by dragging inside the picture, as shown in Figure 4-2. The user can also use the control bar to perform several other operations. The control bar contains the following controls:
A go-back button. This control allows the user to return to the previous node. Clicking this button restores the previous static pan angle, tilt angle, and field of view. This button is enabled only for multinode movies.
A zoom-out button. This control allows the user to zoom out. Pressing the button causes the field of view of the displayed node to increase, thereby making the object or panorama appear to move away from the viewer.
A zoom-in button. This control allows the user to zoom in. Pressing the button while causes the field of view of the displayed node to decrease, thereby making the object or panorama appear to move toward the viewer.
A hot spot display button. This allows the user to highlight the visible hot spots. A single click toggles hot spots on; another click toggles hot spots off. This is a change in behavior from previous hot spot buttons, which displayed hot spots only while the mouse button was held down.
The Shift key can be used to zoom in and the Control key can be used to zoom out.
In addition to these buttons, there is also a label display area (not shown in Figure 4-2) in which helpful information can be displayed. For instance, when the cursor is over one of the buttons, the button’s name appears in the label display area. Similarly, when the cursor is over a hot spot, the hot spot’s name (if it has one) appears in the label display area.
Loading the Movie Controller Component
As defined, the QuickTime VR movie controller is a movie controller component that manages the interface for presenting QuickTime VR movies to users and allowing them to navigate and explore in those movies. This component is stored in the QuickTime VR extension and is loaded automatically whenever an application calls NewMovieController with a QuickTime VR movie.
A special piece of user data in a QuickTime VR movie file indicates the movie controller to use.
Movie Controller Actions
A movie controller action is a constant that you can pass to a movie controller to request that the movie controller perform some action (such as modify certain movie characteristics or respond to user events). For example, you can pass the mcActionSetCursorSettingEnabled action to enable or disable the automatic cursor tracking and shape changing provided by the QuickTime VR movie controller.
There are two ways in which you might be concerned with these actions: your application can invoke these actions directly by calling the MCDoAction function; or your application can install an action filter function, which can receive any of these actions; your action filter can then either intercept the action or send it back to the movie controller for processing.
A movie controller action is usually accompanied by some parameter data. For instance, the mcActionSetCursorSettingEnabled action must be accompanied by a Boolean value that indicates whether to enable or disable cursor tracking and shape changing. When calling MCDoAction, you get or set data through the params parameter. Similarly, an action filter function exchanges data with a movie controller through its params parameter. The type and meaning of this additional parameter data are described in the individual descriptions of each movie controller action.
Using the QuickTime VR Movie Controller
This section illustrates basic ways of interacting with the QuickTime VR movie controller. In particular, it provides source code examples that show how you can
hide the control bar
hide and show buttons in the control bar
disable the automatic cursor tracking and shape changing provided by the QuickTime VR movie controller
Hiding and Showing the Control Bar
You can use standard QuickTime movie component routines to hide and show the control bar associated with a QuickTime VR movie. To hide the control bar, you can call the MCSetVisible function, as illustrated in Listing 4-2.
Listing 4-2 Hiding the control bar
componentResult myResult; |
Boolean isVisible; |
isVisible = false; |
myResult = MCSetVisible(myMC, isVisible); |
Showing and Hiding Control Bar Buttons
You can use standard QuickTime movie controller routines to hide and show specific buttons in the control bar associated with a QuickTime VR movie. The QuickTime VR movie controller automatically shows and hides some buttons, and it automatically disables some buttons that might not be appropriate for a specific movie or node. You can, however, override these automatic behaviors using the QuickTime VR Manager.
For instance, the QuickTime VR movie controller displays the speaker button (used for adjusting a movie’s volume) whenever a movie contains a sound track. It’s possible, however, that only a single node in a large multinode movie has a sound track. In that case, you might want to hide the speaker button in all nodes that do not have a sound track. Conversely, the QuickTime VR movie controller hides the speaker button if a movie does not contain a sound track. You might, however, play a sound loaded from a sound resource or from another QuickTime file. In that case, you might want to show the speaker button and have it control the sound you’re playing. In both these cases, you need to override the default behavior of the QuickTime VR movie controller.
Note first that every VR movie has two sets of movie controller flags: a set of control flags and a set of explicit flags. If a bit in the set of control flags is set (that is, equal to 1), then the associated action or property is enabled. For instance, bit 17 (mcFlagQTVRSuppressZoomBtns) means to suppress the zoom buttons. So, if that bit is set in a VR movie’s control flags, the zoom buttons are not displayed. If that bit is clear, the zoom buttons are displayed.
However, the QuickTime VR movie controller sometimes suppresses buttons even when those buttons have not been explicitly suppressed in the control flags. As already mentioned, if a particular VR movie does not contain a sound track, then the movie controller automatically suppresses the speaker button. If a movie does contain a sound track, then the speaker button is displayed only if the suppress speaker bit is off.
For instance, if your application is playing a sound that it loaded from a sound resource, you might want the user to be able to adjust the sound’s volume using the volume control. To do that, you need a way to force the speaker button to appear. For this reason, the explicit flags were introduced.
The explicit flags indicate which bits in the control flags are to be used explicitly (that is, taken at face value). If a certain bit is set in a movie’s explicit flags, then the corresponding bit in the control flags is interpreted as the desired setting for the feature (and the movie controller does not attempt to do anything clever). In other words, if bit 17 is set in a movie’s explicit flags and bit 17 is clear in that movie’s control flags, then the zoom buttons are always displayed. Similarly, if bit 2 is set in a movie’s explicit flags and bit 2 is clear in that movie’s control flags, then the speaker button is displayed, whether or not the movie contains a sound track.
To get or set a bit in a movie’s explicit flags, you must set the flag mcFlagQTVRExplicitFlagSet in your call to mcActionGetFlags or mcActionSetFlags. To get or set a bit in a movie’s control flags, you must clear the flag mcFlagQTVRExplicitFlagSet in your call to mcActionGetFlags or mcActionSetFlags. Note that when you use the defined constants to set values in the explicit flags, the constant names might be confusing. For instance, setting the bit mcFlagSuppressSpeakerButton in a movie’s explicit flags doesn’t cause the speaker to be suppressed; it just means: “use the actual value of the mcFlagSuppressSpeakerButton bit in the control flags.”
Now you can see how to hide or show a button in the control bar: set the appropriate explicit flag to 1 and set the corresponding control flag to the desired value. Listing 4-3 shows how to force a specific button in the control bar to be displayed.
Listing 4-3 Showing a control bar button
void ShowControllerButton (MovieController theMC, long theButton) |
{ |
long myControllerFlags; |
// Get the current explicit flags |
// and set the explicit flag for the specified button. |
myControllerFlags = mcFlagQTVRExplicitFlagSet; |
MCDoAction(theMC, mcActionGetFlags, &myControllerFlags); |
MCDoAction(theMC, mcActionSetFlags, |
(void *)((myControllerFlags | theButton) | |
mcFlagQTVRExplicitFlagSet)); |
// Get the current control flags |
// and clear the suppress flag for the specified button. |
myControllerFlags = 0; |
MCDoAction(theMC, mcActionGetFlags, &myControllerFlags); |
MCDoAction(theMC, mcActionSetFlags, |
(void *)(myControllerFlags & ~theButton)); |
} |
Listing 4-4 shows how to force a specific button in the control bar to be hidden. Because the suppress flag overrides the setting of the explicit flag, this routine sets only the suppress flag and doesn’t bother with the explicit flag.
Listing 4-4 Hiding a control bar button
void HideControllerButton (MovieController theMC, long theButton) |
{ |
long myControllerFlags; |
// Get the current control flags |
// and set the suppress flag for the specified button. |
myControllerFlags = 0; |
MCDoAction(theMC, mcActionGetFlags, &myControllerFlags); |
MCDoAction(theMC, mcActionSetFlags, |
(void *)((myControllerFlags | theButton)); |
} |
Sending Actions to the QuickTime VR Movie Controller
You can use the MCDoAction function to send a movie controller action to a movie controller. For example, you can execute this line of code to disable the automatic cursor tracking and shape changing provided by the QuickTime VR movie controller:
MCDoAction(myMC, mcActionSetCursorSettingEnabled, (void*) false); |
In this example, the myMC parameter is an identifier for the QuickTime VR movie controller, returned by a previous call to NewMovieController.
QuickTime VR Authoring Components
There are three QTVR authoring components, which were introduced in QuickTime 5:
QTVR Flattener, which is a movie export component that converts an existing QuickTime VR single node movie into a new movie optimized for the Web
Multinode Splitter, also a movie export component
QTVR Object Movie Compressor
All three components are contained in the file QuickTime VR and are installed if the user chooses Select All in the Custom Install option.
As movie exporters, these authoring components can be demonstrated using QuickTime Pro, or a custom application by opening a QuickTime VR movie and then choosing Export from the File menu. You can then choose the particular exporter by selecting it from the Export: pop-up menu in the Export File dialog.
The pop-up menu includes these choices:
Movie to Fast-Start QuickTime VR movie (the Flattener). Appears for all single node panorama and object movies.
Movie to Separate Single-Node Movies (The Multinode Splitter). Appears only for 2.0 format multinode movies.
Movie to QuickTime VR Object Movie (Object Movie Compressor). Appears only for 2.0 format object movies.
Once an export method is selected, you can click the Options button to bring up a dialog where you can choose options specific to the given exporter.
The QTVR Flattener
The QTVR Flattener is a movie export component that converts an existing QuickTime VR single node movie into a new movie that is optimized for the Web. The flattener re-orders media samples; and for panoramas the flattener creates a small preview of the panorama. When viewed on the Web, this preview appears after 5% to 10% of the movie data has been downloaded, allowing users to see a lower-resolution version of the panorama before the full resolution version is available.
To use the QTVR Flattener from your application, you first create a QuickTime VR movie, then open the QTVR Flattener component and call the MovieExportToFile routine, as shown in Listing 4-5.
Listing 4-5 Using the QTVR flattener
ComponentDescription desc; |
Component flattener; |
ComponentInstance qtvrExport = nil; |
desc.componentType = MovieExportType; |
desc.componentSubType = MovieFileType; |
desc.componentManufacturer = QTVRFlattenerType; |
flattener = FindNextComponent(nil, &desc); |
if (flattener) qtvrExport = OpenComponent (flattener); |
if (qtvrExport) |
MovieExportToFile (qtvrExport, &myFileSpec, myQTVRMovie, nil, 0, 0); |
The code snippet shown in Listing 4-5 creates a flattened movie file specified by the myFileSpec parameter. If your QuickTime VR movie is a panorama, the flattened movie file includes a quarter size, blurred JPEG, compressed preview of the panorama image.
Presenting Users with the QTVR Flattener Dialog Box
You can present users with the QTVR Flattener’s own dialog box. This allows users to choose options such as how to compress the preview image or to select a separate preview image file.
To show the dialog box, use the following line of code:
err = MovieExportDoUserDialog (qtvrExport, myQTVRMovie, nil, 0, |
0, &cancel); |
If the user cancels the dialog box, then the Boolean cancel is set to true.
Communicating Directly with the Component
If you don’t want to present the user with the flattener’s dialog box, you can communicate directly with the component by using the MovieExportSetSettingsFromAtomContainer routine as described next.
If you want to specify a preview image other than the default, you need to create a special atom container and then call MovieExportSetSettingsFromAtomContainer before calling MovieExportToFile. You can specify how to compress the image, what resolution to use, and you can even specify your own preview image file to be used. The atom container you pass in can have various atoms that specify certain export options. These atoms must all be children of a flattener settings parent atom.
The preview resolution atom is a 16-bit, big-endian value that allows you to specify the resolution of the preview image. This value, which defaults to kQTVRQuarterRes, indicates how much to reduce the preview image. Note that kQTVRQuarterRes is defined as 4, implying that you can replace this with 5, for example, yielding a 1/6 resolution fast-start preview.
The blur preview atom is a Boolean value that indicates whether to blur the image before compressing. Blurring usually results in a much more highly compressed image. The default value is true.
The create preview atom is a Boolean value that indicates whether a preview image should be created. The default value is true.
The import preview atom is a Boolean value that is used to indicate that the preview image should be imported from an external file rather than generated from the image in the panorama file itself. This allows you to have any image you want as the preview for the panorama. You can specify which file to use by also including the import specification atom, which is an FSSpec data structure that identifies the image file. If you do not include this atom, then the flattener presents the user with a dialog box asking the user to select a file. The default for import preview is false. If an import file is used, the image is used at its natural size and the resolution setting is ignored.
Sample Atom Container for the QTVR Flattener
The sample code inListing 4-6 creates an atom container and adds atoms to indicate an import preview file for the flattener to use.
Listing 4-6 Specifying a preview file for the flattener to use
Boolean yes = true; |
QTAtomContainer exportData; |
QTAtom parent; |
err = QTNewAtomContainer(&exportData); |
// create a parent for the other settings atoms |
err = QTInsertChild (exportData, kParentAtomIsContainer, |
QTVRFlattenerParentAtomType, 1, 0, 0, nil, &parent); |
// Add child atom to indicate we want to import the preview from a file |
err = QTInsertChild (exportData, parent, QTVRImportPreviewAtomType, 1, 0, |
sizeof (yes), &yes, nil); |
// Add child atom to tell which file to import |
err = QTInsertChild (exportData, parent, QTVRImportSpecAtomType, 1, 0, |
sizeof (previewSpec), &previewSpec, nil); |
// Tell the export component |
MovieExportSetSettingsFromAtomContainer (qtvrExport, exportData); |
Overriding the compression settings is a bit more complicated. You need to open a standard image compression dialog component and make calls to obtain an atom container that you can then pass to the QTVR Flattener component.
Listing 4-7 Overriding the compression settings
ComponentInstance sc; |
QTAtomContainer compressorData; |
SCSpatialSettings ss; |
sc = OpenDefaultComponent(StandardCompressionType,StandardCompressionSubType); |
ss.codecType = kCinepakCodecType; |
ss.codec = nil; |
ss.depth = 0; |
ss.spatialQuality = codecHighQuality |
err = SCSetInfo(sc, scSpatialSettingsType, &ss); |
err = SCGetSettingsAsAtomContainer(sc, &compressorData); |
MovieExportSetSettingsFromAtomContainer (qtvrExport, compressorData); |
The QTVR Multinode Splitter
The QTVR Splitter, a movie export component, takes a QTVR version 2.x multinode movie and exports a set of single-node movies with relative URL links to each other.
The QTVR Splitter works by changing all of the link hot spots to URL hotspots, leaving any previously defined URL or undefined (blob) hot spots unchanged. If the QTVR Flattener component is present, the Splitter gives you the option of using it to add fast-start data to the movies, including previews for panorama nodes. Additionally, the Splitter will generate a text file with HTML embed tags for each movie created.
When you display the movies’ output by the Splitter using the QuickTime plug-in, clicking the relative URL links opens the other nodes in the browser window. When loaded in a frame, the Plugin loads the new movies in the same frame.
When the user clicks a link which displays a multinode movie split this way, the first thing to download is the hot spot track, which is live immediately. Then any preview data is downloaded, and finally the tiles download in and are placed over the background grid or preview. The user can jump to another node at any time, and only the nodes they visit are downloaded, unlike a multinode movie, which does not allow navigation until the entire file has downloaded, and therefore downloads all of the nodes, whether the user visits them or not.
Advantages of a Multinode Movie
The one significant advantage of a multinode movie is that when the user jumps to a new node the movie opens to the destination view defined in the authoring process. This can be overcome by specifying view angles in the embed tag (with a new page for each movie which links to it), and the Splitter can do this for you.
Using the QTVR Splitter
As discussed, the QTVR Splitter is a movie export component. When the QuickTime VR Authoring extension is placed in your QuickTime Extensions Folder, any application that uses movie exporters will have access to it. The instructions outlined here use the QuickTime Player Pro application to demonstrate its usage. You begin by creating a multinode movie, using a QuickTime VR tool.
To split the movie:
Open any QTVR version 2.0+ multinode movie in the QuickTime Player Pro application. Version 1.0 multinode movies can be converted to version 2.1 using the QTVR Converter component, which is part of the QuickTime VR Authoring Studio, or ConVRter from Sumware, a third-party developer.
Choose Export... from the File menu. Choose Separate Single-node movies from the popup menu at the bottom of the Export dialog. The file name you specify here will be edited by the Splitter to assure Internet compatibility. Spaces will be converted to underscores, other dangerous characters will be removed, and the resulting name will be truncated to allow the node number to be appended. Take this into account in order to wind up with useful file names at the end of the process.
Clicking the options... button opens the splitters settings dialog.
Generate HTML Embed tags: The splitter will write out a text file including an embed tag for each movie which can be copied and pasted into your HTML pages. Useful data included are the sizes of the movies as well as all of the hot spots and their URLs. Although the URLs are included in the movies, this list can be helpful if you want to override a URL or provide one for an undefined hot spot.
Overwrite Files with matching names: Since the Splitter creates names that are different from the name you specify in the dialog, there is no “replace” confirmation. Leaving this box checked allows the Splitter to overwrite files which have the same names as those it is creating. Since these names are pretty unusual, the chances are that the only files it will overwrite are those created by it from the same source movie. Unchecking this box will cause the Splitter to abort its operation if it runs into a file with a matching name.
Use QTVR Flattener: The Splitter will use the QTVR Flattener to add fast-start data to the files exported, along with an optional preview track for any panorama nodes. Clicking the options... button will open the Flattener’s settings dialog. If this is unchecked, it will be flattened with the generic QuickTime flattener rather than QuickTime VR.
Click OK and let the Splitter do its work.
Test the movies by dragging the first node into a browser window.
Displaying Movies in Web Pages
Now you put all of the movies in the same directory together. Do not change any of the names. Even changing capitalization will break the references. If you need different names, go back and repeat the process with a different starting name.
There are a few ways to go about displaying the movie in your Web pages. The simplest (and least attractive) approach is to put a link to the first node in one of your pages:
<A href src="my_scene_127.mov">click to view the QTVR scene"</a> |
This causes the Plugin to open the movie in an empty browser window. Clicking any URL links loads the new movies in the same place.
You can improve the user experience significantly by embedding the movies in your pages:
<Embed src="my_scene_127.mov"... |
You copy and paste the embed tags provided in the HTML file written by the Splitter. In this case, the Plugin displays the movie in place like a graphic. However, when you click a URL link the new movie will be loaded in a blank window like the above case.
To remedy this, either override the URLs in the movies with links to pages with the other nodes embedded in them (a bit of work), or display the movies in a frame.
To load the movies in a frame, just use the first one as a frame source (instead of an HTML source with it embedded):
<frameset>... |
Now the movies will all load in that frame, providing a smooth experience for the user.
QuickTime VR Object Movie Compressor
The QuickTime VR Object Movie Compressor, a movie export component, takes a multirow object movie and compresses frames in multi-dimensions with the goal of making the file smaller. It includes the user settings dialog box shown in Figure 4-3.
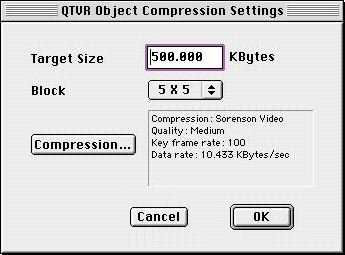
The user settings for the QuickTime VR Object Movie Compressor include:
The Standard Compression Setting, which is set by clicking on the Compression Setting button.
The target file size of the compressed VR object movie, which is specified as:
kQTVRObjExporterSettingsTargetSize = FOUR_CHAR_CODE('tsiz')The Block Size Setting, which can also be set from a QT atom container, controls the dimensions of the compression:
long: blockSize
type: ‘bsiz’
Valid Value: 1, 2, 3, 4 which correspond to the block size of
1x1, 3x3, 5x5, 7x7
Note that this only works for codecs that can do interframe compression: in particular, it will not work for Photo-JPEG.
QuickTime VR Manager
This section discusses the QuickTime VR Manager, the part of QuickTime that your application can use to interact with QuickTime VR.
You can use the QuickTime VR Manager—in conjunction with QuickTime—to open and display QuickTime VR objects and panoramas, change the viewing angle or zoom level, handle mouse events for QuickTime VR movies, and perform other operations on these movies.
To use the information in this section, you need to know how to open and display QuickTime movies, because QuickTime VR objects and panoramas are stored as QuickTime movie tracks. If you need direct access to the movie data stored in an atom container, you also need to be familiar with the atom routines introduced in QuickTime version 2.1.
See the QuickTime API Reference for information about the atom routines. The Reference is available at
http://developer.apple.com/documentation/QuickTime/QuickTime.html
See also Chapter 7, QTVR Atom Containers, in this book for a description of the atom containers in a QuickTime VR movie file.
The QuickTime VR Manager is the part of QuickTime that you can use to control QuickTime VR movies from your application. For example, you can use the QuickTime VR Manager to
display movies of panoramas and objects
perform basic orientation, positioning, and animation control
intercept and override QuickTime VR’s mouse-tracking and default hot spot behaviors
composite flat or perspective overlays (such as QuickDraw 3D objects or QuickTime movies)
specify transition effects
control QuickTime VR’s memory usage
intercept calls to some QuickTime VR Manager functions and modify their behavior
Chapter 5, QuickTime VR Movie Structure, describes the QuickTime VR file format (the format of the movie files that contain QuickTime VR movies). You need this information only if you need to parse existing QuickTime VR movies or you want to create QuickTime VR movies programmatically. For instance, you need this information if you are developing QuickTime VR movie-authoring software. In general, however, you don’t need to know about the format of atoms or atom containers simply to use the functions provided by the QuickTime VR Manager.
Overview of the QuickTime VR Manager
The QuickTime VR Manager is the part of QuickTime that provides an API for controlling QuickTime VR objects and panoramas. You can use the QuickTime VR Manager to
perform basic orientation, positioning, and animation control
intercept and override QuickTime VR’s mouse tracking
modify the display quality
intercept and override QuickTime VR’s default hot spot behavior
composite flat or perspective overlays (such as QuickDraw 3D objects or QuickTime movies)
specify transition effects
get the viewing limits of a node and get and set a node’s viewing constraints
control QuickTime VR’s memory usage
intercept calls to some QuickTime VR Manager functions and modify their behavior
This section describes the main concepts that you need to be familiar with in order to use the QuickTime VR Manager. See Using the QuickTime VR Manager for code examples showing how to use the QuickTime VR Manager.
QuickTime VR Movie Instances
Almost all the QuickTime VR Manager’s functions operate on a QuickTime VR movie instance (defined by the QTVRInstance data type). A QuickTime VR movie instance is an identifier for a particular QuickTime VR movie. You obtain a QuickTime VR movie instance by calling the QTVRGetQTVRInstance function. (See Creating QuickTime VR Movie Instances for an example.)
Buffers
For panoramic nodes, QuickTime VR maintains several buffers that it uses to hold the panoramic image before and after the warping that is applied to correct the cylindrical distortion of the original panoramic image. All or part of the uncorrected panoramic image is stored in QuickTime VR’s back buffer. The corrected image for a particular view (that is, for a particular pan angle, tilt angle, and field of view) is stored in another buffer, the prescreen buffer (or front buffer). During screen updates, the contents of the prescreen buffer are copied into the graphics world associated with the panoramic node. Sometimes, this process is optimized to bypass the pre-screen buffer, going directly from back buffer to the screen.
Figure 4-4 illustrates the internal buffers maintained by QuickTime VR.
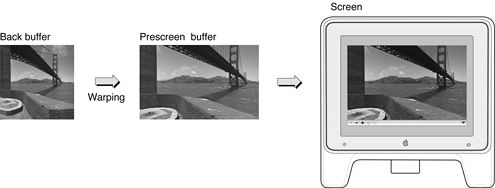
The QuickTime VR Manager allows applications limited access to the contents of the back and prescreen buffers. You can draw directly into the back buffer by installing a back buffer imaging procedure, which is called at preestablished times (for instance, whenever an update event occurs for the window containing the movie). You can also draw directly into the prescreen buffer by installing a prescreen buffer imaging completion procedure, which is called each time QuickTime VR is finished drawing an image into the prescreen buffer. You can use a prescreen buffer imaging completion procedure to add graphical elements to an image before it is copied to the screen.
Note that this type of access is not encouraged, and is not available for cubic panoramas.
Memory Management
QuickTime VR can require large amounts of memory to store its internal representation of the uncorrected image associated with a panoramic node, which is stored in the back buffer. To provide flexibility when operating with limited amounts of memory, a movie’s author can include several different resolutions of an image, in different video tracks in the movie file. By default, QuickTime VR selects the highest resolution image available. When memory is limited, however, QuickTime VR selects the image with the highest resolution that fits into the memory it can allocate for its back buffer.
The QuickTime VR Manager provides functions that you can use to determine what resolutions are available and to get and set the current resolution of a panoramic node. You can also use QuickTime VR Manager functions to override the default behavior for loading data into the back buffer. By default, if enough memory is available, QuickTime VR allocates a back buffer that is large enough to hold the entire uncorrected panoramic image.
Using the QuickTime VR Manager
This section illustrates some of the basic ways of using the QuickTime VR Manager. In particular, it provides source code examples that show how you can
determine whether the QuickTime VR Manager is available in the current operating environment
initialize the QuickTime VR Manager
display a QuickTime VR movie in a window
create QuickTime VR movie instances
manipulate a node’s pan and tilt angles
zoom in and out
install an intercept procedure
define node-entering and node-leaving procedures
manage QuickTime VR’s panoramic image buffers
Determining If The QuickTime VR Manager Is Available
Before calling any QuickTime VR Manager routines, you need to verify that the QuickTime VR Manager is available in the current operating environment and that it has the capabilities you need. For the Mac OS, you can verify that the QuickTime VR Manager is available by calling the Gestalt function with the gestaltQTVRMgrAttr selector. Gestalt returns, in its second parameter, a long word whose value encodes the attributes of the QuickTime VR Manager. Listing 4-8 illustrates how to determine whether the QuickTime VR Manager is available.
Listing 4-8 Checking for the availability of the QuickTime VR Manager
Boolean MyHasQTVRManager (void) |
{ |
OSErr myErr; |
long myAttrs; |
Boolean myHasQTVRMgr = false; |
myErr = Gestalt(gestaltQTVRMgrAttr, &myAttrs); |
if (myErr == noErr) |
if (myAttrs & (1 << gestaltQTVRMgrPresent)) |
myHasQTVRMgr = true; |
return myHasQTVRMgr; |
} |
You can also use the Gestalt function to get information about other attributes of the QuickTime VR Manager. The Gestalt function is available with all operating systems. On those systems that require a call to InitializeQTML, Gestalt is available after calling InitializeQTML. On those systems, calling InitializeQTVR is still required after calling Gestalt, and the value returned from InitializeQTVR must be checked even when the call to Gestalt is successful, so the call to Gestalt is not necessary, but it can be useful in determining the version and features of the QuickTime VR software that is installed.
Initializing the QuickTime VR Manager
In a Windows environment, before your application can call any QuickTime VR Manager routines, you have to call InitializeQTVR so that QuickTime VR can set up its internal data structures. If you make any other calls to the QuickTime VR Manager before calling InitializeQTVR, those calls return either a numerical value of zero or an error code of –30555 (qtvrUninitialized), which indicates that QuickTime VR has not been initialized. Similarly, functions with Boolean return types return false and functions with OSType return types return '????'.
When your application or process has finished using QuickTime VR, it should call TerminateQTVR.
You can call InitializeQTVR and TerminateQTVR more than once; they are reference-counted and nestable.
Creating QuickTime VR Movie Instances
As discussed earlier, most QuickTime VR Manager functions operate on a QuickTime VR movie instance (defined by the QTVRInstance data type), which identifies a particular QuickTime VR movie. You can get a QuickTime VR movie instance by calling the QTVRGetQTVRInstance function, as illustrated in Listing 4-9.
Listing 4-9 Getting a QuickTime VR movie instance
QTVRInstance MyGetQTVRInstanceFromMC (MovieController theController) |
{ |
Track myTrack = nil; |
QTVRInstance myInstance = nil; |
Movie myMovie; |
//Get the movie from the movie controller. |
myMovie = MCGetMovie(theController); |
if (myMovie) { |
//Get the first QTVR track in the movie. |
myTrack = QTVRGetQTVRTrack(myMovie, 1); |
//Get a QTVR instance for that QTVR track. |
if (myTrack) { |
QTVRGetQTVRInstance(myInstance, myTrack, theController); |
//Set our units to be degrees. |
if (myInstance) |
QTVRSetAngularUnits(myInstance, kQTVRDegrees); |
} |
} |
return(myInstance); |
} |
To get a QuickTime VR movie instance, you first need to obtain a QTVR track, a special type of QuickTime track that maintains a list of the nodes in the scene. A single QuickTime movie file can contain more than one QuickTime VR scene and hence more than one QTVR track, so you need to specify which QTVR track you want by calling the QTVRGetQTVRTrack function with the index of the desired track. Listing 4-9 simply gets the first QTVR track in the specified movie.
After getting the desired QTVR track, the MyGetQTVRInstanceFromMC function defined in Listing 4-9 calls the QTVRGetQTVRInstance function to obtain a QuickTime VR movie instance. Finally, MyGetQTVRInstanceFromMC calls QTVRSetAngularUnits to ensure that all angles passed to QuickTime VR functions are interpreted as degrees.
Manipulating Viewing Angles and Zooming
Perhaps the simplest use of the QuickTime VR Manager is to manipulate the current viewing characteristics of an object or panoramic node. You can use the QTVRGetPanAngle and QTVRSetPanAngle functions to manipulate the pan angle, and you can use the QTVRGetTiltAngle and QTVRSetTiltAngle functions to manipulate the tilt angle.
Listing 4-10 illustrates how to pan or tilt a specific number of degrees in a specific direction.
Listing 4-10 Changing the viewing angle
#define kDirLeft 0L |
#define kDirRight 1L |
#define kDirUp 2L |
#define kDirDown 3L |
Boolean MyGoDirByDegrees (QTVRInstance theInstance, long theDir, float theAmt) |
{ |
float theAngle; |
Boolean theMoved = false; //Did calling this routine result in a movement? |
switch (theDir) { |
case kDirUp: |
theAngle = QTVRGetTiltAngle(theInstance); |
QTVRSetTiltAngle(theInstance, theAngle + theAmt); |
break; |
case kDirDown: |
theAngle = QTVRGetTiltAngle(theInstance); |
QTVRSetTiltAngle(theInstance, theAngle – theAmt); |
break; |
case kDirLeft: |
theAngle = QTVRGetPanAngle(theInstance); |
QTVRSetPanAngle(theInstance, theAngle + theAmt); |
break; |
case kDirRight: |
theAngle = QTVRGetPanAngle(theInstance); |
QTVRSetPanAngle(theInstance, theAngle – theAmt); |
break; |
default: |
break; |
} |
//Now update the image on the screen. |
QTVRUpdate(theInstance, kQTVRStatic); |
//Determine whether a movement actually occurred. |
switch (theDir) { |
case kDirUp: |
case kDirDown: |
theMoved = (theAngle != QTVRGetTiltAngle(theInstance)); |
break; |
case kDirLeft: |
case kDirRight: |
theMoved = (theAngle != QTVRGetPanAngle(theInstance)); |
break; |
default: |
break; |
} |
return(theMoved); |
} |
MyGoDirByDegrees is relatively simple. It first determines the direction in which to move, gets the current pan or tilt angle, and then sets a new pan or tilt angle by adding or subtracting the desired displacement to that angle. Notice that MyGoDirByDegrees calls the QTVRUpdate function to update the image on the screen. This update is necessary whenever you change a viewing characteristic programmatically.
Once the new viewing angle has been set and the new image has been displayed, the MyGoDirByDegrees function determines whether the new pan or tilt angle differs from the pan or tilt angle on entry and passes back a Boolean value to indicate whether the call to MyGoDirByDegrees changed the pan or tilt angle. (The new angle may not be different because, for example, the value was already at some limit or constraint. This information might be useful for determining whether to enable or disable some visual effect in the scene.)
Zooming in or out is just as simple as panning or tilting. For both objects and panoramas, you zoom in or out by changing the field of view of the node. Listing 4-11 defines a function that zooms in or out by a predetermined amount.
Listing 4-11 Changing the field of view
#define kDirIn 4L |
#define kDirOut 5L |
void MyZoomInOrOut (QTVRInstance theInstance, long theDir) |
{ |
float theFloat; |
theFloat = QTVRGetFieldOfView(theInstance); |
switch (theDir) { |
case kDirIn: |
theFloat = theFloat / 2.0; |
break; |
case kDirOut: |
theFloat = theFloat * 2.0; |
break; |
default: |
break; |
} |
QTVRSetFieldOfView(theInstance, theFloat); |
QTVRUpdate(theInstance, kQTVRStatic); |
} |
The MyZoomInOrOut function defined in Listing 4-11 simply doubles or halves the current field of view, depending on whether you’re zooming out or in.
Intercepting QuickTime VR Manager Routines
The QuickTime VR Manager provides support for intercepting some of its routines. To intercept a routine, you need to define and install an intercept procedure, a function that is executed in addition to (or instead of) the QuickTime VR Manager function it’s intercepting.
Typically, you use an intercept procedure to augment the behavior of a QuickTime VR Manager function. For instance, you might intercept the QTVRSetPanAngle function to play a specific sound when the user moves to a particular pan angle. In this case, you would have the QuickTime VR Manager execute the QTVRSetPanAngle function, and then you would play the appropriate sound.
Alternatively, you might want to override the intercepted function altogether. For instance, you might intercept the QTVRTriggerHotSpot function so that when the user clicks a custom hot spot, you can respond accordingly. In this case, there is no need to have the QuickTime VR Manager execute the QTVRTriggerHotSpot function.
You declare an intercept procedure like this:
pascal void MyInterceptProc ( |
QTVRInstance qtvr, |
QTVRInterceptPtr qtvrMsg, |
SInt32 refCon, |
Boolean *cancel); |
The qtvr parameter is the instance with which you’re concerned. The qtvrMsg parameter is a pointer to an intercept structure, which contains information about the routine being intercepted and its parameters. The refCon parameter is a long integer available for use by your application. Finally, your intercept procedure should set the cancel parameter to indicate whether the QuickTime VR Manager should execute the intercepted function when your intercept procedure has finished (false) or should not execute the function (true).
The intercept structure is defined by the QTVRInterceptRecord data type:
typedef struct QTVRInterceptRecord { |
SInt32 reserved1; |
SInt32 selector; |
SInt32 reserved2; |
SInt32 reserved3; |
SInt32 paramCount; |
void *parameter[6]; |
} QTVRInterceptRecord, *QTVRInterceptPtr; |
Many of the fields of an intercept structure are reserved. The interesting fields are selector, paramCount, and parameter. The selector field is an intercept selector, a constant that indicates which routine has triggered your intercept procedure. You can, if you wish, install a single intercept procedure for all intercepted functions. In that case, you can inspect the selector field of the intercept structure passed to your intercept routine to determine how to respond.
The QuickTime VR Manager defines these intercept selectors:
typedef enum QTVRProcSelector { |
kQTVRSetPanAngleSelector = 0x2000, |
kQTVRSetTiltAngleSelector = 0x2001, |
kQTVRSetFieldOfViewSelector = 0x2002, |
kQTVRSetViewCenterSelector = 0x2003, |
kQTVRMouseEnterSelector = 0x2004, |
kQTVRMouseWithinSelector = 0x2005, |
kQTVRMouseLeaveSelector = 0x2006, |
kQTVRMouseDownSelector = 0x2007, |
kQTVRMouseStillDownSelector = 0x2008, |
kQTVRMouseUpSelector = 0x2009, |
kQTVRTriggerHotSpotSelector = 0x200A, |
kQTVRGetHotSpotTypeSelector = 0x200B |
} QTVRProcSelector; |
The parameter field of the intercept structure is an array that holds, in order, the parameters that were passed to the intercepted function, minus the QTVR instance parameter. For example, if you intercept the QTVRSetPanAngle function, the parameter array contains a single member, a pointer to a floating-point value that is the new pan angle. You can determine how many members the parameter array contains by inspecting the paramCount field of the intercept structure.
Listing 4-12 defines a simple intercept procedure that is called whenever the QuickTime VR Manager function QTVRSetPanAngle is called. The intercept procedure calls an application-defined function, MyPlayPanSound, to play a sound for the new pan angle.
Listing 4-12 Intercepting the QTVRSetPanAngle function (version 1)
#define MyPi (3.1415926535898) |
#define RadiansToDegrees(x) ((x) * 180.0 / MyPi) |
pascal void MyInterceptProc (QTVRInstance theInstance, |
QTVRInterceptPtr theMsg, SInt32 refcon, Boolean *cancel) |
{ |
Boolean cancelInterceptedProc = false; |
float theAngle, *theAnglePtr; |
switch (theMsg->selector) { |
case kQTVRSetPanAngleSelector: |
theAnglePtr = theMsg->parameter[0]; |
theAngle = *theAnglePtr; |
theAngle = RadiansToDegrees(theAngle); |
MyPlayPanSound(theAngle); //Play a sound for the angle. |
break; |
default: |
break; |
} |
*cancel = cancelInterceptedProc; |
} |
The intercept procedure defined in Listing 4-12 returns the value false in the cancel parameter. This indicates that the QuickTime VR Manager should call the intercepted function after the intercept procedure exits. If the cancel parameter is set to true, the QuickTime VR Manager does not call the intercepted function. This is useful if you want to replace the intercepted function altogether or if you want to call the intercepted function from within your intercept procedure. For example, if you want to play a sound after the new pan angle is displayed, you can define an intercept procedure like the one specified in Listing 4-13.
Listing 4-13 Intercepting the QTVRSetPanAngle function (version 2)
pascal void MyInterceptProc (QTVRInstance theInstance, |
QTVRInterceptPtr theMsg, SInt32 refcon, Boolean *cancel) |
{ |
Boolean cancelInterceptedProc = false; |
switch (theMsg->selector) { |
case kQTVRGetHotSpotTypeSelector: |
{ |
OSType hsType; |
QTVRCallInterceptedProc (theInstance, theMsg); |
hsType = * ((UInt32 *) theMsg->parameter[1]); |
// Turn all url hotspots into undefined hotspots |
if (hsType == kQTVRHotSpotURLType) |
* ((UInt32 *) theMsg->parameter[1]) = |
kQTVRHotSpotUndefinedType; |
cancelInterceptedProc = true; |
break; |
} |
default: |
break; |
} |
*cancel = cancelInterceptedProc; |
} |
The intercept procedure defined in Listing 4-13 looks at the hot spot type returned by the call to QTVRCallInterceptedProc and changes it to undefined if it is a URL hot spot.
Notice that the new intercept procedure returns the value true in the cancel parameter, indicating that the QuickTime VR Manager should not call the intercepted function after the intercept procedure returns. If the intercept procedure returns false, then the intercepted function will be called twice (once because you call QTVRCallInterceptedProc and a second time because you return false in the cancel parameter).
You install an intercept procedure by calling the QTVRInstallInterceptProc function, as shown in Listing 4-14.
Listing 4-14 Installing an intercept procedure
QTVRInterceptUPP MyInstallInterceptProcedure (QTVRInstance theInstance) |
{ |
QTVRInterceptUPP theInterceptProc; |
theInterceptProc = NewQTVRInterceptProc(MyInterceptProc); |
QTVRInstallInterceptProc(theInstance, kQTVRSetPanAngleSelector, |
theInterceptProc, 0, 0); |
return theInterceptProc |
} |
. . . |
myProc = MyInstallInterceptProcedure(qtvr); |
QTVRInstallInterceptProc takes an intercept selector to determine which QuickTime VR Manager function to intercept. If you wish, you can define a single intercept procedure and use the intercept selector passed to it in the selector field of theMsg to decide how to respond.
When you no longer need the intercept procedure you should call QTVRInstallInterceptProc again with the same selector and a nil procedure pointer and then call DisposeRoutineDescriptor on myProc.
Entering and Leaving Nodes
The QuickTime VR Manager provides a way for you to be notified whenever the user is about to enter a new node or leave the current node. You can then react to these notifications in whatever manner you choose.
For example, when the user is about to enter a new node, you might determine the name of that new node and display the name or other information about the node. Similarly, when the user is about to leave the current node, you might initiate a custom node-to-node transition effect. Alternatively, you can cancel the move to the other node; this might be useful in a game when the user hasn’t yet searched the current node completely or accomplished some other predefined task in that node.
To be informed that the user is about to enter a new node, you define and install a node-entering procedure. Listing 4-15 illustrates a simple node-entering procedure that determines the name of the new node and then utters that name.
Listing 4-15 Informing the user of a new node’s name
pascal OSErr MyEnteringNodeProc (QTVRInstance theInstance, |
UInt32 theNodeID, SInt32 refCon) |
{ |
Str255 theString; |
OSErr theErr; |
theErr = MyGetNodeName(theInstance, theNodeID, &theString); |
if (!theErr) |
SpeakString(theString); |
return(theErr); |
} |
You install a node-entering procedure by calling the QTVRSetEnteringNodeProc function, like this:
theErr = QTVRSetEnteringNodeProc(theInstance, |
NewQTVREnteringNodeProc(MyEnteringNodeProc), 0, 0); |
To be informed that the user is about to leave the current node, you define and install a node-leaving procedure. Listing 4-16 illustrates a simple node-leaving procedure that prevents the user from leaving the current node unless all hot spots in the node have been triggered.
pascal OSErr MyLeavingNodeProc (QTVRInstance theInstance, |
UInt32 fromNodeID, UInt32 toNodeID, |
Boolean *cancel, MyDataPtr theDataPtr) |
{ |
Boolean theUserCanLeave = false; //By default, user can’t leave. |
if (theDataPtr->allHotSpotsTouched) |
theUserCanLeave = true; |
*cancel = !theUserCanLeave; |
return(noErr); |
} |
Before returning, your node-leaving procedure should set the Boolean value pointed to by the cancel parameter to false to accept the move from fromNodeID to toNodeID. Set that value to true to cancel the move and remain at the node specified by the fromNodeID parameter. The procedure defined in Listing 4-16 simply reads some private data to determine whether to allow the user to leave the current node.
You install a node-leaving procedure by calling the QTVRSetLeavingNodeProc function, like this:
theErr = QTVRSetLeavingNodeProc(theInstance, |
NewQTVRLeavingNodeProc(MyLeavingNodeProc), (SInt32)&theData, 0); |
In a multinode movie, your node-entering procedure is not called for the first node. This is because the user is considered to be in the first node as soon as the VR movie is opened, before you have a chance to install your node-entering procedure. If you need to have your node-entering procedure called for the first node, you can execute it explicitly, either before or after you’ve installed it as a node-entering procedure.
Drawing in the Prescreen Buffer
The QuickTime VR Manager allows you to define a prescreen buffer imaging completion procedure that is called whenever QuickTime VR finishes drawing a panorama image in the prescreen buffer. Typically, your completion procedure adds graphical elements to the image before the buffer is copied to the screen. For instance, a flight simulator could overlay a heads-up display containing information about the aircraft (its altitude, velocity, and so forth).
You install a prescreen buffer imaging completion procedure by passing its address to the QTVRSetPrescreenImagingCompleteProc function:
theErr = QTVRSetPrescreenImagingCompleteProc(theInstance, |
NewQTVRImagingCompleteProc(MyImagingCompleteProc), |
(SInt32)&theData, 0); |
Listing 4-17 defines a simple completion routine that overlays a picture onto the screen image.
Listing 4-17 Overlaying images in the prescreen buffer
pascal OSErr MyImagingCompleteProc (QTVRInstance, MyDataPtr theDataPtr) |
{ |
if (theDataPtr->hasLogoPict) { |
GWorldPtr theOffscreenGWorld; |
GDHandle theGD; |
Rect gwRect; |
Rect picRect; |
// The current graphics world is set to the prescreen buffer. |
GetGWorld (&theOffscreenGWorld, &theGD); |
gwRect = (*(theOffscreenGWorld->portPixMap))->bounds; |
picRect = (*(theDataPtr->logoPict))->picFrame; |
OffsetRect (&picRect, -picRect.left, -picRect.top); |
OffsetRect (&picRect, gwRect.right - (picRect.right + 8), |
gwRect.bottom - (picRect.bottom + 8)); |
// Draw logo in lower right corner |
DrawPicture (theDataPtr->logoPict, &picRect); |
} |
return noErr; |
} |
On entry to the prescreen buffer imaging completion routine, the current graphics world is set to QuickTime VR’s prescreen buffer. The MyImagingCompleteProc function defined in Listing 4-17 retrieves the dimensions of that buffer and then draws a picture in the lower-right corner of that buffer.
The QuickTime API Reference describes the constants, data structures, and routines provided by the QuickTime VR Manager.
Copyright © 2002, 2009 Apple Inc. All Rights Reserved. Terms of Use | Privacy Policy | Updated: 2009-06-01