Retired Document
Important: This document has not been updated for iOS 7 or later. The content is largely covered in Start Developing iOS Apps Today (Retired).
Designing the Master Scene
When users start the BirdWatching app, the first screen they see displays the master list of bird sightings. In this chapter, you design the appearance of the master list and give the master view controller access to the data in the model layer.
Design the Master View Controller Scene
You’ve been writing a lot of code so far in this tutorial; now you’ll do some design work on the canvas. Open the storyboard on the canvas by selecting MainStoryboard.storyboard in the project navigator.
iOS apps often use table views to display lists of items, because tables provide efficient and customizable ways to display both large and small amounts of data. For example, Mail, Settings, Contacts, and Music use various types of tables to display information. In this section, you specify the overall appearance of the master scene and design the layout of its table rows.
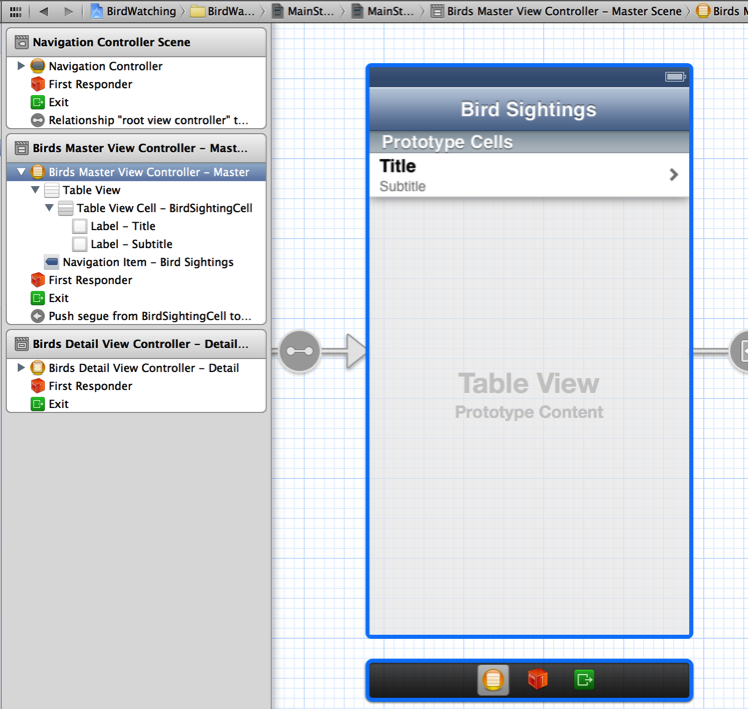
On the canvas, adjust the zoom level (if necessary) to focus on the master scene.
Double-click the title in the navigation bar (that is, Master) and type
Bird Sightings.Click the center of the scene to select the table view.
If you prefer, you can select the table view by selecting Table View in the Birds Master View Controller section in the document outline pane.
If necessary, click the Utilities View button to open the utilities area.
The Utilities View button looks like this:

In the utility area, click the Attributes button to open the Attributes inspector.
The Attributes button looks like this:

In the Table View section of the Attributes inspector, ensure that the Style pop-up menu displays Plain.
As you can see in the master scene, a row in a plain-style table extends the full width of the table view. The rows in a grouped-style table are inset from the edges of the table view, leaving a margin of the background appearance visible on all sides. (To see an example of a grouped-style table, open the Settings app on an iOS-based device.)
When you use storyboards, you have two convenient ways to design the appearance of a table’s rows (which are called cells):
Dynamic prototypes allow you to design one cell and then use it as the template for other cells in the table. Use a dynamic prototype when you want every cell to use the same layout and you can’t predict how many cells the table might display.
Static cells allow you to design the overall layout of the table, including the total number of cells. Use static cells when a table does not change its appearance, regardless of the specific information it displays.
In the master scene, you want each bird-sighting item to be displayed using the same layout, regardless of how many items the user adds, so you design a prototype cell for the master scene’s table. As the app runs, copies of this prototype cell are created as needed to display bird-sighting items.
For this step, the canvas should still be open and the Attributes inspector should still be focused on the master scene’s table view.
In the Table View section of the Attributes inspector, make sure that Dynamic Prototypes is chosen in the Content pop-up menu.
On the canvas, select the table view cell to display table-cell information in the Attributes inspector.
In the Table View Cell section of the Attributes inspector, choose Subtitle in the Style pop-up menu.
The built-in subtitle style causes the cell to display two left-aligned labels: Title in a large bold font and Subtitle in a smaller gray font. When you use a built-in cell style, the connections between these labels and the cell’s properties are made automatically. In a cell that uses the subtitle style, the
textLabelproperty refers to the title and thedetailTextLabelproperty refers to the subtitle.Change the default value in the Identifier text field of the Table View Cell Attributes inspector.
The value in the Identifier field is called a reuse identifier, and it gives the compiler a way to identify the appropriate prototype cell when it’s time to create new cells for the table. By convention, a cell’s reuse identifier should describe what the cell contains, so in this tutorial replace the default value (that is,
Cell) withBirdSightingCell. Note that you’ll need to use this reuse ID elsewhere in your code, so you might want to copy it.Still in the Attributes inspector, choose Disclosure Indicator in the Accessory pop-up menu, if necessary.
An accessory is a standard user interface (UI) element that can appear in a table cell. The disclosure indicator accessory (which looks similar to “>”) tells users that tapping an item reveals related information in a new screen.
Before you edit the master scene’s code files, make sure that the scene on the canvas represents the master view controller class in your code. If you forget this step, none of your customization of the code and of the canvas will be visible when you run the app.
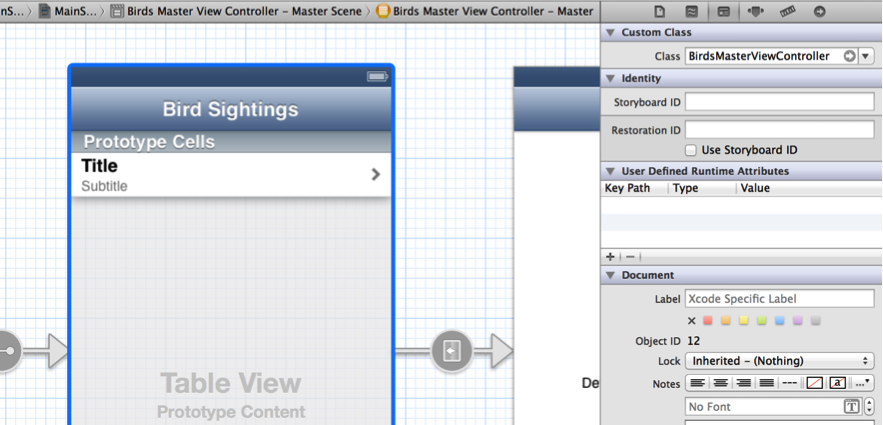
In the document outline, select Birds Master View Controller - Master.
On the canvas, the selected master scene is outlined in blue, as shown here:
Click the Identity button at the top of the utility area to open the Identity inspector.
In the Identity inspector, make sure that the Class field contains
BirdsMasterViewController.You should see something like this:
Clean Up the Master View Controller Implementation File
Before you write the code that allows the master view controller to display the master list of bird sightings, you need to bypass some of the code that the template provides. For example, you don’t need the template-provided Edit button (because the master list in the BirdWatching app doesn’t support editing) or the default _objects array (because you’ll use the data model classes you created earlier).
Although you can delete the unnecessary code, it’s often better to use the multiline comment symbols to make the code invisible to the compiler (the multiline comment symbols are /* and */). Commenting out code that you don’t need makes it easier to change the implementation of your app in the future. For example, the Master-Detail template comments out the moveRowAtIndexPath and canMoveRowAtIndexPath table view methods in the master view controller implementation file because not all apps need tables that can be rearranged.
In the project navigator, select
BirdsMasterViewController.m.Comment out the declaration of the private
_objectsarray.Because you designed your own data model classes, you don’t need the template-provided
_objectsarray. After you add the comment symbols, the beginning ofBirdsMasterViewController.mshould look like this:#import "BirdsMasterViewController.h"
/*
@interface BirdsMasterViewController () {NSMutableArray *_objects;
}
@end
*/
@implementation BirdsMasterViewController
After you add the comment symbols, Xcode displays several problem indicators because the template-provided master view controller code refers to
_objectsin several places. You’ll fix some of these problems when you comment out more code. You’ll fix the remaining problems when you write your own method implementations.Comment out most of the contents of the
viewDidLoadmethod.For now, the
viewDidLoadmethod should only contain the call to[super viewDidLoad]. After you comment out the rest of the template-provided code, yourviewDidLoadmethod should look like this:- (void)viewDidLoad
{[super viewDidLoad];
// Do any additional setup after loading the view, typically from a nib.
/*
self.navigationItem.leftBarButtonItem = self.editButtonItem;
UIBarButtonItem *addButton = [[UIBarButtonItem alloc] initWithBarButtonSystemItem:UIBarButtonSystemItemAdd target:self action:@selector(insertNewObject:)];
self.navigationItem.rightBarButtonItem = addButton;
*/
}
Comment out the
insertNewObjectmethod.The
insertNewObjectmethod adds new objects to the_objectsarray and updates the table. You don’t need this method, because you’ll be updating your custom data model objects and the master list in other ways.Xcode removes a few problem indicators when you comment out the
insertNewObjectmethod.Change the return value of the
canEditRowAtIndexPathtable view method.By default, the Master-Detail template enables table view editing in the master view controller’s table view. Because you won’t be giving users an Edit button in the master scene, change the default return value to
NO.After you make this change, the
canEditRowAtIndexPathmethod should look like this:- (BOOL)tableView:(UITableView *)tableView canEditRowAtIndexPath:(NSIndexPath *)indexPath
{// Return NO if you do not want the specified item to be editable.
return NO;
}
Comment out the
tableView:commitEditingStyle:forRowAtIndexPath:method.You won’t be using the template-provided Edit button in this tutorial, so you don’t need to implement the
commitEditingStylemethod’s support for removing and adding table rows.Commenting out the
commitEditingStylemethod removes one of the problem indicators.
After you finish commenting out the code you don’t need (and updating the canEditRowAtIndexPath method), you still see a few problem indicators. You fix two of these problems in the next step.
Implement the Master View Controller
Typically, an app displays data in a table by implementing the table view data source methods in a table view controller class. At a minimum, the table view controller class implements the numberOfRowsInSection and cellForRowAtIndexPath methods.
To display the master list of bird sightings, the master view controller implements these two data source methods. But first, the master view controller must have access to the data that is managed by the model layer objects.
In the project navigator, select
BirdsMasterViewController.h.Add a forward declaration of the
BirdSightingDataControllerclass.Between the
#importand@interfacestatements, add the following code line:@class BirdSightingDataController;
Declare a data controller property.
Edit the
BirdsMasterViewControllerheader file so that it looks like this:@interface BirdsMasterViewController : UITableViewController
@property (strong, nonatomic) BirdSightingDataController *dataController;
@end
In the project navigator, select
BirdsMasterViewController.m.In
BirdsMasterViewController.m, add the following code lines after#import “BirdsDetailViewController.h”to import the header files of the model layer classes:#import "BirdSightingDataController.h"
#import "BirdSighting.h"
Implement the
awakeFromNibmethod to associate a new data controller object with thedataControllerproperty you declared.To the
awakeFromNibmethod, add the following code line after[super awakeFromNib];:self.dataController = [[BirdSightingDataController alloc] init];
Now that the master view controller has access to the data from the model layer, it can pass that data to the table view data source methods. Make sure that BirdsMasterViewController.m is still open for this step.
Implement the
numberOfRowsInSectionmethod to return the number ofBirdSightingobjects in the array.Replace the default implementation of
numberOfRowsInSectionwith the following code:- (NSInteger)tableView:(UITableView *)tableView numberOfRowsInSection:(NSInteger)section {return [self.dataController countOfList];
}
Providing this implementation of the
numberOfRowsInSectionmethod removes one of the problem indicators, because the method no longer refers to the_objectsarray.Implement the
cellForRowAtIndexPathmethod to create a new cell from the prototype and populate it with data from the appropriateBirdSightingobject.Replace the default implementation of
cellForRowAtIndexPathwith the following code:- (UITableViewCell *)tableView:(UITableView *)tableView cellForRowAtIndexPath:(NSIndexPath *)indexPath {static NSString *CellIdentifier = @"BirdSightingCell";
static NSDateFormatter *formatter = nil;
if (formatter == nil) {formatter = [[NSDateFormatter alloc] init];
[formatter setDateStyle:NSDateFormatterMediumStyle];
}
UITableViewCell *cell = [tableView dequeueReusableCellWithIdentifier:CellIdentifier];
BirdSighting *sightingAtIndex = [self.dataController objectInListAtIndex:indexPath.row];
[[cell textLabel] setText:sightingAtIndex.name];
[[cell detailTextLabel] setText:[formatter stringFromDate:(NSDate *)sightingAtIndex.date]];
return cell;
}
Because the new method implementation does not refer to the
_objectsarray, Xcode removes another problem indicator.
A table view object invokes the cellForRowAtIndexPath method every time it needs to display a table row. In this implementation of the cellForRowAtIndexPath method, you identify the prototype cell that should be used to create new table cells and you specify the format to use for displaying the date. Then, if there are no reusable table cells available, you create a new cell based on the prototype cell you designed on the canvas. Finally, you retrieve the BirdSighting object that’s associated with the row that the user tapped in the master list and update the new cell’s labels with the bird sighting information.
After you complete these steps, the remaining problems are in the prepareForSegue method. You’ll edit this method later.
Recap
In this chapter, you took advantage of dynamic prototype cells to design the layout of the rows in the master scene’s list. Then you implemented the master scene view controller by giving it access to the data in the model layer and using that information in the implementation of the table view data source methods.
At this point in the tutorial, the code in the BirdsMasterViewController.h file should look similar to this:
#import <UIKit/UIKit.h> |
@class BirdSightingDataController; |
@interface BirdsMasterViewController : UITableViewController |
@property (strong, nonatomic) BirdSightingDataController *dataController; |
@end |
The code in the BirdsMasterViewController.m file should look similar to this (methods that you commented out or that you don’t edit in this tutorial are not shown):
#import "BirdsMasterViewController.h" |
#import "BirdsDetailViewController.h" |
#import "BirdSightingDataController.h" |
#import "BirdSighting.h" |
@implementation BirdsMasterViewController |
- (void)awakeFromNib |
{ |
[super awakeFromNib]; |
self.dataController = [[BirdSightingDataController alloc] init]; |
} |
- (void)viewDidLoad |
{ |
[super viewDidLoad]; |
// Do any additional setup after loading the view, typically from a nib. |
} |
- (void)didReceiveMemoryWarning |
{ |
[super didReceiveMemoryWarning]; |
// Dispose of any resources that can be recreated. |
} |
#pragma mark - Table View |
- (NSInteger)numberOfSectionsInTableView:(UITableView *)tableView |
{ |
return 1; |
} |
- (NSInteger)tableView:(UITableView *)tableView numberOfRowsInSection:(NSInteger)section { |
return [self.dataController countOfList]; |
} |
- (UITableViewCell *)tableView:(UITableView *)tableView cellForRowAtIndexPath:(NSIndexPath *)indexPath { |
static NSString *CellIdentifier = @"BirdSightingCell"; |
static NSDateFormatter *formatter = nil; |
if (formatter == nil) { |
formatter = [[NSDateFormatter alloc] init]; |
[formatter setDateStyle:NSDateFormatterMediumStyle]; |
} |
UITableViewCell *cell = [tableView dequeueReusableCellWithIdentifier:CellIdentifier]; |
BirdSighting *sightingAtIndex = [self.dataController objectInListAtIndex:indexPath.row]; |
[[cell textLabel] setText:sightingAtIndex.name]; |
[[cell detailTextLabel] setText:[formatter stringFromDate:(NSDate *)sightingAtIndex.date]]; |
return cell; |
} |
- (BOOL)tableView:(UITableView *)tableView canEditRowAtIndexPath:(NSIndexPath *)indexPath |
{ |
// Return NO if you do not want the specified item to be editable. |
return NO; |
} |
- (void)prepareForSegue:(UIStoryboardSegue *)segue sender:(id)sender |
{ |
if ([[segue identifier] isEqualToString:@"showDetail"]) { |
NSIndexPath *indexPath = [self.tableView indexPathForSelectedRow]; |
NSDate *object = _objects[indexPath.row]; |
[[segue destinationViewController] setDetailItem:object]; |
} |
} |
@end |
Copyright © 2013 Apple Inc. All Rights Reserved. Terms of Use | Privacy Policy | Updated: 2013-10-22