Retired Document
Important: This document may not represent best practices for current development. Links to downloads and other resources may no longer be valid.
Organizing Xcode Projects
Some of the organizational decisions you make when you first set up a project—such as how many targets you need for your software development effort—affect your entire development experience. This chapter provides tips and tricks for organizing your software as you develop with Xcode. It also describes some of the features Xcode provides that let you group and organize information in the user interface for rapid and easy access. For instance, you can save commonly accessed locations as bookmarks or in the Favorites bar, or document project items by adding comments to them.
Software Organization Tips
The following are some general guidelines for organizing your software in Xcode. In subsequent sections, you’ll get more detailed information to flesh out these tips.
Follow standard software development practice to factor your software into logical units of reasonable size, which you can implement as applications, shared libraries, tools, plug-ins, and so on. In Xcode, each of these products requires one target.
Put together projects and targets based on such factors as:
How do the products interact?
How many individuals (or teams) will be working on each task?
Do the products use different source code management systems?
Must the products run on different versions of Mac OS X?
For smaller development tasks, it generally makes sense to keep targets for related products in a single project.
For tasks that are reasonably separate, and especially if they are to be implemented by separate teams, use multiple projects.
Use cross-project dependencies when targets in one project need to depend on targets in other projects.
Use the information in Build Locations to ensure that a target can access the build products of other targets when needed.
Dividing Your Work Into Projects and Targets
To develop software with Xcode, you are going to need at least one project, containing at least one target, and producing at least one product. Those are the basic structures you use for all your development.
Beyond that, there are no hard and fast rules for how you divide your work. For simple products or products that are closely tied together, you might use a single project with multiple targets. For large development tasks with many products, and especially with separate development teams, you’ll want to use multiple projects and targets, perhaps connected with cross-project dependencies.
The following sections provide additional information and tips on organizing your software.
Identifying the Scope
In organizing your software, many decisions depend on the scope of the design goal and the number of products it requires. For example, if you’re working alone on a simple application, you can create a project for the desired application type (such as a Cocoa or Carbon application) and get right to work. Here are some of the decisions you might face:
If you decide to move some code to an internal library, you might add a target for the library.
To take advantage of existing code in another project, you might choose to develop the existing code as a shared library and add a dependency so that the application project depends on the shared library project and makes use of its output.
You might choose not to use a source code management (SCM) system, although even simple projects can sometimes benefit from such use.
Suppose, however, that you are working on a more complex software design, one that will be implemented by several individuals or development teams. Let’s say you are asked to create a new application for “an easy-to-use recording studio.” You may already have components of this application, such as a shared library for presenting music tracks. As you refine the product specification, you identify other common tasks that might belong in a shared library, tool, or companion application. You determine that the main application should rely on Apple technologies to provide certain features, such as burning CDs or making the application scriptable.
Eventually, you have identified a set of products to build, which gives you a good idea of the scope of the task. And that in turn can help you determine how to organize it into Xcode projects and targets.
Trade-offs of Putting Many Targets in One Project
You can help determine whether to put many or all of your targets in one project by considering some of the trade-offs involved. Here are some of the advantages of combining multiple targets in one project:
Indexing works across all targets.
Indexing information is required to access classes in the class browser, view symbols in the Project Symbols smart group, and to take full advantage of code completion. It is also necessary to use Command-double-click to jump to a definition and to use symbolic counterparts.
You can easily set up dependencies between targets in the project.
Anyone using the project has access to all its files.
If you have access to extra CPUs on your network, you can use distributed builds to build a large project more rapidly.
Here are some of the disadvantages of putting all your targets in one project:
All of the code is visible to any individuals or teams using the project, even if they’re working on only one target or a small subset of the overall project.
The project size may become unwieldy; this can cause Xcode to take a long time to perform operations such as indexing.
All targets must use the same SCM system.
All targets must build for the same Mac OS X system version (SDK).
All targets use the same build styles (for example, you can’t have variations on a Deployment build style for different targets).
You can’t use the graphical debugger to debug two executables in one project at the same time.
Trade-offs of Using Multiple Projects
There are also trade-offs in breaking up a software development task into multiple projects and targets. Here are some of the advantages of using multiple projects:
You can use the project as a unit for dividing work among different individuals or teams. The separate projects allow you to segregate the code (for example, to limit access to confidential information).
Each individual project can be of a more manageable size, and Xcode can perform indexing, building, and other operations more quickly.
If projects need to share outputs, they can build into a common directory, as described in Build Locations.
You can use cross-project dependencies to build other projects needed by the current project.
Each project can use source code stored in a different SCM system. However, if individuals have physical access to other projects, it is still possible to look at SCM information from multiple projects that use the same SCM system.
Each project can build for different Mac OS X systems (SDKs).
Each project can define separate build styles.
You can use the graphical debugger to debug two or more executables at the same time, one in each project. This is useful when products communicate directly or otherwise interact.
Here are some of the disadvantages of having multiple projects and targets:
You won’t have cross-project indexing, and thus you will have access only to symbols that are specifically exposed by other projects. This means, for example, that you can’t automatically look up definitions in other projects unless you have physical access to them (not just to their end products).
Similarly, you will not be able to take full advantage of other features that depend on indexing. That includes using code completion, using Command-double-click to jump to a definition, and using symbolic counterparts.
Management of many smaller projects is likely to incur additional overhead. For example, to set up a target that depends on other targets in multiple projects, you’ll first have to set up cross-project references.
Similarly, use of multiple projects may require additional communication between teams.
For an individual working on multiple projects, it may become unwieldy to switch between many open projects.
Individual projects are smaller, and are less likely to be able to take advantage of distributed builds.
Organizing Files
Decisions about how to partition projects and their targets affect the organization of your entire software development effort. However, it is also important that your work in a project is organized and accessible to you. Particularly in larger projects, the number of files can be daunting. To help organize files into manageable chunks, Xcode lets you group them.
A group lets you collect related files together. A source group lets you group an arbitrary set of file, folder, and framework references in your project. A smart group, on the other hand, lets you group together files fitting a particular pattern or rule. This section shows you how to organize files using source and smart groups.
Organizing Files into Source Groups
In the Groups & Files list, source groups look like folders. However, they don’t have to correspond to folders on the disk. You can instead arrange files into groups that make sense to you while working on them in Xcode. For example, in a project containing multiple targets, your project could store all the nib files in one folder and all of the implementation files in another folder on disk. But in the Groups & Files list, you could group the files according to target; that is, the nib files and implementation files for target A would be in one group, the nib files and implementation files for target B would be in another group, and so on. A group doesn’t affect how a target is built.
Creating a New Source Group
You can create a new source group in any of the following ways:
Create an empty group. Choose File > New Group and type the name.
Create a group from existing items. Select the items you wish to group and choose File > Group. You can also Control-click the selected files and choose Group from the contextual menu.
Create a new group based on an existing directory structure. Choose Project > Add to Project, select the folder, and check “Recursively create groups for added folders.” This is described further in Adding Files and Folders.
Adding Files to a Group
You can add files to a group at any time by dragging the file icons to the group’s folder in the Groups & Files list. A line appears to indicate where you are moving the files. Xcode automatically expands groups as you drag items onto them.
Deleting Groups
When you remove a group from your project, you can choose whether to remove the files in that group from the project or simply ungroup the files.
To remove a group and the project’s references to the files in that group, select the group, and choose Edit > Delete or press the Delete key.
To remove a group and keep the files it contains,press Shift and choose File > Ungroup or Control-click the group and choose Ungroup from the contextual menu.
Using Smart Groups to Organize Files
Smart groups are also represented by folder icons in the Groups
& Files list; however, they are colored purple to distinguish
them from source groups. As was mentioned earlier, smart groups
group files that adhere to a common pattern or rule. For example, you
could define a smart group to collect all implementation files ending
in .m or .c. When
you make a change to your project that alters the set of files matching
a smart group’s rule—for example, adding a new .c file—the
smart group automatically updates to reflect the change. You do
not need to add files to a smart group yourself. In fact, Xcode
does not allow you to drag files to a smart group.
Creating a New Smart Group
To create a new smart group, choose File > New Smart Group and select one of the following options
Simple Filter Smart Group creates a smart group that collects files whose names contain a specified string.
Simple Regular Expression Smart Group creates a smart group that uses a regular expression to specify the pattern that file names must follow.
Xcode adds a new smart group of the selected type to your project and brings up an Info window that allows you to configure the group. Xcode provides templates for each type of smart group; it uses these templates to configure new smart groups with a default set of options. For example, the default Simple Filter Smart Group collects all files with "*.nib" in their name. The default Simple Regular Expression Smart Group collects all C, C++, Objective-C, Objective-C++, Java, and AppleScript implementation files in your project.
Configuring a Smart Group
To configure a smart group, select the group in the Groups & Files list and open an Info window. The Info window for a smart group looks similar to the following figure:
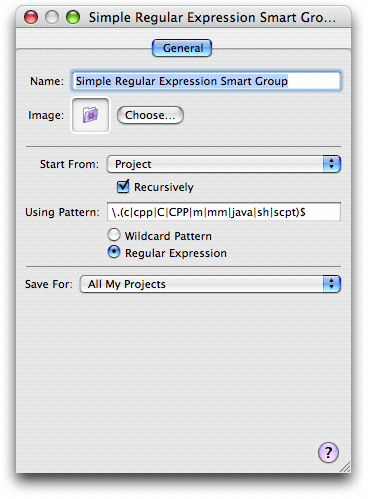
Here is what the smart group Info window contains:
The Name field specifies the name of the new smart group. By default, this is set to the type of the smart group, for example, “Simple Filter Smart Group.”
The Image well displays the icon used for the smart group in the project window. The default image for a smart group is the purple folder icon, but you can also use a custom image to represent your new smart group. To change the icon, click the Choose button and navigate to the image file to use.
The settings that define how the smart group decides to include a file are those in the center of the smart group Info window. The Start From menu specifies the directory from which the smart group starts its search for matching files; by default, this is the project folder. If the Recursively option is enabled, the smart group also searches through subfolders of that folder.
The Using Pattern field specifies the actual pattern that files must match in order to be included in the smart group. As mentioned, this pattern can be either a simple string that the smart group filters on or it can be a regular expression, depending on the value of the radio buttons beneath the field. For examples of each of these, look at the smart group templates. The Simple Filter Smart Group template uses the pattern
*.nib. Any files with “.nib” in their name are included in this smart group. The Simple Regular Expression Smart Group, on the other hand, uses the regular expression\.(c|cpp|C|CPP|m|mm|java|sh|scpt)$to collect all implementation files ending in any one of these suffixes, regardless of the case of the filename and extension.The Save For menu determines the scope for which this smart group is defined.You can have this new smart group appear in all of your projects, or you can specify that the smart group you have created remains specific to the current project.
Viewing Groups and Files
As you learned in The Project Window, you have two ways to view the contents of your project. You can view the groups and files in your project in outline view to see a hierarchical representation of your project organization. You can also view the groups and files in your project as a simple list, in the detail view. The detail view presents a flat list of all the files contained in the source group selected in the Groups & Files list. For example, if you select your project in the Groups & Files list, the detail view shows all of the files in the project. If you select an individual file in the Groups & Files list, only that file is displayed in the detail view. To view the contents of a source group in your project, select that group in the Groups & Files list. The following figure shows the project, selected in the Groups & Files list.
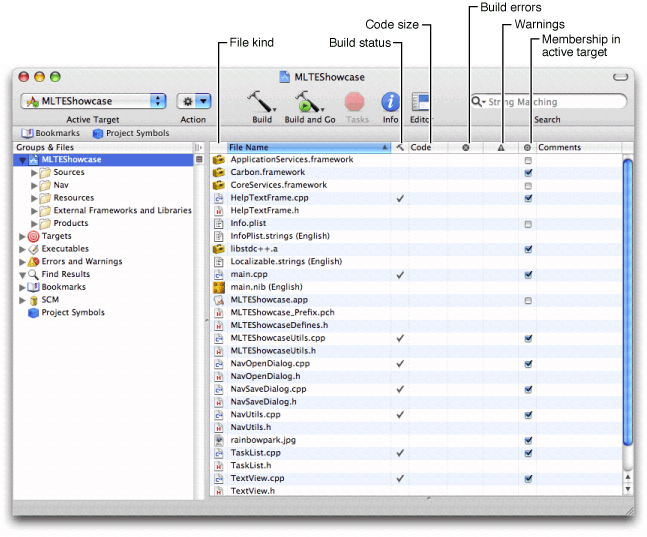
All of the files in the project are displayed in the detail view. The detail view for any file shows the following information:
The first column, with an empty column heading, shows an icon indicating the type of the file. For example, a nib file is marked by the Interface Builder file icon. The icon for a C++ class file displays the characters “C++”.
The File Name column displays the names of the files.
The column marked by the hammer icon displays the build status of each file. If a file has been changed since the active target was last built, this column displays a checkmark, indicating that the file needs to be built. If the file is up to date, this column is empty.
The Code column displays the size of the compiled code generated from the file.
The column marked by the error icon displays the number of errors in the file. If this column is empty, the file either contains no errors or has not yet been built.
The column marked by the warning icon displays the number of warnings for the file. If this column is empty, the file either has no warnings or has not yet been built.
The column marked by the target icon indicates whether the file is included in the active target. If the checkbox next to a file is checked, then the active target includes that file.
The column marked by the source code management (SCM) icon shows the current SCM status of the file.
The Path column shows the file system path to the file or folder.
The Comments column displays any note or other information that you have associated with the file in the Comments pane of the file inspector.
Not all of these columns are visible by default. You can choose which columns are shown in the detail view by using the View > Detail View Columns menu or by Control-clicking anywhere in the heading of one of the detail view’s columns. This brings up a contextual menu from which you can choose the columns to display. For more information, see The Detail View.
Saving Commonly Accessed Locations
In any project, there are locations that you find yourself accessing again and again; files that you edit frequently, headers that you browse, even smart groups that you find yourself using often. Xcode lets you save locations that you access frequently and provides ways for you to quickly jump to these locations. You can bookmark project items. You can also use the Favorites bar to store locations. This section describes how to take advantage of bookmarks and the Favorites bar to provide quick access to project contents.
The Favorites Bar
The Favorites Bar in the project window lets you save commonly accessed items and return to them quickly. By default, the Favorites bar is hidden. To show the Favorites bar, choose View > Show Favorites Bar. To hide the Favorites bar, choose View > Hide Favorites Bar.
To add an item to the Favorites bar, simply drag it to the Favorites bar in the project window. You can save any of the same locations you can bookmark, including files, technical documentation, URLs, and so forth. In addition, you can add smart groups and source groups to the Favorites bar. The Groups & Files list can get quite long as you reveal the contents of more and more groups, scrolling the items at the bottom of the list out of view; you can add groups—including any of the built-in smart groups—to the Favorites bar to quickly jump to that group in the Groups & Files list. To reorder items in the Favorites bar, drag them to the desired location; dragging an item off of the Favorites bar deletes the item from the Favorites bar. To rename an item in the Favorites bar, Option-click the item and type the new name. This changes the name of the entry in the Favorites bar; it does not affect the name of the actual item that the entry represents.
To open a saved location, simply click or double-click it in the Favorites bar. If the item saved in the Favorites bar is a container, such as a group or folder, pressing the item (holding the mouse button down) brings up a pop-up menu that shows the items contents and lets you navigate to them. Each of the items in the Favorites bar serves as a proxy for the actual item. Thus, Control-clicking the item brings up a contextual menu that allows you to perform operations appropriate for the selected item.
Saving Commonly Accessed Locations as Bookmarks
Another way that Xcode lets you organize your project and provide easy access to the information you need is with bookmarks. If you have files or locations in your project that you access often, you can bookmark those spots and return to those locations at any time simply by opening the bookmark.
To create a bookmark, open the location you want to bookmark and choose Find > Add to Bookmarks. Xcode prompts you for the name of the bookmark; you can enter a name to help you remember which location the bookmark marks, or you can use the default name suggested by Xcode. You can bookmark project files, technical documentation, URLs, and so forth.
You can see the bookmarks in your project in several ways:
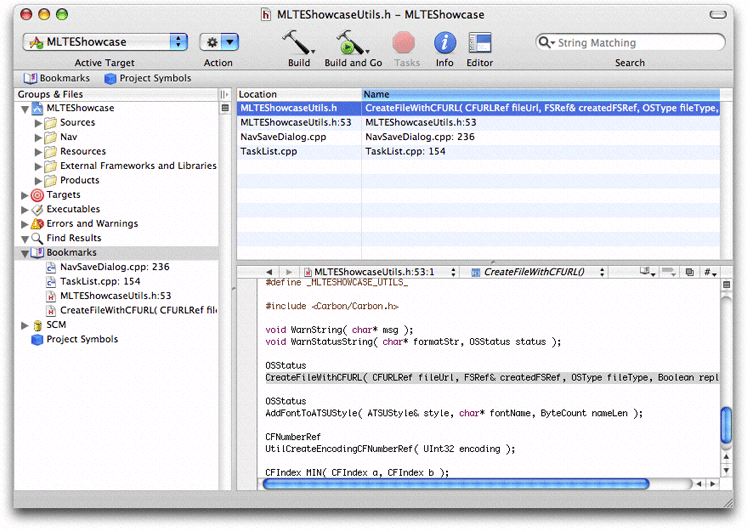
Bookmarks smart group. Select the Bookmarks group in the Groups & Files list to see the bookmarks in the detail view. The detail view shows the name and file of all of the bookmarks in your project. If the attached editor is open, selecting a bookmark opens that location in the editor. Otherwise, you can double-click the bookmark to open the bookmarked location in a separate editor window.
Bookmarks window. To open this window, double-click the Bookmarks smart group or choose Window > Tools > Bookmarks. You can see all bookmarks in your project in this window; double-click any of these bookmarks to open the location.
The bookmarks pop-up menu in the navigation bar of Xcode’s editor. Choose any bookmarked location from this menu to open it in the editor, as described in The Xcode Editor Interface.
Adding Comments to Project Items
To help you keep track of your project contents, you can write comments and associate them with any of the items in your project. Xcode remembers these comments across sessions. In this way, you can document your project and its components, keep design notes, or track improvements you still wish to make. This is especially useful if you are working with large or complex projects that have many different pieces, or if you are working with a team of developers and have multiple people modifying the project.
For example, imagine a large project containing targets that build a suite of applications, a framework used by each of those applications, a command line tool for debugging, and a handful of plug-ins for the applications. With such a large number of targets it might be hard to keep track of exactly what each of the products created by those targets does. To make it easier to remember what each of them does, you could add a short description of the product that it creates to the Comments field for that target. This also aids others who may be working on the project with you; if they can read the comments, they can quickly get up to speed with the project and easily learn about changes made by other members of the development team.
To add comments to a project item:
Select that item in the Groups & Files list or in the detail view and bring up an Info or inspector window.
Click Comments to open the Comments pane, shown here.
Figure 6-4 The Comments pane 
This pane contains a single text field into which you can type any information you wish. To add comments, click in the Comments field and type. You can also link to additional resources from the Comments pane; hypertext links, email addresses and other URLs are clickable in this field.
You can add comments to any project item other than smart groups, including projects, targets, files, and executables. You can view comments you have added to project items in the detail view and you can search the content of those comments using the Search field. If the Comments column is not already visible, choose View > Detail View Columns > Comments or Control-click anywhere in the column heading and choose Comments from the contextual menu.
Copyright © 2004, 2006 Apple Computer, Inc. All Rights Reserved. Terms of Use | Privacy Policy | Updated: 2006-11-07