Creating Pixel Transforms
FxPlug 2.0 introduced a new concept called pixel transforms. A pixel transform is a transformation matrix that gives more information to an FxPlug plug-in about how to compute the location in a texture (or bitmap) that corresponds to a particular point in the image. With this new information, a plug-in may be asked to render fewer pixels, allowing it and the host application to run more efficiently.
Pixel transforms are 4 x 4 matrices that are created by the host to contain information such as the rotation, scale, and foreshortening of the media the plug-in has been applied to. For example, when a user selects proxy resolution in Motion, or medium quality in Final Cut Pro, this information is contained in the pixel transform. Likewise, when the host asks your plug-in to render a small thumbnail preview, the scaling is contained in the pixel transform. Note that the pixel transform isn’t the full transformation matrix of where the layer is positioned in the scene. For that information, you need to use the Fx3DAPI. A pixel transform instead contains either full or partial information on how the input or output image is distorted before being composited into the scene.
When a layer is parallel to the film-back of the virtual camera recording the scene, you might see all of its pixels as shown in Figure 6-1.
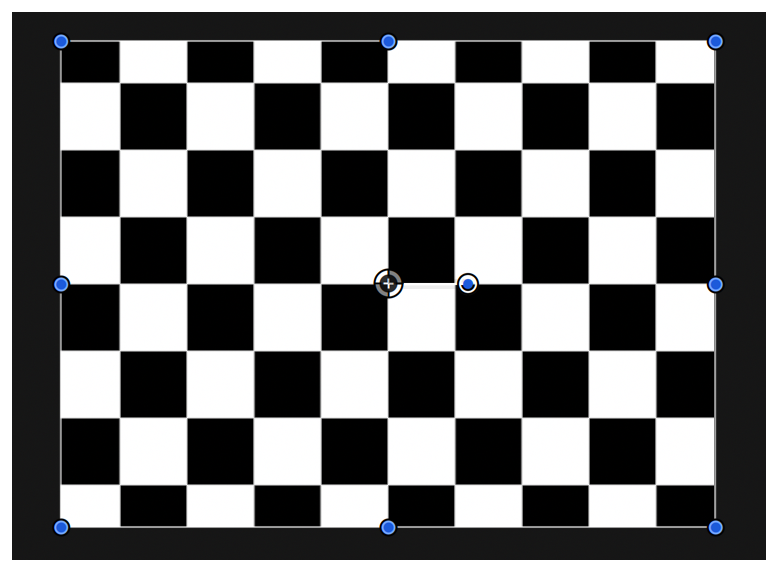
Because the most efficient texture for a generator to produce is one that corresponds exactly to the pixels needed in the final composition, a good pixel transform to use (if the plug-in can support it) is the one that projects from the layer’s object space to the scene’s output space. When the user rotates the layer around the x-axis and pans it back on the z-axis, it becomes shorter along its width, as shown in Figure 6-2.
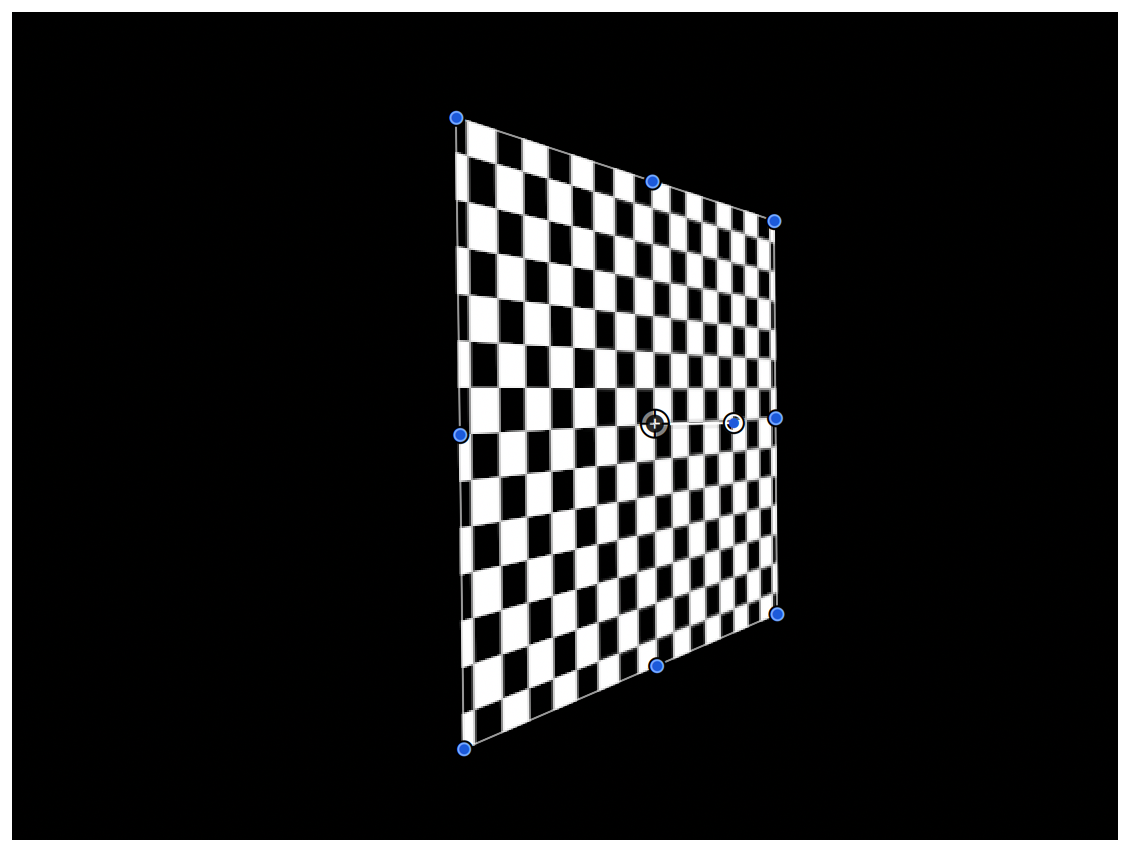
Rotating the layer in this way allows the plug-in to process fewer pixels, as fewer are needed to render the final composition.
Supporting Pixel Transforms
Each plug-in chooses what information it needs to know about via pixel transforms and lets the host know which types of transforms it will deal with. It does this by including an appropriate key-value pair in the dictionary it returns from its properties method. The value included in the dictionary tells the host application what types of transformations a plug-in is capable of working with.
Plug-ins that work in older versions of Motion and Final Cut Pro should already be capable of supporting nonuniform scaling. This scaling has always been required for handling things such as fields, non-square pixels, thumbnail generation, and proxy resolution rendering.
In addition to handling nonuniform scaling, a plug-in can offer support for scaling with translation, scaling with both translation and rotation, any affine transform (including shear), or any full-perspective transform.
Plug-ins that are marked as Pixel Independent can handle full-perspective transforms, because each output pixel relies only on a single input pixel and the location of each input pixel doesn’t affect the rendering of the plug-in. These are generally color transformations, such as converting to grayscale, adjusting the gamma, contrast or brightness, or shifting the hue of the input.
To inform the host application which types of pixel transforms your plug-in supports, it needs to include the kFxPropertyKey_PixelTransformSupport key in the dictionary returned by its -properties method. The value of the key should be one of the following constants in the FxImage class:
enum FxPixelTransformSupport { |
kFxPixelTransform_Scale, |
kFxPixelTransform_ScaleTranslate, |
kFxPixelTransform_Full |
}; |
If a plug-in doesn’t include this key in the properties dictionary, the host application assumes that it supports scale transformations. All plug-ins must support at least scale transforms.
A typical -properties method might look like the following:
- (NSDictionary*)properties |
{ |
return [NSDictionary dictionaryWithObjectsAndKeys: |
[NSNumber numberWithInt:kFxPixelTransform_Scale], |
kFxPropertyKey_PixelTransformSupport, |
nil]; |
} |
Using Pixel Transforms
After your plug-in tells the host application which types of transformations it can use, it needs to use the pixel transforms appropriately for rendering. This generally takes the form of asking the input image for its pixel transform and/or its inverse pixel transform, using the FxImage class’s methods pixelTransform and inversePixelTransform. After you have these transformation matrices, you use them in your plug-in’s fragment shader or bitmap rendering method.
When rendering in hardware, you know the current texture coordinate of each input texture. Likewise, when rendering in software, you know the coordinate of each pixel being worked on. To render properly, you need to pass the current coordinate through the inverse pixel transform. The result is a coordinate that represents the current pixel if the image were in square pixels, not transformed, and at full resolution. This is the coordinate you want to do your math on for distortions, convolution kernels, and so on. After you’ve done your math on your coordinates, run them through the forward pixel transform to get the coordinate from which you sample the input image. (In the case of a generator, you can skip this last step, because there is no input image.)
The following is a simple render output method:
(BOOL)renderOutput:(FxImage*)outputImage
        withInput:(FxImage*)inputImage
        withInfo:(FxRenderInfo)renderInfo
{
    // Get the forward and inverse pixel tarnsforms
    FxMatrix44*    pixelTrans    = [inputImage pixelTransform];
    FxMatrix44* invPixelTrans = [inputImage inversePixelTransform];
    FxBitmap*    inBitmap    = (FxBitmap*)inputImage;
    FxBitmap*    outBitmap    = (FxBitmap*)outputImage;
    …

    UInt32    x,y;
    for (y = 0; y < [outputImage height]; y++)
    {
        float*    dst    = (float*)((UInt8*)[outBitmap dataPtr] +
            (y * [outBitmap rowBytes]));
        for (x = 0; x < [outputImage width]; x++)
        {
            // Convert the current coordinate into full-sized
            // square pixels
            FxPoint2D    coord = {x, y};
            coord = [invPixelTrans transform2DPoint:coord];

            // Do some distortion math here -
            // produce a sine wave distortion
            coord.x += amplitude * sin (coord.y / wavelength);

            // Convert from full-sized square pixels into the
            // space of the image we actually have
            coord = [pixelTrans transform2DPoint:coord];

            //sample from input
            SInt32    newX    = (UInt32)floor (coord.x);
            SInt32    newY    = (UInt32)floor (coord.y);
            if ((0 <= newX) && (newX < [inputImage width]))
            {
                float*    src    = (float*)((UInt8*)[inBitmap dataPtr] +
                    (newY * [inBitmap rowBytes]) + (newX * sizeof (float) * 4));
                *dst++ = *src++;    // alpha
                *dst++ = *src++;    // red
                *dst++ = *src++;    // green
                *dst++ = *src++;    // blue

            }
            else
            {
                *dst++ = 0;
                *dst++ = 0;
                *dst++ = 0;
                *dst++ = 0;
            }
        }
    }
}
|
The above example starts by getting the input image’s forward and inverse pixel transforms. These transforms allow it to convert texture (or bitmap) coordinates into the full-sized, square pixel coordinates that the image is normally displayed in. In that space, the method can perform calculations on the coordinates (for example, performing distortions). If you want to distort pixels along a sine wave, or push pixels away from a particular point in the image, you need to work in square pixels at full resolution to get correct results for all types of footage in all viewing conditions. Likewise, if you want to sample multiple places in the input image for producing a blur or other convolution kernel, you need to space the samples appropriately, regardless of the pixel aspect ratio, use of fields, or viewing resolution.
After the required math on your coordinates is completed, the values must be converted back into the space that the image’s pixels are actually in. You do this by passing the coordinates through the forward pixel transform. Now you can safely sample from the image and know that you’ll get the required result.
Examples of Pixel Transforms
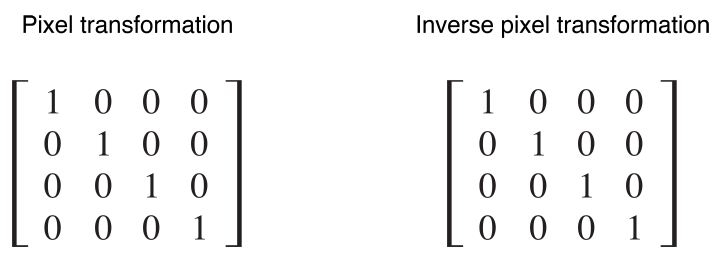
The following are some common examples of pixel transforms you’re likely to see in actual use. If a user creates a project that is a square pixel project and applies some project-sized footage to the canvas—a pretty typical case—the pixel transform will be the identity matrix, as will the inverse pixel transform as shown in Figure 6-3.
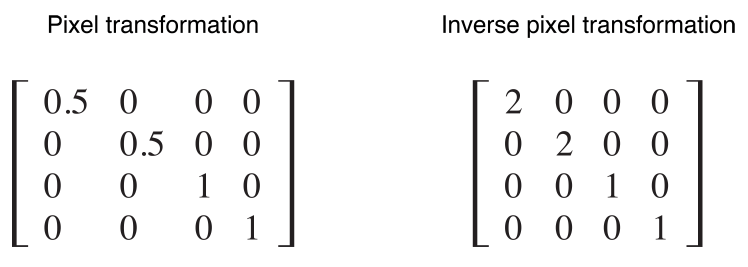
If the user then sets the canvas viewing resolution to half-resolution, you see that reflected in the pixel transform, as shown in Figure 6-4.
If you have a filter applied to footage that has a pixel aspect ratio of 1.33, you see that in the pixel transform, as shown in Figure 6-5.
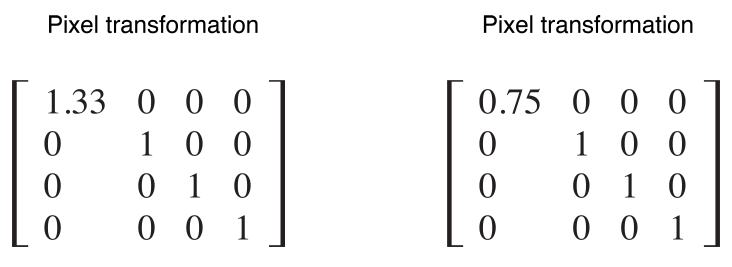
If you make proper use of pixel transforms in your rendering code, you don’t need to have special-case code for thumbnails or proxy resolution, and you don’t need to scale any of your parameters. Your rendering will “just work” for all of these situations.
Copyright © 2005, 2016 Apple Inc. All Rights Reserved. Terms of Use | Privacy Policy | Updated: 2016-10-27