Editing
The AVFoundation framework provides a feature-rich set of classes to facilitate the editing of audio visual assets. At the heart of AVFoundation’s editing API are compositions. A composition is simply a collection of tracks from one or more different media assets. The AVMutableComposition class provides an interface for inserting and removing tracks, as well as managing their temporal orderings. Figure 3-1 shows how a new composition is pieced together from a combination of existing assets to form a new asset. If all you want to do is merge multiple assets together sequentially into a single file, that is as much detail as you need. If you want to perform any custom audio or video processing on the tracks in your composition, you need to incorporate an audio mix or a video composition, respectively.

Using the AVMutableAudioMix class, you can perform custom audio processing on the audio tracks in your composition, as shown in Figure 3-2. Currently, you can specify a maximum volume or set a volume ramp for an audio track.

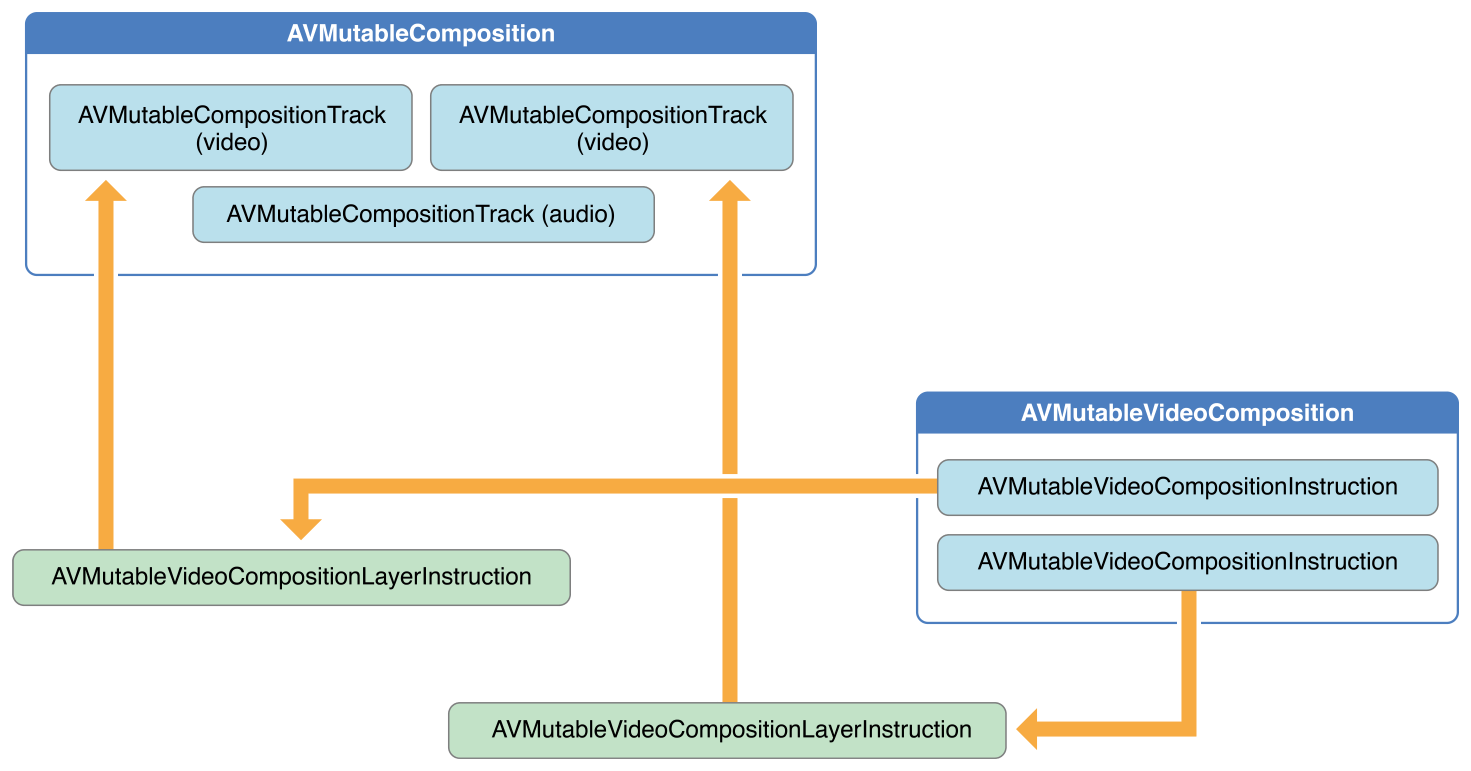
You can use the AVMutableVideoComposition class to work directly with the video tracks in your composition for the purposes of editing, shown in Figure 3-3. With a single video composition, you can specify the desired render size and scale, as well as the frame duration, for the output video. Through a video composition’s instructions (represented by the AVMutableVideoCompositionInstruction class), you can modify the background color of your video and apply layer instructions. These layer instructions (represented by the AVMutableVideoCompositionLayerInstruction class) can be used to apply transforms, transform ramps, opacity and opacity ramps to the video tracks within your composition. The video composition class also gives you the ability to introduce effects from the Core Animation framework into your video using the animationTool property.
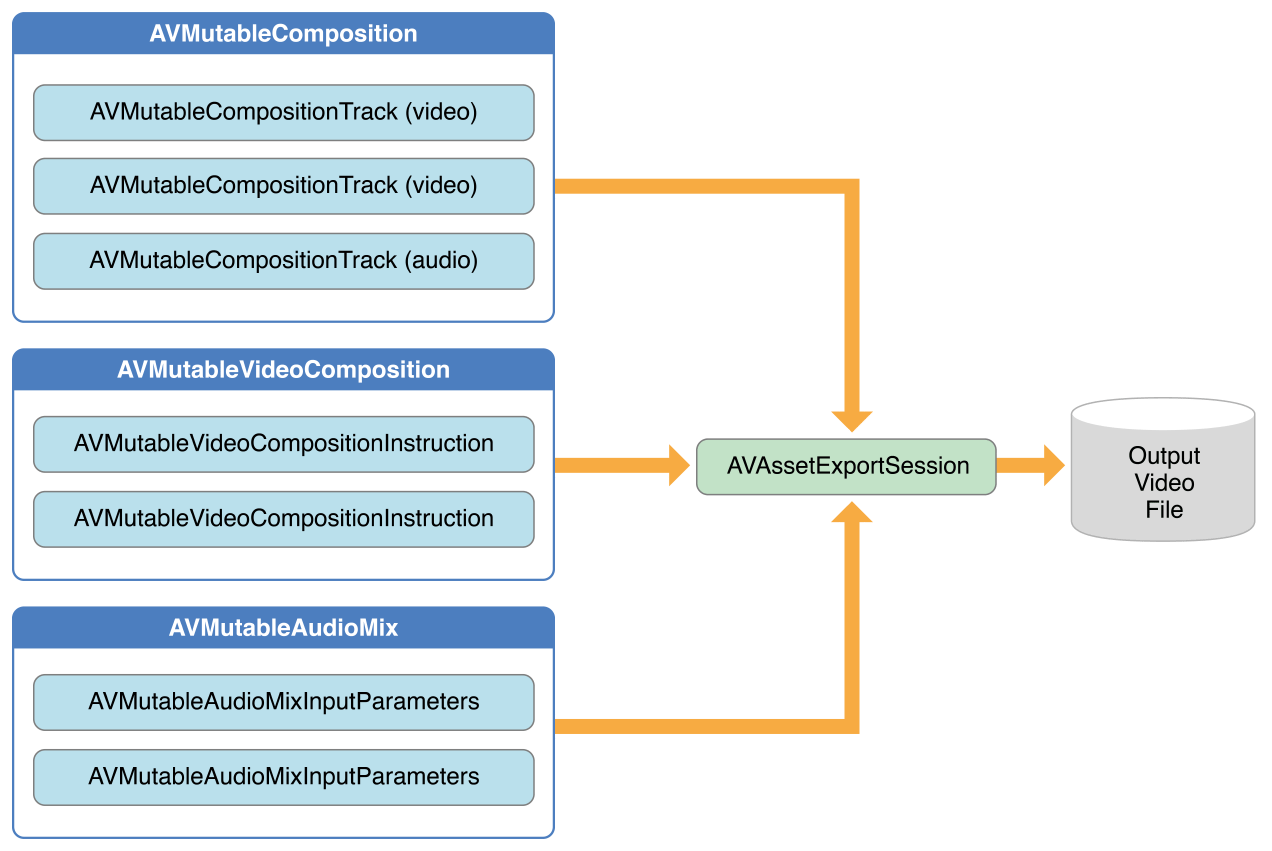
To combine your composition with an audio mix and a video composition, you use an AVAssetExportSession object, as shown in Figure 3-4. You initialize the export session with your composition and then simply assign your audio mix and video composition to the audioMix and videoComposition properties respectively.
Creating a Composition
To create your own composition, you use the AVMutableComposition class. To add media data to your composition, you must add one or more composition tracks, represented by the AVMutableCompositionTrack class. The simplest case is creating a mutable composition with one video track and one audio track:
AVMutableComposition *mutableComposition = [AVMutableComposition composition]; |
// Create the video composition track. |
AVMutableCompositionTrack *mutableCompositionVideoTrack = [mutableComposition addMutableTrackWithMediaType:AVMediaTypeVideo preferredTrackID:kCMPersistentTrackID_Invalid]; |
// Create the audio composition track. |
AVMutableCompositionTrack *mutableCompositionAudioTrack = [mutableComposition addMutableTrackWithMediaType:AVMediaTypeAudio preferredTrackID:kCMPersistentTrackID_Invalid]; |
Options for Initializing a Composition Track
When adding new tracks to a composition, you must provide both a media type and a track ID. Although audio and video are the most commonly used media types, you can specify other media types as well, such as AVMediaTypeSubtitle or AVMediaTypeText.
Every track associated with some audiovisual data has a unique identifier referred to as a track ID. If you specify kCMPersistentTrackID_Invalid as the preferred track ID, a unique identifier is automatically generated for you and associated with the track.
Adding Audiovisual Data to a Composition
Once you have a composition with one or more tracks, you can begin adding your media data to the appropriate tracks. To add media data to a composition track, you need access to the AVAsset object where the media data is located. You can use the mutable composition track interface to place multiple tracks with the same underlying media type together on the same track. The following example illustrates how to add two different video asset tracks in sequence to the same composition track:
// You can retrieve AVAssets from a number of places, like the camera roll for example. |
AVAsset *videoAsset = <#AVAsset with at least one video track#>; |
AVAsset *anotherVideoAsset = <#another AVAsset with at least one video track#>; |
// Get the first video track from each asset. |
AVAssetTrack *videoAssetTrack = [[videoAsset tracksWithMediaType:AVMediaTypeVideo] objectAtIndex:0]; |
AVAssetTrack *anotherVideoAssetTrack = [[anotherVideoAsset tracksWithMediaType:AVMediaTypeVideo] objectAtIndex:0]; |
// Add them both to the composition. |
[mutableCompositionVideoTrack insertTimeRange:CMTimeRangeMake(kCMTimeZero,videoAssetTrack.timeRange.duration) ofTrack:videoAssetTrack atTime:kCMTimeZero error:nil]; |
[mutableCompositionVideoTrack insertTimeRange:CMTimeRangeMake(kCMTimeZero,anotherVideoAssetTrack.timeRange.duration) ofTrack:anotherVideoAssetTrack atTime:videoAssetTrack.timeRange.duration error:nil]; |
Retrieving Compatible Composition Tracks
Where possible, you should have only one composition track for each media type. This unification of compatible asset tracks leads to a minimal amount of resource usage. When presenting media data serially, you should place any media data of the same type on the same composition track. You can query a mutable composition to find out if there are any composition tracks compatible with your desired asset track:
AVMutableCompositionTrack *compatibleCompositionTrack = [mutableComposition mutableTrackCompatibleWithTrack:<#the AVAssetTrack you want to insert#>]; |
if (compatibleCompositionTrack) { |
// Implementation continues. |
} |
Generating a Volume Ramp
A single AVMutableAudioMix object can perform custom audio processing on all of the audio tracks in your composition individually. You create an audio mix using the audioMix class method, and you use instances of the AVMutableAudioMixInputParameters class to associate the audio mix with specific tracks within your composition. An audio mix can be used to vary the volume of an audio track. The following example displays how to set a volume ramp on a specific audio track to slowly fade the audio out over the duration of the composition:
AVMutableAudioMix *mutableAudioMix = [AVMutableAudioMix audioMix]; |
// Create the audio mix input parameters object. |
AVMutableAudioMixInputParameters *mixParameters = [AVMutableAudioMixInputParameters audioMixInputParametersWithTrack:mutableCompositionAudioTrack]; |
// Set the volume ramp to slowly fade the audio out over the duration of the composition. |
[mixParameters setVolumeRampFromStartVolume:1.f toEndVolume:0.f timeRange:CMTimeRangeMake(kCMTimeZero, mutableComposition.duration)]; |
// Attach the input parameters to the audio mix. |
mutableAudioMix.inputParameters = @[mixParameters]; |
Performing Custom Video Processing
As with an audio mix, you only need one AVMutableVideoComposition object to perform all of your custom video processing on your composition’s video tracks. Using a video composition, you can directly set the appropriate render size, scale, and frame rate for your composition’s video tracks. For a detailed example of setting appropriate values for these properties, see Setting the Render Size and Frame Duration.
Changing the Composition’s Background Color
All video compositions must also have an array of AVVideoCompositionInstruction objects containing at least one video composition instruction. You use the AVMutableVideoCompositionInstruction class to create your own video composition instructions. Using video composition instructions, you can modify the composition’s background color, specify whether post processing is needed or apply layer instructions.
The following example illustrates how to create a video composition instruction that changes the background color to red for the entire composition.
AVMutableVideoCompositionInstruction *mutableVideoCompositionInstruction = [AVMutableVideoCompositionInstruction videoCompositionInstruction]; |
mutableVideoCompositionInstruction.timeRange = CMTimeRangeMake(kCMTimeZero, mutableComposition.duration); |
mutableVideoCompositionInstruction.backgroundColor = [[UIColor redColor] CGColor]; |
Applying Opacity Ramps
Video composition instructions can also be used to apply video composition layer instructions. An AVMutableVideoCompositionLayerInstruction object can apply transforms, transform ramps, opacity and opacity ramps to a certain video track within a composition. The order of the layer instructions in a video composition instruction’s layerInstructions array determines how video frames from source tracks should be layered and composed for the duration of that composition instruction. The following code fragment shows how to set an opacity ramp to slowly fade out the first video in a composition before transitioning to the second video:
AVAsset *firstVideoAssetTrack = <#AVAssetTrack representing the first video segment played in the composition#>; |
AVAsset *secondVideoAssetTrack = <#AVAssetTrack representing the second video segment played in the composition#>; |
// Create the first video composition instruction. |
AVMutableVideoCompositionInstruction *firstVideoCompositionInstruction = [AVMutableVideoCompositionInstruction videoCompositionInstruction]; |
// Set its time range to span the duration of the first video track. |
firstVideoCompositionInstruction.timeRange = CMTimeRangeMake(kCMTimeZero, firstVideoAssetTrack.timeRange.duration); |
// Create the layer instruction and associate it with the composition video track. |
AVMutableVideoCompositionLayerInstruction *firstVideoLayerInstruction = [AVMutableVideoCompositionLayerInstruction videoCompositionLayerInstructionWithAssetTrack:mutableCompositionVideoTrack]; |
// Create the opacity ramp to fade out the first video track over its entire duration. |
[firstVideoLayerInstruction setOpacityRampFromStartOpacity:1.f toEndOpacity:0.f timeRange:CMTimeRangeMake(kCMTimeZero, firstVideoAssetTrack.timeRange.duration)]; |
// Create the second video composition instruction so that the second video track isn't transparent. |
AVMutableVideoCompositionInstruction *secondVideoCompositionInstruction = [AVMutableVideoCompositionInstruction videoCompositionInstruction]; |
// Set its time range to span the duration of the second video track. |
secondVideoCompositionInstruction.timeRange = CMTimeRangeMake(firstVideoAssetTrack.timeRange.duration, CMTimeAdd(firstVideoAssetTrack.timeRange.duration, secondVideoAssetTrack.timeRange.duration)); |
// Create the second layer instruction and associate it with the composition video track. |
AVMutableVideoCompositionLayerInstruction *secondVideoLayerInstruction = [AVMutableVideoCompositionLayerInstruction videoCompositionLayerInstructionWithAssetTrack:mutableCompositionVideoTrack]; |
// Attach the first layer instruction to the first video composition instruction. |
firstVideoCompositionInstruction.layerInstructions = @[firstVideoLayerInstruction]; |
// Attach the second layer instruction to the second video composition instruction. |
secondVideoCompositionInstruction.layerInstructions = @[secondVideoLayerInstruction]; |
// Attach both of the video composition instructions to the video composition. |
AVMutableVideoComposition *mutableVideoComposition = [AVMutableVideoComposition videoComposition]; |
mutableVideoComposition.instructions = @[firstVideoCompositionInstruction, secondVideoCompositionInstruction]; |
Incorporating Core Animation Effects
A video composition can add the power of Core Animation to your composition through the animationTool property. Through this animation tool, you can accomplish tasks such as watermarking video and adding titles or animating overlays. Core Animation can be used in two different ways with video compositions: You can add a Core Animation layer as its own individual composition track, or you can render Core Animation effects (using a Core Animation layer) into the video frames in your composition directly. The following code displays the latter option by adding a watermark to the center of the video:
CALayer *watermarkLayer = <#CALayer representing your desired watermark image#>; |
CALayer *parentLayer = [CALayer layer]; |
CALayer *videoLayer = [CALayer layer]; |
parentLayer.frame = CGRectMake(0, 0, mutableVideoComposition.renderSize.width, mutableVideoComposition.renderSize.height); |
videoLayer.frame = CGRectMake(0, 0, mutableVideoComposition.renderSize.width, mutableVideoComposition.renderSize.height); |
[parentLayer addSublayer:videoLayer]; |
watermarkLayer.position = CGPointMake(mutableVideoComposition.renderSize.width/2, mutableVideoComposition.renderSize.height/4); |
[parentLayer addSublayer:watermarkLayer]; |
mutableVideoComposition.animationTool = [AVVideoCompositionCoreAnimationTool videoCompositionCoreAnimationToolWithPostProcessingAsVideoLayer:videoLayer inLayer:parentLayer]; |
Putting It All Together: Combining Multiple Assets and Saving the Result to the Camera Roll
This brief code example illustrates how you can combine two video asset tracks and an audio asset track to create a single video file. It shows how to:
Create an
AVMutableCompositionobject and add multipleAVMutableCompositionTrackobjectsAdd time ranges of
AVAssetTrackobjects to compatible composition tracksCheck the
preferredTransformproperty of a video asset track to determine the video’s orientationUse
AVMutableVideoCompositionLayerInstructionobjects to apply transforms to the video tracks within a compositionSet appropriate values for the
renderSizeandframeDurationproperties of a video compositionUse a composition in conjunction with a video composition when exporting to a video file
Save a video file to the Camera Roll
Creating the Composition
To piece together tracks from separate assets, you use an AVMutableComposition object. Create the composition and add one audio and one video track.
AVMutableComposition *mutableComposition = [AVMutableComposition composition]; |
AVMutableCompositionTrack *videoCompositionTrack = [mutableComposition addMutableTrackWithMediaType:AVMediaTypeVideo preferredTrackID:kCMPersistentTrackID_Invalid]; |
AVMutableCompositionTrack *audioCompositionTrack = [mutableComposition addMutableTrackWithMediaType:AVMediaTypeAudio preferredTrackID:kCMPersistentTrackID_Invalid]; |
Adding the Assets
An empty composition does you no good. Add the two video asset tracks and the audio asset track to the composition.
AVAssetTrack *firstVideoAssetTrack = [[firstVideoAsset tracksWithMediaType:AVMediaTypeVideo] objectAtIndex:0]; |
AVAssetTrack *secondVideoAssetTrack = [[secondVideoAsset tracksWithMediaType:AVMediaTypeVideo] objectAtIndex:0]; |
[videoCompositionTrack insertTimeRange:CMTimeRangeMake(kCMTimeZero, firstVideoAssetTrack.timeRange.duration) ofTrack:firstVideoAssetTrack atTime:kCMTimeZero error:nil]; |
[videoCompositionTrack insertTimeRange:CMTimeRangeMake(kCMTimeZero, secondVideoAssetTrack.timeRange.duration) ofTrack:secondVideoAssetTrack atTime:firstVideoAssetTrack.timeRange.duration error:nil]; |
[audioCompositionTrack insertTimeRange:CMTimeRangeMake(kCMTimeZero, CMTimeAdd(firstVideoAssetTrack.timeRange.duration, secondVideoAssetTrack.timeRange.duration)) ofTrack:[[audioAsset tracksWithMediaType:AVMediaTypeAudio] objectAtIndex:0] atTime:kCMTimeZero error:nil]; |
Checking the Video Orientations
Once you add your video and audio tracks to the composition, you need to ensure that the orientations of both video tracks are correct. By default, all video tracks are assumed to be in landscape mode. If your video track was taken in portrait mode, the video will not be oriented properly when it is exported. Likewise, if you try to combine a video shot in portrait mode with a video shot in landscape mode, the export session will fail to complete.
BOOL isFirstVideoPortrait = NO; |
CGAffineTransform firstTransform = firstVideoAssetTrack.preferredTransform; |
// Check the first video track's preferred transform to determine if it was recorded in portrait mode. |
if (firstTransform.a == 0 && firstTransform.d == 0 && (firstTransform.b == 1.0 || firstTransform.b == -1.0) && (firstTransform.c == 1.0 || firstTransform.c == -1.0)) { |
isFirstVideoPortrait = YES; |
} |
BOOL isSecondVideoPortrait = NO; |
CGAffineTransform secondTransform = secondVideoAssetTrack.preferredTransform; |
// Check the second video track's preferred transform to determine if it was recorded in portrait mode. |
if (secondTransform.a == 0 && secondTransform.d == 0 && (secondTransform.b == 1.0 || secondTransform.b == -1.0) && (secondTransform.c == 1.0 || secondTransform.c == -1.0)) { |
isSecondVideoPortrait = YES; |
} |
if ((isFirstVideoAssetPortrait && !isSecondVideoAssetPortrait) || (!isFirstVideoAssetPortrait && isSecondVideoAssetPortrait)) { |
UIAlertView *incompatibleVideoOrientationAlert = [[UIAlertView alloc] initWithTitle:@"Error!" message:@"Cannot combine a video shot in portrait mode with a video shot in landscape mode." delegate:self cancelButtonTitle:@"Dismiss" otherButtonTitles:nil]; |
[incompatibleVideoOrientationAlert show]; |
return; |
} |
Applying the Video Composition Layer Instructions
Once you know the video segments have compatible orientations, you can apply the necessary layer instructions to each one and add these layer instructions to the video composition.
AVMutableVideoCompositionInstruction *firstVideoCompositionInstruction = [AVMutableVideoCompositionInstruction videoCompositionInstruction]; |
// Set the time range of the first instruction to span the duration of the first video track. |
firstVideoCompositionInstruction.timeRange = CMTimeRangeMake(kCMTimeZero, firstVideoAssetTrack.timeRange.duration); |
AVMutableVideoCompositionInstruction * secondVideoCompositionInstruction = [AVMutableVideoCompositionInstruction videoCompositionInstruction]; |
// Set the time range of the second instruction to span the duration of the second video track. |
secondVideoCompositionInstruction.timeRange = CMTimeRangeMake(firstVideoAssetTrack.timeRange.duration, CMTimeAdd(firstVideoAssetTrack.timeRange.duration, secondVideoAssetTrack.timeRange.duration)); |
AVMutableVideoCompositionLayerInstruction *firstVideoLayerInstruction = [AVMutableVideoCompositionLayerInstruction videoCompositionLayerInstructionWithAssetTrack:videoCompositionTrack]; |
// Set the transform of the first layer instruction to the preferred transform of the first video track. |
[firstVideoLayerInstruction setTransform:firstTransform atTime:kCMTimeZero]; |
AVMutableVideoCompositionLayerInstruction *secondVideoLayerInstruction = [AVMutableVideoCompositionLayerInstruction videoCompositionLayerInstructionWithAssetTrack:videoCompositionTrack]; |
// Set the transform of the second layer instruction to the preferred transform of the second video track. |
[secondVideoLayerInstruction setTransform:secondTransform atTime:firstVideoAssetTrack.timeRange.duration]; |
firstVideoCompositionInstruction.layerInstructions = @[firstVideoLayerInstruction]; |
secondVideoCompositionInstruction.layerInstructions = @[secondVideoLayerInstruction]; |
AVMutableVideoComposition *mutableVideoComposition = [AVMutableVideoComposition videoComposition]; |
mutableVideoComposition.instructions = @[firstVideoCompositionInstruction, secondVideoCompositionInstruction]; |
All AVAssetTrack objects have a preferredTransform property that contains the orientation information for that asset track. This transform is applied whenever the asset track is displayed onscreen. In the previous code, the layer instruction’s transform is set to the asset track’s transform so that the video in the new composition displays properly once you adjust its render size.
Setting the Render Size and Frame Duration
To complete the video orientation fix, you must adjust the renderSize property accordingly. You should also pick a suitable value for the frameDuration property, such as 1/30th of a second (or 30 frames per second). By default, the renderScale property is set to 1.0, which is appropriate for this composition.
CGSize naturalSizeFirst, naturalSizeSecond; |
// If the first video asset was shot in portrait mode, then so was the second one if we made it here. |
if (isFirstVideoAssetPortrait) { |
// Invert the width and height for the video tracks to ensure that they display properly. |
naturalSizeFirst = CGSizeMake(firstVideoAssetTrack.naturalSize.height, firstVideoAssetTrack.naturalSize.width); |
naturalSizeSecond = CGSizeMake(secondVideoAssetTrack.naturalSize.height, secondVideoAssetTrack.naturalSize.width); |
} |
else { |
// If the videos weren't shot in portrait mode, we can just use their natural sizes. |
naturalSizeFirst = firstVideoAssetTrack.naturalSize; |
naturalSizeSecond = secondVideoAssetTrack.naturalSize; |
} |
float renderWidth, renderHeight; |
// Set the renderWidth and renderHeight to the max of the two videos widths and heights. |
if (naturalSizeFirst.width > naturalSizeSecond.width) { |
renderWidth = naturalSizeFirst.width; |
} |
else { |
renderWidth = naturalSizeSecond.width; |
} |
if (naturalSizeFirst.height > naturalSizeSecond.height) { |
renderHeight = naturalSizeFirst.height; |
} |
else { |
renderHeight = naturalSizeSecond.height; |
} |
mutableVideoComposition.renderSize = CGSizeMake(renderWidth, renderHeight); |
// Set the frame duration to an appropriate value (i.e. 30 frames per second for video). |
mutableVideoComposition.frameDuration = CMTimeMake(1,30); |
Exporting the Composition and Saving it to the Camera Roll
The final step in this process involves exporting the entire composition into a single video file and saving that video to the camera roll. You use an AVAssetExportSession object to create the new video file and you pass to it your desired URL for the output file. You can then use the ALAssetsLibrary class to save the resulting video file to the Camera Roll.
// Create a static date formatter so we only have to initialize it once. |
static NSDateFormatter *kDateFormatter; |
if (!kDateFormatter) { |
kDateFormatter = [[NSDateFormatter alloc] init]; |
kDateFormatter.dateStyle = NSDateFormatterMediumStyle; |
kDateFormatter.timeStyle = NSDateFormatterShortStyle; |
} |
// Create the export session with the composition and set the preset to the highest quality. |
AVAssetExportSession *exporter = [[AVAssetExportSession alloc] initWithAsset:mutableComposition presetName:AVAssetExportPresetHighestQuality]; |
// Set the desired output URL for the file created by the export process. |
exporter.outputURL = [[[[NSFileManager defaultManager] URLForDirectory:NSDocumentDirectory inDomain:NSUserDomainMask appropriateForURL:nil create:@YES error:nil] URLByAppendingPathComponent:[kDateFormatter stringFromDate:[NSDate date]]] URLByAppendingPathExtension:CFBridgingRelease(UTTypeCopyPreferredTagWithClass((CFStringRef)AVFileTypeQuickTimeMovie, kUTTagClassFilenameExtension))]; |
// Set the output file type to be a QuickTime movie. |
exporter.outputFileType = AVFileTypeQuickTimeMovie; |
exporter.shouldOptimizeForNetworkUse = YES; |
exporter.videoComposition = mutableVideoComposition; |
// Asynchronously export the composition to a video file and save this file to the camera roll once export completes. |
[exporter exportAsynchronouslyWithCompletionHandler:^{ |
dispatch_async(dispatch_get_main_queue(), ^{ |
if (exporter.status == AVAssetExportSessionStatusCompleted) { |
ALAssetsLibrary *assetsLibrary = [[ALAssetsLibrary alloc] init]; |
if ([assetsLibrary videoAtPathIsCompatibleWithSavedPhotosAlbum:exporter.outputURL]) { |
[assetsLibrary writeVideoAtPathToSavedPhotosAlbum:exporter.outputURL completionBlock:NULL]; |
} |
} |
}); |
}]; |
Copyright © 2015 Apple Inc. All Rights Reserved. Terms of Use | Privacy Policy | Updated: 2015-06-30