

Creating a Managed Object Model
Much of Core Data’s functionality depends on the schema you create to describe your application’s entities, their properties, and the relationships between them. Core Data uses a schema called a managed object model — an instance of NSManagedObjectModel. In general, the richer the model, the better Core Data is able to support your application.
A managed object model allows Core Data to map from records in a persistent store to managed objects that you use in your application. The model is a collection of entity description objects (instances of NSEntityDescription). An entity description describes an entity (which you can think of as a table in a database) in terms of its name, the name of the class used to represent the entity in your application, and what properties (attributes and relationships) it has.
Creating an Entity and Its Properties
When you start a new project in Xcode and open the template selection dialog, select the Use Core Data checkbox. A source file for the Core Data model is created as part of the template. That source file will have the extension .xcdatamodeld. Select that file in the navigator area to display the Core Data model editor.
To create an entity
Click Add Entity.
A new untitled entity appears in the Entities list in the navigator area.
Select the new untitled entity.
In the Entity pane of the Data Model inspector, enter the name of the entity, and press Return.
To create attributes and relationships for the entity
With the new entity selected, click the Add button (+) at the bottom of the appropriate section.
A new untitled attribute or relationship (generically referred to as a property) is added in the Attributes or Relationships section of the editor area.
Select the new untitled property.
The property settings are displayed in the Relationship pane or Attribute pane of the Data Model inspector.
Give the property a name, and press Return.
The attribute or relationship information appears in the editor area.
Employee entity in the Xcode Data Model editor shows an entity called Employee, with attributes that describe the employee: date of birth, name, and start date.
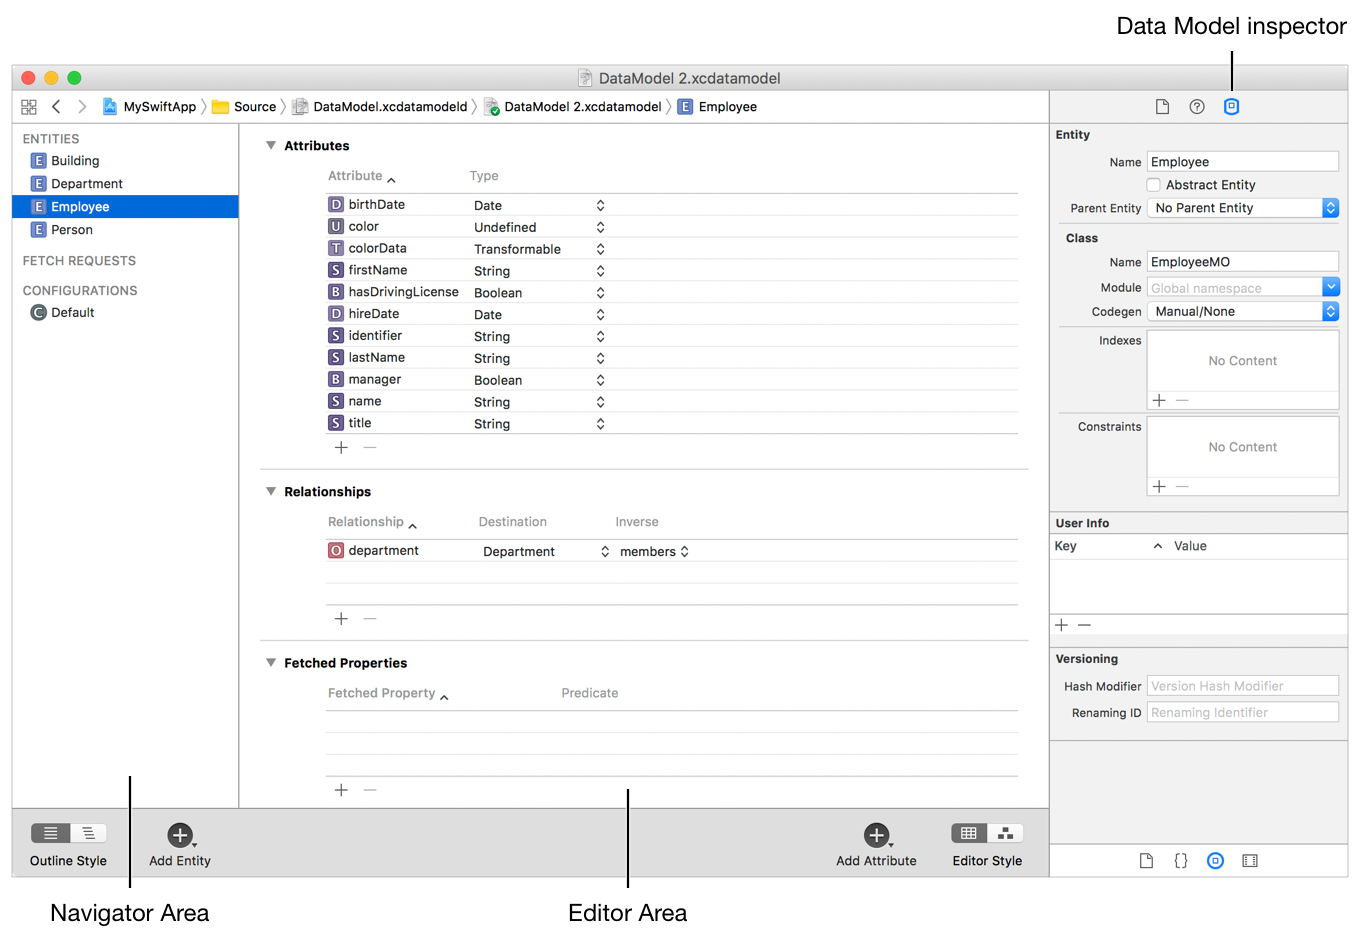
At this point you have created an entity in the model, but you have not created any data. Data is created later, when you launch your application. These entities will be used in your application as the basis for the creation of managed objects (NSManagedObject instances).
Defining an Entity
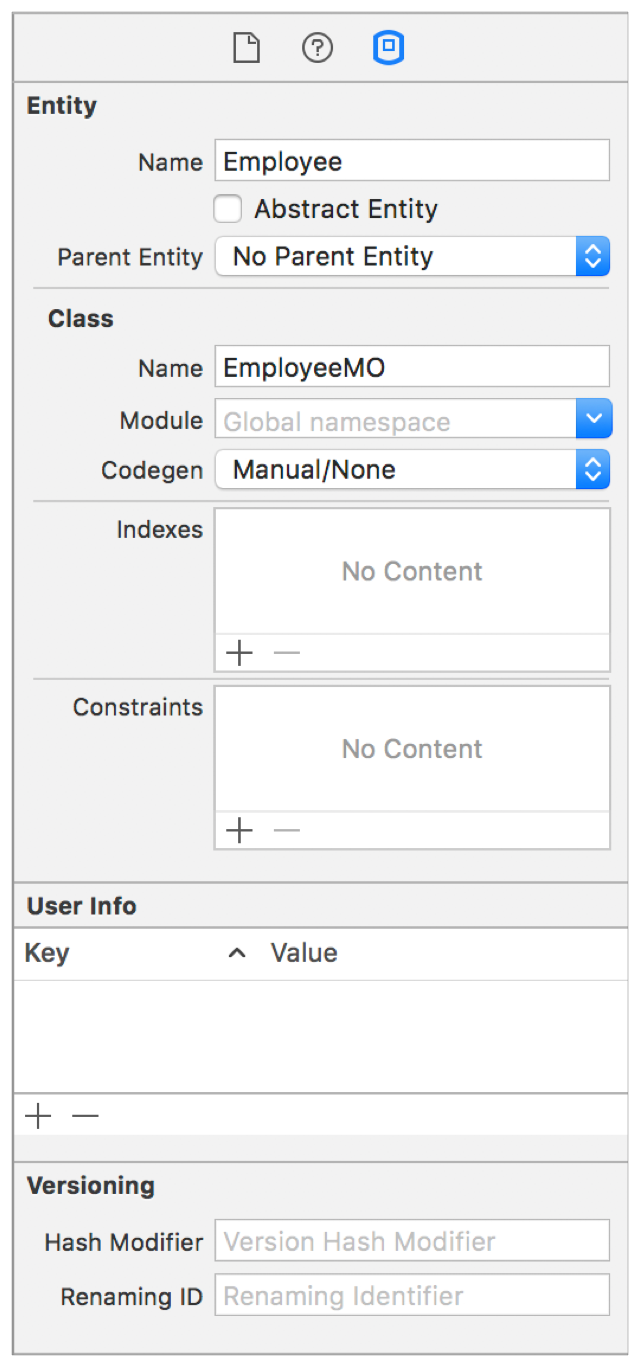
Now that you have named your entity, you define it further in the Entity pane of the Data Model inspector; see Entity pane in the Data Model inspector.
Entity Name and Class Name
Note that the entity name and the class name (a subclass of NSManagedObject) are not the same. The entity structure in the data model does not need to match the class hierarchy. Figure 2-2 shows a class name with the recommended class name pattern of Objective-C, along with an MO suffix. An entity name and a class name are required.
Abstract Entities
Specify that an entity is abstract if you will not create any instances of that entity. You typically make an entity abstract if you have a number of entities that all represent specializations of (inherit from) a common entity that should not itself be instantiated. For example, in the Employee entity you could define Person as an abstract entity and specify that only concrete subentities (Employee and Customer) can be instantiated. By marking an entity as abstract in the Entity pane of the Data Model inspector, you are informing Core Data that it will never be instantiated directly.
Entity Inheritance
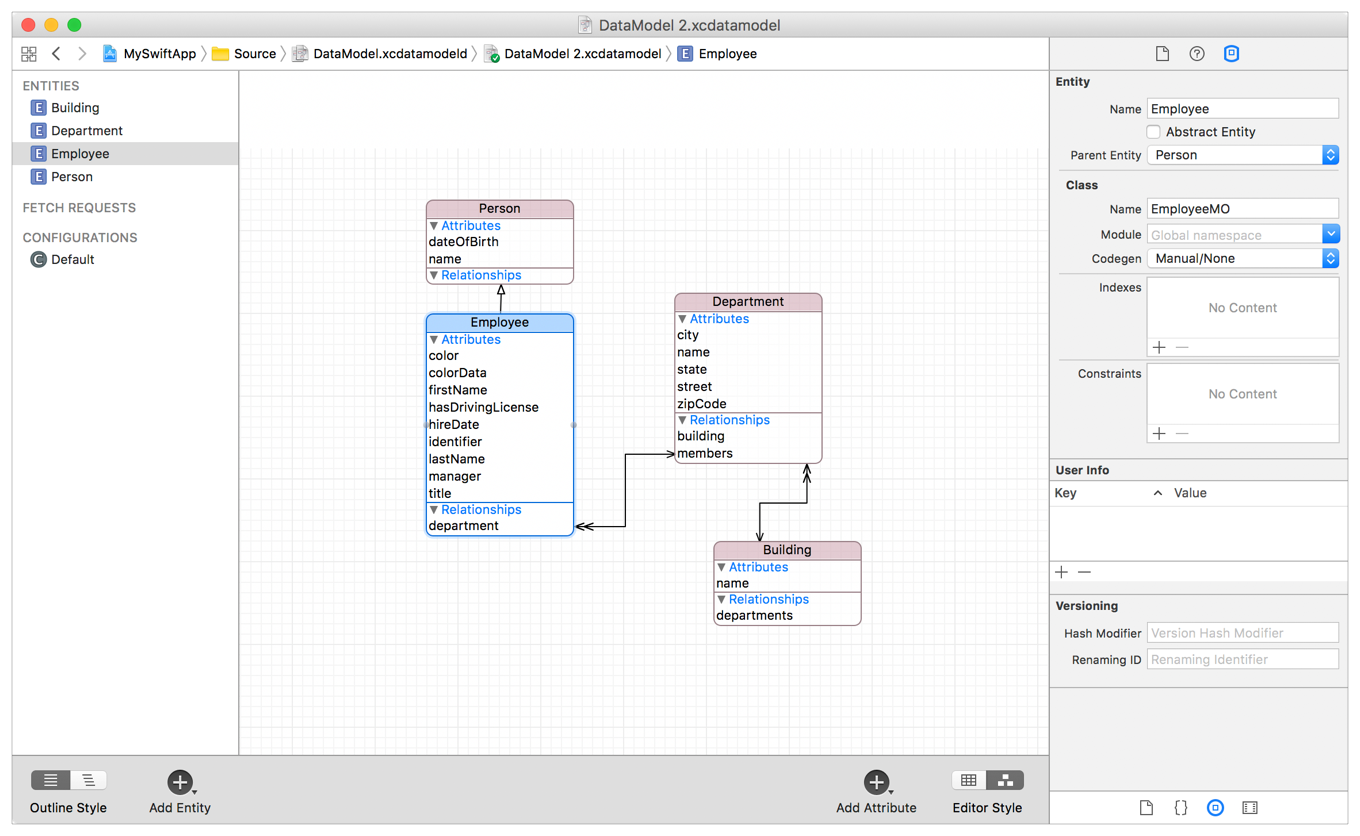
Entity inheritance works in a similar way to class inheritance; and is useful for the same reasons. If you have a number of entities that are similar, you can factor the common properties into a superentity, also known as a parent entity. Rather than specifying the same properties in several entities, you can define them in one entity, and the subentities inherit them. For example, you might define a Person entity with attributes firstName and lastName, and subentities Employee and Customer, which inherit those attributes. An example of this layout is shown in Figure 2-3. Display the layout diagram by clicking the Editor Style buttons in the lower-right corner.
In many cases, you also implement a custom class to correspond to the entity from which classes representing the subentities also inherit. Rather than implementing business logic common to all the entities several times over, you implement them in one place and they are inherited by the subclasses.
Defining Attributes and Relationships
An entity’s properties are its attributes and relationships, including its fetched properties (if it has any). Among other features, each property has a name and a type. A property name cannot be the same as any no-parameter method name of NSObject or NSManagedObject — for example, you cannot give a property the name “description” (see NSPropertyDescription).
Transient attributes are properties that you define as part of the model, but that are not saved to the persistent store as part of an entity instance’s data. Core Data does track changes you make to transient properties, so they are recorded for undo operations. You use transient properties for a variety of purposes, including keeping calculated values and derived values.

Attributes
To define an attribute, select it in the Core Data model editor and specify values in the Attribute pane of the Core Data Model inspector; see Attribute pane in the Data Model inspector. Core Data natively supports a variety of attribute types, such as string, date, and integer (represented as instances of NSString, NSDate, and NSNumber respectively).
You can specify that an attribute is optional—that is, it is not required to have a value. In general, however, avoid doing so, especially for numeric values. Typically, you can get better results using a mandatory attribute with a default value—defined in the attribute—of 0. The reason for this is that SQL has special comparison behavior for NULL that is unlike Objective-C’s nil. NULL in a database is not the same as 0, and searches for 0 do not match columns with NULL. Moreover, NULL in a database is not equivalent to an empty string or empty data blob.
Relationships and Fetched Properties
To define a relationship, select it in the Core Data model editor, and specify values in the Relationship pane of the Data Model inspector; Relationship in the Data Model inspector.

Core Data supports to-one and to-many relationships, and fetched properties. Fetched properties represent weak, one-way relationships. In the employees and departments domain, a fetched property of a department might be “recent hires” (employees do not have an inverse to the recent hires relationship).
The Type pop-up menu defines whether the relationship is a to-one type relationship or a to-many type relationship. Relationships are defined from one direction at a time. To create a many-to-many relationship, you would need to create two to-many relationships and then set them up as inverses of each other.
The Destination pop-up menu defines what object (or objects) is returned when the relationship is accessed in code. If the relationship is defined as to-one, a single object (or nil if the relationship can be optional) is returned. If the relationship is defined as to-many, a set is returned (or again, nil if the relationship can be optional).
The Inverse pop-up menu defines the other half of a relationship. Because each relationship is defined from one direction, this pop-up menu joins two relationships together to create a fully bidirectional relationship.
Relationships are described in greater detail in Creating Managed Object Relationships.
Copyright © 2018 Apple Inc. All rights reserved. Terms of Use | Privacy Policy | Updated: 2017-03-27