Retired Document
Important: This document does not represent best practices for current development. You should convert your app to use AVFoundation instead. See Transitioning QTKit Code to AV Foundation.
QTKit Architecture
This chapter describes the fundamentals of the QTKit software architecture.
To develop successful applications using the classes and methods in the QTKit API, you don’t necessarily have to understand all the details of how QuickTime deals with and manipulates video and media content. The approach taken in this chapter is to provide you with a high-level description of the six classes that form the core object model for the API, with a list of their most commonly used methods, tasks, and behaviors. The next chapter, QTKit Capture, describes the portion of the API that includes classes devoted to the capture and recording of media.
The chapter also discusses a number of use cases and scenarios for handling media playback, editing, exporting, thread safety issues, and applying Core Image filters to video playback. The intent is to provide you with code snippets that demonstrate best practices and techniques to reduce time and effort in your development cycle.
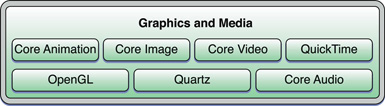
Graphics and Media Layer in OS X
QuickTime and QTKit are graphics and media frameworks that reside in OS X, which includes Core Video, Core Image and Core Animation, as well as OpenGL, Quartz and Core Audio.
To better understand these frameworks, you can view their implementation depicted graphically as a set of layers, shown in Figure 1-1. Each layer provides a progressively more powerful and sophisticated collection of application services. The graphics and media layer implements a number of specialized services for playing audio and video media content and for rendering 2D and 3D graphics.
QuickTime and QTKit are core Apple technologies for displaying and capturing, editing and exporting a wide array of audio, video and multimedia-related content. Both frameworks are powerful building blocks in an ecosystem of OS X technologies intended to provide developers with the tools and frameworks necessary to build and deploy state-of-the-art multimedia applications.
You use QuickTime and QTKit to handle the basic as well as advanced chores of video, audio, and image media processing, and thereby reduce the code you need to write in your application development cycle.
Supported Media Formats
QuickTime and QTKit support a wide range of standards-based formats, in addition to proprietary formats from Apple and others.
Table 1-1 lists some of the more common file formats that are supported.
Audio formats | AIFF, MP3, AU, WAV, uLaw |
Video formats | AVI, AVR, DV, M-JPEG, MPEG-1, MPEG-2, MPEG-4 |
Codecs | AAC, AVI, AVR, DV, M-JPEG, MPEG-1, MPEG-2, MPEG-4, , OpenDML, 3GPP, 3GPP2, AMC, H.264 |
Web streaming formats | HTTP, RTP, RTSP |
A distinction should be emphasized here: audio/video formats supported by QuickTime and QTKit are essentially container formats whose specifications only deal with how the data is stored within a file, not how it is encoded. In the case of QuickTime, the .mov file format which is native to QuickTime serves as a multimedia container file, typically containing one or more tracks, each of which stores a particular type of data, such as audio, video, effects or text. A video codec, by contrast, is software that enables video compression and decompression of digital media. The MPEG-4 codec, for example, is based on the QuickTime file format and is an industry standard.
QTKit Framework
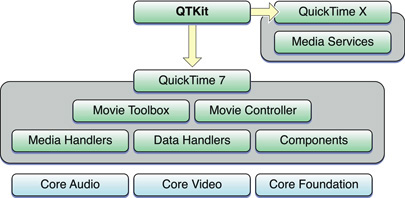
Introduced in OS X v10.4, QTKit is an Objective-C, Cocoa-based framework for manipulating time-based media. Built on top of QuickTime, as shown in Figure 1-2, the framework lets you incorporate movie playback, movie editing, export to standard media formats, audio/video capture and recording, and other multimedia behaviors easily into your Cocoa application.
QTKit developers do not need to know the low-level workings of the QuickTime Movie Toolbox, for example, as shown in the illustration, to play back or edit movies. Nor do they necessarily need to understand the terminology and workings of media and data handlers, as well as components, which are part of QuickTime.
As a modern design, the QTKit software architecture is constructed from the ground up to provide Cocoa developers with the power and capabilities available in QuickTime without having to deal with its innate complexity or low-level abstractions.
Thus, QTKit provides a much less complex programmer interface than QuickTime, and represents a distillation and abstraction of the most essential QuickTime functions as a small set of classes and methods. A great deal of functionality is packed into a relatively small objective API.
The framework is at once powerful, yet easy to use and work with in your Cocoa application. Notably, QTKit provides Objective-C classes that are suitable for use within a wide range of Cocoa-based software, including applications with a GUI and tools intended to run in a “headless” environment. For example, you can use the framework to write command-line tools that manipulate QuickTime movie files.
QTKit is also the primary 64-bit interface into QuickTime. You use QTKit to create 64-bit applications to manipulate a wide range of multimedia content, including audio, video, animation, graphics, text, music, and other media types.
For more detailed information about the classes and methods in the QTKit API, refer to QTKit Framework Reference.
If you want to see the framework header files, you can find them in the OS X /System/Library/Frameworks directory as QTKit.framework. The QTMovieView plug-in control resides in the Interface Builder library of objects.
Tasks and Capabilities
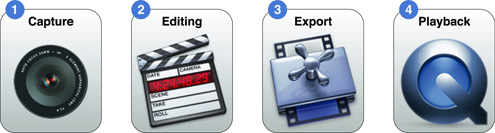
You can use the methods and classes in the QTKit API to accomplish a number of essential media programming tasks, shown graphically in Figure 1-3. At the basic level, the QTKit API lets you:
Play back all types of media (as QuickTime movies)
Edit media
Export from QuickTime movies to other formats
Capture and record digital data into QuickTime movies
In the context of support for workflows with linear media, the QTKit API is intended to perform a specific range of tasks, namely, to:
Acquire (either open existing media from disk or capture media from a specific device)
Edit/author that media
Export media for an intended destination (for example, the web, Apple mobile devices, broadcast, and so on)
Present media on multiple devices, including desktop and mobile
QTKit Capture API
In each iteration of OS X, the QTKit API has been extended with new features and capabilities. In OS X v10.5, for example, QTKit introduced 17 new classes to support professional-grade audio/video capture, discussed in QTKit Capture.
The input and output classes included with the latest iteration of the framework provide all the components necessary for your application to implement the most common use case for a media capture system: recording from a camera to a QuickTime file. The classes in the QTKit capture API enable your application to perform video capture that includes frame-accurate audio/video synchronization. You can then preview captured content and save it to a file.
QuickTime X
QuickTime X is a new media architecture that provides a set of media services for efficient, high-performance playback of audio/video media.
You gain access to these media playback services, available in OS X v10.6, through QTKit by opting-in to QuickTime X with a single method call. How you can modify your existing QTKit code to use these services is discussed in the section Opting into QuickTime X in the chapter Adopting QuickTime X for Playback.
QTKit Class Hierarchy
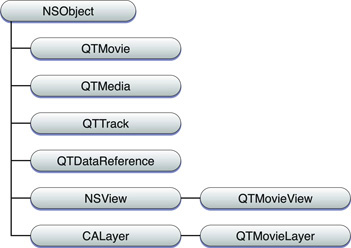
The QTKit framework is comprised of 23 Objective-C, Cocoa classes, along with over 400 methods, attributes, constants, and notifications. The framework has grown and evolved significantly with each iteration of OS X.
For purposes of better conceptual understanding, the QTKit class hierarchy, shown in Figure 1-4, can be divided into a group of six classes that handle the most common chores of media display, playback and editing of QuickTime movies, as well as support for Core Animation layers. These are discussed in this chapter.
Another group of classes in the QTKit API, designed to support professional-grade audio/video capture and recording, are discussed in great detail in the QTKit Capture chapter.
The movie, media, and track class portion of the class hierarchy for the QTKit framework consists of four classes, QTMovie, QTMedia, QTTrack and QTDataReference, all of which inherit from NSObject, while the QTMovieView class inherits from NSView and the QTMovieLayer class, which supports Core Animation rendering, inherits from CALayer.
Classes For Movie Playback
There are six classes in the QTKit API that are used primarily for the rendering and playback of QuickTime movies. Table 1-2 describes briefly each of these classes and what tasks they are commonly used for.
Class | Description | Tasks |
|---|---|---|
| An object that represents a playable collection of media data. | Typically used in combination with a |
| A subclass of | Used to display and control QuickTime movies in combination with a |
| An object that represents the ordering and other characteristics of media data in a | Provides methods for getting and setting track properties. |
| An object that represents the data associated with a | Provides methods for getting and setting the media properties. |
| A representation of a QuickTime data reference which specifies the location of a QuickTime movie or some media data. | Used to specify the location of a movie or its media data. You can create |
| A subclass of | Intended to provide support for Core Animation. |
QTMovie and QTMovieView Objects
Of the 23 classes in the QTKit API, the two most useful and important to understand at the conceptual level are QTMovie and QTMovieView. These form the foundation of the framework, and in the case of QTMovie, include the largest number of methods. You need to know how these objects behave and what tasks they are intended to accomplish in order to work successfully with the API.
QTMovie Object Representation
A QTMovie is an object that represents a playable collection of media data. A movie describes the sources and types of the media in that collection and their spatial and temporal organization. These collections may be used for presentation (such as playback on the screen) or for the organization of media for processing (such as composition and transcoding to a different compression type).
A QTMovie object can be initialized from a file, from a resource specified by a URL, from a block of memory, from a pasteboard, or from an existing QuickTime movie. Once a QTMovie object has been initialized, it will typically be used in combination with a QTMovieView for playback. It can also be used for other purposes, such as converting the media data into a different format.
Just as a QuickTime movie contains a set of tracks, each of which defines the type, the segments, and the ordering of the media data it presents, a QTMovie object is associated with instances of the QTTrack class. In turn, a QTTrack object is associated with a single QTMedia object. QTMovie instances can reference data contained in files, URLs, or in memory. QTMovie provides methods for getting and setting movie properties and for editing movies.
To display a QTMovie object in a window, for example, you use the QTMovieView class. As a subclass of NSView, QTMovieView supports movie playback and editing, with a movie controller bar that is displayed in the view, but can be optionally hidden.
The QTMovie class includes an extensive number of instance and class methods that let you perform a wide range of operations on QuickTime movies. Some of these capabilities include:
Creating and initializing a
QTMovieobjectControlling movie playback
Editing a movie
Saving movie data
Setting movie properties and attributes
Getting movie tracks and movie images
The QTMovie class also includes a large number of string constants that let you specify movie attributes. Some of the more commonly used attributes for handling duration and current time are shown in Table 1-3. The QTMovieOpen... attributes, for example, can be used for initialization and for opting-in to the high-performance media playback services provided by QuickTime X (refer toOpting into QuickTime X for more information). Attributes that deal with load state are discussed in Monitoring Load State.
Coding techniques for using these attributes are described in the QTKit Application Tutorial, in particular the usage of the QTMovieNaturalSizeAttribute for displaying and playing back QuickTime movies at their original or “authored” size.
Attributes | Tasks |
|---|---|
| The duration of a |
| The current time of a |
| The editable setting. |
| The load state value; the value for this key is of type |
| The load state error of a |
| The natural size of a |
| Indicates whether a movie file can be opened asynchronously if possible, an |
| Indicates whether the |
| Indicates whether the |
QTMovie Attributes
The recommended way to open a movie file is with initWithAttributes:error. This is now the designated initializer of the QTMovie class in OS X v10.6. You do this:
- (id)initWithAttributes:(NSDictionary *)attributes |
error:(NSError **)errorPtr; |
+ (id)movieWithAttributes:(NSDictionary *)attributes |
error:(NSError **)errorPtr; |
You pass in a dictionary of attributes describing what it is you want and then QTKit will create a movie with that set of characteristics. There are three kinds of attributes you can put into that dictionary of attributes.
Data locator attributes. These are attributes that specify where the movie data is located. Typically, you pass in a file name or a URL.
QTMovieFileNameAttribute
QTMovieURLAttribute
QTMoviePasteboardAttribute
QTMovieDataAttribute
QTMovieDataReferenceAttribute
Movie configuration attributes. These are attributes applied to the movie as it is being opened. For instance, if you want to open the movie in an editable state, you can put in this attribute and value
YES. Similarly, you could assign a delegate. You could say you want the movie to loop, or you could set the volume to some non-standard volume you want. Basically, in this category of attributes you can put in any settable attribute. These attributes are ones that can be read and written. For information about the attributes you can set and write, refer to the QTKit Framework Reference, specifically the QTMovie Class Reference.QTMovieEditableAttribute
QTMovieDelegateAttribute
QTMovieLoopsAttribute
QTMovieVolumeAttribute
Special initialization attributes. These are attributes that affect how QTKit opens the movie.
QTMovieDontInteractWithUserAttribute
QTMovieResolveDataRefsAttribute
QTMovieAskUnresolvedDataRefsAttribute
QTMovieOpenAsyncOKAttribute
QTMovieOpenAsyncRequiredAttribute
QTMovieOpenForPlaybackAttribute
Note that in OS X v10.6, the designated initializer for the QTMovie class is initWithAttributes:error:, whose first parameter is a dictionary of attribute keys and their desired values. As described, one of these attributes must specify the location of the media data (for instance, using the QTMovieURLAttribute key). Other attributes may specify desired movie-opening behaviors, and others still may specify desired initial values of QTMovie properties (for instance, QTMovieVolumeAttribute).
Requesting Asynchronous Movie Loading
Using the new QTMovieOpenAsyncRequiredAttribute available in OS X v10.6, you can indicate whether you want QTKit to attempt to initialize a QTMovie object asynchronously to the initialization thread. If QTMovieOpenForPlaybackAttribute is also specified and the media resource is compatible with QuickTime X, asynchronous opening will always succeed. If QuickTime 7 is used instead, QTKit will attempt to make use of its limited support for initialization on pre-emptive background threads; for some media types this will fail. In cases of failure, the application can chose to retry the operation without setting QTMovieOpenAsyncRequiredAttribute, or it may choose to report the failure to the user as appropriate.
You accomplish this in your code by passing the QTMovieOpenAsyncRequiredAttribute and setting this exactly in the same way that you set the other attribute (QTMovieOpenForPlaybackAttribute, as shown in Listing 3-2), that is, by putting it into the dictionary of attributes.
- (id)initWithAttributes:(NSDictionary *)attributes |
error:(NSError **)errorPtr; |
You use this code snippet to pass this key.
QTMovie *movie = nil; |
NSError *error = nil; |
NSNumber *num = [NSNumber numberWithBool:YES]; |
NSDictionary *attributes = |
[NSDictionary dictionaryWithObjectsAndKeys: |
fileName, QTMovieFileNameAttribute, |
num, QTMovieLoopsAttribute, |
num, QTMovieOpenAsyncRequiredAttribute, |
nil]; |
movie = [[QTMovie alloc] initWithAttributes:attributes |
error:&error]; |
By setting the QTMovieOpenAsyncRequiredAttribute attribute to an NSNumber wrapping YES, you are indicating that all operations necessary to open the movie file (or other container) and create a valid QTMovie object must occur asynchronously. This means that the methods +movieWithAttributes:error: and -initWithAttributes:error: must return almost immediately, performing any lengthy operations on another thread.
If you require asynchronous opening but QTMovie is unable to honor your request, then the methods +movieWithAttributes:error: and -initWithAttributes:error: return with an NSError. Note that if you give QTMovie a reference to valid movie data with QTMovieOpenAsyncRequiredAttribute, you will always get back a valid, non-nil QTMovie, even if that data cannot be loaded asynchronously. The only time you will ever get back nil is if there is a problem with your parameters or with locating the data.
Caveats
Your application needs to monitor the movie load state to determine the progress of those operations. In point of fact, unless the QTMovie object is being initialized with openAsyncOK=NO, or uses autoplay or simply allows the QTMovieView user interface to control playing, your application must monitor the load state, as discussed in the next section Monitoring Load State.
Opening a movie file and initializing a QTMovie object for that file may require a considerable amount of time, perhaps to convert the data in the file from one format to another. By setting this attribute to an NSNumber wrapping the value YES, you grant QTMovie permission to return a non-nil QTMovie identifier to your application immediately and then to continue processing the file data internally. If a movie is opened asynchronously, you must monitor the movie load state and ensure that it has reached the appropriate threshold before attempting to perform certain operations on the movie. For instance, you cannot export or copy a QTMovie object until its load state has reached QTMovieLoadStateComplete.
By performing this action, you’ve given QTKit permission to spawn a background thread to open your media resource. While that is occurring in the background, your main thread will not be blocked by movie-opening operations. But how do you know the movie is ready to play, particularly if it is a very large file? The answer is: you must monitor load states. That is because the relevant movie data may not be there and it may not be meaningful to ask the movie for its various properties.
Load states are important to understand in working with QTKit in QuickTime X. These are discussed in detail in the next section Monitoring Load State.
Monitoring Load State
Because opening a movie file or URL may involve reading and processing large amounts of movie data, QTKit may take a non-negligible amount of time to make a QTMovie object ready for inspection and playback. Accordingly, you need to pay attention to the movie’s load states when opening a movie file or URL. These are the defined movie load states:
enum { |
QTMovieLoadStateError = -1L, // an error occurred while loading the movie |
QTMovieLoadStateLoading = 1000, // the movie is loading |
QTMovieLoadStateLoaded = 2000, // the movie atom has loaded; it's safe to query movie properties |
QTMovieLoadStatePlayable = 10000, // the movie has loaded enough media data to begin playing |
QTMovieLoadStatePlaythroughOK = 20000, //the movie has loaded enough media data to play through to end |
QTMovieLoadStateComplete = 100000L // the movie has loaded completely |
}; |
typedef NSInteger QTMovieLoadState; |
Movie load states are just specified as integers, increasing from —1 to 100,000. A —1 indicates that something has occurred that returns an error; other states indicate loading. To watch for these load states, you register for the QTMovieDidChangeLoadStateNotification.
movie = [[QTMovie alloc] initWithAttributes:attributes |
error:&error]; |
[[NSNotificationCenter defaultCenter] |
addObserver:self |
selector:@selector(loadStateChanged:) |
name:QTMovieLoadStateDidChangeNotification |
object:movie]; |
You are issued the QTMovieDidChangeLoadStateNotification notification when QTKit detects that the load state has changed from one level to another. If you get to the QTMovieLoadedStateLoaded returned, it means that now you can query the object for its various properties, such as its duration, natural size, the volume, and so on. If you get QTMovieLoadStatePlaythroughOK, it means you can continue to play uninterrupted to the end. To handle the load state change, using the method called by the notification, you do this:
- (void)loadStateChanged:(NSNotification *)notification |
{ |
QTMovie *movie = [notification object]; |
if (movie) { |
[self handleLoadStateChanged:movie]; |
} |
} |
- (void)handleLoadStateChanged:(QTMovie *)movie |
{ |
NSInteger loadState = [[movie |
attributeForKey:QTMovieLoadStateAttribute] longValue]; |
if (loadState == QTMovieLoadStateError) { |
/* an error occurred; handle it */ |
... |
} |
} |
Note that once you call initWithAttributes:error, you might get back a movie that is fully loaded, in which case you won’t get a load state change notification. After you’ve called initWithAttributes:error, be sure to check the load state.
movie = [[QTMovie alloc] initWithAttributes:attributes |
error:&error]; |
[self handleLoadStateChanged:movie]; |
[[NSNotificationCenter defaultCenter] |
addObserver:self |
selector:@selector(loadStateChanged:) |
name:QTMovieLoadStateDidChangeNotification |
object:movie]; |
Not all media files can be loaded asynchronously, so OS X v10.6 provides you with the new QTMovieLoadStateErrorAttribute attribute.
You can check the error returned and then retry opening the media file on the main thread, depending on the playback needs of your application.
- (void)handleLoadStateChanged:(QTMovie *)movie |
{ |
NSInteger loadState = [[movie |
attributeForKey:QTMovieLoadStateAttribute] longValue]; |
if (loadState == QTMovieLoadStateError) { |
NSError *error = [movie attributeForKey: |
QTMovieLoadStateErrorAttribute]; |
NSString *domain = [error domain]; |
NSInteger code = [error code]; |
if (/* not file not found or invalid URL ... */) { |
/* retry without QTMovieOpenAsyncRequiredAttribute */ |
} |
... |
} |
The MyMediaPlayer code sample (shown in Listing 1-1) illustrates how to use and monitor various load states in QuickTime X and OS X v10.6. This block of code (fully commented here) shows the technique you can use to accomplish that particular task.
Listing 1-1 MyMediaPlayer code monitoring load states
-(void)handleLoadStateChanged:(QTMovie *)movie |
{ |
NSInteger loadState = [[movie attributeForKey:QTMovieLoadStateAttribute] longValue]; |
if (loadState == QTMovieLoadStateError) { |
/* what goes here is app-specific */ |
/* you can query QTMovieLoadStateErrorAttribute to get the error code, if it matters */ |
/* for example: |
/* NSError *err = [movie attributeForKey:QTMovieLoadStateErrorAttribute]; */ |
/* you might also need to undo some operations done in the other state handlers */ |
} |
if ((loadState >= QTMovieLoadStateLoaded) && ([mMovieView movie] == nil)) { |
/* can query properties here */ |
/* for instance, if you need to size a QTMovieView based on the movie's natural size, you can do so now */ |
/* you can also put the movie into a view now, even though no media data might yet be available and hence |
nothing will be drawn into the view */ |
[mMovieView setMovie:movie]; |
} |
if ((loadState >= QTMovieLoadStatePlayable) && ([movie rate] == 0.0f)) { |
/* can start movie playing here */ |
} |
} |
-(void)movieLoadStateChanged:(NSNotification *)notification |
{ |
QTMovie *movie = (QTMovie *)[notification object]; |
if (movie) { |
[self handleLoadStateChanged:movie]; |
} |
} |
Note that load-state changes can occur when transitioning from any given load state to any other load state. That is, one can transition from the current load state (whatever it happens to be) to almost any other load state, even to QTMovieLoadStateError. You should also note that any given application can choose to handle any subset of the defined load states. That is, one application might care about QTMovieLoadStateLoaded but another might care only about QTMovieLoadStatePlayable. It is important to understand that load state changes do not necessarily pass through all defined stages. The first load state ever reported might be QTMovieLoadStateComplete. Keep in mind that it is never guaranteed that an application will ever get any specific load state when querying the QTMovieLoadStateAttribute.
Now if your application simply wants to play media without dealing with load state issues, you can use a method on QTMovie that does not require you monitor all load state progress. You can use the autoplay method to monitor load progress for you.
// put a movie in a view and play it when ready |
movie = [[QTMovie alloc] initWithAttributes:attributes |
error:NULL]; |
[movieView setMovie:movie]; |
[movie autoplay]; |
QTMovieView Object Representation
A QTMovieView is a subclass of NSView that can be used to display and control QuickTime movies. You normally use a QTMovieView in combination with a QTMovie object, which supplies the movie being displayed.
To display a QTMovie object in a window, you use the QTMovieView class.
A QTMovieView also supports editing operations on the movie. It also provides an optional controller bar that allows users to directly control the playback of a movie. If you want to provide your own custom controls instead, the QTMovieView class provides a full complement of methods to control playback, such as play, pause, and stop. The movie can be placed within an arbitrary bounding rectangle in the view’s coordinate system, and the remainder of the view can be filled with a fill color. The movie controller, if it is visible, can also be placed within an arbitrary bounding rectangle in the view’s coordinate system.
QTMovieView in Interface Builder
A QTMovieView object (shown in Figure 1-5) is provided in Interface Builder that lets you simply drag a QuickTime movie object, complete with a controller for playback, into a window, and then set attributes for the movie.
QTTrack, QTMedia and QTDataReference Object Representation
A QuickTime movie consists of one or more tracks, each of which is associated with a single media. Similarly, a QTMovie is associated with one or more objects of type QTTrack, each of which is associated with a single QTMedia object. The QTTrack and QTMedia classes provide a number of methods for operating on QuickTime tracks and media, but only when using QuickTime 7.
The QTTrack class represents a QuickTime track (of type Track). QTTrack objects are associated with QTMovie objects and support methods for getting and setting the track properties.
The QTMedia class represents a QuickTime media (of type Media). QTMedia objects are associated with QTTrack objects and support methods for getting and setting the media properties, but only when using QuickTime 7.
A QTDataReference object is a representation of a QuickTime data reference, which is used to specify the location of a movie or its media data. You can create QTDataReference objects that refer to data stored in files accessed using filenames or URLs, or in memory accessed using handles, pointers, or NSData objects.
QTMovieLayer Object Representation
As a subclass of CALayer, the QTMovieLayer object provides support for Core Animation layers. You can use this object to draw the contents of a movie into a layer, rendering a QTMovie within a layer hierarchy. Using the layerWithMovie: method, for example, you create an autoreleased QTMovieLayer associated with the specified object. You can then modify the default characteristics—that is, the movie starts playing immediately at rate 1.0 from its beginning—by setting layer properties or movie properties. (For more information about how to take advantage of QTKit and Core Animation layers in your application, refer to the section Working With Core Animation Layers).
Structures For Dealing With Time
In addition to a rich set of classes and methods, the QTKit framework also provides a number of functions for working with QTTime and QTTimeRange structures. These define the QTTime and QTTimeRange structures for representing specific times and time ranges in a movie or track. These structures are:
QTTime. Defines the value and time scale of a time.typedef struct {long long timeValue;
long timeScale;
long flags;
} QTTime;
QTTimeis a simple data structure that consists of three fields. In this case, thetimeScalefield is the number of units per second you work with when dealing with time. ThetimeValuefield is the number of those units in duration.QTTimeRange. Defines a range of time, and is used, for instance, to specify the active segment of a movie or track.typedef struct {QTTime time;
QTTime duration;
} QTTimeRange;
QTTimeRangeis also a simple data structure that consists of two fields. In this case, thetimefield indicates the start time of the range and thedurationfield indicates the duration of the range.
There are also a number of functions that you use in dealing with time. These include:
QTTime QTMakeTime (long long timeValue, long timeScale);QTTime QTTimeIncrement (QTTime time, QTime increment);QTTime QTMakeTimeScaled (QTTime time, long timeScale);QTTimeRange QTMakeTimeRange (QTTime time, QTTime duration);
You use these functions to create a QTTime structure, get and set times, compare QTTime structures, add and subtract times, and get a description. In addition, other functions are also available for creating a QTTimeRange structure, querying time ranges, creating unions and intersections of time ranges, and getting a description.
In QTKit it is important to understand that the primary object for rendering and playing movies, QTMovie, does not rely on a single time scale, since times are all fully expressed as QTTime structures. To specify a point in time in a time coordinate system, for example, you use a QTTime structure. In QTKit, you don’t need to think of a movie or a track as having an intrinsic time scale, or that the time scale should have some meaning based on the format of the media in a track.
Dealing with Thread Safety
Processor-intensive operations can delay responsiveness of your application by blocking the user interface or by limiting the number of tasks that can be performed at the same time. As a consequence, the user experience suffers.
QTKit provides a number of methods for dealing with and managing QTMovie objects on background threads. By moving processor-intensive tasks to background threads, you free up the main thread and thus improve the speed, responsiveness and overall performance of your application.
User interface elements must stay on the main thread, however. You also need to avoid creating or presenting a dialog box or window on a background thread. In addition, your application should not allow more than one thread to work on the same QTMovie object at same time if you want to ensure thread safety. As the caller, it’s your responsibility to ensure that this is the case.
The QTMovie class has class and instance methods that support thread safety, shown in Table 1-4. These methods allow you to notify the framework when it will be using, or is finished using QTKit objects on background threads. This includes the ability to inform QTKit when you want to use a QTMovie instance on a background thread when you are attaching or detaching a QTMovie instance from the current thread. Note that these methods can be nested, although the +enter... and +exit... methods must be balanced, as described in the tasks field in Table 1-4.
Methods For Thread-Safety | Tasks |
|---|---|
| Performs any QTKit-specific initialization for the background thread. You must pair a call to this method with a subsequent call to |
| Performs any QTKit-specific initialization for the background thread, allowing non-thread-safe components. You must pair a call to this method with a subsequent call to |
| Performs any QTKit-specific shut-down for the background thread. You must pair a call to this method with a previous call to |
| Attaches a |
| Detaches a |
Before any QTKit operations can be performed on a secondary thread, either +enterQTKitOnThread or +enterQTKitOnThreadDisablingThreadSafetyProtection must be called, and +exitQTKitOnThread must be called before exiting the thread. A QTMovie object can be migrated from one thread to another by first calling -detachFromCurrentThread on the first thread and then -attachToCurrentThread on the second thread.
Recommended Procedures For Working With Background Threads
Follow these guidelines for working with QTMovie objects on background threads:
Allocate all
QTMovieobjects on the main thread.To operate on a
QTMovieon a different thread, detach it from the current thread. You use the-detachFromCurrentThreadinstance method on the QuickTime movie associated with thatQTMovieas gotten with thequickTimeMovie:method). Then you attach it to the different thread using the-attachToCurrentThreadmethod.Call
+enterQTKitOnThreadbefore you make any other QTKit calls on a secondary thread.Call
+exitQTKitOnThreadbefore exiting a thread you have made QTKit calls on.Be prepared to handle errors from any of those calls; some movies cannot be moved to secondary threads (this is codec-specific).
Setting Up a QTMovie Object on the Main Thread
The following code snippet (Listing 1-2) demonstrates how to set up a QTMovie object on the main thread and how to do an export on a background thread.
Listing 1-2 Setting up a movie on the main thread and exporting on a background thread
- (void)doExportWithFile:(NSString *)inFile |
{ |
QTMovie *movie = nil; |
NSDictionary *attrs = [NSDictionary dictionaryWithObjectsAndKeys:(id)inFile, QTMovieFileNameAttribute, |
[NSNumber numberWithBool:NO], QTMovieOpenAsyncOKAttribute, nil]; |
movie = [QTMovie movieWithAttributes:attrs error:nil]; |
[movie detachFromCurrentThread]; |
[NSThread detachNewThreadSelector:@selector(doExportOnThread:) |
toTarget:self |
withObject:movie]; |
} |
// exporting on a background thread |
- (void)doExportOnThread:(QTMovie *)movie |
{ |
NSAutoreleasePool *pool = [[NSAutoreleasePool alloc] init]; |
NSDictionary *attrs = [NSDictionary dictionaryWithObjectsAndKeys: |
[NSNumber numberWithBool:YES], QTMovieExport, |
[NSNumber numberWithLong:'M4V '], QTMovieExportType, nil]; |
[QTMovie enterQTKitOnThread]; |
[movie attachToCurrentThread]; |
// do export |
[movie writeToFile:@"/Users/Shared/iPodMovie.m4v" withAttributes:attrs]; |
[movie detachFromCurrentThread]; |
[QTMovie exitQTKitOnThread]; |
[pool release]; |
} |
Using QTKit for Media Playback
This section discusses some of the coding techniques you can use to construct different Cocoa applications, using the classes and methods in QTKit. The primary focus is on how to build a media player application that incorporates editing. Simple tasks such as opening, saving, and creating an empty movie file are also explained. The last section describes more advanced programming techniques you can use to integrate Core Image and Core Animation methods for image processing and applying filters to movie playback.
Playback and Editing
Follow these steps to build a simple QTKit media player application that handles playback and editing of media types that QuickTime supports, such as .mov, .mp4 and audio files.
Launch Xcode and create a Cocoa-document based project.
Import the
QTKit.hheader files into your projectDeclare a retained reference to a
QTMovieinstance, using the @property directive.@property(retain) QTMovie *movie;
At this point, the code in your
MyDocument.hfile should look like this.#import <Cocoa/Cocoa.h>
#import <QTKit/QTKit.h>
@interface MyDocument : NSDocument
@property(retain) QTMovie *movie;
@end
Save the file.
In the implementation (.m) file of your Xcode project, set the contents of your movie document. To begin with, you open the
MyDocument.mimplementation file.Set a URL location for obtaining the contents of your movie document and use the
setMovie:method to set the document’s movie to be theQTMovieobject you just created.Scroll down to the block of code that includes the
- (BOOL)readFromData:method.Replace that block of code with the following code in the next step.
- (BOOL)readFromURL:(NSURL *)absoluteURL ofType:(NSString *)typeName error:(NSError **)outError
{QTMovie *newMovie = [QTMovie movieWithURL:absoluteURL error:outError];
if (newMovie) {[self setMovie:newMovie];
}
return (newMovie != nil);
}
Add the
@synthesizedirective to generate the getter and setter methods you need and to complete your implementation.@synthesize movie;
Deallocate memory.
- (void)dealloc
{QTMovie *movie = [self movie];
[self setMovie:nil];
[super dealloc];
}
Save your file.
Launch Interface Builder 3.2.
Open the
MyDocument.xibfile.Because of the integration between Xcode 3.2 and Interface Builder 3.2, the methods you declared in your
MyDocument.hfile have been kept in sync with Interface Builder 3.2.In Interface Builder 3.2, select Tools > Library to open a library of plug-in objects.
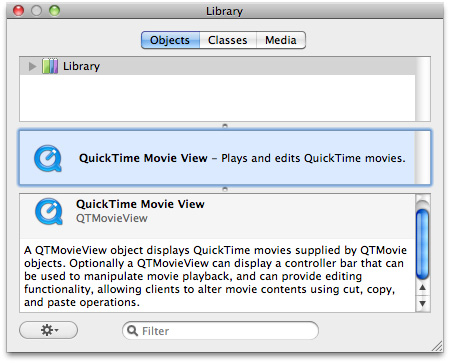
Scroll down until you find the QuickTime Movie View object in the objects library, as shown in Figure 1-5.
The
QTMovieViewobject provides you with an instance of a view subclass to display QuickTime movies that are supplied byQTMovieobjects in your project.Select the “Your document contents here” text object in the window and press Delete.
Drag the
QTMovieViewobject from the library into your window and resize the object to fit the window.Note that the object combines both a view and a control for playback of media.
Modify the movie view attributes, shown in Figure 1-6.
Choose Tools > Inspector.
In the Inspector panel, select the Movie View Attributes icon, which appears as the first icon in the row at the top of the panel.
Make sure the Show Controller checkbox is checked.
Figure 1-6 Movie view attributes 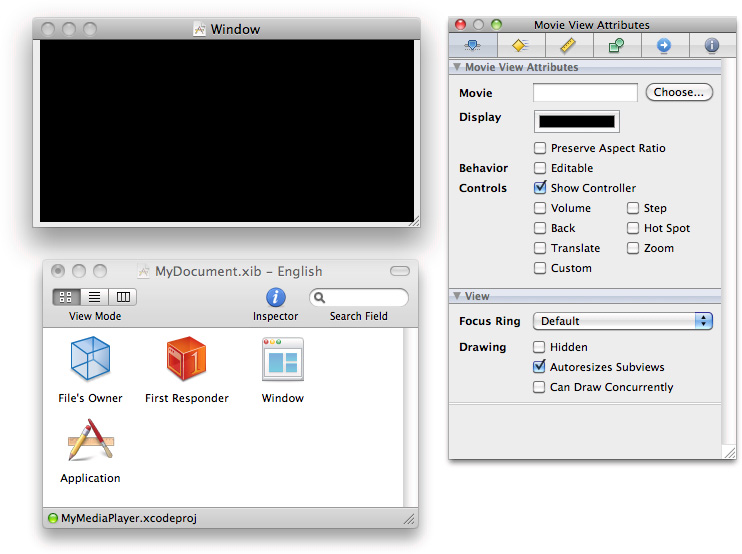
Set the autosizing for the
QTMovieViewobject in the Movie View Size, as shown in Figure 1-7.Figure 1-7 Movie view size 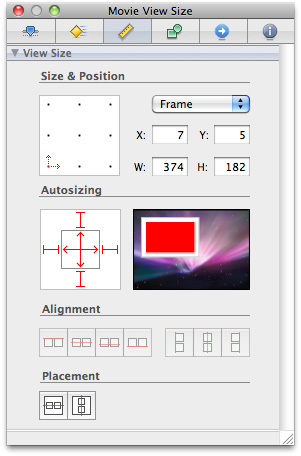
Connect the movie view object to the QuickTime movie to be displayed. You do this by defining a Cocoa binding:
In the
QTMovieViewInspector (select theQTMovieViewand open with Command-Shift-I, if needed), navigate to the Bindings panel. (You can also access it by selecting Tools > Bindings Panel.)In the Parameters section of the Bindings panel, open the movie parameter by clicking the disclosure triangle next to it.
In the “Bind to:” pull-down menu, select File’s Owner.
In the Model Key Path field, enter the text
movie, shown in Figure 1-8.Figure 1-8 Movie view bindings 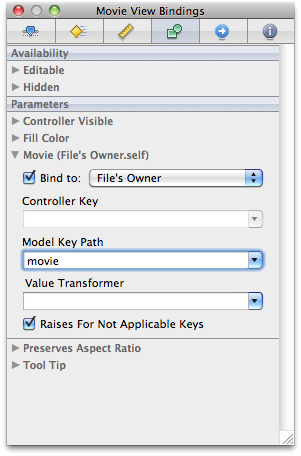
Check the “Bind to:” checkbox to save your settings.
In this case, by specifying the binding in Figure 1-8, you’ve instructed Cocoa essentially to create a connection at runtime between the object that loads the user interface—that is, the File’s Owner object—and the
QTMovieViewobject. This connection provides theQTMovieViewobject with a reference to the QuickTime movie that is to be opened and displayed.Save your
MyDocument.xibfile in Interface Builder and return to your Xcode project.After you’ve completed this sequence of steps, you simply build and run the
MyMediaPlayerproject in Xcode. When the player launches, you can open and play any QuickTime movie of your choice. Simply locate a.movfile and launch the movie from the File > Open menu in your media player application.
Media Editing Methods
QTKit provides four QTMovieView methods for editing movies. These are
add:. An action method that lets you add the contents of the clipboard to the movie at the current movie time.addScaled:. An action method that lets you add the contents of the clipboard to the movie, scaled to fit into the current movie selection.replace:. An action method that replaces the current movie selection with the contents of the clipboard. If there is no selection, the contents of the clipboard replace the entire movie.trim:. An action method that lets you trim the movie to the current movie selection. If there is no selection, the current frame is retained and the remainder of the movie is deleted.
To enable editing capabilities in your sample media player application, you add this line of code inside the block of code beginning with the readFromURL:ofType:error: method.
[newMovie setAttribute:[NSNumber numberWithBool:YES] forKey:QTMovieEditableAttribute]; |
The complete block of code to support editing is shown as follows:
- (BOOL)readFromURL:(NSURL *)absoluteURL ofType:(NSString *)typeName error:(NSError **)outError |
{ |
QTMovie *newMovie = [QTMovie movieWithURL:absoluteURL error:outError]; |
if (newMovie) { |
[newMovie setAttribute:[NSNumber numberWithBool:YES] forKey:QTMovieEditableAttribute]; |
[self setMovie:newMovie]; |
} |
return (newMovie != nil); |
} |
By calling the setAttribute:forKey: method and using the QTMovie editable attribute, you’ve marked the movie as editable. This means that any editing operations you choose, such as cut, copy, and paste, can be performed on the movie itself. The value for this key is of type NSNumber, interpreted as a Boolean value. If the movie can be edited, the value is YES. You use attributes to specify and perform a large number of media-processing tasks (some of which are shown in Table 1-3).
The readFromURL:ofType:error: method enables you to set the contents of the document by reading from a file or file package, of a specified type, located by a URL.
Saving a Movie
To save a movie, you do this:
- (IBAction)saveDocument:(id)sender |
{ |
[[movieView movie] updateMovieFile]; |
[self updateChangeCount:NSChangeCleared]; |
} |
Creating an Empty Movie File
To create an empty movie file and place a movie into the file, do this:
QTMovie *movie = nil; |
NSImage *image = nil; |
NSDictionary *attrs = nil; |
movie = [[QTMovie alloc] initToWritableFile:fileName error:NULL]; |
image = [NSImage imageNamed:@"myImage"]; |
attrs = [NSDictionary dictionaryWithObject:@"jpeg" |
forKey:QTAddImageCodecType]; |
[movie addImage:image |
forDuration:QTMakeTime(3, 1) |
withAttributes:attrs]; |
[movie updateMovieFile]; |
Getting a Movie Frame Image
To get an image for a movie frame at a specific time, you simply use the frameImageAtTime:withAttributes:error: method, which accepts a dictionary of attributes..
- (void *)frameImageAtTime:(QTTime)time |
withAttributes:(NSDictionary *)attributes |
error:(NSError **)errorPtr; |
The dictionary of attributes may contain the following keys:
QTMovieFrameImageSize |
QTMovieFrameImageType |
QTMovieFrameImageRepresentationsType |
QTMovieFrameImageOpenGLContext |
QTMovieFrameImagePixelFormat |
QTMovieFrameImageDeinterlaceFields |
QTMovieFrameImageHighQuality |
QTMovieFrameImageSingleField |
Refer to QTMovie.h and the QTKit Framework Reference for additional information about these attributes.
For the QTMovieFrameImageType attribute, some of the possible values are
QTMovieFrameImageTypeNSImage |
QTMovieFrameImageTypeCGImageRef |
QTMovieFrameImageTypeCIImage |
QTMovieFrameImageTypeCVPixelBufferRef |
QTMovieFrameImageTypeCVOpenGLTextureRef |
If you want to get a CGImage for a movie frame at a given time, you ask for a particular image type (NSImage is the default, and the default representation is NSBitmapImageRep):
NSDictionary *dict = [NSDictionary |
dictionaryWithObject:QTMovieFrameImageTypeCGImageRef |
forKey:QTMovieFrameImageType]; |
QTTime time = [movie currentTime]; |
CGImageRef theImage = (CGImageRef)[movie frameImageAtTime:time |
withAttributes:dict error:NULL]; |
Applying Core Image Filters to a Movie
QTKit is designed to work with a number of other OS X graphics and media technologies, as discussed in Graphics and Media Layer in OS X. These media technologies, which include Core Audio, Core Animation, Quartz 2D, Open GL, and Core Image, provide you with a powerful set of tools for multimedia application development.
For example, what if you used QTKit to apply a Core Image filter to the playback of a QuickTime movie? The effects of applying that filter could be quite stunning and visually exciting.
Core Image is an Objective-C framework, like QTKit, but primarily with an API for image processing. It comes bundled with a long list of filters that your application can use to perform such tasks as:
Enhancing and modifying still images
Processing RAW photos
Generating an array of effects on live video playback
The MyMovieFilter, which is available in OS X v10.5, is a sample code application that demonstrates how to play a movie into a layer-backed QTMovieView and apply a Core Image filter while the movie is playing.
You follow these steps to construct the MyMovieFilter application.
Create a Cocoa-document based project.
In your declaration file, create an instance of the
QTMovieobject and an outlet for aQTMovieView.@interface MyDocument : NSDocument
{QTMovie *mMovie;
IBOutlet QTMovieView *mMovieView;
Declare an instance variable
mCIFilterthat points to aCIFilterobject.CIFilter *mCIFilter;
Declare an instance variable
mVideoPreviewFilterthat points to an object of typeNSString.NSString *mVideoPreviewFilter;
}
In your implementation file, declare the
-availableFiltersinstance method@"VideoPreviewFilter"property that returns anNSArrayreturn value. This is an array of CIFilters that you use to display the Filter pop-up menu.- (NSArray *)availableFilters
{return [NSArray arrayWithObjects:
@"CIKaleidoscope",
@"CIGaussianBlur",
@"CIZoomBlur",
@"CIColorInvert",
@"CISepiaTone",
@"CIBumpDistortion",
@"CICircularWrap",
@"CIHoleDistortion",
@"CITorusLensDistortion",
@"CITwirlDistortion",
@"CIVortexDistortion",
@"CICMYKHalftone",
@"CIColorPosterize",
@"CIDotScreen",
@"CIHatchedScreen",
@"CIBloom",
@"CICrystallize",
@"CIEdges",
@"CIEdgeWork",
@"CIGloom",
@"CIPixellate",
nil];
}
You bind the method to the pop-up menu in Interface Builder, as shown in Figure 1-9.
Figure 1-9 Binding to File’s Owner 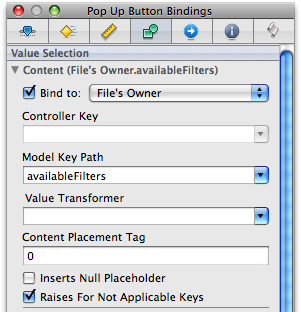
Return the
NSStringobject associated with themVideoPreviewFilterinstance variable. That is the getter method that returns the current filter selection.- (NSString *)videoPreviewFilter
{return mVideoPreviewFilter;
}
Note that in the Core Image API, filters are specified as strings, so that string identifiers are used as keys to filter names.
In Interface Builder, you enable Core Animation rendering by simply checking the box that enables you to apply a Core Animation layer to your
QTMovieViewobject. This binds it to thevideoPreviewFilter.Finally, you add this line of code to your
setVideoPreviewFiltermethod block in your implementation file:[[mMovieView layer] setFilters:[NSArray arrayWithObject:mCIFilter]];
Opting For Layer Backing
You have a QTMovieView object that opts for layer backing. This means that instead of the standard NSView backing model, it uses Core Animation to do its rendering.
Because the QTMovieView object now uses a layer, rendering video into a layer, it has all the services that layers are entitled to, including the ability to apply a Core Image filter to that layer. That service is part of the CALayer interface. If you look at the CALayer.h header file, you find a property for applying a CIFilter to it.
In this case, you’ve taken your QTMovieView and said this wants to be a layer now, so it behaves like every other Core Animation layer. Then you’ve specified a CIFilter, which you would like you to apply to this layer.
Working With Core Animation Layers
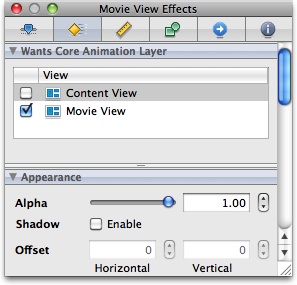
Technically, layer-backed views use Core Animation layers as their backing store. Enabling layer-backing for the view (and its descendants) in this particular code sample is accomplished via Interface Builder by setting the Wants Core Animation Layer check box on the Movie View in the Movie View Effects Inspector Panel (shown in Figure 1-10).
When layer backing is enabled for a view, the view and all its subviews are, in effect, mirrored by a Core Animation layer tree. The view and its subviews still take part in the responder-chain, still receive events, and act as any other view. However, when redrawing needs to be done and the content has not changed, the render tree handles the redraw rather than the application.
Aside from providing cached redrawing, layer-backed views expose a number of the advanced visual properties of Core Animation layer properties, including:
Control over the view’s opacity
An optional shadow, specified using an
NSShadowobjectAn optional array of Core Image filters that are applied to the content behind a view before its content is composited
A Core Image filter used to composite the view’s contents with the background
An optional array of Core Image filters that are applied to the contents of the view and its subviews
Notably, this sample takes advantage of the advanced Core Animation layer visual properties and applies a Core Image filter to the contents of the QTMovieView to achieve a cool visual effect.
When you launch the application, a document window is automatically displayed showing a preselected movie. You press the Play button and the movie starts playing. You press the Pause button and the movie will stop. A pop-up menu is provided to allow you to select a Core Image filter in to apply to the movie, shown in Figure 1-11. After launch, the filter default is set to No Value.
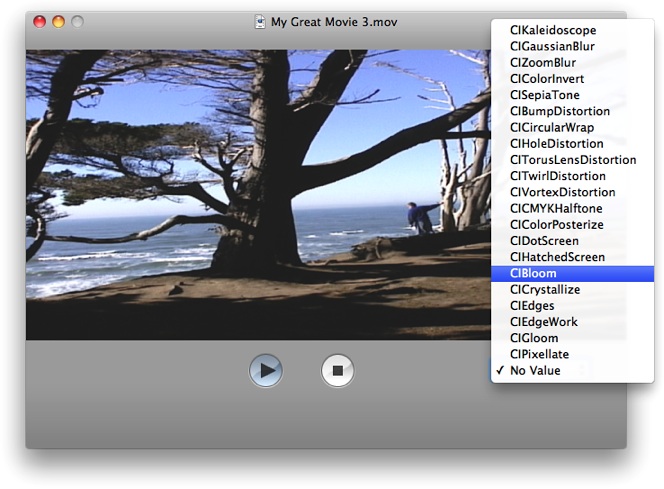
You then select a filter of your choice while the movie is playing or stopped and the filter will automatically be applied to the movie. You can even change the filter while the movie is playing.
Integrating Multimedia in OS X
QTKit can be used as the audio/video playback engine of choice for working with and building applications with other graphics and imaging frameworks in OS X.
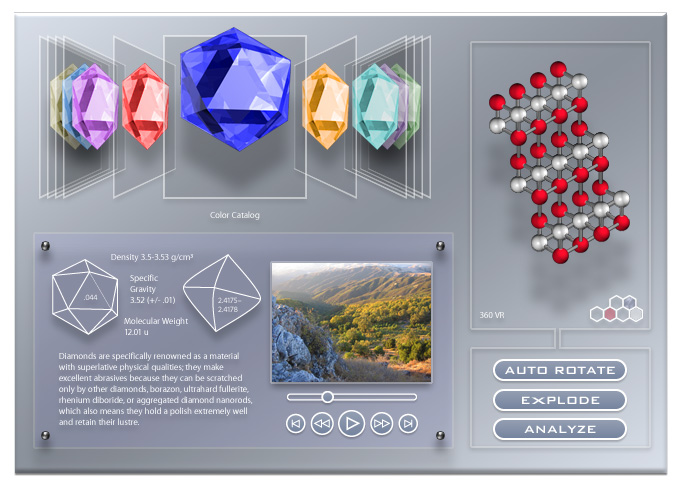
For example, you could use Core Animation with multiple QTMovieLayer objects for video compositing in conjunction with playback in QTKit. By applying Core Image filters to the playback of video media, you can take advantage of Core Animation layer-backing support, as demonstrated in Applying Core Image Filters to a Movie. Using the tools and graphics frameworks provided in OS X, you could construct media-rich, immersive environments such as the multimedia kiosk depicted in Figure 1-12.
In that environment, the user has the ability to interact with the media content, and to perceive that content from a number of different angles and dimensions. Ultimately, the experience becomes immersive for the user, in that it is possible to interact on multiple levels with the content of the presentation.
Copyright © 2016 Apple Inc. All Rights Reserved. Terms of Use | Privacy Policy | Updated: 2016-08-26