Retired Document
Important: The use of iCloud with Core Data has been deprecated and is no longer being supported.
Using the iCloud Debugging Tools
Xcode, iOS, and OS X include tools that help you analyze and interpret changes in iCloud on your device and in the cloud. Solve common integration problems using the information in this chapter along with the guidance in Troubleshooting.
Understanding the iCloud Report
The iCloud Report gives you a detailed overview of your app’s ubiquity container. The Transfer Activity timeline provides a broad overview of the changes being transferred over the network, and the Documents section lists the status of individual files.
Interpreting Transfer Activity
The iCloud Report displays the bandwidth usage of iCloud over time for your app. Green bars indicate that transaction logs or other miscellaneous requests have been sent from the currently attached peer to iCloud, and blue bars indicate that transactions logs and requests have been received from iCloud. You use the Transfer Activity timeline to:
Find out when your app is about to receive an iCloud event
Check that your app is properly communicating with iCloud
Optimize the frequency and timing of your managed object context saves
Store Initialization
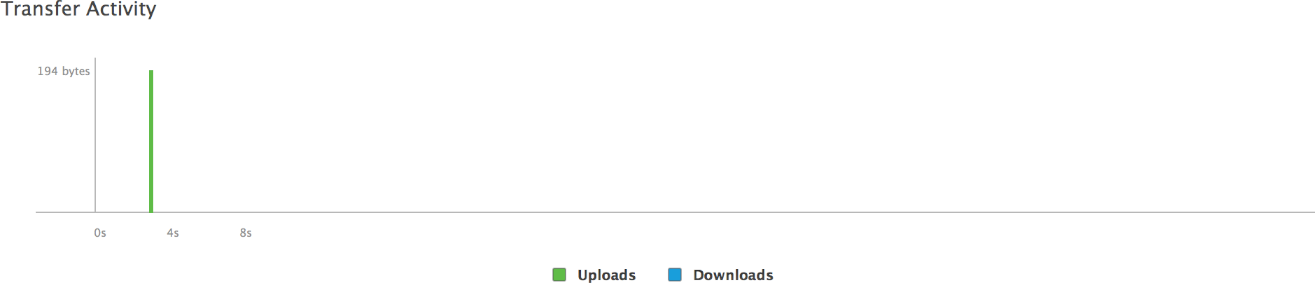
When you launch your app for the first time, Core Data and the system send metadata about your persistent store to the cloud. This is displayed as a single green upload bar, as shown in Figure 5-1 below. As this happens, Core Data will log a message containing “Using local storage: 1,” which means that your app is currently using a temporary local persistent store.
After iCloud finishes processing the request, Core Data creates an iCloud-enabled persistent store and transitions to it. Core Data posts the notifications described in iCloud Performs a One-Time Setup and logs a message containing “Using local storage: 0,” which means that your app is currently using the iCloud-enabled persistent store.
If the iCloud account already has records persisted from other peers, the system downloads the associated transaction logs from iCloud in one or more requests, as shown in Figure 5-2 below.
Content Changes
Every time you save a managed object context, Core Data records the changes in a transaction log inside your app’s ubiquity container. In the container, the transaction log is processed, and the file is uploaded to iCloud as shown in Figure 5-3 below. Core Data notifies your app, too, as discussed in Core Data Posts Content Changes from iCloud.
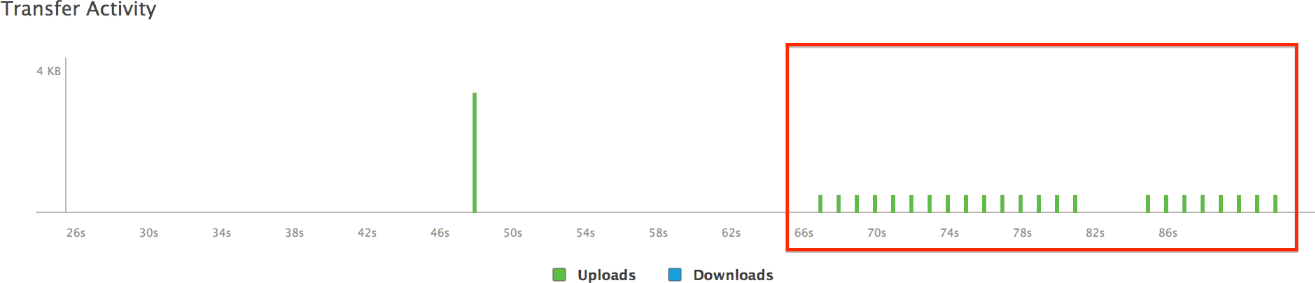
Core Data creates a transaction log every time you save your managed object context to ensure atomicity. Each transaction is uploaded from the ubiquity container to iCloud in a separate request to guarantee that each transaction log is persisted wholly in a single operation. When you save too frequently, you increase the work other peers do to import your changes. However, when you save too infrequently, large transaction logs lead to increased memory usage. For example, in Figure 5-4 below, the large cluster of small green bars indicates that your app is saving too often. You can read more about optimization in Best Practices.
After other peers persist changes to iCloud, the associated transactions are downloaded to your app’s ubiquity container, as shown in Figure 5-5 below.
Monitoring Document Status
The iCloud Report’s Documents section displays the status of files in your app’s local copy of the ubiquity container, compared with those in the copy in the cloud. Table 5-1 describes these document states. The files Core Data creates are an implementation detail, but you can generally infer the state of the device by comparing the number of transaction logs on two devices and by monitoring file status changes.
Status | Description |
|---|---|
Current | The most up-to-date version of the file is in iCloud. |
Stored in Cloud | The file is in iCloud. |
Data Not Present | The file is not yet in iCloud. |
Excluded | The file is set not to upload to iCloud. |
Has Revisions | The file has multiple versions. |
Enabling iCloud Debug Logging
While the iCloud Report is typically sufficient, occasionally it can be helpful to take a look at more detailed information. When you need in-depth iCloud logs, follow the steps below.
On iOS
Install the iCloud Storage Debug Logging Profile on your iOS device.
Restart your device.
Reproduce the issue.
Sync your device with iTunes.
Retrieve the iCloud device logs from
~/Library/Logs/CrashReporter/MobileDevice/device-name/DiagnosticLogs.Open the Settings app and delete the profile to turn off logging.
On OS X
Open Terminal and run
ubcontrol -k 7to enable logging.Retrieve the iCloud logs from
~/Library/Logs/Ubiquity.Open Terminal and run
ubcontrol -k 1to turn off logging.
Copyright © 2017 Apple Inc. All Rights Reserved. Terms of Use | Privacy Policy | Updated: 2017-06-06