Subclassing CIFilter: Recipes for Custom Effects
You can create custom effects by using the output of one image filter as the input of another, chaining as many filters together as you’d like. When you create an effect this way that you want to use multiple times, consider subclassing CIFilter to encapsulate the effect as a filter.
This chapter shows how Core Image subclasses CIFilter to create the CIColorInvert filter. Then it describes recipes for chaining together a variety of filters to achieve interesting effects. By following the subclassing procedure in Subclassing CIFilter to Create the CIColorInvert Filter, you should be able to create filters from the recipes in this chapter or venture forth to create your own interesting combinations of the built-in filters provided by Core Image.
Subclassing CIFilter to Create the CIColorInvert Filter
When you subclass CIFilter you can modify existing filters by coding them with preset values or by chaining them together. Core Image implements some of its built-in filters using this technique.
To subclass a filter you need to perform the following tasks:
Declare properties for the filter’s input parameters. You must prefix each input parameter name with
input, such asinputImage.Override the
setDefaultsmethod, if necessary. (It’s not necessary in this example because the input parameters are set values.)Override the
outputImagemethod.
The CIColorInvert filter provided by Core Image is a variation on the CIColorMatrix filter. As its name suggests, CIColorInvert supplies vectors to CIColorMatrix that invert the colors of the input image. Follow the simple example shown in Listing 5-1 and Listing 5-2 to build your own filters.
Listing 5-1 The interface for the CIColorInvert filter
@interface CIColorInvert: CIFilter { |
CIImage *inputImage; |
} |
@property (retain, nonatomic) CIImage *inputImage; |
@end |
Listing 5-2 The outputImage method for the CIColorInvert filter
@implementation CIColorInvert |
@synthesize inputImage; |
- (CIImage *) outputImage |
{ |
CIFilter *filter = [CIFilter filterWithName:@"CIColorMatrix" |
withInputParameters: @{ |
kCIInputImageKey: inputImage, |
@"inputRVector": [CIVector vectorWithX:-1 Y:0 Z:0], |
@"inputGVector": [CIVector vectorWithX:0 Y:-1 Z:0], |
@"inputBVector": [CIVector vectorWithX:0 Y:0 Z:-1], |
@"inputBiasVector": [CIVector vectorWithX:1 Y:1 Z:1], |
}]; |
return filter.outputImage; |
} |
Chroma Key Filter Recipe
Removes a color or range of colors from a source image and then composites the source image with a background image.
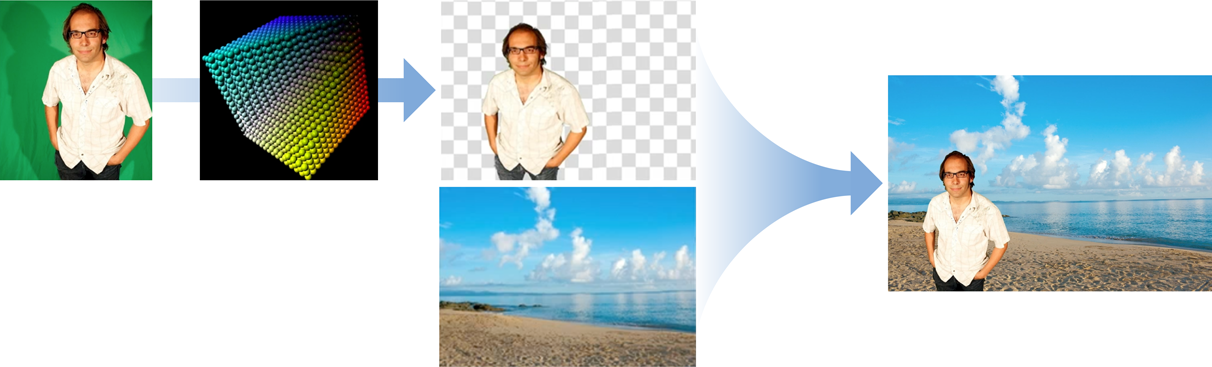
To create a chroma key filter:
Create a cube map of data that maps the color values you want to remove so they are transparent (alpha value is 0.0).
Use the CIColorCube filter and the cube map to remove chroma-key color from the source image.
Use the CISourceOverCompositing filter to blend the processed source image over a background image
The sections that follow show how to perform each step.
Create a Cube Map
A color cube is a 3D color lookup table. The Core Image filter CIColorCube takes color values as input and applies a lookup table to the values. The default lookup table for CIColorCube is an identity matrix—meaning that is does nothing to its supplied data. However, this recipe requires that you remove all green from the image. (You can remove a different color if you’d like.)
You need to remove all the green from the image by setting green to alpha = 0.0, which makes it transparent. “Green” encompasses a range of colors. The most straightforward way to proceed is to convert the color values in the image from RGBA to HSV values. In HSV, hue is represented as an angle around the central axis of a cylinder. In that representation, you can visualize color as a pie slice and then simply remove the slice that represents the chroma-key color.
To remove green, you need to define the minimum and maximum angles around the central access that contain green hues. Then, for anything that’s green, you set its alpha value to 0.0. Pure green is at a value corresponding to 120º. The minimum and maximum angles need to center around that value.
Cube map data must be premultiplied alpha, so the final step for creating the cube map is to multiply the RGB values by the alpha value you just computed, which is either 0.0 for green hues or 1.0 otherwise. Listing 5-3 shows how to create the color cube needed for this filter recipe.
Listing 5-3 The color cube in code
// Allocate memory |
const unsigned int size = 64; |
float *cubeData = (float *)malloc (size * size * size * sizeof (float) * 4); |
float rgb[3], hsv[3], *c = cubeData; |
// Populate cube with a simple gradient going from 0 to 1 |
for (int z = 0; z < size; z++){ |
rgb[2] = ((double)z)/(size-1); // Blue value |
for (int y = 0; y < size; y++){ |
rgb[1] = ((double)y)/(size-1); // Green value |
for (int x = 0; x < size; x ++){ |
rgb[0] = ((double)x)/(size-1); // Red value |
// Convert RGB to HSV |
// You can find publicly available rgbToHSV functions on the Internet |
rgbToHSV(rgb, hsv); |
// Use the hue value to determine which to make transparent |
// The minimum and maximum hue angle depends on |
// the color you want to remove |
float alpha = (hsv[0] > minHueAngle && hsv[0] < maxHueAngle) ? 0.0f: 1.0f; |
// Calculate premultiplied alpha values for the cube |
c[0] = rgb[0] * alpha; |
c[1] = rgb[1] * alpha; |
c[2] = rgb[2] * alpha; |
c[3] = alpha; |
c += 4; // advance our pointer into memory for the next color value |
} |
} |
} |
// Create memory with the cube data |
NSData *data = [NSData dataWithBytesNoCopy:cubeData |
length:cubeDataSize |
freeWhenDone:YES]; |
CIColorCube *colorCube = [CIFilter filterWithName:@"CIColorCube"]; |
[colorCube setValue:@(size) forKey:@"inputCubeDimension"]; |
// Set data for cube |
[colorCube setValue:data forKey:@"inputCubeData"]; |
Remove green from the source image
Now that you have the color map data, supply the foreground image—the one you want the green removed from—to the CIColorCube filter and get the output image.
[colorCube setValue:myInputImage forKey:kCIInputImageKey]; |
CIImage *result = [colorCube valueForKey:kCIOutputImageKey]; |
Blend the processed source image over a background image
Set the input parameters of the CISourceOverCompositing filter as follows:
Set
inputImageto the image produced from the CIColorCube filter.Set
inputBackgroundImageto the image that shows the new background. This example uses a beach image.
The foreground image now appears as if it is on the beach.
White Vignette for Faces Filter Recipe
Increases the brightness of an image at the periphery of a face detected in an image.

To create a white vignette filter:
Find the human face in an image.
Create a base shade map using CIRadialGradient centered on the face.
Blend the base shade map with the original image.
The sections that follow show how to perform each step.
Find the Face
Use the CIDetector class to locate a face in an image. The first item in the array that featuresInImage:options: returns is the face the filter operates on. After you have the face, calculate the center of the face from the bounds provided by the detector. You need the center value to create the shade map. Listing 5-4 shows how to locate a face using CIDetector.
Listing 5-4 Using CIDetector to locate one face
CIDetector *detector = [CIDector detectorOfType:CIDetectorTypeFace |
context:nil |
options:nil]; |
NSArray *faceArray = [detector featuresInImage:image options:nil]; |
CIFeature *face = faceArray[0]; |
CGFloat xCenter = face.bounds.origin.x + face.bounds.size.width/2.0; |
CGFloat yCenter = face.bounds.origin.y + face.bounds.size.height/2.0; |
CIVector *center = [CIVector vectorWithX:xCenter Y:yCenter]; |
Create a Shade Map
Use the CIRadialGradient filter to create a shade map centered on the face. The center of the shade map should be transparent so that the face in the image remains untouched. The edges of the map should be opaque white. Areas in between should have varying degrees of transparency.
To achieve this effect, set the input parameters to CIRadialGradient as follows:
Set
inputRadius0to a value larger than the longest dimension of the the image.Set
inputRadius1to a value larger than the face, such asface.bounds.size.height + 50.Set
inputColor0to opaque white.Set
inputColor1to transparent white.Set the
inputCenterto the center of the face bounds that you computed with Listing 5-4.
Blend the Gradient with the Face
Set the input parameters of the CISourceOverCompositing filter as follows:
Set
inputImageto the original image.Set
inputBackgroundImageto the shade map produced in the last step.
Tilt-Shift Filter Recipe
Selectively focuses an image to simulate a miniature scene.
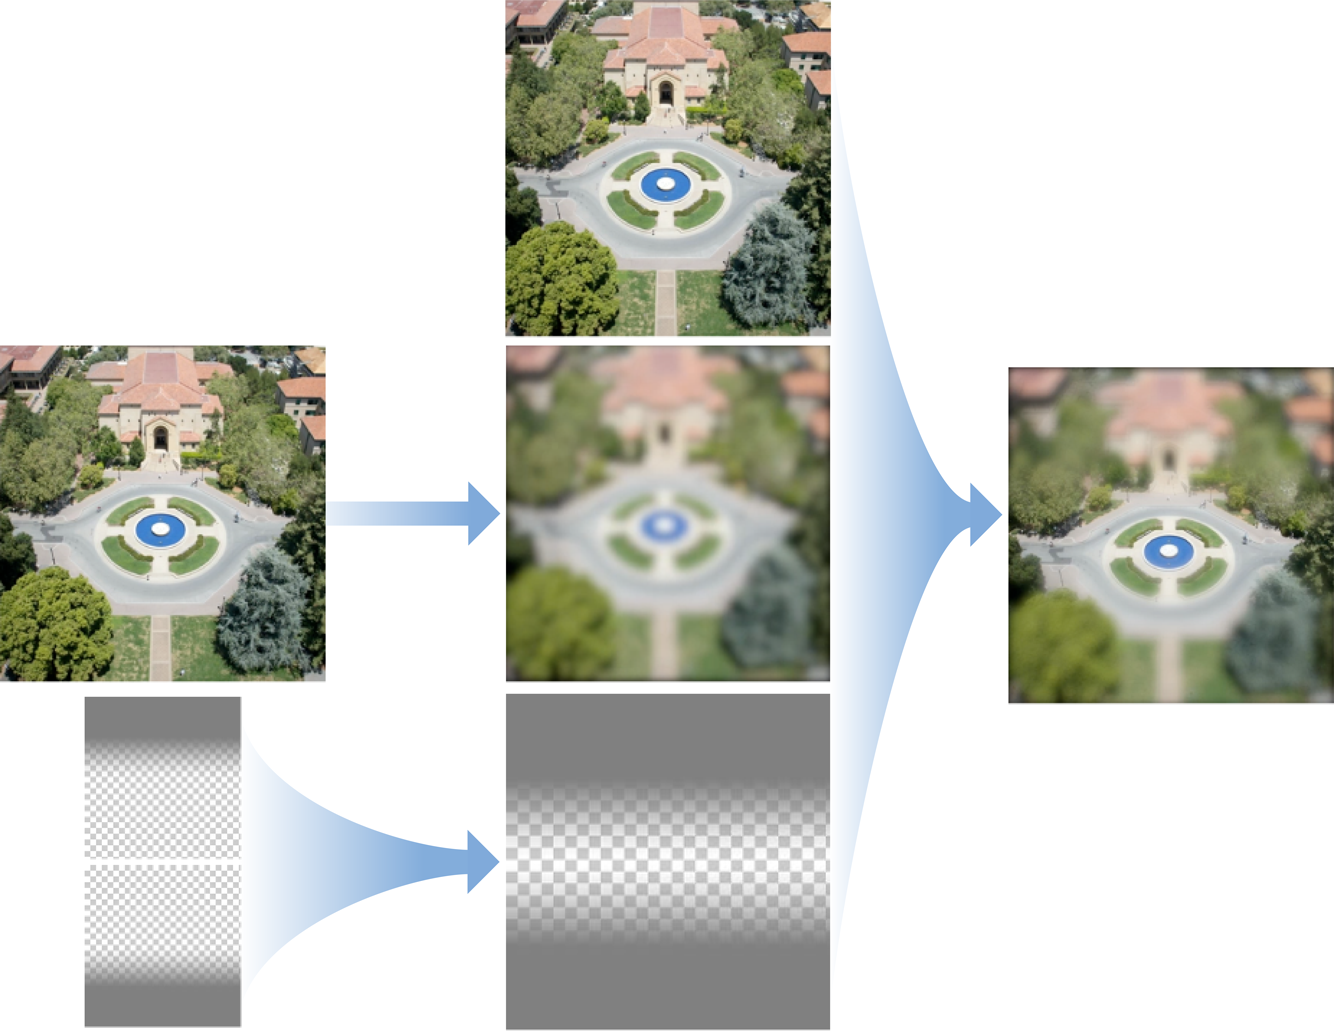
To create a tilt-shift filter :
Create a blurred version of the image.
Create two linear gradients.
Create a mask by compositing the linear gradients.
Composite the blurred image, the mask, and the original image.
The sections that follow show how to perform each step.
Create a Blurred Version of the image
Set the input parameters of the CIGaussianBlur filter as follows:
Set
inputImageto the image you want to process.Set
inputRadiusto 10.0 (which is the default value).
Create Two Linear Gradients
Create a linear gradient from a single color (such as green or gray) that varies from top to bottom. Set the input parameters of CILinearGradient as follows:
Set
inputPoint0to (0, 0.75 * h)Set
inputColor0to (0,1,0,1)Set
inputPoint1to (0, 0.5*h)Set
inputColor1to (0,1,0,0)
Create a green linear gradient that varies from bottom to top. Set the input parameters of CILinearGradient as follows:
Set
inputPoint0to (0, 0.25 * h)Set
inputColor0to (0,1,0,1)Set
inputPoint1to (0, 0.5*h)Set
inputColor1to (0,1,0,0)
Create a Mask from the Linear Gradients
To create a mask, set the input parameters of the CIAdditionCompositing filter as follows:
Set
inputImageto the first linear gradient you created.Set
inputBackgroundImageto the second linear gradient you created.
Combine the Blurred Image, Source Image, and the Gradients
The final step is to use the CIBlendWithMask filter, setting the input parameters as follows:
Set
inputImageto the blurred version of the image.Set
inputBackgroundImageto the original, unprocessed image.Set
inputMaskImageto the mask, that is, the combined gradients.
The mask will affect only the outer portion of an image. The transparent portions of the mask will show through the original, unprocessed image. The opaque portions of the mask allow the blurred image to show.
Anonymous Faces Filter Recipe
Finds faces in an image and pixellates them so they can’t be recognized.
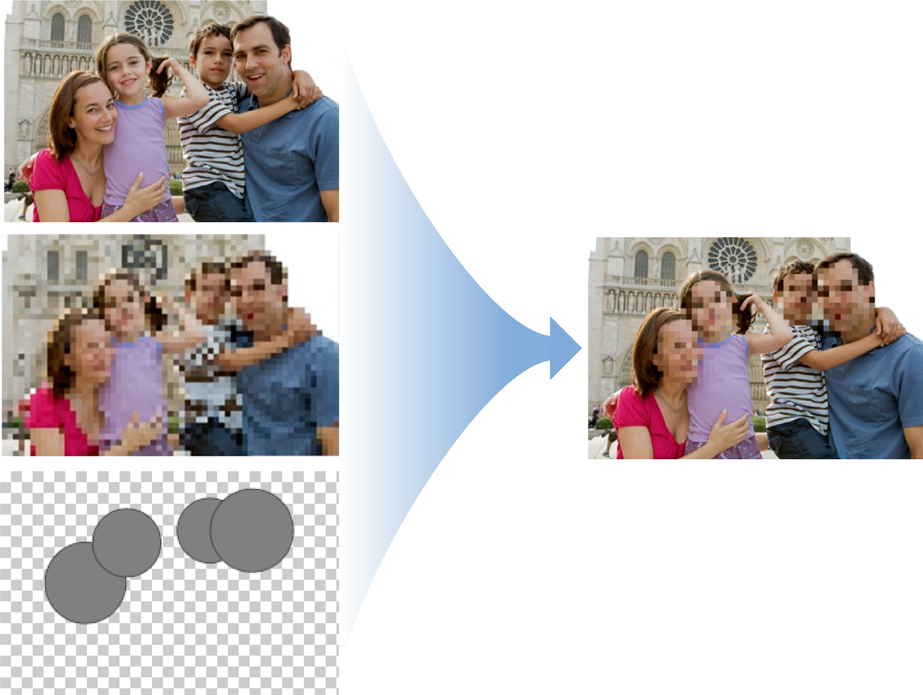
To create an anonymous faces filter:
Create a pixellated version of the image.
Build a mask using the faces detected in the image.
Blend the pixellated image with the original image using the mask.
The sections that follow show how to perform each step.
Create a Pixellated version of the image
Set the input parameters of the CIPixellate filter as follows:
Set
inputImageto the image that contains the faces.Set
inputScaletomax(width, height)/60or another value that seems pleasing to you, wherewidthandheightrefer to the image’s width and height.
Build a Mask From the Faces Detected in the Image
Use the CIDetector class for find the faces in the image. For each face:
Use the
CIRadialGradientfilter to create a circle that surrounds the face.Use the
CISourceOverCompositingfilter to add the gradient to the mask.
Listing 5-5 Building a mask for the faces detected in an image
CIDetector *detector = [CIDetector detectorOfType:CIDetectorTypeFace |
context:nil |
options:nil]; |
NSArray *faceArray = [detector featuresInImage:image options:nil]; |
// Create a green circle to cover the rects that are returned. |
CIImage *maskImage = nil; |
for (CIFeature *f in faceArray) { |
CGFloat centerX = f.bounds.origin.x + f.bounds.size.width / 2.0; |
CGFloat centerY = f.bounds.origin.y + f.bounds.size.height / 2.0; |
CGFloat radius = MIN(f.bounds.size.width, f.bounds.size.height) / 1.5); |
CIFilter *radialGradient = [CIFilter filterWithName:@"CIRadialGradient" withInputParameters:@{ |
@"inputRadius0": @(radius), |
@"inputRadius1": @(radius + 1.0f), |
@"inputColor0": [CIColor colorWithRed:0.0 green:1.0 blue:0.0 alpha:1.0], |
@"inputColor1": [CIColor colorWithRed:0.0 green:0.0 blue:0.0 alpha:0.0], |
kCIInputCenterKey: [CIVector vectorWithX:centerX Y:centerY], |
}]; |
CIImage *circleImage = [radialGradient valueForKey:kCIOutputImageKey]; |
if (nil == maskImage) |
maskImage = circleImage; |
else |
maskImage = [[CIFilter filterWithName:@"CISourceOverCompositing" withInputParameters:@{ |
kCIInputImageKey: circleImage, |
kCIInputBackgroundImageKey: maskImage, |
}] valueForKey:kCIOutputImageKey]; |
} |
Blend the Pixellated Image, the Mask, and the Original Image
Set the input parameters of the CIBlendWithMask filter to the following:
Set
inputImageto the pixellated version of the image.Set
inputBackgroundImageto the original image.Set
inputMaskImageto to the composited green circles.
Pixellate Transition Filter Recipe
Transitions from one image to another by pixelating each image.
To create a pixellate-transition filter:
Use CIDissolveTransition to transition between the source and destination images.
Pixellate the result of the transition filter.
The sections that follow show how to perform each step.
Create a Dissolve Transition
Set the input parameters of the CIDissolveTransition filter as follows:
Set
inputImageto the image from which you want to transition.Set
inputTagetImageto the image to which you want to transition.Set
inputTimeto a value similar tomin(max(2*(time - 0.25), 0), 1), which is a ramp function that’s clamped between two values.
Pixellate the Result of the Transition
Set the CIPixellate filter to vary the scale of the pixels over time by setting its input parameters as:
Set
inputImageto the output image from the CIDissolveTransition filter.Set
inputScaleto change over time by supplying values from a triangle function:90*(1 - 2*abs(time - 0.5))Use the default value for
inputCenter.
Old Film Filter Recipe
Decreases the quality of a video image to make it look like an old, scratchy analog film.
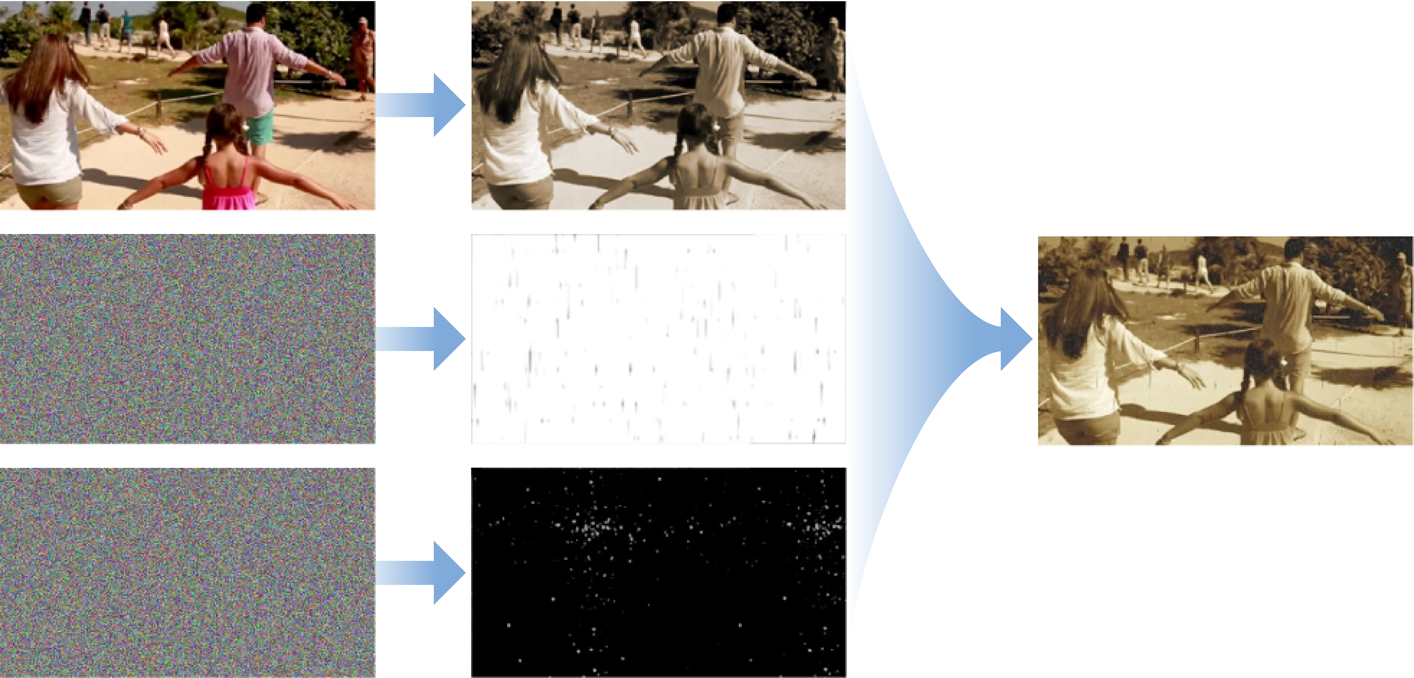
To create an old-film filter:
Apply the CISepiaTone filter to the original video image.
Create randomly varying white specks.
Create randomly varying dark scratches.
Composite the specks and scratches onto the sepia-toned image.
The sections that follow show how to perform each step.
Apply Sepia to the Video Image
Set the input parameters of the CISepiaTone as follows:
Set
inputImageto the video image to apply the effect to.Set
inputIntensityto 1.0.
Create Randomly Varying White Specks
Use the CIRandomGenerator filter, which produces colored noise. It does not have any input parameters.
To process the noise so that you get only white specks, use the CIColorMatrix filter with the input parameters set as follows:
Set
inputImageto the output produced by the random generator.Set
inputRVector,inputGVector, andinputBVectorto (0,1,0,0).Set
inputBiasVectorto (0,0,0,0).
Use the CISourceOverCompositing filter to blend the specks with the video image by setting the filter’s input parameters as follows:
Set
inputImageto the white-specks image produced by the CIColorMatrix filter.Set
inputBackgroundImageto the image produced by the CISepiaTone filter.
Create Randomly Varying Dark Scratches
Use the CIRandomGenerator filter again to generate colored noise. Then process its output using the CIAffineTransform filter with these input parameters:
Set
inputImageto the noise generated by the CIRandomGenerator filter.Set
inputTransformto scale x by 1.5 and y by 25. This makes the pixels thick and long, but they will still be colored.
An alternative to using CIAffineTransform is to transform the noise using the imageByApplyingTransform: method.
To make the pixels dark, set the input parameters of the CIColorMatrix filter as follows:
Set
inputImageto the transformed video image.Set
inputRVectorto (4,0,0,0).Set
inputGVector,inputBVector, andinputAVectorto (0,0,0,0).Set
inputBiasVectorto (0,1,1,1).
This results in cyan-colored scratches.
To make the scratches dark, apply the CIMinimumComponent filter to the cyan-colored scratches. This filter uses the minimum value of the r,g,b, values to produce a grayscale image.
Composite the Specks and Scratches to the Sepia Video Image
Set the input parameters of the CIMultiplyCompositing filter as follows:
Set
inputBackgroundImageto the processed video image (sepia tone, white specks).Set
inputImageto the dark scratches, that is, the output from the CIMinimumComponent filter.
Copyright © 2004, 2016 Apple Inc. All Rights Reserved. Terms of Use | Privacy Policy | Updated: 2016-09-13