Creating Tables
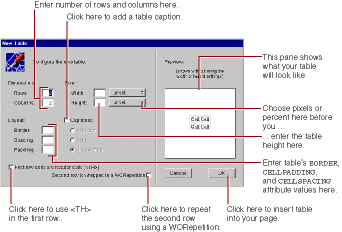
To create a table, click ![]() from the toolbar. The table panel appears, which allows you to configure the table before you insert it.
from the toolbar. The table panel appears, which allows you to configure the table before you insert it.

To change the number of rows or columns in the table, use the Dimensions fields. When you press Enter, the preview pane shows what your table will look like.
To change the width of the table, select a unit for the width (pixels or percent) in the Width pop-up list. Enter the width in the Width field, which is now active. The preview pane is not affected by the table width setting.
To change the height of the table, select pixels in the Height pop-up list. Enter the height in the Height field, which is now active. The preview pane is affected by the table height setting.
To add a caption to the table, click the Captioned checkbox. You can choose whether you want the caption at the top, at the bottom, or wherever the user's browser decides to put it.
To change the table's border, spacing (corresponding to the HTML CELLSPACING tag), and padding (corresponding to the HTML CELLPADDING tag) enter the appropriate sizes (in pixels) in the Layout fields.
Sometimes the first row of a table contains captions for the columns. To create a table like this, click the checkbox marked "First row cells are header cells." The first row cells are wrapped in an HTML <TH> tag instead of a <TD> tag, which will cause the cells to be printed in bold in most browsers.
To create a table whose contents depends on a repetition, click the checkbox marked "Second row is wrapped in a WORepetition." The preview pane renders the repeated row in blue.
Click OK to place the table at the insertion point.
© 1999 Apple Computer, Inc. – (Last Updated July 27 99)