Developing a Game Center-Aware Game
Adding Game Center support requires more than simple coding changes. Game Center imposes specific requirements on the design of your game. For example, to implement leaderboards, your game must have a way to quantitatively measure a player's performance. But more than that, Game Center changes how you design and test your game. You aren't simply adding code to your app; you are also configuring assets used by Game Center. These assets are configured separately from your app bundle but are intimately tied to the code in your game. You need to test these pieces to ensure that all of the pieces work correctly together.
To create a Game Center-aware game, you need to understand these basics before you begin writing code.
Supporting Game Center in Your User Interface
When you add Game Center support to your game, parts of your game’s user interface displays Game Center content. Some of this content, such as player authentication, is required. Other user interface elements, such as leaderboards, are optional, but are often expected by players.
Figure 1-1 shows an example model for a game’s user interface, shown as a series of screens and transitions between them. Not all games use this exact organization of user interface screens, but it provides a useful starting point for a discussion of how adding Game Center might alter your game’s user interface.
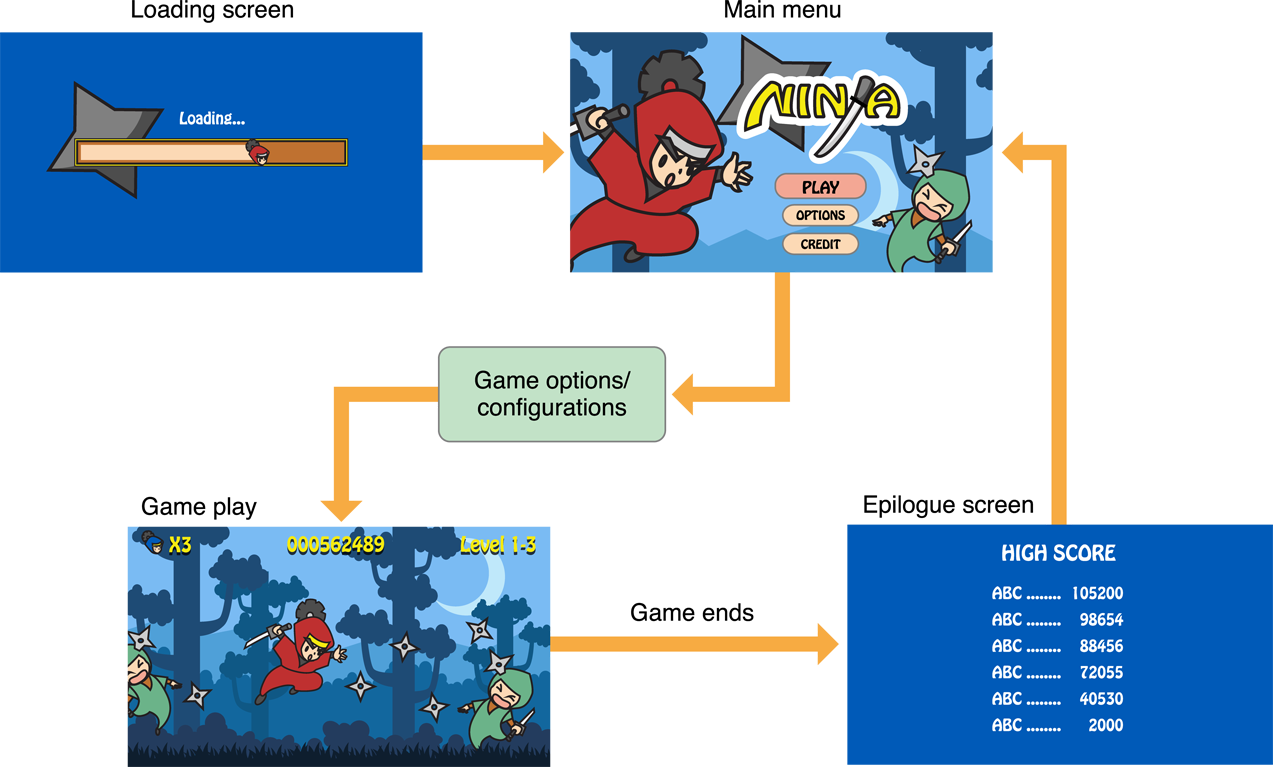
When this sample game is launched, the first thing the player sees is a loading screen. Games often require large, memory-intensive images, 3D models, sounds and game data. These resources must be accessed quickly while the game is running. Often, to accomplish this, a game loads critical resources when first launched and keeps them in memory until the app terminates. A typical loading screen displays information about the game or your company, along with a progress bar or an animated user interface while the content loads.
After the game has loaded enough resources, it transitions to a menu screen. Typically, this is the first interactive screen the player sees. The menu screen has a series of buttons that players use to launch the gameplay or other features of the game. For example, any or all of the following functions are commonly accessed from the menu screen:
Single player play mode
Multiplayer play mode
Game configuration options
Social networking services
Using the the screen flow shown in Figure 1-1, tapping the single-player Play button allows the user to choose the difficulty of the game. The purpose of this screen is to provide the player with options on how they want to play the game. Depending on the design of your game, this configuration process could be a simple interface on a single screen or a complex series of user interface screens. For example:
A chess game that allows the player the choice of color.
A puzzle game that allows the player to select a particular puzzle to play.
A role-playing game that has a series of screens that allow the player to configure a character.
The gameplay screen is where the bulk of your game logic executes. This part of your project includes rendering code, user interface interactions, and game logic that executes your game’s concept. Depending on the type of game you are implementing, your app’s gameplay can be a single screen or a series of multiple screens with transitions between them.
After the player completes a game, an epilogue screen appears to tell the player how they did. For example, a game that includes a scoring mechanism can show the player how their score was calculated. Once the player dismisses this screen, the game transitions back to the main menu.
Figure 1-2 shows the example game modified to incorporate Game Center.

All Game Center apps must authenticate the player. The authentication typically begins as soon as the user starts your game. In the sample game, the authentication process begins while the title screen is displayed. If a player is not currently signed in to Game Center, the title screen is temporarily replaced with Game Center’s authentication screen. This screen stays up until the player completes the authentication process or cancels. Either returns the player to the title screen. If a player is already signed in to a Game Center account, then the authentication screen is never displayed. Instead, a banner is briefly displayed to welcome the player back without leaving the main menu.
The menu screen now includes buttons to display Game Center content. When the player presses one of these buttons, the game allocates, initializes and presents one of Game Kit’s user interface classes. When dismissed, control returns back to the title screen.
The game shown in Figure 1-2 has also been modified to provide a multiplayer game mode. As with single-player mode, the game presents a series of screens to configure the desired match. Some of these screens are specific to the game and are used to configure the game’s options. Other screens display the built-in matchmaking user interface. Note that your own game’s configuration screens can appear both before and after the matchmaking screen. The choices made before a matchmaking screen appears are usually choices that affect the matchmaking experience. For example, the player can choose a specific map to play on, so that they can be matched with players interested in the same map. The configuration screens that appear after matchmaking is complete are used to allow the players, now connected into a match, to make other decisions about how the match is played. Both sets of screens include match configuration data that must be synchronized to all players in the match.
Finally, a Game Center-aware game can be launched because the player received a push notification related to Game Center—for example, when the player has been invited to join a match. If your game was launched as a result of a push notification, it can transition directly into a matchmaking screens immediately after the authentication process completes. In this case the title screen appears only for a brief period of time.
While Figure 1-2 focuses on new screens of content to display, the content on existing screens can change too, or the tasks you perform on those screens can change. For example, at the end of the match, you can have your game report the score it displays to a Game Center leaderboard. Similarly, during gameplay, as a player makes progress towards an achievement, your game sends the updated progress to Game Center.
It is important that you remember that this is only one possible way to design your game’s user interface. You should consider other alternatives when building your user interface, and choose one that makes the most sense for your game. For example, many games use a customized graphics design with a consistent artistic theme. In this case, Game Center’s standard user interface classes won’t match your game’s theme. So, one question you must ask is whether you want to use the standard user interface (which takes little effort to add) or whether you want to incorporate your own custom user interface. If you decide to create a custom user interface, you should further decide whether to create that user interface as distinct screens of content or incorporate the content into existing interfaces, such as your game’s menu screen.
Adapting Your Game Design
Each feature in Game Center imposes requirements on your game design. For example, a leaderboard score is a numerical value representing how well the player did while playing your game. To implement a leaderboard in your game, the game design must include a play mechanism and calculate a score based on how well the player did. The requirements and limitations for each Game Center feature are described in the detailed chapters later in this document. Table 1-1 summarizes the relevant characteristics.
Feature | Requirements | Limitations | Assets |
|---|---|---|---|
Leaderboard | Scoring mechanism | Maximum number of leaderboards, formatting options for leaderboard scores | Strings, leaderboard sorting, artwork |
Leaderboard Sets | A leaderboard | Maximum number of leaderboards and sets allowed. All apps in a group must either have sets or not have sets. | Strings, leaderboard grouping, artwork |
Achievements | Tracking code to watch what a player does in the game | Maximum number of achievements per game, maximum point allocation. | Strings, artwork |
Challenges | You must implement either leaderboards or achievements | — | — |
Saving Games | Code to load and save game information | The player must have an iCloud account | — |
Matchmaking | Multiplayer game design | Number of players, size of data packets, networking | Custom invitation sound |
Customizing the Game Center Sounds
You can change the default Game Center sounds using GKInvite. For example, when a player receives an invitation, Game Center plays a sound to announce the invitation. Your game can instead provide a custom sound to be played when invitations for it are received. To do this, include a sound file in your app bundle. All of the default Game Center sounds can be changed using a custom sound file. The file must be in either caf, aif, or wav format and be named GKInvite plus the appropriate file extension.
Creating and Managing Game Center Resources
Building a game that supports Game Center is different from building a game that does not. All games have resources, such as images, models, and sound files, used to render the game’s user interface. However, you also need to create specific resources to support Game Center’s user interface. The way you provide these assets is different than in a standard app. Figure 1-3 shows the process for a standard app.

You develop and test your app on your own development machine. App resources are embedded in the app bundle you create using Xcode. The process of building your app includes these resources in the final bundle, where they are loaded by your app’s binary at runtime.
When your app is complete, you submit the app bundle for review by copying it to iTunes Connect. At the same time, you create a record in iTunes Connect using the same bundle ID as the one in your app bundle. This record includes metadata that describes the app; most of this data is used to describe your app in the App Store. Once submitted, Apple reviews your app and it is either approved or denied.
After your app is approved, you choose when it is published. Once published, the app bundle and metadata are copied from iTunes Connect to the App Store. There, users discover and purchase the app. Once purchased, the app bundle is downloaded to the user’s device.
Figure 1-4 shows the additional steps required and the process when creating Game Center assets. Although this step is not shown, your app bundle and metadata are submitted to iTunes Connect as before.
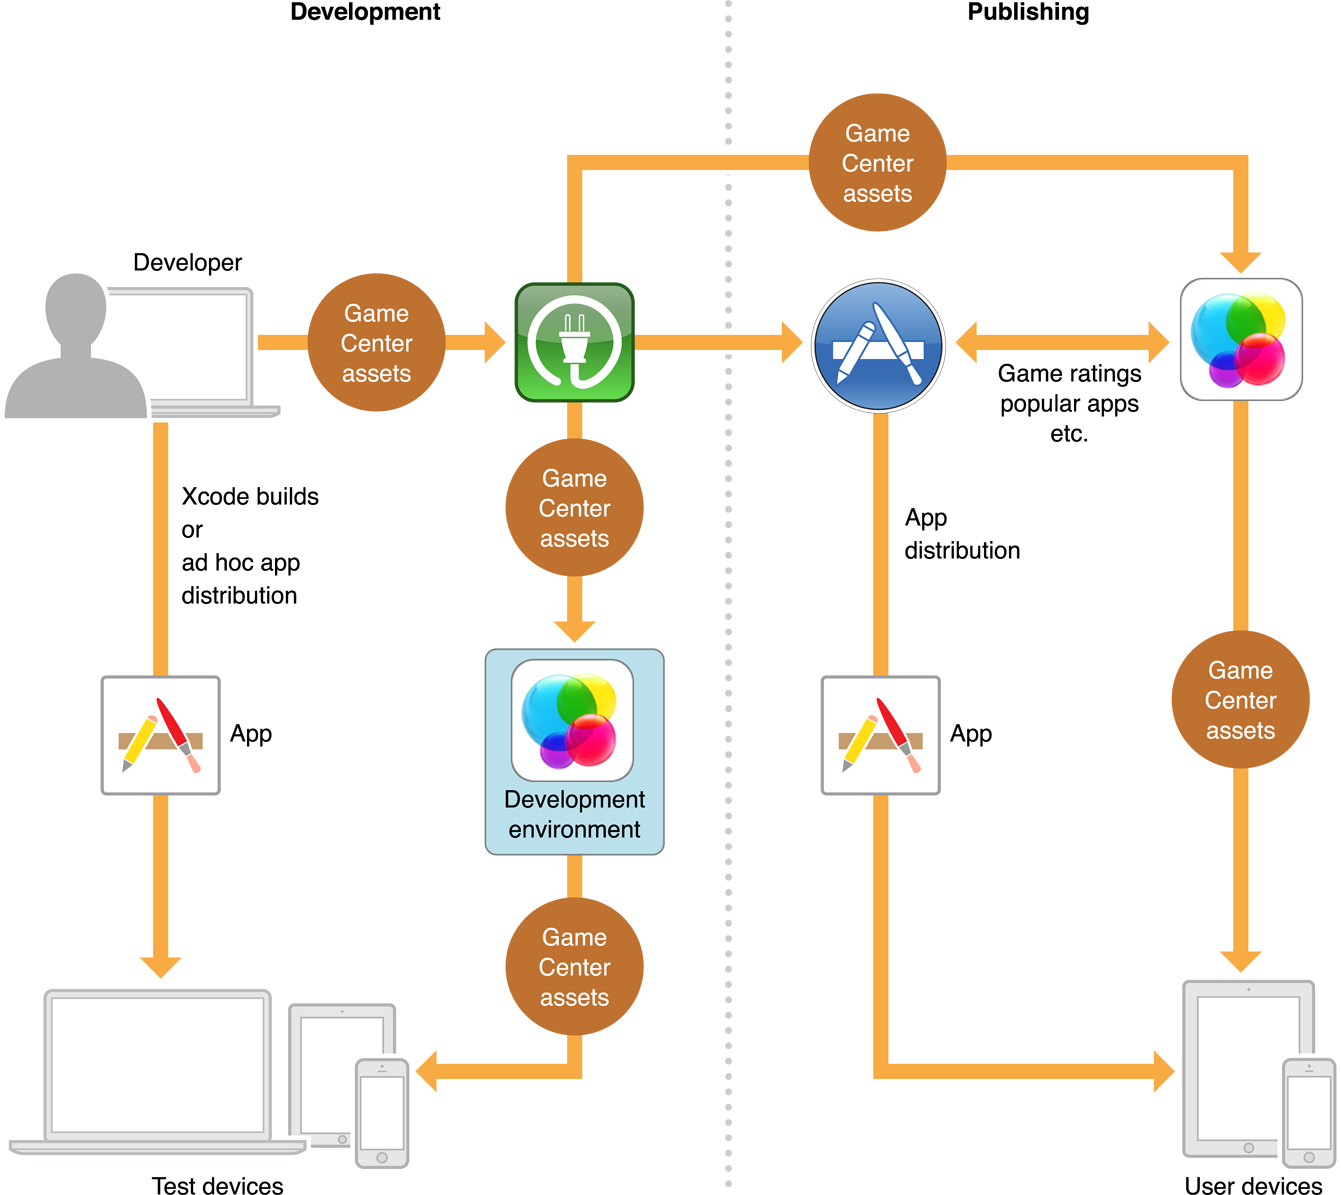
Here are some of the changes to the development process:
Originally, the iTunes Connect record was created at the end of the development process, when you were ready to submit the app for review. When creating a Game Center-aware game, you create the iTunes Connect record as soon as you are ready to implement and test your Game Center features. The iTunes Connect record is needed to authorize your game to access the Game Center service.
Assets you create in iTunes Connect are automatically copied to a special test environment provided by Apple. This environment mimics the regular Game Center service but is private to developers. Development builds of your game automatically load the assets from the test environment.
When your game is published, the Game Center assets are copied to the Game Center service in the same way that your game is copied to the App Store. These builds of your game load the assets from the live Game Center servers.
Once your assets are published to the live servers, some assets become more difficult to change because they are already in use by players and live versions of your game. For example, leaderboard scores are formatted using the leaderboard assets you created. If you changed your scoring mechanism and changed your leaderboard assets to match, older scores would still be posted on Game Center and would be inconsistent with newer scores. For this reason, some assets you create cannot be modified after a version of your game that uses those assets ships. You should set up your development process to ensure that your assets (and the related code) are extensively tested before you submit your game for review so that changes to these assets are not necessary.
Game Groups
Game Groups are an additional feature in iTunes Connect that allow you to tie multiple Game Center-aware games into a single connected group that shares some portion of your Game Center content. Each game in the game group is a distinct game on iTunes Connect with its own record. However, some assets are shared.
The benefit of a game group is that you can ship multiple distinct versions of your game on the App Store, but still allow these games to act as if they are a single game online. For example:
You have separate iOS and OS X versions of your game.
You have free and paid versions of your game.
Two distinct forms of grouping are possible in iTunes Connect:
Shared game assets. You create a common pool of leaderboards and achievement assets that are shared by all versions of your game. If a player has both versions of your game, items earned in one version are visible in the other.
Matchmaking compatibility. This allows you to specify which versions of your game can form matches. You ensure that all games in a compatibility group share the same networking code. A matchmaking group can even be formed between different versions of a game shipping with a single bundle ID. For example, if you shipped four versions of your game (1.0, 1.1, 2.0, 3.0), you could specify that version 1.0 and version 1.1 of the game could play together, because nothing in version 1.1 changed the networking implementation.
Game Groups impose additional process overhead on your game design. Now, instead of merely having to deal with synchronization issues between your game code and the assets you create in iTunes Connect, you now also need to synchronize any implementation changes between the different game implementations. See Groups in Game Center Configuration Guide for iTunes Connect for information on how to create and manage game groups in iTunes Connect.
Incorporating Game Center into Your Game
Here’s a reasonable process to follow when designing a game that supports Game Center:
Decide which Game Center features you plan to support.
Define your game mechanics, keeping in mind the requirements and limitations of Game Center.
Implement your game engine, ignoring Game Center for now. Focus on developing the other aspects of your game, such as your game engine and gameplay. You do this to avoid needing to create an iTunes Connect record earlier than you need to.
When you need to implement Game Center:
Create an iTunes Connect record for your game, using the game’s bundle ID. Enable Game Center in the iTunes Connect record; setting this flag in the iTunes Connect record authorizes the Game Center service to allow your game to connect to it.
Create an explicit App ID using your game’s bundle ID.
Enable Game Center in this App ID; this authorizes the app on the device to contact Game Center’s servers.
Create a new provisioning profile using this new explicit App ID.
Test to ensure you can build and sign your game using this profile.
Add the Game Kit framework to your project.
Import the
GameKit/GameKit.hheader.
If your game requires Game Center, add the Game Center key to the list of capabilities your app requires from the device. See Requiring Game Center in Your Game (iOS only).
If your game does not require Game Center, you should establish a weak link from your game to the Game Kit framework. Then, when your game launches, test to make sure that Game Center is supported. See Optionally Supporting Game Center in Your Game.
Implement authentication.
Implement other Game Center features.
Test your Game Center features using the Game Center development environment.
Testing Your Game Center Game
Testing your Game Center game no longer requires a separate profile for testing. For more information on how the removal of the sandbox environment affects testing, see Game Center: Life without a Sandbox.
Requiring Game Center in Your Game (iOS only)
If your game requires Game Center to function (for example, a multiplayer game that requires Game Center to match players), you want to ensure that only devices that support Game Center can download your game. To ensure that your game runs only on supported devices, add the gamekit key to the list of required device capabilities in your game’s Info.plist file. See Information Property List Key Reference for information about property lists.
Optionally Supporting Game Center in Your Game
If you want your game to use Game Center, but your game does not require Game Center to function properly, you can weak link your game to the Game Kit framework and test for its existence at runtime. See SDK Compatibility Guide.
Copyright © 2016 Apple Inc. All Rights Reserved. Terms of Use | Privacy Policy | Updated: 2016-06-13