Creating Onscreen Controls
In addition to the traditional parameter controls in the Inspector, plug-in developers can create controls for their plug-ins directly on the canvas over the user’s footage and other objects. This allows for a richer set of tools and for direct manipulation of plug-in parameters, which many users find more intuitive. See Figure 5-1 for an example.
In the past, support for onscreen controls has been somewhat limited. They were available only in Motion and had limitations that made them impractical for many types of plug-ins. More robust support for onscreen controls has been added and, as such, opened up a number of interesting and powerful new possibilities.
Creating Onscreen Controls
Onscreen controls are a type of plug-in, just like filters and generators. To implement one, you create an NSObject subclass that implements the FxOnScreenControl protocol and add an entry for it to your plug-in’s Info.plist file. The protocol comprises several methods for drawing the onscreen controls and handling input events from the user.
FxPlug 2.0 introduced a new protocol, the FxOnScreenControl_v2 protocol. This protocol adds additional optional methods for handling mouse-moved events.
The FxOnScreenControl Protocol
Plug-ins use the FxOnScreenControl protocol to draw controls and other UI elements on the screen. Plug-ins also use this protocol to handle mouse and keyboard events.
Initialization
Although not formally part of the protocol, your onscreen control plug-in is initially sent an initWithAPIManager: message, just as an FxFilter or FxGenerator object would.
Your plug-in saves the pointer to the API Manager object so that it can retrieve and set the parameter values of the filter or generator it’s associated with. This is the only way the plug-in can communicate with the effect plug-in for which it vends the user interface.
Drawing Spaces
The first thing an onscreen control plug-in needs to do is tell the host application what drawing space it will use. The plug-in can draw in canvas space, object space, or document space. Most plug-ins should do their drawing in canvas space so that handles and similar user interface elements are drawn at a consistent size, always facing the user.
The canvas is the area of the host application where the user places their footage, interacts with it, and watches it play back. It can be larger or smaller than just the area that gets rendered when the user exports their project as a movie, and its size varies based on how the user arranges the windows and panes of the application. The user can zoom in the canvas to see more detail in their project, or zoom out to get a higher-level overview. Its pixels are addressed starting at 0 from the leftmost and bottommost pixels to whatever the width and height happen to be. This may make it seem somewhat daunting to work with, but as you’ll see, you almost always want to use this space for your drawing because it gives users the best experience.
Object space is the space that your plug-in’s point parameters are already in. It’s the normalized space of the object your plug-in is applied to (or of the object itself in the case of a generator). Point parameters have values in the range 0 to 1 in both directions to represent the area of the object—(0,0) represents the lower-left corner of the object, and (1,1) represents the upper-right corner. As such, working with absolute pixel values is very cumbersome in object space. But working with points is very convenient because you can easily handle proxy resolution and pixel aspect ratio by simply multiplying the point’s coordinates by the width and height of the image. (Note that in previous versions of FxPlug plug-ins, there was a space called object-centered space. It was, in fact, just object space. Because it did nothing useful beyond object space, it’s been deprecated. It shouldn’t be used going forward.)
Document space is centered at the scene’s origin and is always in project pixels. So if you have an 1080p HD project, document space initially stretches from (–960,–540) to (960,540) along the x and y axes. It’s in the same coordinates as the scene. As you move the camera, the coordinates stay anchored in the scene, rather than on the object or to the canvas.
To summarize:
Canvas space allows you to draw handles that always face the user and to use the various transforms to draw other parts of your onscreen controls in object space, if necessary.
Object space allows you to easily handle point parameters without having to worry about non-square pixels, proxy resolution, or fields.
Document space allows you to draw in the same space as the scene.
Your onscreen control plug-in should return the appropriate drawing space constant from its drawingCoordinates method. This tells the host application which space you’ll be drawing in, and which space it should transform mouse positions into when calling your plug-in to handle events.
Drawing Your Onscreen Control
Your plug-in needs to implement the drawOSC:height:activePart:time: method. This method tells you the width and height of the input to the plug-in, which control of your onscreen control the mouse is currently interacting with and at what time in the timeline you should be querying the parameters of the effect plug-in.
Your plug-in is asked to draw its onscreen control in two different modes: for render and for selection. Drawing for render means drawing the controls for the user to see and interact with. Drawing for selection means drawing the areas the user can interact with so that the system can do the appropriate hit-testing. You can determine which you’re supposed to be drawing by calling glGetIntegerv (GL_RENDER_MODE, &renderMode).
For example, you have a rectangular area that the user can manipulate, and you want them to be able to drag any corner of the rectangle, any of the sides, and to be able to drag the entire item. The rectangle is defined by two point parameters in your effect plug-in. It might look something like the example in Figure 5-2.
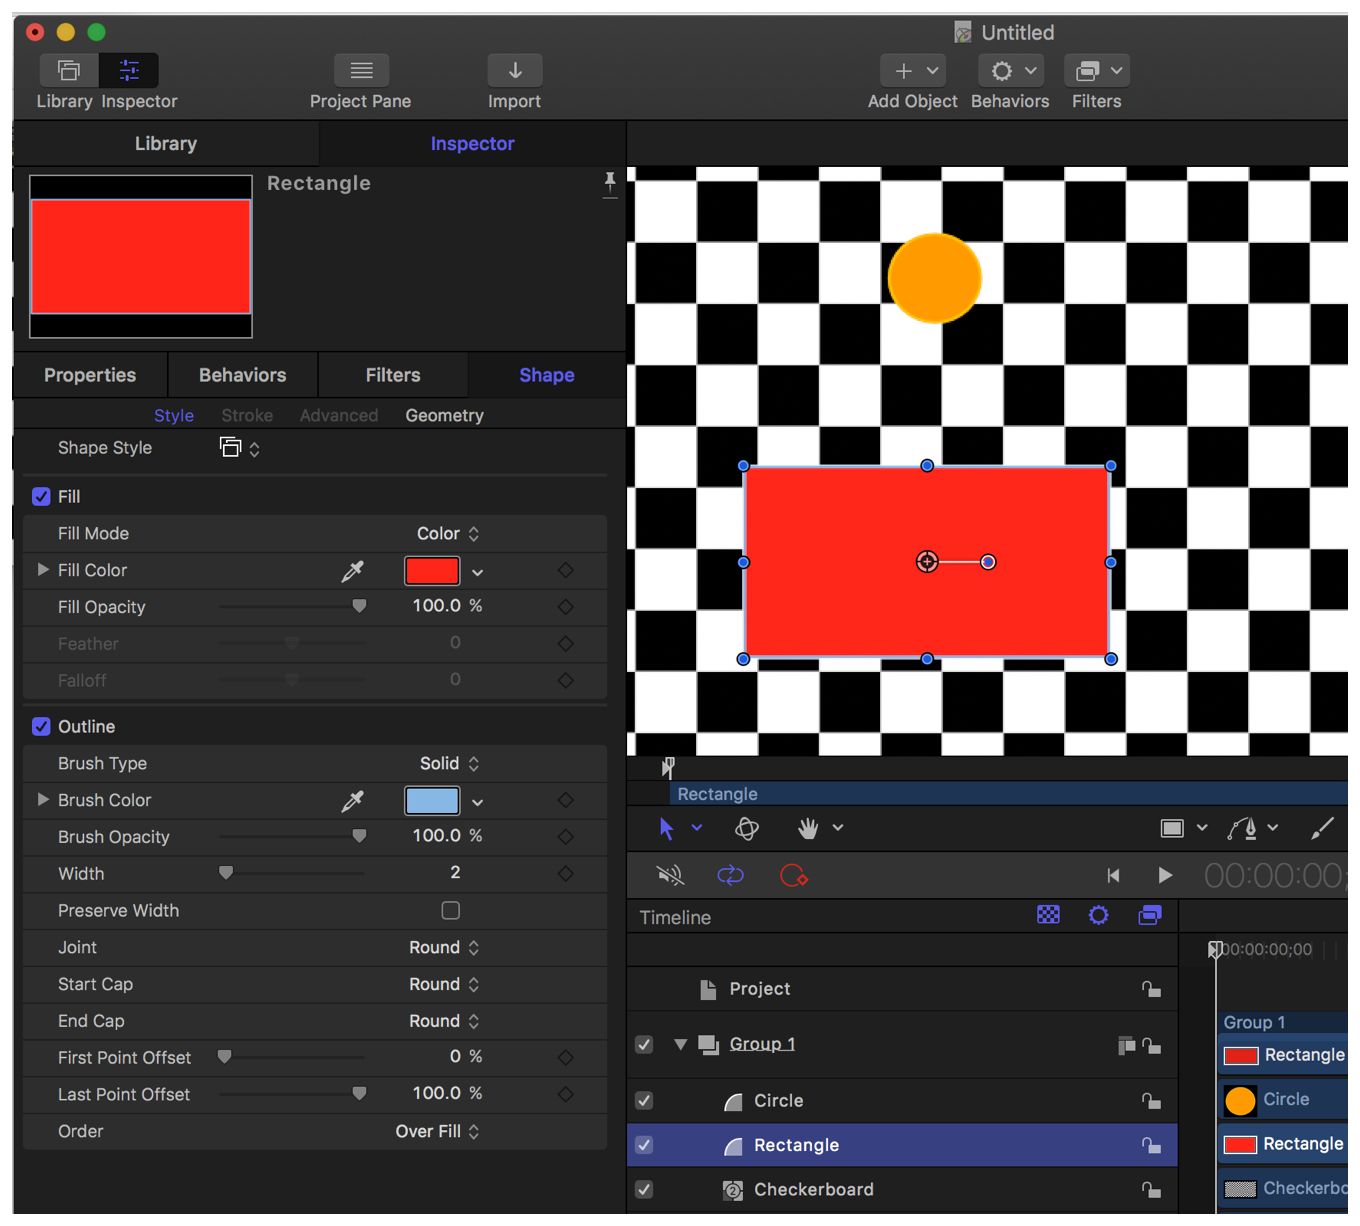
When asked to draw for rendering, you draw the outline of the rectangle and the eight handles at the corners and on the sides. When asked to draw for selection, though, you also draw the area inside of the rectangle, because the user can click in it and drag it around as shown in Figure 5-3.
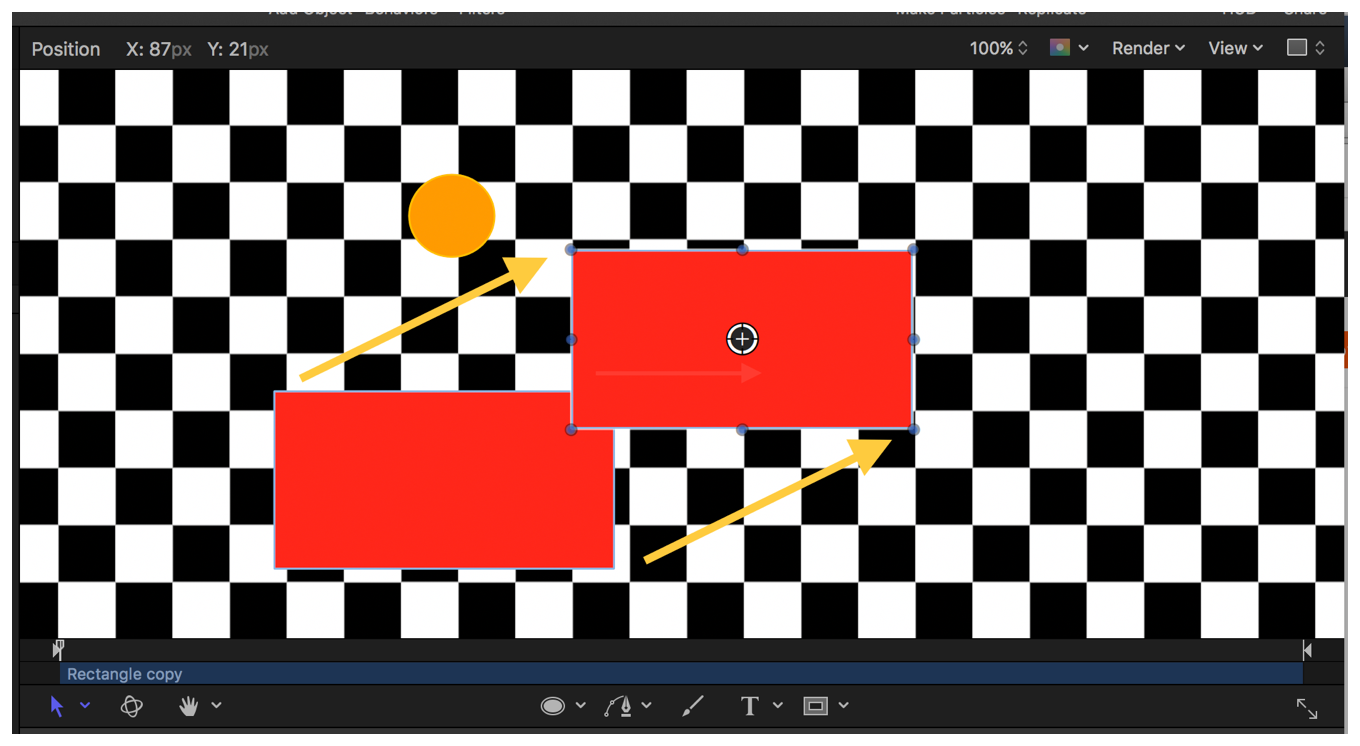
When drawing for selection, you tell OpenGL where the handles or other interesting parts of your onscreen control are located by first calling glLoadName() with a constant representing the control part, and then use OpenGL calls to fill in the area of your control part. This drawing is not displayed to the user, so it should not be antialiased.
The code in Listing 5-1 demonstrates how to draw a square handle the user can manipulate.
Listing 5-1 Drawing manipulatable onscreen control handles
- (void)drawHandleAt:(FxPoint2D)location |
selected:(BOOL)isSelected |
{ |
const double kSideLen = 5.0; |
if (isSelected) |
{ |
glColor4f (1.0, 0.0, 0.0, 0.5); |
} |
else |
{ |
glColor4f (0.25, 0.25, 1.0, 0.5); |
} |
glBegin (GL_QUADS); |
{ |
glVertex2f (location.x - kSideLen, location.y - kSideLen); |
glVertex2f (location.x + kSideLen, location.y - kSideLen); |
glVertex2f (location.x + kSideLen, location.y + kSideLen); |
glVertex2f (location.x - kSideLen, location.y + kSideLen); |
} |
glEnd (); |
} |
// Our drawOSC:height:activePart:time: method will call this method when |
// it’s time to draw for selection. We simply call glLoadName () with the |
// name of each part as we draw it. We’ll draw handles at the 4 corners |
// and in the centers of each side. |
- (void)drawForSelectionWithWidth:(int)width |
height:(int)height |
activePart:(int)activePart |
andTime:(double)time |
{ |
id<FxOnScreenControlAPI_v2> oscAPI = [_apiManager apiForProtocol:@protocol(FxOnScreenControlAPI_v2)]; |
// Retrieve the positions of the handles on the corners and sides of |
// the box the user drew |
FxPoint2D lowerLeft, lowerRight, upperRight, upperLeft; |
FxPoint2D left, right, top, bottom; |
[self getQuadUpperLeft:&upperLeft |
left:&left |
lowerLeft:&lowerLeft |
bottom:&bottom |
lowerRight:&lowerRight |
right:&right |
upperRight:&upperRight |
top:&top |
atTime:time]; |
// Draw the main quad |
glLoadName (kShapeOSC_Quad); |
glBegin (GL_QUADS); |
{ |
glVertex2f (lowerLeft.x, lowerLeft.y); |
glVertex2f (lowerRight.x, lowerRight.y); |
glVertex2f (upperRight.x, upperRight.y); |
glVertex2f (upperLeft.x, upperLeft.y); |
} |
glEnd (); |
// Draw handles at the corners and on the sides |
glLoadName (kShapeOSC_LowerLeft); |
[self drawHandleAt:lowerLeft |
selected:NO]; |
glLoadName (kShapeOSC_Bottom); |
[self drawHandleAt:bottom |
selected:NO]; |
glLoadName (kShapeOSC_LowerRight); |
[self drawHandleAt:lowerRight |
selected:NO]; |
glLoadName (kShapeOSC_Right); |
[self drawHandleAt:right |
selected:NO]; |
glLoadName (kShapeOSC_UpperRight); |
[self drawHandleAt:upperRight |
selected:NO]; |
glLoadName (kShapeOSC_Top); |
[self drawHandleAt:top |
selected:NO]; |
glLoadName (kShapeOSC_UpperLeft); |
[self drawHandleAt:upperLeft |
selected:NO]; |
glLoadName (kShapeOSC_Left); |
[self drawHandleAt:left |
selected:NO]; |
} |
After the host application has the information about where your controls are located, it calls your plug-in to draw them for display to the user. It will tell you which part the mouse is over, as well, so that you can draw it in a highlighted state, if necessary.
// This method will be called by drawOSC:height:activePart:time: when we |
// need to actually display the OSC to the user. activePart will be one of the |
// parts we named with glLoadName (). |
- (void)drawForRenderingWithWidth:(int)width |
height:(int)height |
activePart:(int)activePart |
andTime:(double)time |
{ |
// Convert the point parameters from object-relative space to a |
// quad in canvas space |
FxPoint2D lowerLeft, lowerRight, upperRight, upperLeft; |
FxPoint2D left, right, top, bottom; |
[self getQuadUpperLeft:&upperLeft |
left:&left |
lowerLeft:&lowerLeft |
bottom:&bottom |
lowerRight:&lowerRight |
right:&right |
upperRight:&upperRight |
top:&top |
atTime:time]; |
// Draw the shadowed outline of the quad |
glColor4f (0.0, 0.0, 0.0, 0.5); |
glBegin (GL_LINE_LOOP); |
{ |
glVertex2f (lowerLeft.x + 1.0, lowerLeft.y - 1.0); |
glVertex2f (lowerRight.x + 1.0, lowerRight.y - 1.0); |
glVertex2f (upperRight.x + 1.0, upperRight.y - 1.0); |
glVertex2f (upperLeft.x + 1.0, upperLeft.y - 1.0); |
} |
glEnd (); |
glColor4f (1.0, 1.0, 1.0, 1.0); |
glBegin (GL_LINE_LOOP); |
{ |
glVertex2f (lowerLeft.x, lowerLeft.y); |
glVertex2f (lowerRight.x, lowerRight.y); |
glVertex2f (upperRight.x, upperRight.y); |
glVertex2f (upperLeft.x, upperLeft.y); |
} |
glEnd (); |
// Draw handles at the corners and on the sides |
[self drawHandleAt:lowerLeft |
selected:activePart == kShapeOSC_LowerLeft]; |
[self drawHandleAt:bottom |
selected:activePart == kShapeOSC_Bottom]; |
[self drawHandleAt:lowerRight |
selected:activePart == kShapeOSC_LowerRight]; |
[self drawHandleAt:right |
selected:activePart == kShapeOSC_Right]; |
[self drawHandleAt:upperRight |
selected:activePart == kShapeOSC_UpperRight]; |
[self drawHandleAt:top |
selected:activePart == kShapeOSC_Top]; |
[self drawHandleAt:upperLeft |
selected:activePart == kShapeOSC_UpperLeft]; |
[self drawHandleAt:left |
selected:activePart == kShapeOSC_Left]; |
} |
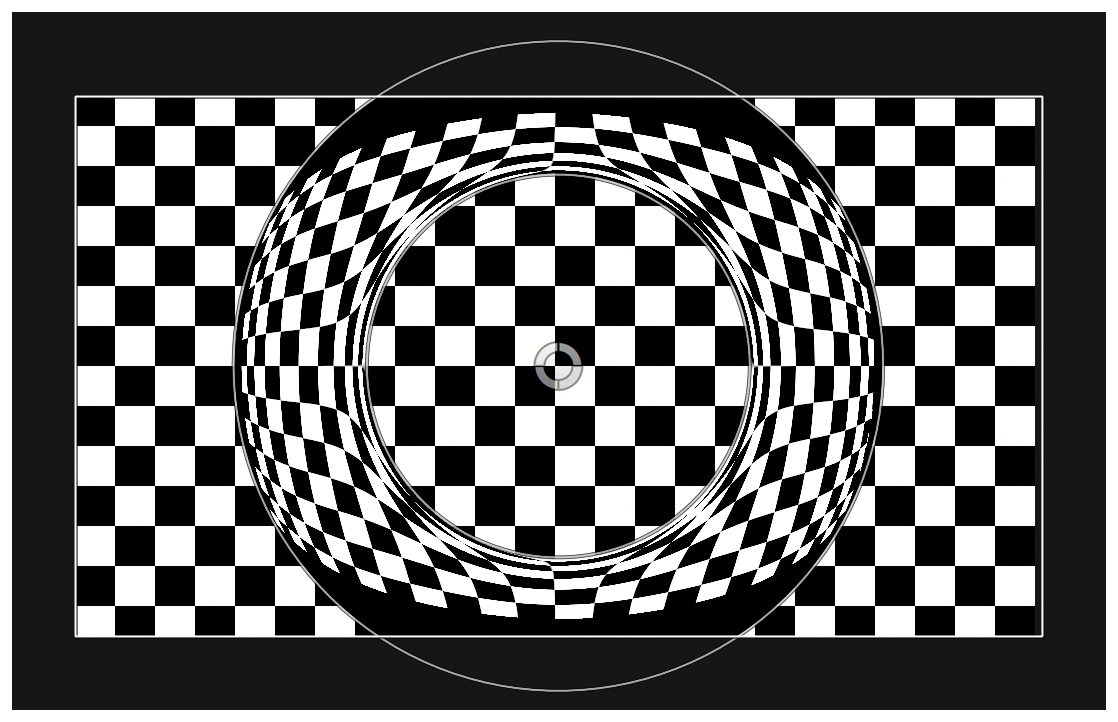
As mentioned earlier, it’s common that some control parts are drawn in object space so that they align with your effect, but draw their handles in canvas space so that they always remain the same size and always face the user. You can do this by using the methods in the FxOnScreenControlAPI and FxOnScreenControlAPI_v2 protocols. An example would be drawing a circular control that’s defined by a parameter that represents a distance in square, full-sized pixels.
In your FxFilter, for example, you create a point parameter and a floating-point slider in addParameters to define where the circle’s located and how large it is, as shown in Listing 5-2.
Listing 5-2 Example addParameters implementation
- (BOOL)addParameters |
{ |
id<FxParameterCreationAPI> parmsApi; |
parmsApi = [_apiManager apiForProtocol:@protocol(FxParameterCreationAPI)]; |
if ( parmsApi != NULL ) |
{ |
NSBundle *bundle = [NSBundle bundleForClass:[self class]]; |
... |
[parmsApi addPointParameterWithName:@"Shape::Circle Center" |
parmId:kShape_CircleCenter |
defaultX:0.75 |
defaultY:0.75 |
parmFlags:kFxParameterFlag_DEFAULT]; |
[parmsApi addFloatSliderWithName:@"Shape::Circle Radius" |
parmId:kShape_CircleRadius |
defaultValue:100.0 |
parameterMin:0.0 |
parameterMax:1000.0 |
sliderMin:0.0 |
sliderMax:500.0 |
delta:1.0 |
parmFlags:kFxParameterFlag_DEFAULT]; |
... |
return YES; |
} |
else |
{ |
return NO; |
} |
} |
In the onscreen control drawing code, you reference these parameters and the current mouse position to draw the control and handle in the proper place, as shown in Listing 5-3.
Listing 5-3 Mouse-moved example implementation
- (void)mouseMovedWithPositionX:(double)mousePositionX |
positionY:(double)mousePositionY |
activePart:(int)activePart |
modifiers:(FxModifierKeys)modifiers |
forceUpdate:(BOOL *)forceUpdate |
time:(double)time |
{ |
// Convert the mouse position into object relative coordinates for drawing later |
id<FxOnScreenControlAPI_v2> oscAPI = [_apiManager apiForProtocol:@protocol(FxOnScreenControlAPI_v2)]; |
// The _mouseMovedPos variable is an class member that we’ll reference again in |
// our mouseDown handler and drawing routines |
[oscAPI convertPointFromSpace:kFxDrawingCoordinates_CANVAS |
fromX:mousePositionX |
fromY:mousePositionY |
toSpace:kFxDrawingCoordinates_OBJECT |
toX:&_mouseMovedPos.x |
toY:&_mouseMovedPos.y]; |
// Redraw the OSC so we see the change in position on the circle's handle |
*forceUpdate = YES; |
} |
… |
- (void)drawCircleAt:(FxPoint2D)center |
withRadius:(FxPoint2D)radius |
{ |
id<FxOnScreenControlAPI_v2> oscAPI = [_apiManager apiForProtocol:@protocol(FxOnScreenControlAPI_v2)]; |
unsigned int objWidth; |
unsigned int objHeight; |
double objPixelAspectRatio; |
[oscAPI objectWidth:&objWidth |
height:&objHeight |
pixelAspectRatio:&objPixelAspectRatio]; |
// NOTE: If we want our circles to be the correct size and round, we need to multiply the center |
// by the object's pixel aspect ratio to get to square pixels, add in the radius, which is |
// always in square pixels, then divide by the pixel aspect ratio to get back to object |
// coordinates. Then the object to screen transform will handle transforming the result into |
// screen space. |
glBegin (GL_LINE_LOOP); |
{ |
double delta = 0.1; |
const double startX = ((center.x * objPixelAspectRatio) + radius.x) / objPixelAspectRatio; |
const double startY = center.y; |
double previousX = startX; |
double previousY = startY; |
double ang; |
for (ang = delta; ang < (2.0 * M_PI); ang += delta) |
{ |
const double currentX = ((center.x * objPixelAspectRatio) + radius.x * cos (ang)) / objPixelAspectRatio; |
const double currentY = (center.y + radius.y * sin (ang)); |
glVertex2f (currentX, currentY); |
previousX = currentX; |
previousY = currentY; |
} |
glVertex2f (startX, startY); |
} |
glEnd (); |
} |
... |
- (void)drawOSC:(int)width |
height:(int)height |
activePart:(int)activePart |
time:(double)time |
{ |
… |
// Draw the circle |
id<FxOnScreenControlAPI_v2> oscAPI = [_apiManager apiForProtocol:@protocol(FxOnScreenControlAPI_v2)]; |
// Convert the center point from object relative to object absolute coordinates |
NSRect inputBounds = [oscAPI inputBounds]; |
FxPoint2D objAbsCenter = { |
inputBounds.origin.x + inputBounds.size.width * circleCenter.x, |
inputBounds.origin.y + inputBounds.size.height * circleCenter.y |
}; |
FxPoint2D radiusV = { radius, radius }; |
// Get the object to screen transformation so we can tell OpenGL |
// to draw in the right space |
FxMatrix44* objectToScreen = [oscAPI objectToScreenTransform]; |
// Set up the OpenGL transformation matrix to draw in object space |
glMatrixMode (GL_MODELVIEW); |
glPushMatrix (); |
Matrix44Data* mat = [objectToScreen matrix]; |
glMultTransposeMatrixd ((GLdouble*)mat); |
glColor4f (1.0, 1.0, 1.0, 1.0); |
[self drawCircleAt:objAbsCenter |
withRadius:radiusV]; |
// Now start drawing in canvas space to draw the handle |
glPopMatrix (); |
[self drawCircleHandleAt:objAbsCenter |
withRadius:radiusV |
selected:activePart == kShapeOSC_CircleHandle]; |
... |
} |
Mouse and Keyboard Events
Because users need to interact with your controls you must implement mouse and keyboard event handling. Mouse coordinates passed to the plug-in are in the drawing space of the plug-in. So if your plug-in returns kFxDrawingCoordinates_CANVAS for its drawingCoordinates method, your mouse event handlers all receive mouse coordinates in canvas space.
When the user clicks in one of your controls, your plug-in receives a call to the mouseDown:positionY:activePart:modifiers:forceUpdate:time: method. If the user then drags the mouse, your plug-in receives a call to its -mouseDragged:positionY:activePart:modifiers:forceUpdate:time: method. And finally, when the user releases the mouse, the host app calls your plug-in’s -mouseUp:positionY:activePart:modifiers:forceUpdate:time: method. In each of these methods, return YES for the forceUpdate parameter if you need the host application to redraw your controls (which you almost always will).
Generally, as the mouse is dragged, you’ll be updating your plug-in’s parameters. First, get the current value of the parameters, then calculate the new value, based on where the mouse was dragged to, and finally, set the new value of the parameters based on the change in mouse position.
Listing 5-4 demonstrates how to change the point parameters that represent the corners of the rectangle when the lower-left corner handle is dragged.
Listing 5-4 Example mouseDragged:positionY:activePart:modifiers:forceUpdate:time: implementation
- (void)mouseDragged:(double)mousePositionX |
positionY:(double)mousePositionY |
activePart:(int)activePart |
modifiers:(FxModifierKeys)modifiers |
forceUpdate:(BOOL *)forceUpdate |
time:(double)time |
{ |
id<FxOnScreenControlAPI_v2> oscAPI = [_apiManager apiForProtocol:@protocol(FxOnScreenControlAPI_v2)]; |
id<FxParameterSettingAPI> paramSetAPI = [_apiManager apiForProtocol:@protocol(FxParameterSettingAPI)]; |
id<FxParameterRetrievalAPI> paramGetAPI = [_apiManager apiForProtocol:@protocol(FxParameterRetrievalAPI)]; |
if ((oscAPI == nil) or (paramGetAPI == nil) or (paramSetAPI == nil)) |
{ |
NSLog (@"Unable to obtain the OSC or parameter APIs in %s:%d", __func__, __LINE__); |
return; |
} |
// Get some info about the object |
unsigned int objWidth; |
unsigned int objHeight; |
double objPixelAspectRatio; |
[oscAPI objectWidth:&objWidth |
height:&objHeight |
pixelAspectRatio:&objPixelAspectRatio]; |
// Get the point parameter's values |
FxPoint2D lowerLeft; |
FxPoint2D upperRight; |
FxPoint2D mousePosObjSpace; |
[paramGetAPI getXValue:&lowerLeft.x |
YValue:&lowerLeft.y |
fromParm:kShape_LowerLeft |
atTime:time]; |
[paramGetAPI getXValue:&upperRight.x |
YValue:&upperRight.y |
fromParm:kShape_UpperRight |
atTime:time]; |
// Get the mouse position in object relative space |
[oscAPI convertPointFromSpace:kFxDrawingCoordinates_CANVAS |
fromX:mousePositionX |
fromY:mousePositionY |
toSpace:kFxDrawingCoordinates_OBJECT |
toX:&mousePosObjSpace.x |
toY:&mousePosObjSpace.y]; |
// Find the change from the last time |
FxPoint2D delta = { |
mousePosObjSpace.x - _mouseDownPos.x, |
mousePosObjSpace.y - _mouseDownPos.y |
}; |
// Save the current location for the next time around |
_mouseDownPos = mousePosObjSpace; |
_mouseMovedPos = mousePosObjSpace; |
// Tell the app to update |
*forceUpdate = YES; |
// Now respond to the part that the user clicked in |
FxPoint2D newLowerLeft; |
switch (activePart) |
{ |
... |
case kShapeOSC_LowerLeft: |
newLowerLeft.x = mousePosObjSpace.x; |
newLowerLeft.y = mousePosObjSpace.y; |
newUpperRight = upperRight; |
break; |
... |
} |
// Set the new values |
... |
[paramSetAPI setXValue:newLowerLeft.x |
YValue:newLowerLeft.y |
toParm:kShape_LowerLeft |
atTime:time]; |
... |
} |
} |
In addition to mouse events, you can also receive keyboard events in the keyDown:positionY:keyPressed:modifiers:forceUpdate:didHandle:time: and keyUp:positionY:keyPressed:modifiers:forceUpdate:didHandle:time: methods.
If you implement the FxOnScreenControlAPI_v2 version of the protocol, you can receive mouseMovedWithPositionX:positionY:activePart:modifiers:forceUpdate:time:, mouseEnteredWithPositionX:positionY:modifiers:forceUpdate:time:, and mouseExitedWithPositionX:positionY:modifiers:forceUpdate:time: messages when the user moves the mouse into or out of the area covered by your controls.
Copyright © 2005, 2016 Apple Inc. All Rights Reserved. Terms of Use | Privacy Policy | Updated: 2016-10-27