Creating and Configuring Scroll Views
Scroll views are created as any other view is, either programmatically or in Interface Builder. Only a small amount of additional configuration is required to achieve basic scrolling capabilities.
Creating Scroll Views
A scroll view is created and inserted into a controller or view hierarchy like any other view. There are only two additional steps required to complete the scroll view configuration:
You must set the
contentSizeproperty to the size of the scrollable content. This specifies the size of the scrollable area.You must also add a view or views that are displayed and scrolled by the scroll view. These view(s) provide the displayed content.
You can optionally configure any visual cues your application requires—vertical and horizontal scroll indicators, drag bouncing, zoom bouncing, and directional constraint of scrolling
Creating Scroll Views in Interface Builder
To create a scroll view in Interface Builder, you drag the UIScrollView icon located in the Library->Cocoa Touch->Data Views section of the Library palette into the view ‘window’. You then connect the UIViewController subclass’s view outlet to the scroll view. Figure 1-1 shows the connection, assuming that the File’s Owner is the UIViewController subclass (a common design pattern).
UIViewController subclass connects to a scroll view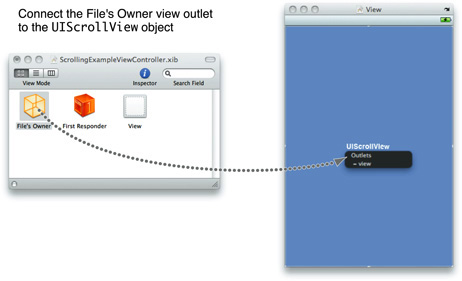
Even though the UIScrollView inspector in Interface Builder allows you to set many of the properties of the scroll view instance, you are still responsible for setting the contentSize property, which defines the size of the scrollable area, in your application code. If you’ve connected the scroll view to the view property of a controller instance (typically the File’s Owner), initializing the contentSize property occurs in the controller’s viewDidLoad method shown in Listing 1-1.
Listing 1-1 Setting a scroll view’s size
- (void)viewDidLoad { |
[super viewDidLoad]; |
UIScrollView *tempScrollView=(UIScrollView *)self.view; |
tempScrollView.contentSize=CGSizeMake(1280,960); |
} |
After the scroll view’s size has been configured, your application can then add the required subview(s) that provide the view content, either programmatically or by inserting them into the scroll view in Interface Builder.
Creating Scroll Views Programmatically
It’s also possible to create a scroll view entirely in code. This is typically done in your controller class, specifically, in the implementation of the loadView method. A sample implementation is shown in Listing 1-2.
Listing 1-2 Creating s scroll view programmatically
- (void)loadView { |
CGRect fullScreenRect=[[UIScreen mainScreen] applicationFrame]; |
scrollView=[[UIScrollView alloc] initWithFrame:fullScreenRect]; |
scrollView.contentSize=CGSizeMake(320,758); |
// do any further configuration to the scroll view |
// add a view, or views, as a subview of the scroll view. |
// release scrollView as self.view retains it |
self.view=scrollView; |
[scrollView release]; |
} |
This code creates a scroll view that is the size of the full screen (less the status bar), sets the scrollView object as the controller’s view, and sets the contentSize property to 320 x 758 pixels. This code creates a scroll view that will scroll vertically.
There would be more code in this method implementation, for example, code that would insert the subview or views and configure those as required. Also, this code assumes that the controller doesn’t have a view set already. If it did, you would be responsible for releasing the existing view before setting the scroll view as the controller’s view.
Adding Subviews
After you have created and configured the scroll view, you must add a subview or subviews to display the content. Whether you should use a single subview or multiple subviews directly in your scroll view is a design decision that is usually based on one requirement: Does your scroll view need to support zooming?
If you intend to support zoom in your scroll view, the most common technique is to use a single subview that encompasses the entire contentSize of the scroll view and then add additional subviews to that view. This allows you to specify the single ‘collection’ content view as the view to zoom, and all its subviews will zoom according to its state.
If zooming is not a requirement, then whether your scroll view uses a single subview (with or without its own subviews) or multiple subviews is an application dependent decision.
Configuring The Scroll View Content Size, Content Inset, And Scroll Indicators
The contentSize property is the size of the content that you need to display in the scroll view. In Creating Scroll Views in Interface Builder, it is set to 320 wide by 758 pixels high. The image in Figure 1-2 shows the content of the scroll view with the contentSize width and height indicated.
contentSize dimensions labeled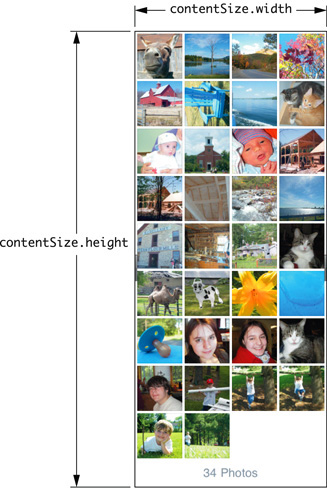
You may want to add padding around the edges of the scroll view content, typically at the top and bottom so controllers and toolbars don’t interfere with the content. To add padding, use the contentInset property to specify a buffer area around the content of the scroll view. One way of thinking of it is that it makes the scroll view content area larger without changing the size of the subview or the size of the view’s content.
The contentInset property is a UIEdgeInsets struct with the fields top, bottom, left, right. Figure 1-3 shows the content with the contentInset and contentSize indicated.
contentSize and contentInset indicated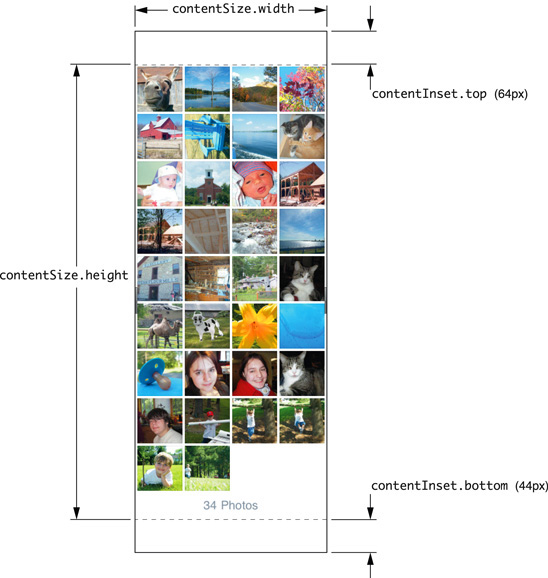
As shown in Figure 1-3 specifying (64,44,0,0) for the contentInset property results in an additional buffer area that is 64 pixels at the top of the content (20 pixels for the status bar and 44 pixels for the navigation controller) and 44 pixels at the bottom (the height of the toolbar). Setting contentInset to these values allows displaying the navigation control and toolbar on screen, yet still allows scrolling to display the entire content of the scroll view.
Listing 1-3 Setting the contentInset property
- (void)loadView { |
CGRect fullScreenRect=[[UIScreen mainScreen] applicationFrame]; |
scrollView=[[UIScrollView alloc] initWithFrame:fullScreenRect]; |
self.view=scrollView; |
scrollView.contentSize=CGSizeMake(320,758); |
scrollView.contentInset=UIEdgeInsetsMake(64.0,0.0,44.0,0.0); |
// do any further configuration to the scroll view |
// add a view, or views, as a subview of the scroll view. |
// release scrollView as self.view retains it |
self.view=scrollView; |
[scrollView release]; |
} |
Figure 1-4 shows the results of setting the contentInset top and bottom parameters to those values. When scrolled to the top (as shown on the left), the screen leaves space for the navigation bar and the status bar. The image on the right shows the content scrolled to the bottom with space for the toolbar. In both cases you can see the content through the transparent navigation bar and toolbar when scrolled, yet when the content is scrolled fully to the top or bottom, all content is visible.
contentInset top and bottom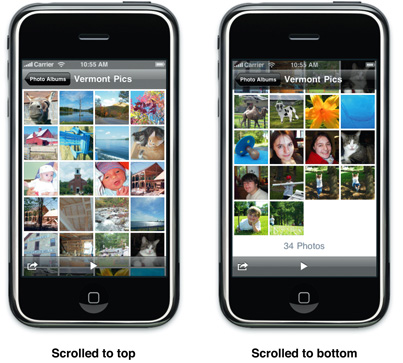
However, changing the contentInset value has an unexpected side effect when your scroll view displays scroll indicators. As the user drags the content to the top or bottom of the screen, the scroll indicator scrolls over any content displayed in the areas that are within the area defined by contentInset for example, in the navigation control and toolbar.
To correct this, you must set the scrollIndicatorInsets property. As with the contentInset property, the scrollIndicatorInsets property is defined as a UIEdgeInsets struct. Setting the vertical inset values restricts the vertical scroll indicators from being displayed beyond that inset and this also results in the horizontal scroll indicators being displayed outside the contentInset rect area.
Altering the contentInset without also setting the scrollIndicatorInsets property allows the scroll indicators to be drawn over the navigation controller and the toolbar, an unwanted result. However, setting the scrollIndicatorInsets values to match the contentInset value remedies this situation.
The corrected loadView implementation in Listing 1-4 shows the additional code required to configure the scroll view by adding the scrollIndicatorInsets initialization.
Listing 1-4 Setting the scroll view contentInset and scrollIndicatorInsets properties
- (void)loadView { |
CGRect fullScreenRect=[[UIScreen mainScreen] applicationFrame]; |
scrollView=[[UIScrollView alloc] initWithFrame:fullScreenRect]; |
scrollView.contentSize=CGSizeMake(320,758); |
scrollView.contentInset=UIEdgeInsetsMake(64.0,0.0,44.0,0.0); |
scrollView.scrollIndicatorInsets=UIEdgeInsetsMake(64.0,0.0,44.0,0.0); |
// do any further configuration to the scroll view |
// add a view, or views, as a subview of the scroll view. |
// release scrollView as self.view retains it |
self.view=scrollView; |
[scrollView release]; |
} |
Copyright © 2011 Apple Inc. All Rights Reserved. Terms of Use | Privacy Policy | Updated: 2011-06-06