Split View Controllers
The UISplitViewController class is a container view controller that manages two panes of information. The first pane has a fixed width of 320 points and a height that matches the visible window height. The second pane fills the remaining space. Figure 4-1 shows a split view controller interface.
The panes of a split view interface contain content that is managed by view controllers you provide. Because the panes contain application-specific content, it is up to you to manage interactions between the two view controllers. However, rotations and other system-related behaviors are managed by the split view controller itself.
A split view controller must always be the root of any interface you create. In other words, you must always install the view from a UISplitViewController object as the root view of your application’s window. The panes of your split view interface may then contain navigation controllers, tab bar controllers, or any other type of view controller you need to implement your interface. Split view controllers cannot be presented modally.
The easiest way to integrate a split view controller into your application is to start from a new project. The Split View-based Application template in Xcode provides a good starting point for building an interface that incorporates a split view controller. Everything you need to implement the split view interface is already provided. All you have to do is modify the array of view controllers to present your content. The process for modifying these view controllers is virtually identical to the process used in iPhone applications. The only difference is that you now have more screen space available for displaying your detail-related content. However, you can also integrate split view controllers into your existing interfaces.
Creating a Split View Controller Using a Storyboard
If you are creating a new Xcode project, the Master-Detail Application template gives you a split view in the storyboard, set as the first scene.
To add a split view controller to an existing app:
Open your application’s main storyboard.
Drag a split view controller out of the library.
Interface Builder creates a split view controller a navigation controller and a view controller, and it creates relationships between them. These relationships identify the newly created view controllers as the left and right panes of the split view controller.
Display it as the first view controller by selecting the option Is Initial View Controller in the Attributes inspector (or present the view controller in your user interface in another way.)
The contents of the two view controllers you embed in the split view are your responsibility. You configure these view controllers just as you would configure any other view controllers in your application. For example, for embedded navigation and tab bar controllers, you may need to specify additional view controller information.
Creating a Split View Controller Programmatically
To create a split view controller programmatically, create a new instance of the UISplitViewController class and assign view controllers to its two properties. Because its contents are built on-the-fly from the view controllers you provide, you do not have to specify a nib file when creating a split view controller. Therefore, you can just use the init method to initialize it. Listing 4-1 shows an example of how to create and configure a split view interface at launch time. You would replace the first and second view controllers with the view controller objects that present your application’s content. The window variable is assumed to be an outlet that points to the window loaded from your application’s main nib file.
Listing 4-1 Creating a split view controller programmatically
- (BOOL)application:(UIApplication *)application didFinishLaunchingWithOptions:(NSDictionary *)launchOptions |
{ |
MyFirstViewController* firstVC = [[MyFirstViewController alloc] init]; |
MySecondViewController* secondVC = [[MySecondViewController alloc] init]; |
UISplitViewController* splitVC = [[UISplitViewController alloc] init]; |
splitVC.viewControllers = [NSArray arrayWithObjects:firstVC, secondVC, nil]; |
window = [[UIWindow alloc] initWithFrame:[[UIScreen mainScreen] bounds]]; |
window.rootViewController = splitVC; |
[window makeKeyAndVisible]; |
return YES; |
} |
Supporting Orientation Changes in a Split View
A split view controller relies on its two contained view controllers to determine what orientations are supported. It only supports an orientation if both contained view controllers do. Even if one of the contained view controllers isn’t currently being displayed, it must support the orientation. When the orientation changes, the split view controller handles most of the rotation behaviors automatically.
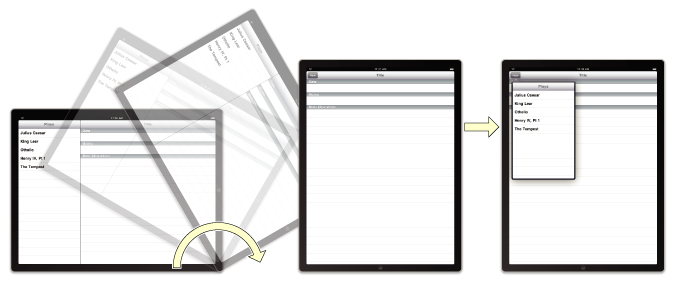
In a landscape orientation, the split view controller presents the two panes side-by-side with a small divider separating them. In a portrait orientation, the split view controller either shows both panes or it shows only the second, larger pane and provides a toolbar button for displaying the first pane using a popover, depending on the value returned by the splitViewController:shouldHideViewController:inOrientation: delegate method.
Copyright © 2014 Apple Inc. All Rights Reserved. Terms of Use | Privacy Policy | Updated: 2014-11-15