Tab Bar Controllers
You use tab bar controller to organize your app into one or more distinct modes of operation. The view hierarchy of a tab bar controller is self contained. It is composed of views that the tab bar controller manages directly and views that are managed by content view controllers you provide. Each content view controller manages a distinct view hierarchy, and the tab bar controller coordinates the navigation between the view hierarchies.
This chapter describes how you configure and use tab bar controllers in your app. For information about ways in which you can combine tab bar controllers with other types of view controller objects, see Combined View Controller Interfaces.
Anatomy of a Tab Bar Interface
A tab bar interface is useful in situations where you want to provide different perspectives on the same set of data or in situations where you want to organize your app along functional lines. The key component of a tab bar interface is the presence of a tab bar view along the bottom of the screen. This view is used to initiate the navigation between your app’s different modes and can also convey information about the state of each mode.
The manager for a tab bar interface is a tab bar controller object. The tab bar controller creates and manages the tab bar view and also manages the view controllers that provide the content view for each mode. Each content view controller is designated as the view controller for one of the tabs in the tab bar view. When a tab is tapped by the user, the tab bar controller object selects the tab and displays the view associated with the corresponding content view controller.
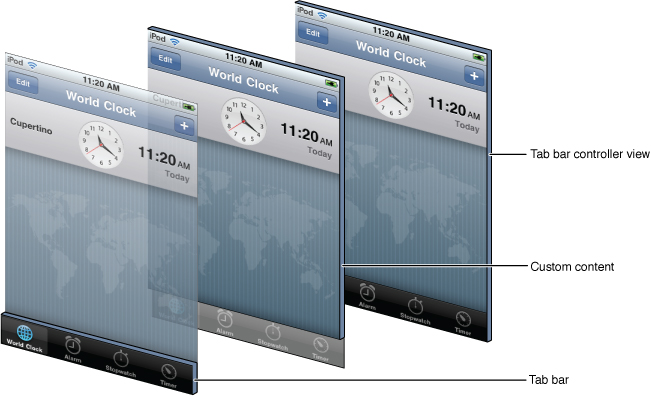
Figure 2-1 shows the tab bar interface implemented by the Clock app. The tab bar controller has its own container view, which encompasses all of the other views, including the tab bar view. The custom content is provided by the view controller of the selected tab.
When a tab bar view is part of a tab bar interface, it must not be modified. In a tab bar interface, the tab bar view is considered to be part of a private view hierarchy that is owned by the tab bar controller object. If you do need to change the list of active tabs, you must always do so using the methods of the tab bar controller itself. For information on how to modify a tab bar interface at runtime, see Managing Tabs at Runtime.
The Objects of a Tab Bar Interface
A standard tab bar interface consists of the following objects:
A
UITabBarControllerobjectOne content view controller object for each tab
An optional delegate object
Figure 2-2 shows the relationship of the tab bar controller to its associated view controllers. Each view controller in the tab bar controller’s viewControllers property is a view controller for a corresponding tab in the tab bar.
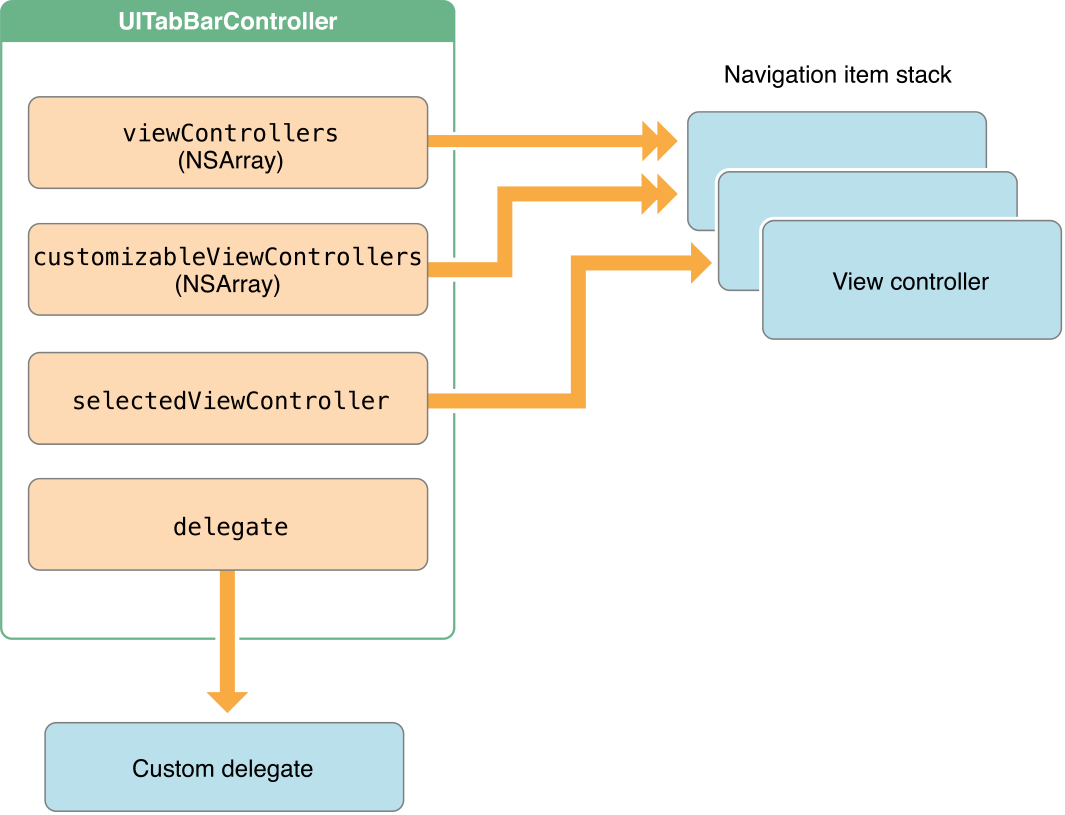
If you add more than five items to the viewControllers property, the tab bar controller automatically inserts a special view controller (called the More view controller) to handle the display of the additional items. The More view controller provides a custom interface that lists the additional view controllers in a table, which can expand to accommodate any number of view controllers. The More view controller cannot be customized or selected and does not appear in any of the view controller lists managed by the tab bar controller. It appears automatically when it is needed and is separate from your custom content. You can get a reference to it though by accessing the moreNavigationController property of UITabBarController.
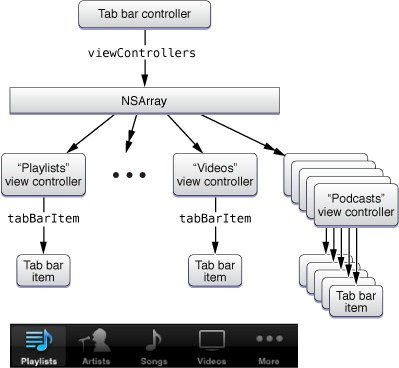
You do not modify the tab bar view directly. The tab bar controller object assembles the contents of the tab bar from the UITabBarItem objects provided by your content view controllers. Figure 2-3 shows the relationship between the tab bar controller, view controllers, and the tab bar item objects in the iPod app. Because there are more view controllers than can be displayed at once, tab bar items from only the first four view controllers are displayed. The final tab bar item is provided by the More view controller.
Because tab bar items are used to configure the tab bar, you must configure the tab bar item of each view controller before displaying the tab bar interface. If you are using Interface Builder to assemble your interface, you can specify the title and image as described in Creating a Tab Bar Interface Using a Storyboard. If you are creating your tab bar interface programmatically, you must create a new UITabBarItem object for each of your content view controllers, as described in Creating a Tab Bar Interface Programmatically.
A tab bar controller also supports an optional delegate object that can be used to respond to tab bar selections and customizations. For information about responding to delegate-related messages, see Managing Tabs at Runtime.
Creating a Tab Bar Interface
Before creating a tab bar interface, you need to decide how you intend to use a tab bar interface. Because it imposes an overarching organization on your data,you should use one only in these specific ways:
Install it directly as a window’s root view controller.
Install it as one of the two view controllers in a split view interface. (iPad only)
Present it modally from another view controller.
Display it from a popover. (iPad only)
Installing a tab bar interface in your app’s main window is by far the most common way to use it. In such a scenario, the tab bar interface provides the fundamental organizing principle for your app’s data, with each tab leading the user to a distinct part of the app. You can use tab bar controllers by themselves or in conjunction with other view controllers to create even more sophisticated interfaces. For more information, see Combined View Controller Interfaces.
It is also possible to present a tab bar controller modally if a very specific need makes doing so worthwhile. For example, you could present a tab bar controller modally in order to edit some complex data set that had several distinct sets of options. Because a modal view fills all or most of the screen (depending on the device), the presence of the tab bar would simply reflect the choices available for viewing or editing the modally presented data. Avoid using a tab bar in this way if a simpler design approach is available.
Defining the Content View Controllers for a Tab Bar Interface
Because each mode of a tab bar interface is separate from all other modes, the view controller for each tab defines the content for that tab. Thus, the view controller you choose for each tab should reflect the needs of that particular mode of operation. If you need to present a relatively rich set of data, you could install a navigation controller to manage the navigation through that data. If the data being presented is simpler, you could install a content view controller with a single view.
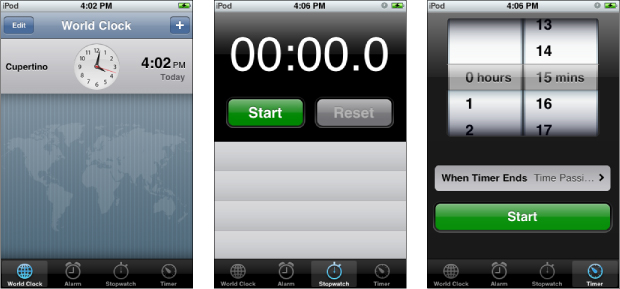
Figure 2-4 shows several screens from the Clock app. The World Clock tab uses a navigation controller primarily so that it can present the buttons it needs to edit the list of clocks. The Stopwatch tab requires only a single screen for its entire interface and therefore uses a single view controller. The Timer tab uses a custom view controller for the main screen and presents an additional view controller modally when the When Timer Ends button is tapped.
The tab bar controller handles all of the interactions associated with presenting the content view controllers, so there is very little you have to do with regard to managing tabs or the view controllers in them. Once displayed, your content view controllers should simply focus on presenting their content.
For general information and guidance on defining custom view controllers, see Creating Custom Content View Controllers in View Controller Programming Guide for iOS.
Creating a Tab Bar Interface Using a Storyboard
If you are creating a new Xcode project, the Tabbed Application template gives you a tab bar controller in the storyboard, set as the first scene.
To create a tab bar controller in a storyboard, do the following:
Drag a tab bar controller from the library.
Interface Builder creates a tab bar controller and two view controllers, and it creates relationships between them. These relationships identify each of the newly created view controllers as the view controller for one tab of the tab bar controller.
Display it as the first view controller by selecting the option Is Initial View Controller in the Attributes inspector (or present the view controller in your user interface in another way.)
Creating a Tab Bar Interface Programmatically
If you prefer to create a tab bar controller programmatically, the most appropriate place to do so is in the applicationDidFinishLaunching: method of your application delegate. Because a tab bar controller usually provides the root view of your app’s window, you need to create it immediately after launch and before you show the window. The steps for creating a tab bar interface are as follows:
Create a new
UITabBarControllerobject.Create a content view controller for each tab.
Add the view controllers to an array and assign that array to your tab bar controller’s
viewControllersproperty.Set the tab bar controller as the root view controller of your window (or otherwise present it in your interface).
Listing 2-1 shows the basic code needed to create and install a tab bar controller interface in the main window of your app. This example creates only two tabs, but you could create as many tabs as needed by creating more view controller objects and adding them to the controllers array. You need to replace the custom view controller names MyViewController and MyOtherViewController with classes from your own app.
Listing 2-1 Creating a tab bar controller from scratch
- (void)applicationDidFinishLaunching:(UIApplication *)application { |
tabBarController = [[UITabBarController alloc] init]; |
MyViewController* vc1 = [[MyViewController alloc] init]; |
MyOtherViewController* vc2 = [[MyOtherViewController alloc] init]; |
NSArray* controllers = [NSArray arrayWithObjects:vc1, vc2, nil]; |
tabBarController.viewControllers = controllers; |
window.rootViewController = tabBarController; |
} |
Creating a Tab Bar Item Programmatically
For each content view controller in your tab bar interface, you must provide a UITabBarItem object with the image and text to be displayed in the corresponding tab. You can associate tab bar items with your view controllers at any time before displaying your tab bar interface. You do this by assigning the tab bar item to the tabBarItem property of the corresponding view controller. The recommended time to create a tab bar item is during the initialization of the view controller itself, but this is typically feasible only for custom view controllers. You can also create and initialize the view controller object, create the tab bar item, and then make the association.
Listing 2-2 shows an example of how to create a tab bar item for a custom view controller. Because it is associated with a custom view controller, the view controller creates the tab bar item itself as part of its initialization process. In this example, the tab bar item includes both a custom image (which is stored in the application bundle) and a custom title string.
Listing 2-2 Creating the view controller’s tab bar item
UIImage* anImage = [UIImage imageNamed:@"MyViewControllerImage.png"]; |
UITabBarItem* theItem = [[UITabBarItem alloc] initWithTitle:@"Home" image:anImage tag:0]; |
Managing Tabs at Runtime
After creating your tab bar interface, there are several ways to modify it and respond to changes in your app. You can add and remove tabs or use a delegate object to prevent the selection of tabs based on dynamic conditions. You can also add badges to individual tabs to call the user’s attention to that tab.
Adding and Removing Tabs
If the number of tabs in your tab bar interface can change dynamically, you can make the appropriate changes at runtime as needed. You change the tabs at runtime in the same way you specify tabs at creation time, by assigning the appropriate set of view controllers to your tab bar controller. If you are adding or removing tabs in a way that might be seen by the user, you can animate the tab changes using the setViewControllers:animated: method.
Listing 2-3 shows a method that removes the currently selected tab in response to a tap in a specific button in the same tab. This method is implemented by the view controller for the tab. You might use something similar in your own code if you want to remove a tab that is no longer needed. For example, you could use it to remove a tab containing some user-specific data that needs to be entered only once.
Listing 2-3 Removing the current tab
- (IBAction)processUserInformation:(id)sender |
{ |
// Call some app-specific method to validate the user data. |
// If the custom method returns YES, remove the tab. |
if ([self userDataIsValid]) |
{ |
NSMutableArray* newArray = [NSMutableArray arrayWithArray:self.tabBarController.viewControllers]; |
[newArray removeObject:self]; |
[self.tabBarController setViewControllers:newArray animated:YES]; |
} |
} |
Preventing the Selection of Tabs
If you need to prevent the user from selecting a tab, you can do so by providing a delegate object and implementing the tabBarController:shouldSelectViewController: method on that object. Preventing the selection of tabs should be done only on a temporary basis, such as when a tab does not have any content. For example, if your app requires the user to provide some specific information, such as a login name and password, you could disable all tabs except the one that prompts the user for the required information. Listing 2-4 shows an example of what such a method looks like. The hasValidLogin method is a custom method that you implement to validate the provided information.
Listing 2-4 Preventing the selection of tabs
- (BOOL)tabBarController:(UITabBarController *)aTabBar |
shouldSelectViewController:(UIViewController *)viewController |
{ |
if (![self hasValidLogin] && (viewController != [aTabBar.viewControllers objectAtIndex:0]) ) |
{ |
// Disable all but the first tab. |
return NO; |
} |
return YES; |
} |
Monitoring User-Initiated Tab Changes
There are two types of user-initiated changes that can occur on a tab bar:
The user can select a tab.
The user can rearrange the tabs.
Both types of changes are reported to the tab bar controller’s delegate, which is an object that conforms to the UITabBarControllerDelegate protocol. You might provide a delegate to keep track of user changes and update your app’s state information accordingly. However, you should not use these notifications to perform work that would normally be handled by the view controllers being hidden and shown. For example, you would not use your tab bar controller delegate to change the appearance of the status bar to match the style of the currently selected view. Visual changes of that nature are best handled by your content view controllers.
For more information about the methods of the UITabBarControllerDelegate protocol and how you use them, see UITabBarControllerDelegate Protocol Reference.
Preventing the Customization of Tabs
The More view controller provides built-in support for the user to modify the items displayed in the tab bar. For apps with lots of tabs, this support allows the user to pick and choose which screens are readily accessible and which require additional navigation to reach. The left side of Figure 2-5 shows the More selection screen displayed by the iPod app. When the user taps the Edit button in the upper-left corner of this screen, the More controller automatically displays the configuration screen shown on the right. From this screen, the user can replace the contents of the tab bar by dragging new items to it.

While it is a good idea to let the user rearrange tabs most of the time, there may be situations where you might not want the user to remove specific tabs from the tab bar or place specific tabs on the tab bar. In these situations, you can assign an array of view controller objects to the customizableViewControllers property. This array should contain the subset of view controllers that it is all right to rearrange. View controllers not in the array are not displayed on the configuration screen and cannot be removed from the tab bar if they are already there.
Changing a Tab’s Badge
The appearance of a tab in a tab bar interface normally does not change, except when it is selected. To call attention to a specific tab, perhaps because there is new content on that tab for the user to look at, you can use a badge.
A badge is a small red marker displayed in the corner of the tab. Inside the badge is some custom text that you provide. Typically, badges contain numerical values reflecting the number of new items available on the tab, but you can also specify very short character strings too. Figure 2-6 shows badges for tabs in the Phone app.
To assign a badge to a tab, assign a non-nil value to the badgeValue property of the corresponding tab bar item. Listing 2-5 shows an example of how a view controller that displays the number of new items in its badge might set the badge value.
Listing 2-5 Setting a tab’s badge
if (numberOfNewItems == 0) |
self.tabBarItem.badgeValue = nil; |
else |
self.tabBarItem.badgeValue = [NSString stringWithFormat:@"%d", numberOfNewItems]; |
It is up to you to decide when to display badge values and to update the badge value at the appropriate times. However, if your view controller contains a property with such a value, you can use key-value observing (KVO) notifications to detect changes to the value and update the badge accordingly. For information about setting up and handling KVO notifications, see Key-Value Observing Programming Guide.
Tab Bar Controllers and View Rotation
Tab bar controllers support a portrait orientation by default and do not rotate to a landscape orientation unless all of the contained view controllers support such an orientation. When a device orientation change occurs, the tab bar controller queries its array of view controllers. If any one of them does not support the orientation, the tab bar controller does not change its orientation.
Tab Bars and Full-Screen Layout
Tab bar controllers support full-screen layout differently from the way most other controllers support it. You can still set the wantsFullScreenLayout property of your content view controller to YES if you want its view to underlap the status bar or a navigation bar (if present). However, setting this property to YES does not cause the view to underlap the tab bar view. The tab bar controller always resizes your view to prevent it from underlapping the tab bar.
For more information on full-screen layout for custom views, see Creating Custom Content View Controllers in View Controller Programming Guide for iOS.
Copyright © 2014 Apple Inc. All Rights Reserved. Terms of Use | Privacy Policy | Updated: 2014-11-15