Launching your iPhone Application in Landscape
This document describes in detail how to start your iPhone application in landscape orientation.
Introduction
iPhone applications typically launch into portrait orientation to match the orientation of the home screen. However, many applications are better suited to running in landscape orientation only. This document describes the changes you must apply to your application for it to launch into landscape orientation on iPhone and iPod Touch.
Interface Orientation and the Status Bar
In the General tab of the project editor for your application' target, enable only the Landscape Left and Landscape Right options under Supported Device Orientation as shown in Figure 1. Make sure you have selected iPhone from the Devices menu when making the changes.
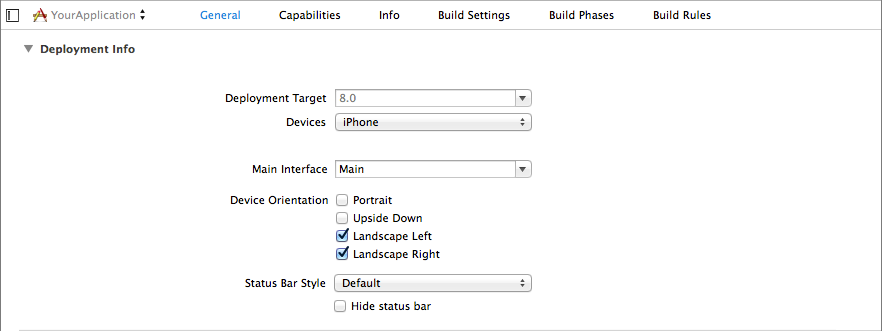
Changes made here are reflected under the
The values of the UISupportedInterfaceOrientations key determine how the status bar is positioned while the the app is launching. In iOS 7 and below, if the UIInterfaceOrientationPortrait value is present, the status bar will always be positioned for portrait orientation. Otherwise, the status bar will be positioned according to the first orientation that appears under the UISupportedInterfaceOrientations key.
The absence of an interface orientation value from the UISupportedInterfaceOrientations key prevents your app from rotating to that orientation after launch, even if the app window's root view controller supports the orientation. This provides a quick way to restrict the interface orientations supported by your app without implementing the -supportedInterfaceOrientations method in your applications's view controllers. See the View Controller Programming Guide for more information.
Launch Images
Launch images for iPhone apps are always sized to match the dimensions of the screen in portrait orientation. For applications that launch into landscape orientation, you should use your preferred graphics editing software to rotate the content of the launch image while keeping the image's size consistent with a portrait launch image (height > width).
Avoid using asset catalogs to manage the launch images of landscape applications. Except for launch images used by the iPhone 6 Plus, asset catalogs assume that all iPhone launch images are for the portrait orientation. When your application is compiled, entries for each launch image are added to the compiled information property list under the UILaunchImages key. The value for the UILaunchImageOrientation key in each of these entries is always Portrait. These entries are then ignored at launch time because the value of Portrait for the UILaunchImageOrientation key does not match the launch orientation (Landscape Left or Landscape Right). The result is a blank screen during launch as the system cannot find an appropriate launch image.
Instead, you should use a Launch File if your application only supports iOS 8 and above. Otherwise, you will need to add your launch images as resources to your project and then add the UILaunchImages key to your application's information property list. Be sure to disable use of the asset catalog for managing the launch images by selecting 'Don't use asset catalogs' from the Launch Image Source menu under the General tab of the project editor for your applications' target.

Listing 1 shows an example of the UILaunchImages key with entires for each device. Add this snippet to your application's information property list and then edit the value under each UILaunchImageName key to match the corresponding image from your project. Do not include the extension or any modifiers (@2x, @3x). You can edit your information property list by control+clicking on it in the File Navigator and choosing Open As > Source Code from the popup menu.
Listing 1 Entries under the UILaunchImages key specify the launch image for each particular screen size
<key>UILaunchImages</key> |
<array> |
<dict> |
<key>UILaunchImageMinimumOSVersion</key> |
<string>7.0</string> |
<key>UILaunchImageName</key> |
<string>Default-iOS7-568h</string> |
<key>UILaunchImageOrientation</key> |
<string>Landscape</string> |
<key>UILaunchImageSize</key> |
<string>{320, 568}</string> |
</dict> |
<dict> |
<key>UILaunchImageMinimumOSVersion</key> |
<string>7.0</string> |
<key>UILaunchImageName</key> |
<string>Default-iOS7</string> |
<key>UILaunchImageOrientation</key> |
<string>Landscape</string> |
<key>UILaunchImageSize</key> |
<string>{320, 480}</string> |
</dict> |
<dict> |
<key>UILaunchImageMinimumOSVersion</key> |
<string>8.0</string> |
<key>UILaunchImageName</key> |
<string>Default-iOS8-667h</string> |
<key>UILaunchImageOrientation</key> |
<string>Landscape</string> |
<key>UILaunchImageSize</key> |
<string>{375, 667}</string> |
</dict> |
<dict> |
<key>UILaunchImageMinimumOSVersion</key> |
<string>8.0</string> |
<key>UILaunchImageName</key> |
<string>Default-iOS8-736h</string> |
<key>UILaunchImageOrientation</key> |
<string>Landscape</string> |
<key>UILaunchImageSize</key> |
<string>{414, 736}</string> |
</dict> |
</array> |
Configuring the App Window
Your application must assign a view controller to its window's rootViewController property before returning from application:didFinishLaunchingWithOptions:. If your application has specified a main storyboard, the initial view controller in the storyboard is automatically configured to be the window's root view controller.
Methods to Implement in Your App's View Controllers
For a view controller to support landscape orientation, you don't need to do anything. By default, view controllers support all orientations except portrait upside-down. However, because UIInterfaceOrientationPortrait was not included in the list of interface orientation values for the UISupportedInterfaceOrientations key in your app's Information Property List, the app will not rotate into portrait orientation, leaving landscape left and landscape right as the only allowed orientations. See the View Controller Programming Guide for more information.
For a view controller to support landscape orientation on iOS 5 and below, it must override the shouldAutorotateToInterfaceOrientation: method as shown in Listing 2.
Listing 2 Ensuring that landscape orientation is maintained
- (BOOL)shouldAutorotateToInterfaceOrientation:(UIInterfaceOrientation)interfaceOrientation |
{ |
return UIInterfaceOrientationIsLandscape(interfaceOrientation); |
} |
Designing Your Views
When designing a landscape-only view in Interface Builder, you should make most of your changes while editing the [wAny hAny] size class. Unless your app only supports iOS 8 or later, you should avoid making changes while editing the [wCompact hCompact] or [wAny hCompact] size classes. Changes made to these size classes are not included in the compatibility storyboard generated for devices running iOS 7 and below. Changes which should only apply to the iPhone 6 Plus should be made while editing the [wRegular hCompact] size class.
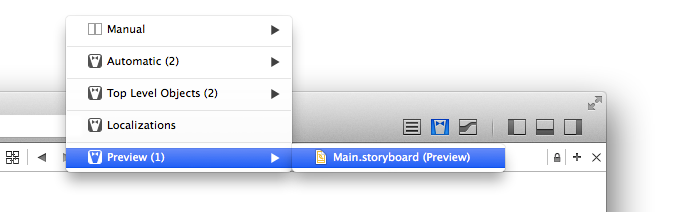
Interface Builder can simulate landscape metrics of various iOS devices in the Preview assistant, displayed alongside the editor. Enable the assistant editor and select Preview > Storyboard Name from the jump bar for the assistant editor as shown in Figure 3.
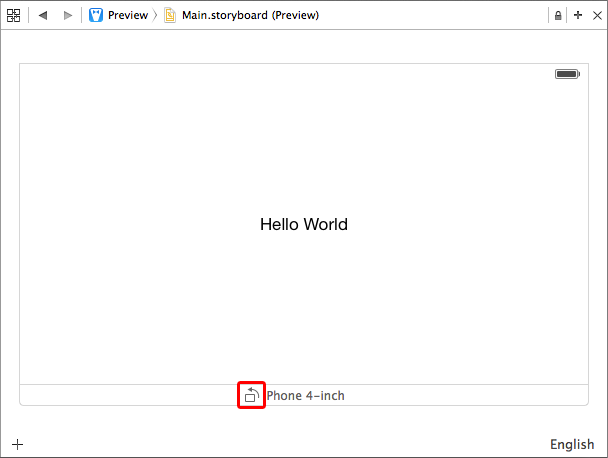
Simulated devices can be added using the + button in the bottom left corner of the assistant editor. To rotate a simulated device to landscape, click the button next to the device name as shown in Figure 4.
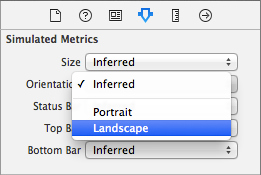
If you have opted to not use size classes for a storyboard, Interface Builder can apply landscape metrics to the canvas of the scene you are currently editing. When landscape metrics are applied, as shown in Figure 5, Interface Builder respects the constraints applied to each view and adjusts their position on the canvas.
Regardless of how you orient the canvas in Interface Builder, remember that storyboard scenes themselves have no concept of interface orientation.
Allowing Your App to Rotate Into Portrait Orientation After Launch
Even if your app primarily displays its content in landscape, it may be advantageous or necessary to present certain view controllers in the portrait orientation. When UIKit detects a change in device orientation, it uses the UIApplication object and the root view controller to determine whether the new orientation is allowed. If both objects agree that the new orientation is supported, then auto rotation occurs. Otherwise the orientation change is ignored.
By default, the UIApplication object sources its supported interface orientations from the values specified for the UISupportedInterfaceOrientations key in the applications's Information Property List. You can override this behavior by implementing the application:supportedInterfaceOrientationsForWindow: method in your application's delegate. The supported orientation values returned by this method only take effect after the application has finished launching. You can therefore use this method to support a different set of orientations after launch.
Listing 3 Allowing your app to rotate into portrait after launch.
- (NSUInteger)application:(UIApplication *)application supportedInterfaceOrientationsForWindow:(UIWindow *)window |
{ |
return UIInterfaceOrientationMaskAllButUpsideDown; |
} |
Recall that view controllers support portrait and both landscape orientations by default. Without the UIApplication object preventing rotation into portrait orientation at the app level, you will need to implement -supportedInterfaceOrientations as shown in Listing 4 for all view controllers that must only display in landscape.
Listing 4 Supporting only landscape orientations for a view controller.
- (NSUInteger)supportedInterfaceOrientations |
{ |
return UIInterfaceOrientationMaskLandscape; |
} |
The system only queries the supported interface orientations of the app window's root view controller. You may discover that your view controller's supportedInterfaceOrientations method is not called if it is inside a container, such as a UINavigationController, which does not involve its child view controllers when deciding its supported interface orientations. In this case, the navigation controller's delegate should implement navigationControllerSupportedInterfaceOrientations: as shown in Listing 5. If your application must support iOS 6, you should instead subclass UINavigationController and override supportedInterfaceOrientations as shown in Listing 4.
Listing 5 Supporting only landscape orientations for a navigation controller.
-(NSUInteger)navigationControllerSupportedInterfaceOrientations:(UINavigationController *)navigationController |
{ |
return UIInterfaceOrientationMaskLandscape; |
} |
Document Revision History
| Date | Notes |
|---|---|
| 2015-05-26 | Updated for Xcode 6 and iOS 8. |
| 2013-08-09 | Updated to cover changes to auto-rotation that were introduced with iOS 6. |
| 2009-06-29 | New document that describes how to start your iPhone application in landscape orientation at launch time. |
Copyright © 2015 Apple Inc. All Rights Reserved. Terms of Use | Privacy Policy | Updated: 2015-05-26