Retired Document
Important: This document has been replaced by App Distribution Guide. App Distribution Guide offers step-by-step instructions for configuring, testing, and submitting your app for approval. This new document describes how to use Xcode and other Apple developer tools to create and configure your project, request signing certificates, create provisioning profiles, configure special App Store technologies, test your app on devices, create your app record in iTunes Connect, and submit your app for approval to Apple. If you have a company Apple Developer Program membership, you’ll also learn how to manage your team’s certificates and provisioning assets.
Developing an App
Figure 4-1 shows a typical organization of the development process. You design what you want your app to do and how it should work, implement those ideas in code, and then test the code you’ve written.
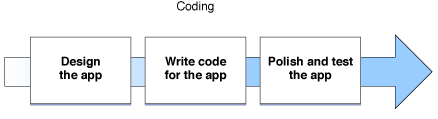
The figure above gives you an idea of the process, but it doesn’t express the reality of it. In practice, it looks more like the process shown in Figure 4-1.
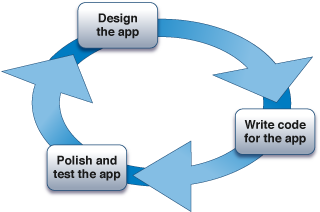
It is up to you to decide how much time you plan to put into each phase as you iterate through the development of your app. For example, you might choose to implement a small number of features on each pass, as is typical in Agile development, or you might choose to write a design specification that describes how everything should work in your app and implement it all at once, or you might choose something in between. Regardless of which approach you use, polishing your app and iterating over elements of your design is essential to delivering a good experience to the user. You want to make sure your app provides an interface that users can easily understand; that task is difficult to accomplish without putting your app in front of users and observing how they interact with it.
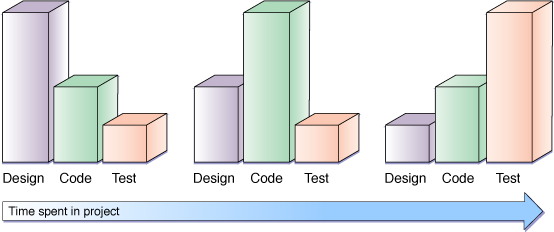
As you iterate through the development process, notice how your time is divided among the three phases varies. For example, at the beginning of the project, you have an idea, but no code to write or test, so more of your time is spent on design decisions. As you get ready to ship your app, your designs are mostly complete, you are changing the code only where necessary to fix problems, and you are spending the majority of your time testing to verify that your app works correctly and that users love it.
When you first start working on an app, start by reading the specific guides for the operating system you intend to target. These guides describe the technologies available to you, explain the architecture of apps on that operating system, and guide you on how your app should look and act to match the expectations of users. The rest of this chapter gives you a high-level overview of key development concepts to consider during each of the three steps in the iterative process.
Designing an App
When you start a new app, keep your design flexible. This suggestion is particularly true for a first app, when you are still learning the details of what makes a good app. Alternatively, assume your first project is not something you intend to ship but is used instead to learn more about the technologies you need to understand. By designing a flexible architecture, you are better prepared to respond to user feedback during your testing process—and even after you ship, too. The following sections describe a couple of techniques that may help you with your initial design.
Use the Model-View-Controller Pattern
The Model-View-Controller pattern is one of many patterns in common use in Cocoa and Cocoa Touch, and it is essential to designing apps on iOS and OS X. When you use the Model-View-Controller pattern, you divide the concerns of your app into three major areas; these areas are typically represented in your app by different classes.
Model: What kind of data does your app store? How does it store it? Where is the data stored?
View: What does your user interface look like? How is it composed? How does it animate?
Controller: What tasks can a user perform? What things happen as the user interacts with your app’s user interface? What tasks are necessary for your models and views to interact with each other?
By separating these concerns, you can revise one portion of your app without requiring significant changes in the rest of the app. This concept is important if you intend to redesign your user interface; ideally, you should be able to replace the user interface of your app without changing the model code. Being able to replace the user interface not only makes it easy to adjust the design of your user interface based on user feedback, it also makes it easy to extend your app to provide new user interfaces or share model classes between multiple apps. Figure 4-4 shows a single common data model applied across iOS and Mac apps.
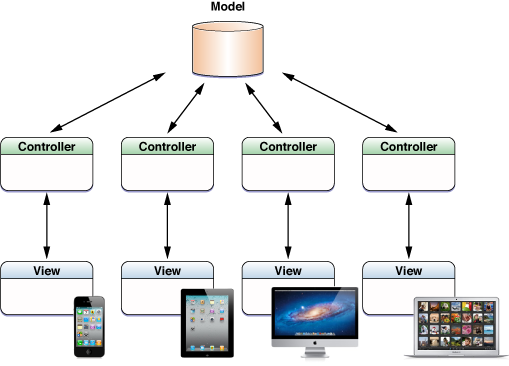
In the figure, the iOS app supports both the iPad user-interface idiom and the iPhone user-interface idiom and the Mac app supports both a windowed and full-screen interface. Using a common set of classes to represent your data model is ideal for an app suite designed to support iCloud; the apps store data in iCloud using a single file format, but each app uses a separate set of presentation objects. Thus, each app can be tailored to present an ideal interface for that kind of device.
Use Data-Driven Designs
Do not hard code all of the behavior into your app’s source code. Instead, divide the work of your app between code and data. At runtime, the actual behavior of your app should be determined by the data. This pattern is used repeatedly through Cocoa and Cocoa touch. Here are a few examples:
Localization: Localization often includes storing localized text into strings files; these files are then loaded at runtime. This design allows the language of the user interface to be easily changed; when the app is relaunched after changing a localization setting, it automatically appears in the new language. Implementing a new interface in a different language may even be possible without changing the source code of your app.
Nib file: A special file type, known as a nib file, stores objects as data. The data inside each nib file defines a custom collection of Objective-C objects, including the class and internal state of each object; this state includes references to other objects, connecting all of the objects into an object graph. When you develop an app, you create nib files and store them in your project; when you build the app, Xcode copies the files into the app bundle. When your app is running and needs new copies of the objects stored in the nib file, it instantiates the nib file. The operating system extracts the data stored in the nib file, re-creates the objects, and connects the resulting object graph to other objects in your app, just as if you had created and configured those objects programmatically.
Nib files are used most often to store user interface objects and related objects such as controllers. Xcode allows you to create or modify nib files using graphical tools. Because the user interface elements are stored as data, you can often create or modify parts of your user interface without changing your app’s source code. Although a programmer often defines the initial design of a nib file’s contents to connect the nib file to the underlying app code, separating the nib file as data makes it easier for nonprogrammers with specialized interface design skills to polish your app’s user interface. Nib files can even be used to localize your app by loading different nib files at runtime based on the user’s preferred language or locale.
Storyboards: In iOS 5, storyboards replace nib files as the preferred way to design an user interface in Cocoa Touch apps. Storyboards share many of the same benefits of nib files—they can be created using custom tools and stored in the project; the resulting storyboards are copied into the built app and loaded by the app at runtime. A storyboard differs from a nib file by allowing a single storyboard to hold multiple screens of content as well as transitions between those screens that are triggered when the app is running. The entire collection of screens and transitions is created and modified as a single entity, allowing you to better visualize how the user interface is organized. Xcode performs the necessary work to allow portions of the storyboard file to be instantiated efficiently, just as if you had created your design in multiple nib files. The details of how a storyboard does these things are not critical here; the important concept to understand is that storyboards are created and loaded as data.
Adopting data-driven programming techniques in your own class designs can pay dividends in other areas as well. For example, a game might use data files to define the characteristics of elements in the gameplay. Cocoa and Cocoa Touch provide archiving classes that can store this data in a human-readable format, allowing your designers to open these files and tweak the design of the game without recompiling the code. And, although storing this data in files in your app bundle is the easiest way to implement this kind of design, you can even move these data files to a network server and allow your app to reload this data live. During development, the ability to reload game data without quitting your app can speed this iterative process even more.
So, whether you load your files once at launch or allow the files to be reloaded, being able to change your app’s behavior without recompiling code allows you work faster polishing your app’s user interface and behavior.
Writing Code
When coding your app, start by reading the relevant programming guide for the technology you plan to use, if one is available. These guides often provide specific guidance on how classes in a particular framework are intended to be used together. Although you can try to learn how a framework works by reading the header files or the references, programming guides are designed to guide you through the design of the framework and how to structure your app to use that technology.
Objective-C is a flexible language. That flexibility, and its underlying C architecture, make it easy to write apps that crash or run incorrectly. Ideally, you never want erroneous code to live in your project for very long, and you definitely don’t want erroneous code to be checked into your source code repository. To avoid that, consider the practices described in the following sections.
Treat Warnings as Errors
Often, warnings indicate code that may not work properly at runtime. Even when a warning does not indicate a fatal error, its presence in your project may obscure more critical warnings that do represent errors. Be aggressive; set up your Xcode project to treat warnings as errors, and fix those errors just as you would any other compiler error.
Use the Analyze Action in Xcode to Find Less Obvious Coding Errors
The Objective-C compiler has a built-in code analyzer that detects many common coding errors. It not only understands C programming errors, but it also has been programmed to enforce many Cocoa and Cocoa Touch coding conventions. Thus, if your app has subtle logic errors or is failing to conform to the coding conventions, it can provide an early indicator of a problem and explain exactly where your logic went awry. Always check your code with the Analyze command before committing it to the repository.
Implement Unit Tests and User Interface Tests
Unit tests are additional code you write to test your app. Because you understand the logic of how your classes are intended to be used, you can write targeted tests to verify that this behavior works correctly. A typical unit test instantiates objects from your app’s classes, configures them, and then calls one or more methods on an object to perform actual work. Finally, the unit test executes one or more test assertions to verify that the results match what the test expected. Xcode has built-in support for unit testing; when you create your project, you can automatically have Xcode include a target that builds and runs unit tests. All you need to do is fill in the tests.
By consistently and regularly using unit tests, you decrease the chance of a breaking change being introduced into your source code for any length of time. When you find a bug that your unit tests didn’t detect, that bug is often an indication of another unit test you need to write. In addition to helping you verify that your classes work correctly, unit tests often improve the design of your classes. To test an object in isolation, the object must be able to be instantiated without having large numbers of dependencies on other objects or classes. You may even need to be able to override some of the behaviors of the instantiated test object so that it calls your test code, rather than calling some other subsystem of your app. This flexibility, when incorporated directly into your class design, forces the classes under test to have clean interfaces.
User interface classes are sometimes harder to test using unit tests; for those areas, you may want to use an automation tool to script the user interface itself. If you are an iOS developer, you can use interface automation provided by the Instruments app; see Instruments User Guide.
Depending on how you intend to use unit tests, you may write tests at different stages in your development process. For example, a common Agile practice, test-driven development, suggests that you never add new code to your app without first creating a failing test. Creating a failing test first helps ensure that the test is correct before writing the code. When using TDD, your test suite grows organically alongside your app and is refactored as you change your class interfaces and implementations. Other practices are possible as well. For example, if you are experimenting widely on the design and implementation of your app, you might not be ready to lock down the interface of a class until after a few iterations. In that situation, you may choose to design the tests after your class designs have stabilized somewhat. Implementing tests later may force you to make small changes to the class interface and implementation if you choose this strategy.
Polishing and Testing an App
After you implement your code, you need to test it to shake out bugs and other incorrect behaviors. And no matter how many unit tests you write or tools you use up front, you are going to run into bugs. But even more than that, there are other defects you want to look for. You want to ensure that users are comfortable with your app’s behavior. You want users to feel confident that your app is well written and is protecting their best interests.
The following suggestions have guidelines for polishing your app.
Test on Various Devices
Different kinds of devices have different capabilities; testing on more than one kind of device ensures that you are not making assumptions about how your app is going to operate. This step is particularly important when developing apps for iOS; Simulator is useful when developing your app, it has none of the performance characteristics or memory restrictions of the actual hardware. You need to put your app on actual devices and test it there.
Use the Archive Action to Create Test Versions of an App
The Xcode archive action allows you to build your app and store it, along with critical debugging information, in a bundle that is managed by Xcode. Archives are also used whenever you want to distribute your app, but they are also useful during development. For example, if you ship a test version of your app to testers, archiving the debugging information makes it easier to interpret crash reports that they send to you. When you are ready to make an archive, take this time to review the other build and compiler settings in your project.
Use Instruments to Guide Your Efforts
The Instruments app, installed with Xcode, can be easily accessed through the Profile action in Xcode. Instruments is essential for learning how your app uses memory, how it uses the different subsystems of the operating system, and how well it performs under load. For an iOS app, Instruments can help you study how fast your app depletes a device’s battery.
Ensure That Your App Meets the Approval Guidelines
If you’ve already archived an app and you are getting close to publishing it, you should use the Xcode Test action to verify the app. It tests a number of common problems that can immediately disqualify an app from being approved. In addition to using this automated test, you should also read over the guidelines and verify that your app follows them.
Creating Great Apps
Creating great apps is more art than science, but there is still plenty of science you can apply to improve the quality of your apps. In particular, by avoiding potential pitfalls, you avoid making an app that users don’t like. Happy users often give apps a high rating on the App Store and recommend those apps to their friends.
Here are a few areas you should consider at all points during the design and implementation of your app.
Design User-Focused Apps
When you design your app, focus on providing a great user experience. Avoid unnecessary interruptions or behaviors that prevent a user from performing tasks in your app.
Focus on the idiom for the device your app is running on and tailor your app’s interface to the user’s expectations on those devices. For example, although an iPhone has less screen space to display its user interface than other devices, another, more compelling, difference is the way a user interacts with an iPhone. A user may pull an iPhone out of a pocket to perform a short task, and then immediately put it back—a very short interaction with the device. In contrast, an iPad not only has more screen space to display the user interface, but also users tend to use an iPad for longer tasks. A Mac has even more screen space and is likely to be used for longer still. When you design an iPhone app, you need to consider that a user’s interaction with your app is going to be brief, and thus interruptions may be perceived as more bothersome than they might be in an iPad or Mac app. By tailoring the experience to the OS and device and following Apple’s human interface guidelines, your apps should match up well with a user’s expectations.
Develop a Security Model
Security is essential to all apps and operating systems, particularly now. Devices are always networked, all the time. A compromised device may attempt to attack other devices. And security concerns go beyond attacks to take control of a device; users may store valuable personal data on their devices using your app. If a device is lost or stolen, users want to know that their data is safe.
Focus on the data: Examine how your app receives, stores, transfers and uses data. For example, if your app stores data in a file on an iOS device, that data is subject to inspection or modification when the device is backed up to iTunes. That data can then be synchronized back to the device and read back into your app. Or, if your app receives data over a network, the data you receive from another entity might be a crafted into a malicious attack. Understanding how data flows through your app (and at what levels of trust) is critical to anticipating how your app may be attacked. Anticipating how your app might be attacked helps you design your app to detect and avoid these attacks.
Acquire only the minimum privileges to perform a task: A compromised app can do anything your app is permitted to do. On OS X, if your app performs tasks that require high levels of privileges, consider splitting your app into multiple processes and giving the secure privileges to a process that performs only those tasks.
Another example of this principle is app sandboxing; sandboxing prevents other apps from accessing data files stored by your app. iOS apps are automatically sandboxed. On OS X, you need to explicitly implement sandboxing to protect your app.
Fail securely: If a task performed by your app might fail, always fail in a way that maintains the security of the device your app is running on and the user’s data.
Ensure Your App Runs Reliably
Make your apps as defect-free as possible. In the real world, errors happen all the time; your app must be designed and implemented so that it handles errors returned to it by the operating system. Here’s a small subset of common errors your app must expect to happen at any time:
Network outages: Mobile devices often switch between networks or may be disconnected if the user moves away from a network hub or cellular tower. If your app requires networking, it must be prepared to be disconnected and reconnected at any time, even in the middle of a network operation.
Running out of storage: Devices have a finite amount of storage; iCloud also places limits on the maximum amount of data your app can store in the cloud. Your app might exceed the storage limits when it attempts to write data to a file.
Running out of memory: Devices also provide a finite amount of memory to your app. On iOS, if your app runs out of memory and is unable to free up memory when the system asks for it, it is terminated by the operating system. On OS X, you app may continue to run if it uses too much memory, but it runs slower and slower as it uses more virtual memory. Expect your app to run low on memory; it must be prepared to free up caches and other resources.
When considering the design of an app, always try to fail safely. Your app may be terminated because of a programming error on your part or an unavoidable condition (such as requesting memory when none is available and none can be freed by your app). It may even be terminated directly by the user. You want to make sure that the user’s data is not corrupted when your app is terminated. For example, one way to fail safely is to do all of the work necessary for a task without changing any of the existing data. Only after the task succeeds do you swap the completed work with the previous contents. This technique is often used when writing files to storage; write a new file, and then swap the data for that file with the data for the existing saved file.
Tune Your App’s Performance
An app’s perceived performance is a critical part of its interaction with the user. An app that hangs on the launch screen or responds erratically to user input is perceived badly by users. More importantly, poorly performing apps are usually inefficient; on mobile devices, inefficient apps consume more battery power and reduce the usable time of the device on a single battery charge.
As you develop your app, consider these basic practices:
Understand which features must respond quickly to user requests: For example, an app’s launch time is almost always something you should improve during the development process. Other critical tasks should always be performed quickly. When a task cannot be performed quickly, your app’s user interface should provide some clue to the user that the task may take additional time. Tasks that cannot be performed quickly should not block the user interface; perform these tasks in the background instead.
Fit your app’s implementation to the problems it solves: The choice of classes you use (or algorithms you implement) should be based on the needs of your app. For example, there’s a vast difference between an app that performs tasks on a dozen items and an app that performs tasks on millions of items. Match your design to the workload.
Avoid premature optimizations: Avoid implementing highly complex algorithms or solutions until you are certain they are necessary for your app’s actual performance. Instead, your early efforts should be to keep the design readable and understandable. Hide implementation details behind a clean class interface so that the implementation can be easily changed without requiring code dependent on that class to change as well. Ideally, so long as your unit tests continue to pass, you should always be able to change the implementation of a class to something more efficient without changing any other code in your app.
Profile your implementation to discover where it spends its time: Often, the code that runs the slowest is not the code you expect to. The most reliable way to understand how an app executes is to profile it. Instruments provides many great profiling tools that you can use to understand the actual behavior of your app.
To Learn More
If you are an iOS developer, read the following documents:
Read App Programming Guide for iOS to learn more about app programming on iOS.
Read iOS Technology Overview to learn about the technologies that iOS makes available to an app.
Read iOS Human Interface Guidelines to learn about how to make your app consistent with iOS’s user interface conventions.
Read Tools Workflow Guide for iOS for details about the tasks you must complete to develop your app.
If you are an OS X developer, read the following documents:
Read Mac App Programming Guide to learn more about app programming on OS X.
Read Mac Technology Overview to learn about the technologies that OS X makes available to an app.
Read OS X Human Interface Guidelines to learn about how to make your app consistent with OS X’s user interface conventions.
Read Tools Workflow Guide for Mac for details about the tasks you must complete to develop your app.
Best Practices in Coding and App Design
Use these documents to help you improve the quality of your code:
Read Coding Guidelines for Cocoa to learn about the coding conventions used throughout Cocoa and Cocoa Touch. Using these same conventions in your own source code improves the consistency of your code.
Read Secure Coding Guide and Security Overview to learn how to make your app more secure.
Read Performance Overview to learn how to make your app more efficient.
Copyright © 2013 Apple Inc. All Rights Reserved. Terms of Use | Privacy Policy | Updated: 2013-04-23