Retired Document
Important: This document may not represent best practices for current development. Links to downloads and other resources may no longer be valid.
Dual-Product Web Application Tutorial
This tutorial walks you through using Dashcode version 3.0 or later to create a project that produces two products: a Safari web application and a mobile Safari web application. A Safari web application is a dedicated part of a website that provides Safari users with interactivity and discrete functionality. A mobile Safari web application (also known as an iPhone web application) is web content optimized for Safari on iPhone that provides users of iOS-based devices with interactivity and discrete functionality.
As you follow the steps in this tutorial, you learn:
How to set up and work with a dual-product project
How to customize the user interface of both products
How to specify a data source
How to use bindings to automatically update each product’s user interface with data from a server
This is the third of three tutorials in this document. If you’re interested in learning how to develop a Dashboard widget, read the first tutorial, Dashboard Widget Tutorial. If you want to learn how to create a mobile Safari web application only and not a Safari web application, read the second tutorial, Mobile Safari Web Application Tutorial.
Before You Begin
In this tutorial, you create a single Dashcode project that contains two products: a Safari web application and a mobile Safari web application. A product is a set of files and resources that defines a web application optimized to run in either Safari or Safari on iPhone.
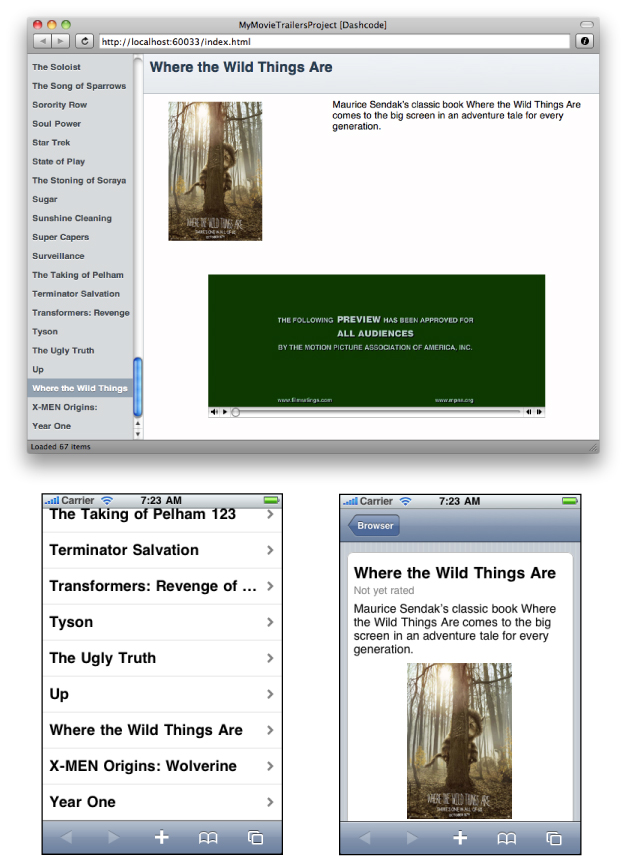
The project you create in this tutorial is based on the browser style of web application and displays current movie trailers available on Apple’s website. When you’re finished, the products will look similar to those shown in Figure 3-1.
Before continuing, make sure that you have Dashcode version 3.0 or later installed on your Mac. If you don’t have Dashcode installed, read Getting and Running Dashcode to learn how to get and install Dashcode.
Choose a Template
To start, double-click the Dashcode icon to open it. A new project window opens and a dialog appears that displays two types of projects—Safari and Dashboard—and an assortment of templates for each project type. Templates are handy starting points for creating common types of web applications and widgets. (To find out what a template does, select its icon to show a short description of its capabilities.)
For this tutorial, select the Safari project type. Then, to create a browser-type, dual-product web application project:
Select the Browser template.
Make sure both “Develop for:” checkboxes are selected (they are selected by default).
Click Choose.
The dialog disappears and the project window displays the first page of a new web application based on the Browser template, as shown in Figure 3-2.
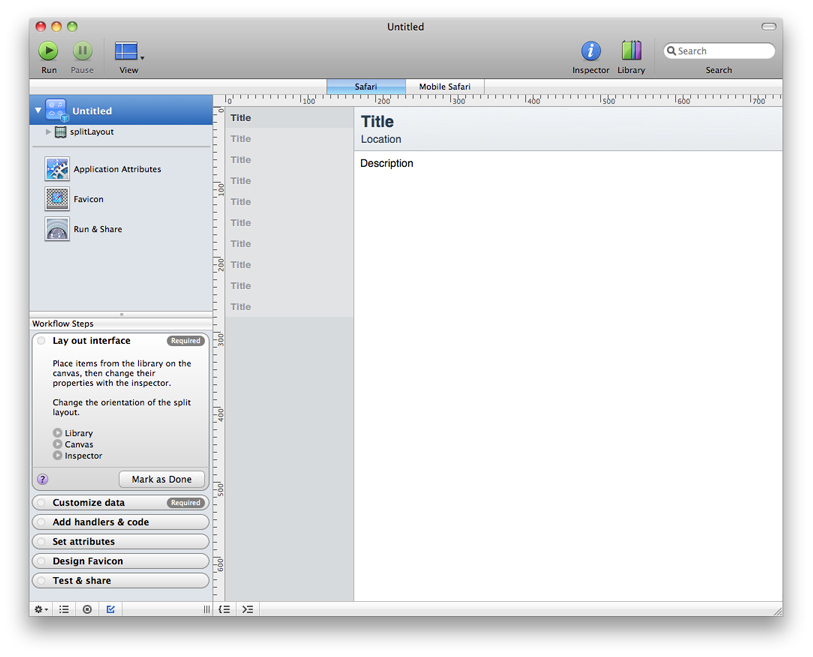
The main portion of the window is the canvas, which you use to design your web application’s interface. The bar between the canvas and the toolbar is the product bar, which contains buttons you use to switch between the products of a dual-product project. As shown in Figure 3-2, the user interface of the Safari web application is displayed on the canvas by default (note that the Safari button is selected). To see the user interface of the mobile Safari web application, click the Mobile Safari button in the product bar.
Along the left side of the project window is the navigator, which you use to switch between the various tools available when you’re designing a web application. When you switch between products in a dual-product project, the contents of the navigator changes appropriately.
At the bottom of the navigator in Figure 3-2 you can see the Workflow Steps list, which guides you through the development process. If you don’t want to see the Workflow Steps list, you can hide it by choosing View > Steps or by clicking the button that looks like a box with a checkmark in it at the bottom edge of the project window (this button is highlighted in Figure 3-2).
Alternatively, you can view a list of the current product’s data sources or code files in place of the Workflow Steps list. If you want to see the Data Sources list, click the data source button in the bottom edge of the project window (it’s to the left of the workflow steps button and it looks like a circle with a square inside it). If you want to see the Files list, choose View > Files or click the list button in the bottom edge of the project window (it’s the button to the left of the data sources button and it looks like a bulleted list).
Save and Test the Default Web Applications
You don’t need to customize your project at all to see how the default web applications work, but it’s good practice to save your project before you begin to make changes. Choose File > Save to save the project. Give your project a name, such as MyMovieTrailersProject, and select a location to save it in. The project encapsulates both web application products and the information that Dashcode needs to create them for you. If you quit Dashcode at any time, you can double-click your saved project to reopen it.
Your new web applications are already functional, even though they display only placeholder data. To prove this, start by testing the Safari web application:
Make sure the Safari button is selected in the product bar.
Click the green Run button in the Dashcode toolbar (alternatively, you can choose Debug > Run).
When you do this, Dashcode opens the Safari web application in a simulator application.
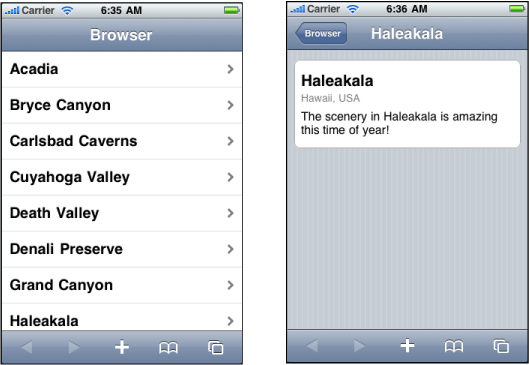
Take a few moments to use the web application. Notice that when you click the name of a park in the list along the left edge of the window, the area to the right displays information about that park. The list on the left is known as the master list, because it contains the complete list of items you can view. The right portion of the window is known as the detail area or detail view, because it shows details about the item selected in the master list. Figure 3-3 shows the default Safari web application running in the Dashcode simulator (the simulator displays the saved project name, in this case MyMovieTrailersProject, in the title bar).

After you’ve tested the Safari web application, stop the simulation and test the mobile Safari web application. To stop the simulation, you can choose Quit from the simulation application menu, press Command-Q, or click the red close button in the upper-left corner of the simulator window. Alternatively, in Dashcode, you can click the red Stop button in the toolbar.
To test the mobile Safari web application:
Select the Mobile Safari button in the product bar.
Click the green Run button in the Dashcode toolbar or choose Debug > Run.
As you use the mobile Safari web application, you see that the master list of parks takes up the entire first page. When you click a park name, a new page slides in that displays details about that park.
Notice that a back button appears near the upper-left corner of the detail page and that its label is the same as the title of the first page. You click this button to return to the previous page. The two pages of the default mobile Safari web application should look similar to those shown in Figure 3-4.
Now that you’ve seen the default appearance and behavior of both of your products, it’s time to customize them to display the movie trailer data similar to the data shown in Figure 3-1. Before you do this, be sure to quit the simulation of the mobile Safari web application. As you did after testing the Safari web application, quit the simulation by choosing Quit from the simulation application menu, pressing Command-Q, or clicking the red close button in the upper-left corner of the simulator window. Or, in Dashcode, you can click the red Stop button in the toolbar.
Customize the User Interface of the Safari Web Application
As you can see when you compare the finished Safari web application shown in Figure 3-1 with the default product shown in Figure 3-3, there are a few differences in the detail area. Specifically, the finished Safari web application displays the following details about the selected movie:
Title
Rating
Poster
Description
Trailer
This section shows you how to change the default user interface to resemble the user interface of the finished product. Before you begin, make sure the Safari button is selected in the product bar.
To make enough room to display the poster of the selected movie trailer to the left of the description, you need to move the description element to the right. Follow these steps to do this:
Click the word “Description” on the canvas. This displays a rectangular outline around the
detailDescriptionelement. Look closely at this rectangle and notice the small, circular resize handles that Dashcode displays at intervals along the perimeter.Using the resize handle on the left edge of the outlined
detailDescriptionelement, drag to the right until the word “Description” is centered horizontally in the detail area on the canvas.
Now you need to add two new parts to the canvas. If the Library isn’t open already, open it by clicking the Library button in the Dashcode toolbar or by choosing Window > Show Library. Click the Parts tab in the Library window to see the Dashcode parts you can use.
You need to add the Image part to display the selected movie’s poster in your web application. To find the Image part, you can scroll through the list of parts in the Library until you find it or you can type image in the search field at the bottom of the Library window.
Drag the Image part onto the canvas and place it to the left of the description element you moved earlier. Use the resize handles on the perimeter of the image to adjust its size until you think it looks good.
Before you can align the top edge of the image with the top edge of the description, you need to change the way Dashcode displays the Image part in relation to the other parts on the canvas. To do this, follow these steps:
If the inspector isn’t open already, click the blue Info button in the Dashcode toolbar, or choose Window > Show Inspector. Open the Metrics inspector by clicking the button that looks like a ruler in the inspector’s toolbar.
Select the Image part on the canvas. The title of the inspector changes to “Metrics (image).”
In the Layout section of the Metrics inspector, choose Absolute from the pop-up menu.
After you’ve done this, you can move the Image part so that its top edge aligns with the top edge of the description element. To do this, drag from the center of the Image part (don’t use the resize handles).
Go back to the Library and find the Video part. This part displays the selected movie’s trailer and includes playback controls. Drag the Video part onto the bottom half of the canvas, into the area below the Image part you added and below the word “Description.” Using its resize handles, adjust the size of the Video part until you think it fits well in the lower half of the canvas.
In the navigator, make sure both the image and the video elements that you added are inside the detailBox element. To do this, follow these steps:
In the navigator, slowly drag the
imageelement straight upwards until thedetailBoxelement is highlighted and a blue line appears below thedetailDescriptionelement, as shown in Figure 3-5.Figure 3-5 In the navigator, drag the imageelement into thedetailBoxelement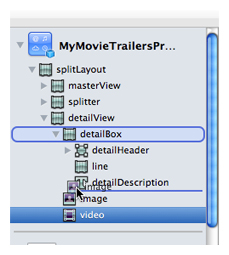
Release the mouse button. In the navigator, the
imageelement is now directly below thedetailDescriptionelement.Similarly, slowly drag the
videoelement straight upwards until thedetailBoxelement is highlighted and a blue line appears below theimageelement.Release the mouse button. In the navigator, the
videoelement is now directly below theimageelement.
After you’ve placed the new parts appropriately, the project window should look similar to the project window shown in Figure 3-6. (Note the placement of the image and video elements in the navigator.)

You do not need to add any more parts to your web application, so you might want to close the Library window. However, you’ll need to open it again when you customize the user interface of the mobile Safari web application.
Specify a Data Source and Examine the Data Model
Now that you’ve completed the user interface of the Safari web application, it’s time to specify a data source that supplies actual data in place of the default placeholder data the template provides.
As described in Before You Begin, your finished products display movie-trailer information from Apple’s website. To make this happen, you need to give Dashcode the correct URL. To do this, follow these steps:
Show the Data Sources list in the navigator. To do this, click the data sources button in the lower-left corner of the project window (it’s the one that looks like a circle with a square inside it). After you do this, you should see two data sources in the Data Sources list, one named
dataSourceand one nameditemsList.Select
dataSourcein the Data Sources list. This reveals a view below the canvas, which contains the layout of data in the data source. This layout is called the data model.Paste the following URL into the URL field at the top of the data model view:
http://www.apple.com/trailers/home/xml/current.xmlClick the Reload button to the right of the URL field or press Return.
If you’ve entered the URL correctly, Dashcode refreshes the data model view to display the layout of the new data source and some current movie-trailer data from Apple’s website.
Take some time to look at the data model. Notice that it is a hierarchy with each member, called a property, displayed on a separate line. A property that contains other properties has a disclosure triangle to the left of it.
The data model also displays bindings and binding controls. As you can see in Figure 3-7, a gray capsule that contains the text itemsList.dataArray is displayed to the right of the top-level content property. This capsule represents a completed binding that Dashcode provides by default in the Browser template. This binding means that the itemsList element on the canvas can get its information from the content property in the data source.
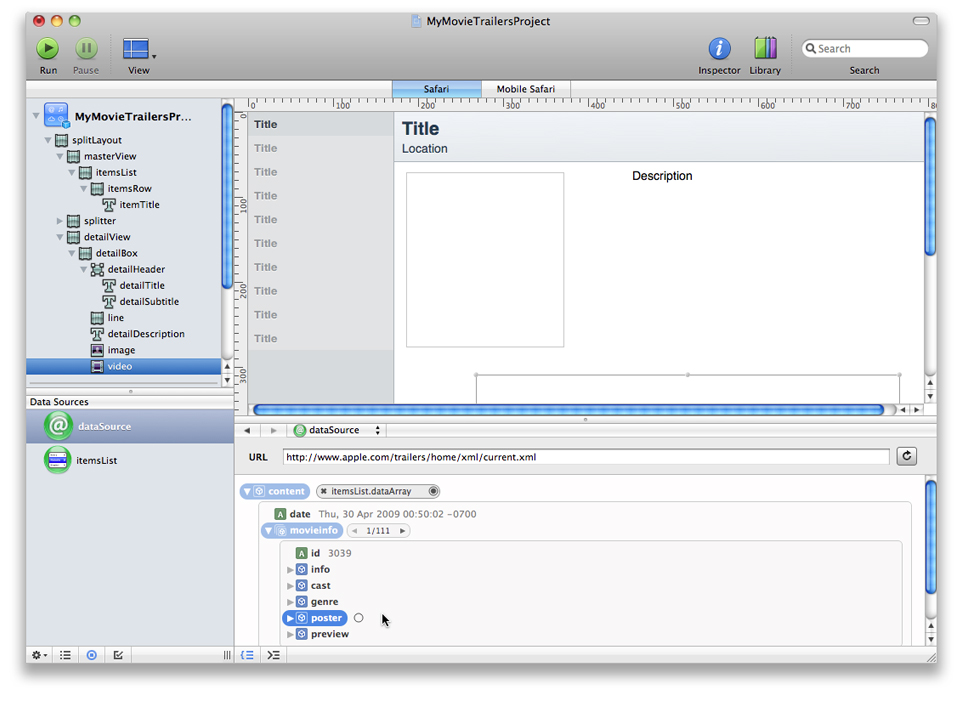
If a property in the data model does not already have a binding, moving the mouse pointer over the property reveals a circular binding control to the right of the property. For example, in Figure 3-7 you can see a binding control revealed next to the poster property.
Because the data source you’ve specified is available to both products your project creates, you do not have to perform the steps in this section again when you switch to the mobile Safari product. However, you must create a separate set of bindings in each product. This is because bindings connect properties in the data source with elements in the user interface, and each product can have a different set of elements in its user interface.
Create Bindings for the Safari Web Application
As mentioned in Specify a Data Source and Examine the Data Model, there is already a binding in the data model view of the data source named dataSource. In this tutorial, you do not change this existing binding between the content property and the itemsList element, but you do create a few new bindings.
Create the First Binding
The first binding you create identifies which data source property should supply the movie titles to display in the web application’s master list. To do this, make sure you can still see the data model for dataSource and that the disclosure triangle next to the content property is pointing down (you should see something similar to the data model shown in Figure 3-7). Then, follow these steps:
If it’s not already pointing down, click the disclosure triangle next to the
movieinfoproperty to open it. Then, click the disclosure triangle next to theinfoproperty (it’s inside themovieinfoproperty).Press and hold the mouse button on the binding control next to the
titleproperty (it’s the first property inside theinfoproperty).Without releasing the mouse button, drag from the binding control to the item title element on the canvas (it’s the first occurrence of the word “Title” in the master list on the canvas).
When you do this, you should see a blue connection line extend from the binding control to the item title element and a little gray box that contains the element’s name,
itemTitle, as shown in Figure 3-8.Figure 3-8 Dashcode displays a blue connection line between a data source property and an element on the canvas 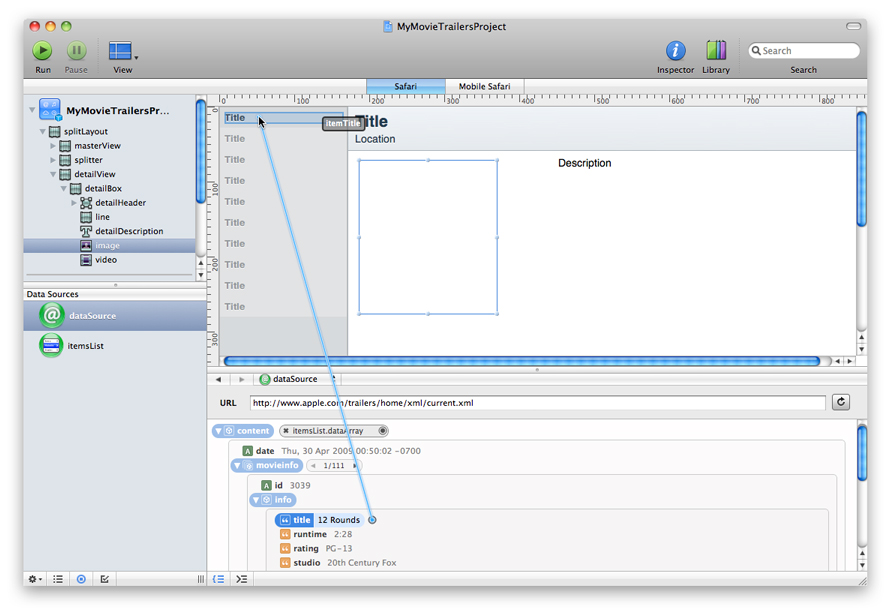
Release the mouse button while the item title element is highlighted. Immediately, Dashcode displays a contextual menu that lists the bindable properties for this element.
In this case, you should see a contextual menu that contains: text, editable, visible, enabled, html, and class.
In this contextual menu, choose text.
Note that if you click outside the contextual menu, the binding does not complete and you must start over from step 2.
After you finish these steps, you should see a new gray capsule in the data model. This capsule should be next to the title property and should contain the text itemTitle.text.
Create the Remaining Bindings
Now you need to create bindings to parts in the detail area of your Safari web application. Even though these new bindings are between different data source properties and parts, the actions you take to create each one are very similar to the actions described in steps 2 through 5 in Create the First Binding.
The new bindings you need to create are from properties in the itemsList data source. To reveal the data model for this data source, click itemsList in the Data Sources list.
The four new bindings you need to create are described below. You do not have to create these bindings in the order given, but you must create each one using the precise properties and elements described. Before you begin, make sure the disclosure triangle next to the selection property is pointing down, because all the properties you need to use are inside this property.
Bind the title of the selected movie to the title in the detail header.
In the data model, find the
titleproperty inside theinfoproperty.Drag from the
titleproperty’s binding control to thedetailTitleelement on the canvas. (On the canvas, thedetailTitleelement displays the word “Title” in a large font, and appears above the word “Location.”)Choose text from the contextual menu that appears when you release the mouse button.
Bind the description of the selected movie to the description that appears above the video.
In the data model, find the
descriptionproperty inside theinfoproperty.Drag from the
descriptionproperty’s binding control to thedetailDescriptionelement on the canvas. (ThedetailDescriptionelement is the one you moved to the right to make room for the Image part in Customize the User Interface of the Safari Web Application).Choose text from the contextual menu that appears when you release the mouse button.
Bind the poster of the selected movie to the Image part.
In the data model, find the
xlargeproperty inside theposterproperty.Drag from the
xlargeproperty’s binding control to theimageelement on the canvas (this is the Image part you added in Customize the User Interface of the Safari Web Application).Choose src from the contextual menu that appears when you release the mouse button.
Bind the trailer of the selected movie to the Video part.
In the data model, find the
largeproperty inside thepreviewproperty.Drag from the
largeproperty’s binding control to thevideoelement on the canvas (this is the Video part you added in Customize the User Interface of the Safari Web Application)Choose src from the contextual menu that appears when you release the mouse button.
After you’ve finished creating these bindings, you’ve completed all the steps necessary to produce a Safari web application that looks similar to the one shown in Figure 3-1.
Test the Safari Web Application
If you haven’t saved your project recently, save it now. Make sure the Safari button is still selected in the product bar and click Run to test your product. If this is the first time you’ve run your web application since you specified Apple’s website for the dataSource data source in Specify a Data Source and Examine the Data Model, Dashcode displays a dialog that asks you if you want to simulate running on the domain that hosts that website. Click Simulate in this dialog so you can see the data from the website.
You should see something similar to the Safari web application shown in Figure 3-1. Note that you will probably see a different list of movies, depending on which movie trailers are available.
Scroll the master list and select a movie title. Click the Video part’s playback control to see the trailer for the movie you selected.
Customize the User Interface of the Mobile Safari Web Application
Now that your Safari web application is in good shape, it’s time to turn your attention to your mobile Safari web application. Although you don’t need to make any changes to the master list displayed on the first page, you do want to display the poster for the selected movie on the detail page, as shown in Figure 3-1. Before you begin, be sure to select the Mobile Safari button in the product bar.
To show the detail page on the canvas, click detailLevel in the navigator. If you don’t see detailLevel listed in the navigator, open the disclosure triangles next to browser and next to stackLayout to reveal it.
As you did with the Safari web application, you need to add the Image part to your page. If the Library is not already open, open it by clicking the Library button in the Dashcode toolbar or choose Window > Show Library. Click the Parts tab in the Library window to see the available parts. Find the Image part by scrolling through the list of parts or by typing image in the search field at the bottom of the Library window.
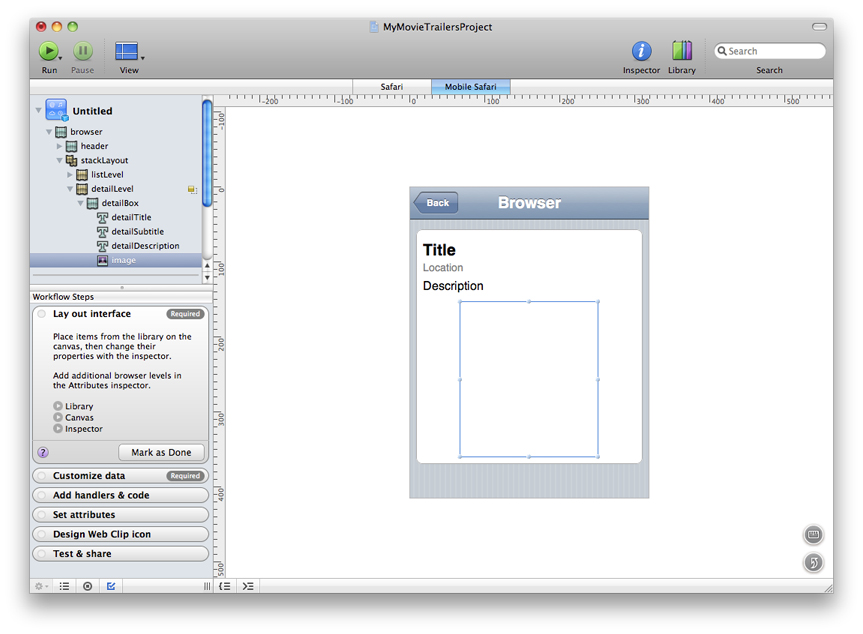
Place the Image part inside the white box on the detail page, below the title, location, and description elements. To do this, drag the Image part onto the canvas and, without releasing the mouse button, drag it towards the bottom edge of the white box until the title, location, and description elements jump above the Image part. If you happen to release the mouse button before you finish placing the Image part, delete the Image part, drag in a new one, and try again.
Adjust the size of the Image part by using its resize handles until you think it fits well into the space inside the white box. After you do this, your project window should look something like the project window shown in Figure 3-9:
Create Bindings for the Mobile Safari Web Application
In this section, you’ll create five bindings: one to an element on the master list page and four to elements on the detail page. Before you begin, make sure the Mobile Safari button is selected in the product bar.
Create a Binding to an Element on the Master List Page
The first binding you create identifies which data source property should supply the movie titles to your web application’s master list. (If you don’t remember the meaning of terms such as data source and property, see Specify a Data Source and Examine the Data Model.) To show the master list on the canvas, click the listLevel element in the navigator. If you don’t see listLevel listed in the navigator, open the disclosure triangles next to browser and stackLayout.
If the Data Sources list isn’t already visible in the navigator, show it by clicking the data sources button in the lower-left corner of the project window (it’s the one that looks like a circle with a square inside it). Select dataSource in the Data Sources list to reveal its data model. Notice that the URL you entered for your Safari web application is already in the URL field.
To bind the movie titles to the master list’s row titles, open the disclosure triangle next to the content property and do the following:
In the data model, find the
titleproperty inside theinfoproperty.Drag from the
titleproperty’s binding control to therowTitleelement on the canvas. (TherowTitleelement contains the first occurrence of the word “Item” in the list.)Choose text from the contextual menu that appears when you release the mouse button.
Create Four Bindings to Elements on the Detail Page
Now create the four bindings you need on the detail page. In the navigator, select the detailLevel element to show the detail page on the canvas. In the Data Sources list, select the list data source to reveal its data model. In the data model, make sure the disclosure triangle next to the selection property is pointing down, because all the properties you need to use are inside this property.
Bind the title of the selected movie to the title in the white box.
In the data model, find the
titleproperty inside theinfoproperty.Drag from the
titleproperty’s binding control to thedetailTitleelement on the canvas. (ThedetailTitleelement contains the word “Title” on the canvas.)Choose text from the contextual menu that appears when you release the mouse button.
Bind the rating of the selected movie to the subtitle in the white box.
In the data model, find the
ratingproperty inside theinfoproperty.Drag from the
ratingproperty’s binding control to thedetailSubtitleelement on the canvas. (ThedetailSubtitleelement contains the word “Location” on the canvas.)Choose text from the contextual menu that appears when you release the mouse button.
Bind the description of the selected movie to the description in the white box.
In the data model, find the
descriptionproperty inside theinfoproperty.Drag from the
descriptionproperty’s binding control to thedetailDescriptionelement on the canvas. (ThedetailDescriptionelement contains the word “Description" on the canvas.)Choose text from the contextual menu that appears when you release the mouse button.
Bind the poster of the selected movie to the Image part.
In the data model, find the
xlargeproperty inside theposterproperty.Drag from the
xlargeproperty’s binding control to theimageelement on the canvas (this is the Image part that you added in Customize the User Interface of the Mobile Safari Web Application).Choose src from the contextual menu that appears when you release the mouse button.
After you’ve finished creating these bindings, you’ve completed all the steps necessary to produce a mobile Safari web application that looks similar to the one shown in Figure 3-1.
Test the Mobile Safari Web Application
If you haven’t saved your project recently, save it now. Make sure the Mobile Safari button is still selected in the product bar and click Run to test your product. You do not see the dialog that asks you if you want to simulate running on the www.apple.com domain, because Dashcode continues to simulate running on the remote domain you specify until you change it.
On the first page you should see a long list of current movie titles. Click a title and you should see the rating, description, and poster for that movie.
Next Steps
Congratulations! You’ve learned how to use Dashcode to create a dual-product project that produces two web application products.
To learn about deploying your products, see Deploying a Web Application.
Copyright © 2012 Apple Inc. All Rights Reserved. Terms of Use | Privacy Policy | Updated: 2012-02-16