Implementation Strategy
Follow the implementation guidelines in this chapter to avoid common pitfalls and produce incrementally testable code. Although your backing data store (and therefore the implementation of your incremental store) will be unique, the guidelines below lay the foundation for any store. You will learn how to:
Set up an incremental store
Translate between your custom unique identifiers and
NSManagedObjectIDinstancesRespond to fetch requests
Fulfill attribute faults
Handle scope modifiers and sort descriptors
Respond to save requests (create, update, and destroy objects)
Fulfill to-one relationship faults
Fulfill to-many relationship faults
Report errors
Setting Up an Incremental Store
The NSIncrementalStore class is an abstract subclass of the NSPersistentStore class that defines the communication mechanisms between your custom store and the Core Data framework. To begin setting up the store, create a new class that inherits from NSIncrementalStore.
You need to register your NSIncrementalStore class with the Core Data framework before you can use the store in your app. The persistent store coordinator creates instances of your class as needed by performing a lookup using the store type string constant you provide. The easiest way to ensure that registration happens before you attempt to add the custom incremental store to your persistent store coordinator is to perform registration in iOS using application:didFinishLaunchingWithOptions: and to perform registration in OS X using applicationDidFinishLaunching:.
func application(application: UIApplication, didFinishLaunchingWithOptions launchOptions: [NSObject: AnyObject]?) -> Bool { |
NSPersistentStoreCoordinator.registerStoreClass(XYZMyIncrementalStore.self, forStoreType: "XYZMyIncrementalStore") |
} |
- (BOOL)application:(UIApplication *)application didFinishLaunchingWithOptions:(NSDictionary *)launchOptions { |
[NSPersistentStoreCoordinator registerStoreClass:[XYZMyIncrementalStore class] |
forStoreType:@"XYZMyIncrementalStore"]; |
} |
When you add your incremental store to your persistent store coordinator, the persistent store coordinator creates an instance of your class and asks it to perform basic validation and setup by invoking loadMetadata:.
In your implementation of loadMetadata:, you validate the URL used to create the store, load metadata from the backing data store if it already exists, and you create the store object’s metadata dictionary. At a minimum, the metadata dictionary must contain the following two key-value pairs:
A unique identifier for the store at the given URL. It must be uniquely and reproducibly derivable, such that multiple instances of your store return the same UUID.
The string identifier you used to register the store with the persistent store coordinator.
If the store is new, you may optionally choose not to create and set the store’s metadata. In this case, basic metadata is automatically created for you. Return NO and set the error parameter if the store metadata is invalid. For example, return NO on two conditions: if the URL is an HTTP URL when your store expects a file URL, or if the user doesn’t have permissions to access the store.
func loadMetadata() throws -> Bool { |
guard let storeURL = self.URL else { |
throw IncrementalStoreError.NoStoreURL |
} |
// ... metadata validation |
let metadata = [NSStoreUUIDKey: "<#key loaded from backing data store#>", NSStoreTypeKey: "XYZIncrementalStore"] |
self.metadata = metadata |
return true |
} |
- (BOOL)loadMetadata:(NSError *__autoreleasing *)error { |
NSURL *storeURL = [self URL]; |
// ... metadata validation |
NSDictionary *metadata = @{NSStoreUUIDKey: <#key loaded from backing data store#>, |
NSStoreTypeKey: @"XYZMyIncrementalStore"}; |
[self setMetadata:metadata]; |
return YES; |
} |
In addition, if your backing store supports schema migration, you save to your backing data store the automatically generated model version hashes in the metadata dictionary with the key NSStoreModelVersionHashes.. On subsequent loads, retrieve the model version hashes and store them in the metadata dictionary. If the model version hashes in your backing data store are different from the ones returned by the current model in your app, the persistent store coordinator performs migration.
Translating Between Custom Unique Identifiers and Managed Object IDs
Create utility methods that map between the unique identifiers in your backing data store and the NSManagedObjectID instances you use to identify objects in memory. Typically, a unique identifier corresponds to a primary key in your data store. Associate an NSManagedObjectID instance with a reference object of type NSString or NSNumber. While the reference object is declared as type id, do not use any other object type.
NSIncrementalStore provides two methods to facilitate translation:
newObjectIDForEntity:referenceObject:Use this method to create a managed object ID for an entity with a given reference object.
Use this method to retrieve the reference object for a given managed object ID.
Creating an NSManagedObjectID instance is as simple as requesting it from your incremental store.
let uniqueIdentifier = ... |
let entityDescription = ... |
let objectID = self.newObjectID(entityDescription, referenceObject: uniqueIdentifier) |
id uniqueIdentifier = ... |
NSEntityDescription *entityDescription = ... |
NSManagedObjectID *objectID = [self newObjectIDForEntity:entityDescription referenceObject:uniqueIdentifier]; |
Likewise, retrieving the reference object for an NSManagedObjectID instance is just as simple.
let objectID = ... |
let referenceObject = self.referenceObject(objectID) |
NSManagedObjectID *objectID = ... |
id referenceObject = [self referenceObjectForObjectID:objectID]; |
Responding to Fetch Requests
When a fetch or save request is executed, the persistent store coordinator forwards the request to your incremental store. Save requests are covered in Responding to Save Requests (Creating, Updating, and Destroying Objects). In this section, the focus is on fetch requests.
In the most common case, you respond to a fetch request with an array of NSManagedObject instances. These instances have associated managed object IDs that are based on the information contained in the NSFetchRequest object you receive. There is no need to retrieve the properties on the object right now; Core Data will return properties as faults. Prefetching properties is discussed in Caching and Prefetching.
Because fetch requests can quickly become complex, begin by implementing all that’s needed to return an array of every managed object of a single entity type. Handling Scope Modifiers and Sort Descriptors introduces more complicated requests.
The persistent store coordinator invokes executeRequest:withContext:error: on your incremental store and passes in an NSPersistentStoreRequest object. After checking that the request is indeed a fetch request, you cast the request to an NSFetchRequest type and begin formulating a response.
override func executeRequest(request: NSPersistentStoreRequest, withContext context: NSManagedObjectContext?) throws -> AnyObject { |
switch request { |
case let fetchRequest as NSFetchRequest: |
let entity = fetchRequest.entity |
... |
- (id)executeRequest:(NSPersistentStoreRequest *)request withContext:(NSManagedObjectContext *)context error:(NSError *__autoreleasing *)error { |
if ([request requestType] == NSFetchRequestType) { |
NSFetchRequest *fetchRequest = (NSFetchRequest *)request; |
NSEntityDescription *entity = [fetchRequest entity]; |
... |
Next, retrieve the unique identifiers for every object of the specified entity type from your backing data store, create managed object IDs from those identifiers, and ask the context for managed objects with those object IDs. Add all of the managed objects to an array and return the array.
... |
let primarKeys = ... |
var fetchedObjects = [NSManagedObject]() |
for primaryKey in primaryKeys { |
let objectID = <#your method that returns an object ID with an identifier and entity#> |
let managedObject = context.objectWithID(objectID) |
fetchedObjects.append(managedObject) |
} |
return fetchedObjects |
} |
} |
... |
NSArray *primaryKeys = ... |
NSMutableArray *fetchedObjects = [NSMutableArray arrayWithCapacity:[primaryKeys count]]; |
for (NSString *primaryKey in primaryKeys) { |
NSManagedObjectID *objectID = <#your method that returns an object ID with an identifier and entity#> |
NSManagedObject *managedObject = [context objectWithID:objectID]; |
[fetchedObjects addObject:managedObject]; |
} |
return fetchedObjects; |
} |
} |
Checkpoint
At this point, your incremental store can respond to fetch requests with faults.
Setup: Construct a simple Core Data stack with one entity, and manually prepopulate your backing data store with several rows of test data.
Test: Execute a simple fetch request on the store, asking for all objects of a single entity type. If all goes well, the managed object context returns an array of NSManagedObject instances with valid object IDs. All of the values on these managed objects appear as faults (and raise an exception if accessed).
What Is a Fault?
Faulting (see Faulting and Uniquing in Core Data Programming Guide) allows for increased flexibility in memory use by deferring the materialization of property values until they are needed by the user. See Figure 1-1, which shows the logic used by Core Data and your incremental store when a property is accessed.
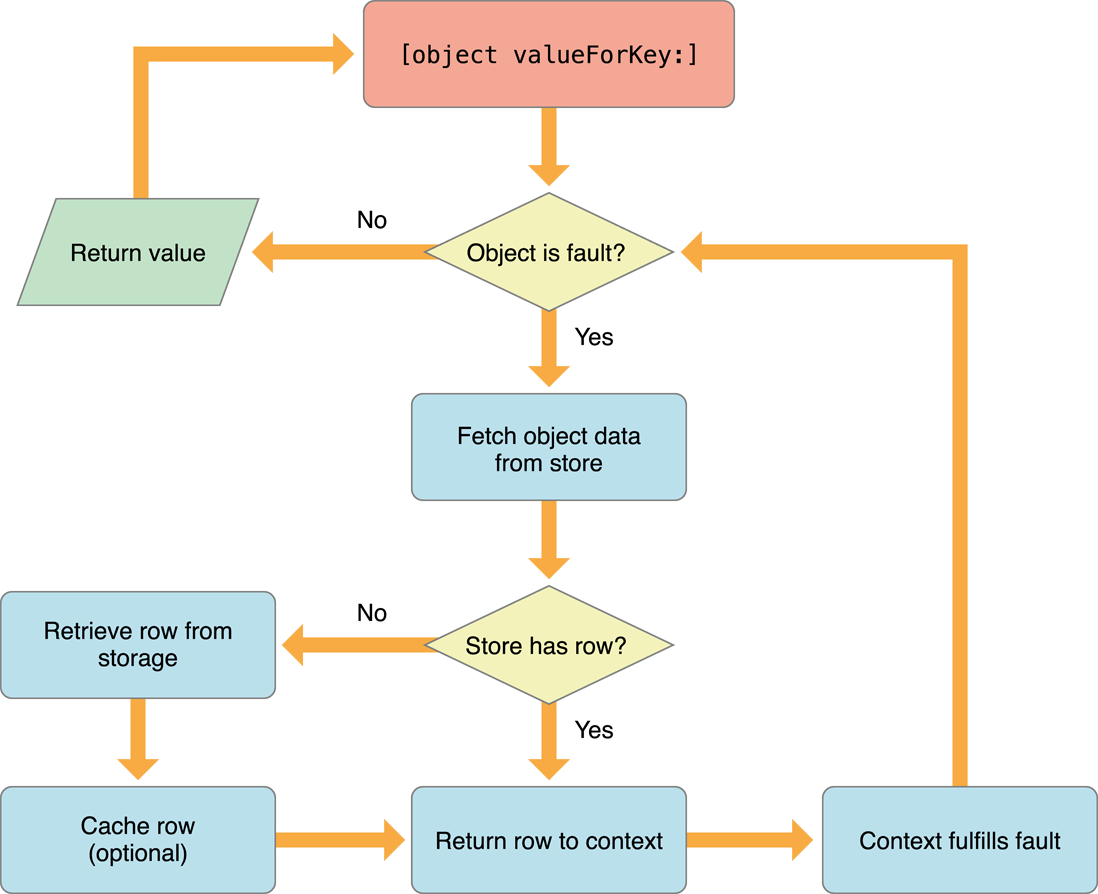
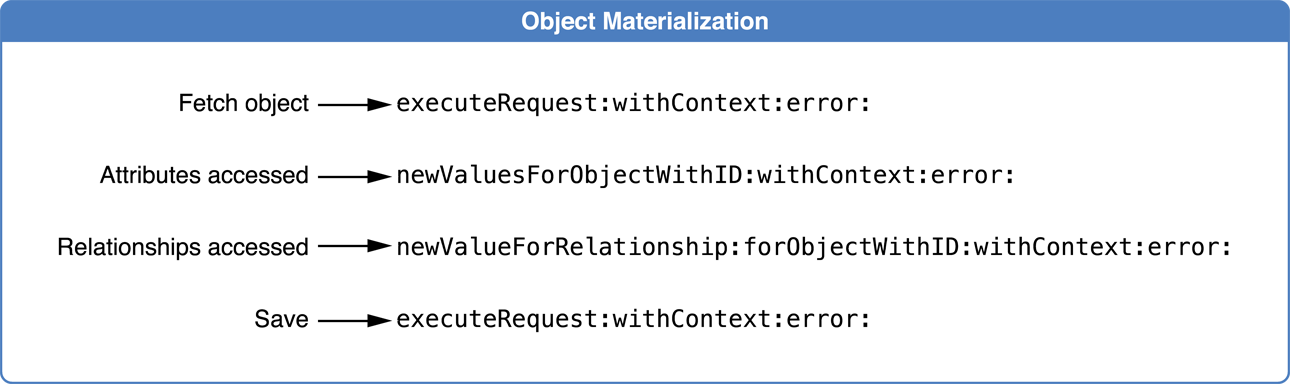
When a managed object is first returned—as part of the result set from executeRequest:withContext:error:—it is a fault. At some later point, the user may attempt to access properties of that object, at which point Core Data calls newValuesForObjectWithID:withContext:error: or newValueForRelationship:forObjectWithID:withContext:error:, or both, for the object. Figure 1-2 shows the actions that trigger your incremental store’s methods to run.
Fulfilling Attribute Faults
When a fault has been fired on a managed object, the persistent store coordinator sends your incremental store a newValuesForObjectWithID:withContext:error: message asking the store to retrieve the values for the attributes on a managed object. The persistent store coordinator uses these values to fulfill faults. The coordinator expects you to return an object of type NSIncrementalStoreNode that encapsulates the attribute values being faulted into memory. Create an incremental store node with an NSDictionary object containing key-value pairs where keys are names of properties on the entity Core Data is faulting in.
override func newValuesForObjectWithID(objectID: NSManagedObjectID, withContext context: NSManagedObjectContext) throws -> NSIncrementalStoreNode { |
let uniqueIdentifier = <#your method for retrieving a unique identifier from an objectID #> |
// Retrieve the values and version for the object with the specified unique identifier from your backing store |
let values = ... |
let version: UInt64 = ... |
let node = NSIncrementalStoreNode(objectID: objectID, withValues: values, version: version) |
return node |
} |
- (NSIncrementalStoreNode *)newValuesForObjectWithID:(NSManagedObjectID *)objectID withContext:(NSManagedObjectContext *)context error:(NSError *__autoreleasing *)error { |
NSString *uniqueIdentifier = <#your method for retrieving a unique identifier from an object ID#> |
// Retrieve the values and version for the object with the specified unique identifier from your backing store |
NSDictionary *values = ... |
uint64_t version = ... |
NSIncrementalStoreNode *node = [[NSIncrementalStoreNode alloc] initWithObjectID:objectID withValues:values version:version]; |
return node; |
} |
Here, the incremental store node’s version number corresponds to the version of the data as it existed when it was last fetched. The version number is used by the persistent store coordinator to detect and handle merge conflicts. The version number should be stored with the record and incremented whenever the record is saved.
To learn how to reply with to-one relationships using newValuesForObjectWithID:withContext:error:, see Fulfilling To-One Relationship Faults.
Checkpoint
At this point, your incremental store can respond to fetch requests and fulfill attribute faults.
Setup: Construct a simple Core Data stack with one entity, and manually prepopulate your backing data store with several rows of test data. Consider creating a table view based app to display the data visually.
Test: Execute a fetch request, log the objects returned, and print their values. You will notice that simply executing the fetch request does not cause any value faults to be fired; you must attempt to inspect an object for Core Data to fault in attribute values.
Handling Scope Modifiers and Sort Descriptors
You use scope modifiers and sort descriptors to limit and order the results returned from a fetch. For the greatest performance, your incremental store should offload as much work as possible to the backing data store. When your backing store cannot handle a scope modifier or sort descriptor, you may operate on the results in memory.
To perform a fetch or use an NSFetchedResultsController object, your incremental store class must support sort descriptors on a fetch request. Sort descriptors describe the property on an entity to compare with and specify whether the results should be in ascending or descending order. However, you should not attempt to support every sort descriptor and scope modifier. Rather, design your store around the requirements of your app.
Scope modifiers change the result set by limiting which objects of a particular entity may be returned—either by limiting the count or by enforcing a predicate. You can read more about predicate formatting in the Predicate Programming Guide and learn how to parse predicates in Parsing Predicates.
Checkpoint
You can now execute fetch requests with simple sort descriptors and scope modifiers.
Setup: Construct a simple Core Data stack with one entity, and manually prepopulate your backing data store with several rows of test data.
Test: Create fetch requests with predicates and sort descriptors. Verify that the results are properly filtered and returned in the correct order.
Responding to Save Requests (Creating, Updating, and Destroying Objects)
When a managed object context is instructed to save, it informs its persistent store coordinator. The coordinator works with the managed object context to sort in-memory objects into four sets:
Created
Updated
Deleted
Unchanged
The store coordinator discards the set of objects that have not changed and sends the three remaining sets to your incremental store.
Special Case: Creating Objects
Objects created in memory by a managed object context are first assigned temporary object IDs so that they may be uniquely identified without involving the persistent store. When a context is saved, however, the persistent store coordinator asks your incremental store to provide permanent object IDs for these objects.
First, the persistent store coordinator invokes obtainPermanentIDsForObjects:error: with the collection of newly created managed objects. This is your store’s chance to request permanent object IDs from your backing data store. Then, the coordinator invokes executeRequest:withContext:error: to process every transaction.
override func obtainPermanentIDsForObjects(array: [NSManagedObject]) throws -> [NSManagedObjectID] { |
var objectIDs = [NSManagedObjectID]() |
for managedObject in array { |
let objectID = <#request a primary key from your backing data store and use your method to convert the key into an NSManagedObjectID#> |
objectIDs.append(objectID) |
} |
return objectIDs |
} |
- (NSArray *)obtainPermanentIDsForObjects:(NSArray *)array error:(NSError *__autoreleasing *)error { |
NSMutableArray *objectIDs = [NSMutableArray arrayWithCapacity:[array count]]; |
for (NSManagedObject *managedObject in array) { |
NSManagedObjectID *objectID = <#request a primary key from your backing data store and use your method to convert the key into an NSManagedObjectID#> |
[objectIDs addObject:objectID]; |
} |
return objectIDs; |
} |
Handling Save Requests
After asking your incremental store to provide permanent object IDs for newly created objects, the persistent store coordinator then invokes executeRequest:withContext:error:. The store coordinator passes in an NSSaveChangesRequest object containing the insert, update, and delete transaction sets. Remember to set the version number to one for newly inserted objects and to increment the version number of updated objects for optimistic locking. A fourth set, lockedObjects, contains objects that haven’t changed but that have been marked for optimistic locking. You should increment the version number for these objects as well. For more on handling optimistic locking failures, see Optimistic Locking.
override func executeRequest(request: NSPersistentStoreRequest, withContext context: NSManagedObjectContext?) throws -> AnyObject { |
switch request { |
case let fetchRequest as NSFetchRequest: |
... |
case let saveRequest as NSSaveChangesRequest: |
let insertedObjects = saveRequest.insertedObjects |
let updatedObjects = saveRequest.updatedObjects |
let deletedObjects = saveRequest.deletedObjects |
let optLockObjects = saveRequest.lockedObjects |
return [AnyObject]() |
default: |
throw IncrementalStoreError.InvalidRequest |
} |
} |
- (id)executeRequest:(NSPersistentStoreRequest *)request withContext:(NSManagedObjectContext *)context error:(NSError *__autoreleasing *)error { |
if ([request requestType] == NSFetchRequestType) { |
... |
} else if ([request requestType] == NSSaveRequestType) { |
NSSaveChangesRequest *saveRequest = (NSSaveChangesRequest *)request; |
NSSet *insertedObjects = [saveRequest insertedObjects]; |
NSSet *updatedObjects = [saveRequest updatedObjects]; |
NSSet *deletedObjects = [saveRequest deletedObjects]; |
NSSet *optLockObjects = [saveRequest lockedObjects]; |
// ... Perform any operations on your backing data store needed to persist the changes. set and increment version numbers. |
return @[]; |
} |
} |
After persisting the changes to your backing data store, return an empty array to signify success.
Checkpoint
You can now create, delete, and make changes to new managed objects.
Setup: Construct a simple Core Data stack with two entities, and manually prepopulate your backing data store with several rows of test data.
Test: Create several managed objects, set their properties, and save their associated managed object context. Re-fetch to ensure that that objects were successfully persisted.
Fulfilling To-One Relationship Faults
Core Data represents to-one relationships between entities by using NSManagedObjectID instances. By relating managed objects using managed object IDs rather than relating directly to other managed objects, Core Data does not need to fault in all your sets of related objects.
If the backing data store makes to-one relationships readily available, your incremental store returns to-one relationships in newValuesForObjectWithID:withContext:error:. If your app and data store are more efficient when all relationship fetching is deferred, your store may instead return them in newValuesForRelationship:forObjectWithID:withContext:error:, which is discussed in the next section.
Store to-one relationships as unique identifiers alongside entity values in your backing data store and retrieve both in a single request. Translate the unique identifiers into object IDs, and replace your unique identifiers with the object IDs in the values dictionary.
override func newValuesForObjectWithID(objectID: NSManagedObjectID, withContext context: NSManagedObjectContext) throws -> NSIncrementalStoreNode { |
let values = ... |
// ... Convert raw unique identifiers for to-one relationships into NSManagedObjectID instances |
... |
let node = NSIncrementalStoreNode(objectID: objectID, withValues: values, version: version) |
return node |
- (NSIncrementalStoreNode *)newValuesForObjectWithID:(NSManagedObjectID *)objectID withContext:(NSManagedObjectContext *)context error:(NSError *__autoreleasing *)error { |
... |
NSDictionary *values = ... |
// ... Convert raw unique identifiers for to-one relationships into NSManagedObjectID instances |
... |
NSIncrementalStoreNode *node = [[NSIncrementalStoreNode alloc] initWithObjectID:objectID withValues:values version:version]; |
return node; |
} |
Checkpoint
You can now create and persist to-one relationships between two objects.
Setup: Construct a simple Core Data stack with two entities, and manually prepopulate your backing data store with several rows of test data.
Test: Create a to-one relationship between your two entities. Test that you can create, remove, and persist a relationship between two managed objects.
Fulfilling To-Many Relationship Faults
To-many relationships between entities are represented by sets of managed object IDs. By relating objects with sets of object IDs rather than directly to sets of objects, Core Data does not need to fault in your entire object graph. To-many relationships are generally more expensive to query for and can potentially consume large amounts of memory. Therefore Core Data faults in to-many relationships separately from to-one relationships and values, in newValuesForRelationship:forObjectWithID:withContext:error:.
Use the relationship’s name method to determine which relationship is being faulted in. Request the unique identifiers for this relationship from your backing store, and return managed objects representing the entities.
override func newValueForRelationship(relationship: NSRelationshipDescription, forObjectWithID objectID: NSManagedObjectID, withContext context: NSManagedObjectContext?) throws -> AnyObject { |
let relationshipName = relationship.name |
let objectIDs = <#retrieve the object ID(s) for the relationship from your backing data store#> |
return objectIDs |
} |
- (id)newValueForRelationship:(NSRelationshipDescription *)relationship forObjectWithID:(NSManagedObjectID *)objectID withContext:(NSManagedObjectContext *)context error:(NSError *__autoreleasing *)error { |
NSString *relationshipName = [relationship name]; |
NSArray *objectIDs = <#retrieve the object ID(s) for the relationship from your backing data store#> |
return objectIDs; |
} |
Return a collection of managed object IDs for a to-many relationship in an NSArray object. This approach also allows you to support ordered relationships.
When dealing with relationships, you may notice that the inverse relationship is not explicitly handled. Rather, relationships are all expressed in one direction. Therefore a bidirectional many-to-many relationship is no more difficult to handle than a one-to-many relationship.
Checkpoint
You can now create and persist to-many relationships between entities.
Setup: Construct a simple Core Data stack with two entities, and manually prepopulate your backing data store with several rows of test data.
Test: Add a to-many relationship as the inverse relationship of your existing to-one relationship between the two entities in your model. Test your incremental store’s ability to add and remove objects in a relationship as well as persist the to-many relationship with your backing data store.
Error Reporting
Core Data forwards errors from your incremental store to the request creator. Your incremental store should be prepared to report internal errors as well as issues with a request’s properties. Rather than raise an exception, it is usually sufficient to return nil or NO as appropriate and provide an NSError object with a clear, actionable error message.
Copyright © 2016 Apple Inc. All Rights Reserved. Terms of Use | Privacy Policy | Updated: 2016-03-21