Retired Document
Important: This document has been replaced by App Distribution Guide. App Distribution Guide offers step-by-step instructions for configuring, testing, and submitting your app for approval. This new document describes how to use Xcode and other Apple developer tools to create and configure your project, request signing certificates, create provisioning profiles, configure special App Store technologies, test your app on devices, create your app record in iTunes Connect, and submit your app for approval to Apple. If you have a company Apple Developer Program membership, you’ll also learn how to manage your team’s certificates and provisioning assets.
Building an App for the App Store
Here are the steps to create and ship an app for the App Store. Although these steps are presented in a specific, logical order, occasionally the needs of your app or your development team require you to perform these steps in a different order or even backtrack to a step you have already performed. For example, any time you add someone to your team, you have to go back and perform some administration tasks.
Figure 1-1 shows a high-level overview of the development process; each of these steps is primarily an administrative step or a coding step. Administrative steps are usually handled by the team agent or someone the team agent has delegated some authority to. Coding tasks are primarily handled by programmers on the team.
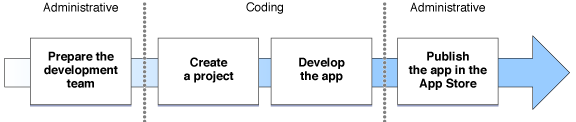
The remainder of this chapter explains each of these steps. Later chapters go into more detail about the steps and the kinds of tasks that must be performed to complete them.
Prepare the Development Team
One person signs up as a team agent and in the process creates a new development team. The team agent can invite other people to join the team and set their access privileges. Finally, the team sets up code signing certificates and other resources necessary for developers on the team to sign apps.
Configure the Project
The next step is to create a new Xcode project for the app. You choose an Xcode template that most closely corresponds to the kind of app you want to make and customize the initial settings for the app. You also create other items required to sign and publish your app.
Depending on the design of your app and the services you plan to use in it, you may find yourself performing other kinds of app configuration in this step. Some Apple technologies require a combination of code you write and data you configure to operate properly. For example, Apple Push Notification Service requires you to create special certificates used to authenticate your server to the push notification service. If you know up front that you plan to use push notification in your app, you may also create these push notification certificates during this step.
Develop the App
This step is what most people think of when they talk about developing an app: Designing user interfaces and functionality, implementing those ideas in code, and testing the resulting app to ensure it works correctly. While a lot of this work is programming, this step also includes other important tasks, such as creating data assets used by the app. These assets, including but not limited to icons, sound files, and artwork, are used directly by the app or by the operating system on the app’s behalf. Many assets need to be localized into other languages or locales; an important part of designing your app is planning for the assets you need to create and knowing which assets should be localized.
You continue to polish and refine your app until it is ready to ship.
Publish the App in the App Store
Publishing an app on the App Store requires a few administrative tasks. Your team provides the information displayed for the app by the App Store. You also submit the app to Apple for approval. Once the app is approved, you set the date the app should appear for sale in the App Store. Then, you use Apple’s tools to monitor the sales of the app, customer reviews, and crash reports. These data can help you prepare bug fixes and help you decide on what improvements to make in a major revision to the app. When you have bug fix or a major revision ready to ship, you send it for approval and set a publication date, just as you did for the initial release.
Copyright © 2013 Apple Inc. All Rights Reserved. Terms of Use | Privacy Policy | Updated: 2013-04-23