

Slide Over and Split View Quick Start
Follow the guidance in this chapter to get your app up and running with iOS 9 multitasking on eligible iPad models.

When you start a new, template-based project in Xcode 7, Slide Over and Split View are enabled by default. If you transition an older project to iOS 9, make your app eligible for Slide Over and Split View by ensuring your Xcode project is configured as follows:
Set the Base SDK to “Latest iOS,” as described in Setting the Base SDK in App Distribution Guide.
Provide a
LaunchScreen.storyboardfile (instead of a.pngimage file as you did in iOS 7 and earlier), as described in Creating a Launch Screen File in App Distribution Guide.In your project’s
Info.plistfile, in the “Supported interface orientations (iPad)” array, declare support for all four device orientations, as shown here:
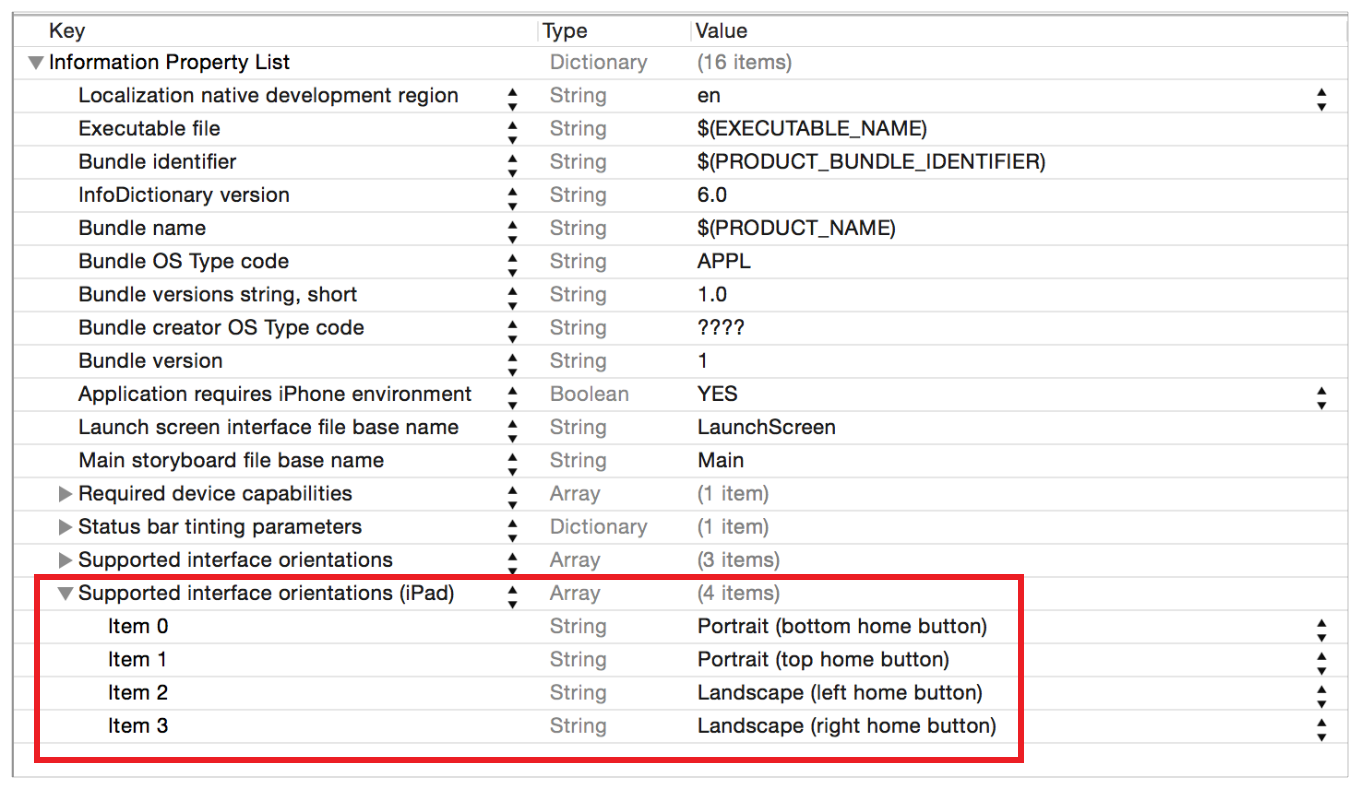
In Slide Over and Split View, the primary and secondary apps both run in the foreground and have equal standing with the system for most purposes. Only the primary app:
Owns the status bar
Is eligible to work with a second physical screen
Can participate in Picture in Picture automatic invocation
Can occupy two-thirds of the screen in landscape orientation, obtaining a regular horizontal size class in Split View on iPad and iPad mini (the secondary app can occupy, at most, half of the screen in landscape Split View, remaining in a compact horizontal size class on iPad and iPad mini)
On iPad Pro in landscape orientation, the primary and secondary apps each obtain a regular horizontal size class in the half/half Split View configuration. All the size classes your app can encounter on iPad are shown in Figure 2-1.
In Split View, the user controls the size of your app window. The user does this by rotating the device (as in previous versions of iOS) or by horizontally sliding the vertical divider that separates the primary and secondary apps. The system communicates either type of change to your app in the same way: as a bounds change to your window with concomitant changes to your root view controller’s size classes. (User movement of the divider also figures prominently in app state transitions, as described later in this section.)
Prior to iOS 9, iPad horizontal and vertical size classes were always “regular.” With Slide Over and Split View, this changes dramatically. Figure 2-1 shows the various size classes your app can encounter as a user configures the apps on an iPad screen.
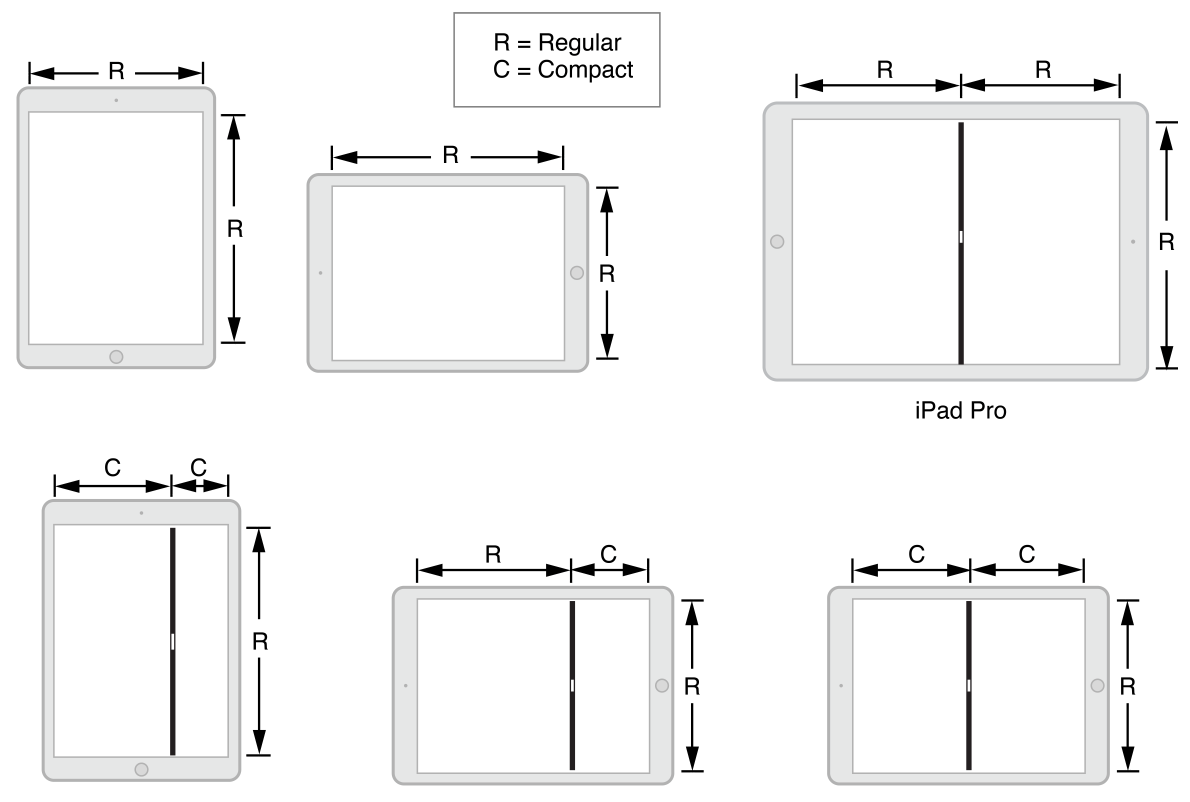
On iPad and iPad mini, the horizontal size class is compact for both apps in Slide Over and Split View—except for the single case of the primary app obtaining a regular horizontal size class in landscape 2/3–1/3 orientation (center-bottom in Figure 2-1). On iPad Pro, the horizontal size class is regular in one additional case, (upper-right in Figure 2-1). Both apps on iPad Pro in 50/50 landscape orientation obtain a regular horizontal size class.
To play well in this context, your app must be adaptive. Design your app to:
Employ Auto Layout and size classes as described in Auto Layout Guide, Size Classes Design Help, and Simulating Screen Size and Orientation.
The required
LaunchScreen.storyboardfile for your app must employ Auto Layout. New projects created using the app templates in Xcode 7 automatically get aLaunchScreen.storyboardfile. To learn how to add one to your project, read Creating a Launch Screen File in App Distribution Guide.Respond to trait collection and size changes by implementing methods in the
UITraitEnvironmentandUIContentContainerprotocols.Respond to app state transition delegate method calls, as described in Execution States for Apps in App Programming Guide for iOS.
Correctly handling your app’s state transitions is more important in iOS 9. In a Split View context, both onscreen apps move offscreen whenever the user moves the Split View divider. This is true even when the user changes intent and returns the divider to its starting position.
When the user moves the divider, the system calls your app delegate object with the applicationWillResignActive: protocol method. The system then resizes your app (offscreen) to capture one or more snapshots to provide a smooth user experience when the user eventually releases the divider. This is because the final bounds of your app’s window, at the time the user releases the divider, cannot be predicted. Complicating the story is the fact that the user might rotate the device while moving the divider.
Write your app so this resizing/snapshotting process does not lose data model state or navigation state for the user. That is, when a user has resized your app—or moved the divider and returned it to the previous position—and finally releases the divider, the user expects your app’s state and its navigation location (including view, selection, scroll position, and so on) to be identical to what they were when the user first touched the divider. Take advantage of the applicationWillResignActive: call to perform the work you need to preserve user state. For guidance, read What to Do When Your App Is Interrupted Temporarily in App Programming Guide for iOS.
If the user moves the divider all the way to the screen edge to dismiss your app, the system calls your applicationDidEnterBackground: protocol method.
For guidance on gracefully handling app state transitions, read Strategies for Handling App State Transitions in App Programming Guide for iOS. For information on the snapshotting process, read Prepare for the App Snapshot, and refer to Capturing a View Snapshot in UIView Class Reference.
Copyright © 2018 Apple Inc. All rights reserved. Terms of Use | Privacy Policy | Updated: 2016-03-01