Creating Custom Layouts
Before you start building custom layouts, consider whether doing so is really necessary. The UICollectionViewFlowLayout class provides a significant amount of behavior that has already been optimized for efficiency and that can be adapted in several ways to achieve many different types of standard layouts. The only times to consider implementing a custom layout are in the following situations:
The layout you want looks nothing like a grid or a line-based breaking layout (a layout in which items are placed into a row until it’s full, then continue on to the next line until all items are placed) or necessitates scrolling in more than one direction.
You want to change all of the cell positions frequently enough that it would be more work to modify the existing flow layout than to create a custom layout.
The good news is that, from an API perspective, implementing a custom layout is not difficult. The hardest part is performing the calculations needed to determine the positions of items in the layout. When you know the locations of those items, providing that information to the collection view is straightforward.
Subclassing UICollectionViewLayout
For custom layouts, you want to subclass UICollectionViewLayout, which provides you with a fresh starting point for your design. Only a handful of methods provide the core behavior for your layout object and are required in your implementation. The rest of the methods are there for you to override as needed to tweak the layout behavior. The core methods handle the following crucial tasks:
Specify the size of the scrollable content area.
Provide attribute objects for the cells and views that make up your layout so that the collection view can position each cell and view.
Although you can create a functional layout object that implements just the core methods, your layout is likely to be more engaging if you implement several of the optional methods as well.
The layout object uses information provided by its data source to create the collection view’s layout. Your layout communicates with the data source by calling methods on the collectionView property, which is accessible in all of the layout’s methods. Keep in mind what your collection view knows and doesn’t know during the layout process. Because the layout process is under way, the collection view cannot track the layout or positioning of views. So even though the layout object will not restrict you from calling any of the collection view’s methods, refrain from relying on the collection view for anything other than the data necessary to compute your layout.
Understanding the Core Layout Process
The collection view works directly with your custom layout object to manage the overall layout process. When the collection view determines that it needs layout information, it asks your layout object to provide it. For example, the collection view asks for layout information when it is first displayed or is resized. You can also tell the collection view to update its layout explicitly by calling the invalidateLayout method of the layout object. That method throws away the existing layout information and forces the layout object to generate new layout information.
During the layout process, the collection view calls specific methods of your layout object. These methods are your chance to calculate the position of items and to provide the collection view with the primary information it needs. Other methods may be called, too, but these methods are always called during the layout process in the following order:
Use the
prepareLayoutmethod to perform the up-front calculations needed to provide layout information.Use the
collectionViewContentSizemethod to return the overall size of the entire content area based on your initial calculations.Use the
layoutAttributesForElementsInRect:method to return the attributes for cells and views that are in the specified rectangle.
Figure 5-1 illustrates how you can use the preceding methods to generate your layout information.
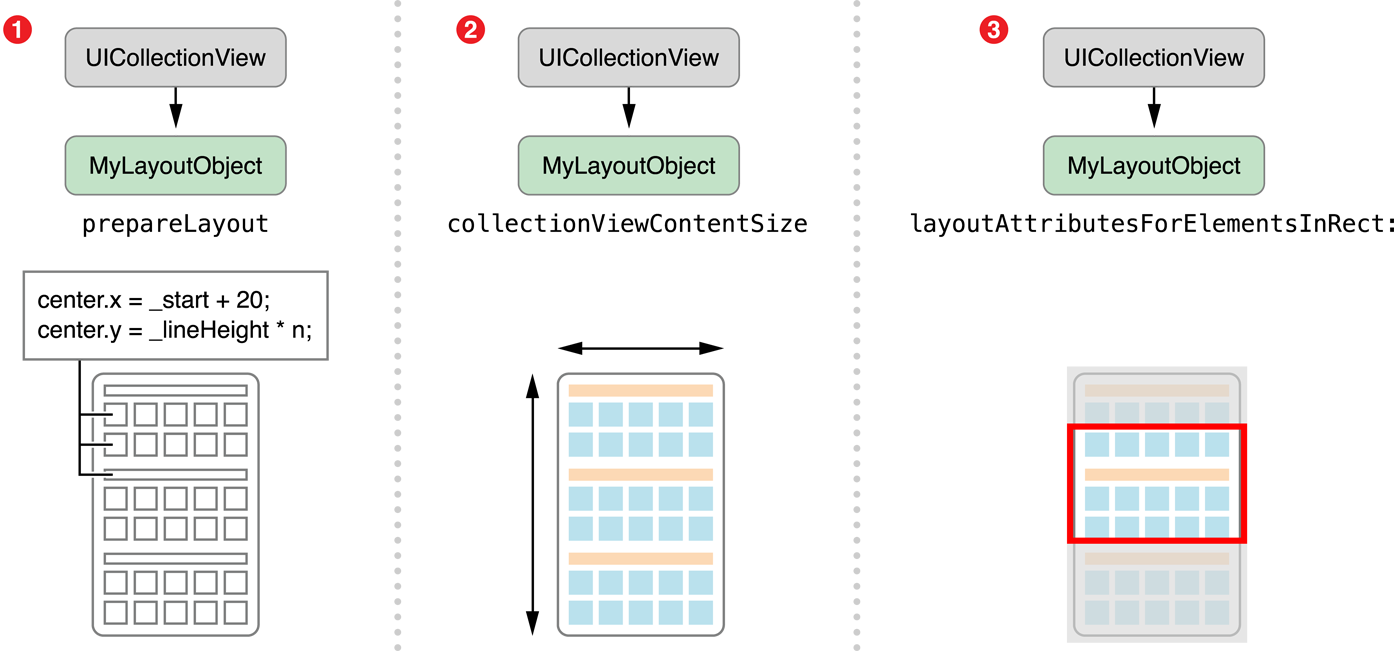
The prepareLayout method is your opportunity to perform whatever calculations are needed to determine the position of the cells and views in the layout. At a minimum, you should compute enough information in this method to be able to return the overall size of the content area, which you return to the collection view in step 2.
The collection view uses the content size to configure its scroll view appropriately. For instance, if your computed content size expands past the bounds of the current device’s screen both vertically and horizontally, the scroll view adjusts to allow scrolling in both directions simultaneously. Unlike the UICollectionViewFlowLayout, it does not by default adjust the layout of content to scroll in only one direction.
Based on the current scroll position, the collection view then calls your layoutAttributesForElementsInRect: method to ask for the attributes of the cells and views in a specific rectangle, which may or may not be the same as the visible rectangle. After returning that information, the core layout process is effectively complete.
After layout finishes, the attributes of your cells and views remain the same until you or the collection view invalidates the layout. Calling the invalidateLayout method of your layout object causes the layout process to begin again, starting with a new call to the prepareLayout method. The collection view can also invalidate your layout automatically during scrolling. If the user scrolls its content, the collection view calls the layout object’s shouldInvalidateLayoutForBoundsChange: method and invalidates the layout if that method returns YES.
Creating Layout Attributes
The attributes objects that your layout is responsible for are instances of the UICollectionViewLayoutAttributes class. These instances can be created in a variety of different methods in your app. When your app is not dealing with thousands of items, it makes sense to create these instances while preparing the layout, because the layout information can be cached and referenced rather than computed on the fly. If the costs of computing all the attributes up front outweighs the benefits of caching in your app, it is just as easy to create attributes in the moment when they are requested.
Regardless, when creating new instances of the UICollectionViewLayoutAttributes class, use one of the following class methods:
You must use the correct class method based on the type of the view being displayed because the collection view uses that information to request the appropriate type of view from the data source object. Using the incorrect method causes the collection view to create the wrong views in the wrong places and your layout does not appear as intended.
After creating each attributes object, set the relevant attributes for the corresponding view. At a minimum, set the size and position of the view in the layout. In cases where the views of your layout overlap, assign a value to the zIndex property to ensure a consistent ordering of the overlapping views. Other properties let you control the visibility or appearance of the cell or view and can be changed as needed. If the standard attributes class does not suit your app’s needs, you can subclass and expand it to store other information about each view. When subclassing layout attributes, it’s required that you implement the isEqual: method for comparing your custom attributes because the collection view uses this method for some of its operations.
For more information about layout attributes, see UICollectionViewLayoutAttributes Class Reference.
Preparing the Layout
At the beginning of the layout cycle, the layout object calls prepareLayout before beginning the layout process. This method is your chance to calculate information that later informs your layout. The prepareLayout method is not required to implement a custom layout but is provided as an opportunity to make initial calculations if necessary. After this method is called, your layout must have enough information to calculate the collection view’s content size, the next step in the layout process. The information, however, can range from this minimum requirement to creating and storing all the layout attributes objects your layout will use. Use of the prepareLayout method is subject to the infrastructure of your app and to what makes sense to compute up front versus what to compute upon request. For an example of what the prepareLayout method might look like, see Preparing the Layout.
Providing Layout Attributes for Items in a Given Rectangle
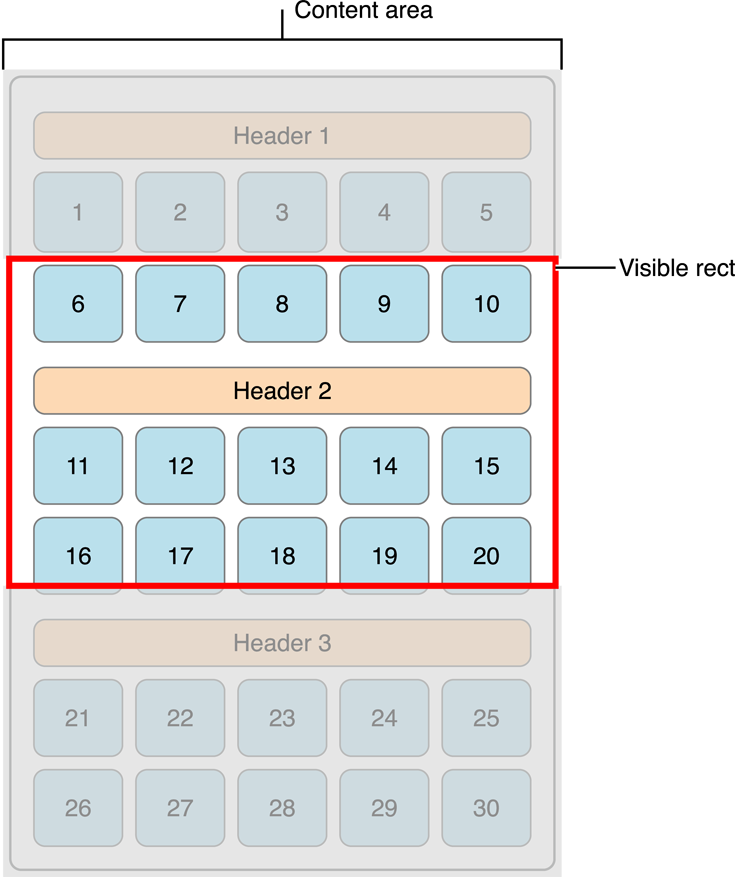
During the final step of the layout process, the collection view calls your layout object’s layoutAttributesForElementsInRect: method. The purpose of this method is to provide layout attributes for every cell and every supplementary or decoration view that intersects the specified rectangle. For a large scrollable content area, the collection view may just ask for the attributes of items in the portion of that content area that is currently visible. In Figure 5-2, the currently visible content that your layout object needs to create attribute objects for is cells 6 through 20 along with the second header view. You must be prepared to provide layout attributes for any portion of your collection view content area. Such attributes might be used to facilitate animations for inserted or deleted items.
Because the layoutAttributesForElementsInRect: method is called after your layout object’s prepareLayout method, you should already have most of the information you need in order to return or create the required attributes. The implementation of your layoutAttributesForElementsInRect: method follows these steps:
Iterate over the data generated by the
prepareLayoutmethod to either access cached attributes or create new ones.Check the frame of each item to see whether it intersects the rectangle passed to the
layoutAttributesForElementsInRect:method.For each intersecting item, add a corresponding
UICollectionViewLayoutAttributesobject to an array.Return the array of layout attributes to the collection view.
Depending on how you manage your layout information, you might create UICollectionViewLayoutAttributes objects in your prepareLayout method or wait and do it in your layoutAttributesForElementsInRect: method. While forming an implementation that matches the needs of your application, keep in mind the benefits of caching layout information. Computing new layout attributes repeatedly for cells is an expensive operation, one that can have noticeably detrimental effects on your app’s performance. That said, when the amount of items your collection view manages is large, it may make more sense (for performance) to create the layout attributes when requested. It’s simply a matter of figuring out which strategy makes most sense for your app.
For a specific example of how one might implement layoutAttributesForElementsInRect:, see Providing Layout Attributes.
Providing Layout Attributes On Demand
The collection view periodically asks your layout object to provide attributes for individual items outside of the formal layout process. For example, the collection view asks for this information when configuring insertion and deletion animations for an item. Your layout object must be prepared to provide the layout attributes for each cell, supplementary view, and decoration view it supports. You do this by overriding the following methods:
Your implementation of these methods should retrieve the current layout attributes for the given cell or view. Every custom layout object is expected to implement the layoutAttributesForItemAtIndexPath: method. If your layout does not contain any supplementary views, you do not need to override the layoutAttributesForSupplementaryViewOfKind:atIndexPath: method. Similarly, if it does not contain decoration views, you do not need to override the layoutAttributesForDecorationViewOfKind:atIndexPath: method. When returning attributes, you should not update the layout attributes. If you need to change the layout information, invalidate the layout object and let it update that data during a subsequent layout cycle.
Connecting Your Custom Layout for Use
There are two ways to link your custom layout to the collection view: programmatically or through storyboards. The collection view links to its layout through a writable property, collectionViewLayout. To set the layout to your custom implementation, set your collection view’s layout property to an instance of your custom layout object. Listing 5-1 shows the line of code needed.
Listing 5-1 Linking your custom layout
self.collectionView.collectionViewLayout = [[MyCustomLayout alloc] init]; |
Otherwise, from your storyboard, open the Document Outline panel and select your collection view (it is listed in the drop-down menu for your controller). With the collection view selected, open the Attributes inspector in the Utilities pane, and underneath the section labeled Collection View change the Layout option from Flow to Custom. The option beneath it changes from Scroll Direction to Class, and you can now select your custom layout class.
Making Your Custom Layouts More Engaging
Providing layout attributes for each cell and view during the layout process is required, but there are other behaviors that can improve the user experience with your custom layout. Implementing these behaviors is optional but recommended.
Elevating Content Through Supplementary Views
Supplementary views are separate from the collection view’s cells and have their own set of layout attributes. Like cells, these views are provided by the data source object, but their purpose is to enhance the main content of your app. For example, the UICollectionViewFlowLayout uses supplementary views for section headers and footers. Another app could use supplementary views to give each cell its own text label to display information about that cell. Like collection view cells, supplementary views undergo a recycling process to optimize the amount of resources used by the collection view. Therefore, all supplementary views used in your app should be subclassed from the UICollectionReusableView class.
The steps for adding supplementary views to your layouts are as follows:
Register your supplementary view to the collection view’s layout object using either the
registerClass:forSupplementaryViewOfKind:withReuseIdentifier:orregisterNib:forSupplementaryViewOfKind:withReuseIdentifier:method.In your data source, implement
collectionView:viewForSupplementaryElementOfKind:atIndexPath:. Because these views are reusable, calldequeueReusableSupplementaryViewOfKind:withReuseIdentifier:forIndexPath:to dequeue, or create, a new reusable view and set any necessary data before returning it.Create layout attributes objects for your supplementary views just as you do for cells.
Include these layout attributes objects in the array of attributes returned by the
layoutAttributesForElementsInRect:method.Implement the
layoutAttributesForSupplementaryViewOfKind:atIndexPath:method to return the attributes object for the specified supplementary view whenever queried.
The process for creating the attributes objects for supplementary views in your custom layout is nearly identical to the process for cells, but differs in that a custom layout can have multiple types of supplementary views but is restricted to one type of cell. This is because supplementary views are meant to enhance the main content and are therefore separate from it. There are many ways in which an app’s content can be supplemented, and so each of the supplementary view’s methods specifies which kind of view is being addressed to distinguish it from the others and allow your layout to compute its attributes correctly based on its type. When registering a supplementary view for use, the string you provide is used by the layout object to distinguish the view from others. For an example of incorporating supplementary views into your custom layout, see Incorporating Supplementary Views.
Including Decoration Views in Your Custom Layouts
Decoration views are visual adornments that enhance the appearance of your collection view layouts. Unlike cells and supplementary views, decoration views provide visual content only and are thus independent of the data source. You can use them to provide custom backgrounds, fill in the spaces around cells, or even obscure cells if you want. Decoration views are defined and managed solely by the layout object and do not interact with the collection view’s data source object.
To add decoration views to your layouts, do the following:
Register your decoration view with the layout object using the
registerClass:forDecorationViewOfKind:orregisterNib:forDecorationViewOfKind:method. Although this approach is similar to registering cells and supplementary views, remember that registering decoration views occurs within the layout object, not within the data source.In your layout object’s
layoutAttributesForElementsInRect:method, create attributes for your decoration views just as you do for your cells and supplementary views.Implement the
layoutAttributesForDecorationViewOfKind:atIndexPath:method in your layout object and return the attributes for your decoration views when asked.Optionally, implement the
initialLayoutAttributesForAppearingDecorationElementOfKind:atIndexPath:andfinalLayoutAttributesForDisappearingDecorationElementOfKind:atIndexPath:methods to handle animations for the appearance and disappearance of your decoration views. For more information, see Making Insertion and Deletion Animations More Interesting
The creation process for decoration views is different from the process for cells and supplementary views. Registering a class or nib file is all you have to do to ensure that decoration views are created when they are needed. Because they are purely visual, decoration views are not expected to need any configuration beyond what is already done in the provided nib file or by the object’s initWithFrame: method. For this reason, when a decoration view is needed, the collection view creates it for you and applies the attributes provided by the layout object. Any decoration views should still be a subclass of UICollectionReusableView because the layout object employs a recycling mechanism for its decoration views.
Making Insertion and Deletion Animations More Interesting
Inserting and deleting cells and views poses an interesting challenge during layout. Inserting a cell can cause the layout for other cells and views to change. Even though the layout object knows how to animate existing cells and views from their current locations to new locations, it has no current location for the cell being inserted. Rather than insert the new cell without animations, the collection view asks the layout object to provide a set of initial attributes to use for the animation. Similarly, when a cell is deleted, the collection view asks the layout object to provide a set of final attributes to use for the endpoint of any animations.
To understand how initial attributes work, it helps to see an example. The starting layout (Figure 5-3) shows a collection view that initially contains only three cells. When a new cell is inserted, the collection view asks the layout object to provide initial attributes for the cell being inserted. In this case, the layout object sets the initial position of the cell to the middle of the collection view and sets its alpha value to 0 to hide it. During the animations, this new cell appears to fade in and move from the center of the collection view to its final position in the lower-right corner.
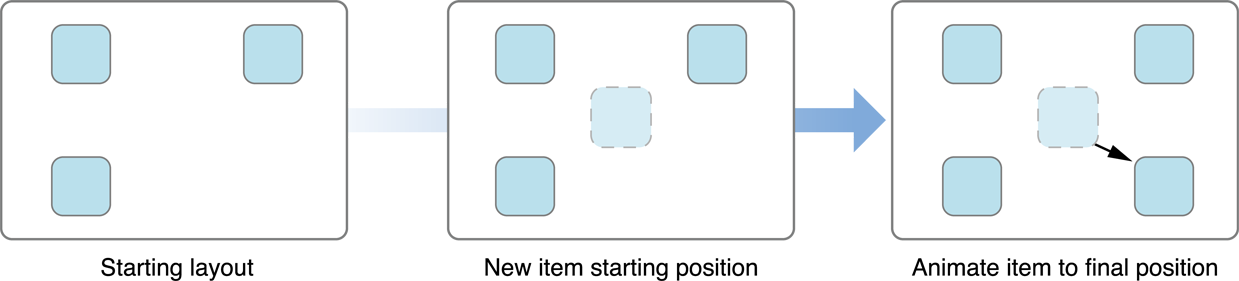
Listing 5-2 shows the code you might use to specify the initial attributes for the inserted cell from Figure 5-3. This method sets the position of the cell to the center of the collection view and makes it transparent. The layout object would then provide the final position and alpha for the cell as part of the normal layout process.
Listing 5-2 Specifying the initial attributes for an inserted cell
- (UICollectionViewLayoutAttributes *)initialLayoutAttributesForAppearingItemAtIndexPath:(NSIndexPath *)itemIndexPath { |
UICollectionViewLayoutAttributes* attributes = [self layoutAttributesForItemAtIndexPath:itemIndexPath]; |
attributes.alpha = 0.0; |
CGSize size = [self collectionView].frame.size; |
attributes.center = CGPointMake(size.width / 2.0, size.height / 2.0); |
return attributes; |
} |
The process for handling deletions is identical to the process for insertions except that you specify the final attributes instead of the initial attributes. From the previous example, if you used the same attributes that you used when inserting the cell, deleting the cell would cause it to fade out while moving to the center of the collection view. There are six methods available to you within the UICollectionViewLayout class—two separate methods (for initial and final attributes) for items, supplementary views, and decoration views.
Improving the Scrolling Experience of Your Layout
Your custom layout object can influence the scrolling behavior of the collection view to create a better user experience. When scrolling-related touch events end, the scroll view determines the final resting place of the scrolling content based on the current speed and deceleration rate in effect. When the collection view knows that location, it asks its layout object if the location should be modified by calling its targetContentOffsetForProposedContentOffset:withScrollingVelocity: method. Because it calls this method while the underlying content is still moving, your custom layout can affect the final resting point of the scrolling content.
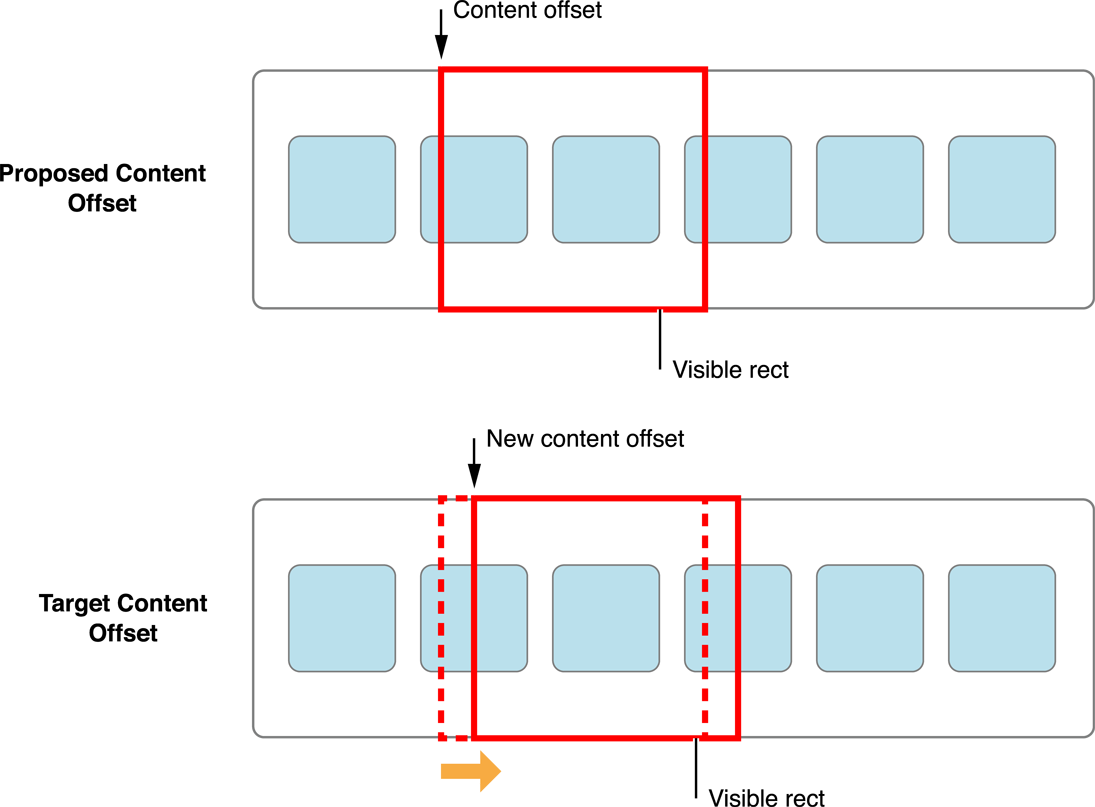
Figure 5-4 demonstrates how you might use your layout object to change the scrolling behavior of the collection view. Suppose the collection view offset starts at (0, 0) and the user swipes left. The collection view computes where the scrolling would naturally stop and provides that value as the “proposed” content offset value. Your layout object might change the proposed value to ensure that when scrolling stops, an item is centered precisely in the visible bounds of the collection view. This new value becomes the target content offset and is what you return from your targetContentOffsetForProposedContentOffset:withScrollingVelocity: method.
Tips for Implementing Your Custom Layouts
Here are some tips and suggestions for implementing your custom layout objects:
Consider using the
prepareLayoutmethod to create and store theUICollectionViewLayoutAttributesobjects you need for later. The collection view is going to ask for layout attribute objects at some point, so in some cases it makes sense to create and store them up front. This is especially true if you have a relatively small number of items (several hundred) or the actual layout attributes for those items change infrequently.If your layout needs to manage thousands of items, though, you need to weigh the benefits of caching versus recomputing. For variable-size items whose layout changes infrequently, caching generally eliminates the need to recompute complex layout information regularly. For large numbers of fixed-size items, it may just be simpler to compute attributes on demand. And for items whose attributes change frequently, you might be recomputing all the time anyway so caching may just take up extra space in memory.
Avoid subclassing
UICollectionView. The collection view has little or no appearance of its own. Instead, it pulls all of its views from your data source object and all of the layout-related information from the layout object. If you are trying to lay out items in three dimensions, the proper way to do it is to implement a custom layout that sets the 3D transform of each cell and view appropriately.Never call the
visibleCellsmethod ofUICollectionViewfrom thelayoutAttributesForElementsInRect:method of your custom layout object. The collection view knows nothing of where items are positioned, other than what the layout object tells it. So asking for the visible cells is just going to forward the request to your layout object.Your layout object should always know the location of items in the content area and should be able to return the attributes of those items at any time. In most cases, it should do this on its own. In a limited number of cases, the layout object might rely on information in the data source to position items. For example, a layout that displays items on a map might retrieve the map location of each item from the data source.
Copyright © 2014 Apple Inc. All Rights Reserved. Terms of Use | Privacy Policy | Updated: 2014-07-15