Creating a Master-Detail Interface
This article explains how to use bindings to implement a basic master-detail interface. In the master interface portion, a table view is used to display your collection of objects. In the detail interface portion, other views are used to display the selected object. This article contains examples of binding table columns to array controllers.
A master-detail interface can be extended in a variety of ways that are not fully covered in this article. In particular, there are many aspects of a table view that work seamlessly with Cocoa bindings. Refer to these other articles for specific tasks:
Displaying Images Using Bindings describes the various options used when displaying images in columns and contains an example of a custom value transformer.
Implementing To-One Relationships Using Pop-Up Menus explains how to implement editable to-one relationship as pop-up menus.
Filtering Using a Custom Array Controller explains how to add a search field to the master interface in order to filter the objects it displays.
What’s a Master-Detail Interface?
In a master-detail interface, the user can select objects from a list of objects and inspect the selected objects. The master interface displays the collection of objects, and the detail interface implements an inspector of the selected object. Whenever the user changes the selection in the master interface, the detail interface is updated to show the new selection. If no object is selected, the detail interface displays nothing or disables itself (if it is editable). If multiple objects are selected (assuming multiple selection is allowed), the detail interface is disabled or it applies to all selected objects. Typically, such an interface also allows users to add and remove objects from the collection.
What components you use to implement a master-detail interface depend on your application. Often, the master interface is implemented by a table view and the detail interface is a collection of views located above or below the master interface. Figure 1 shows a master-detail interface in a media asset application. In this example, the table view displays a collection of media objects and the views below display the properties of the selected media object.

Creating Models
This article assumes that you have already designed your model classes, the objects that encapsulate your application data and provide methods to operate on that data. A master-detail interface is used to display a collection of model objects. Therefore, your root model object is expected to be a collection of these objects.
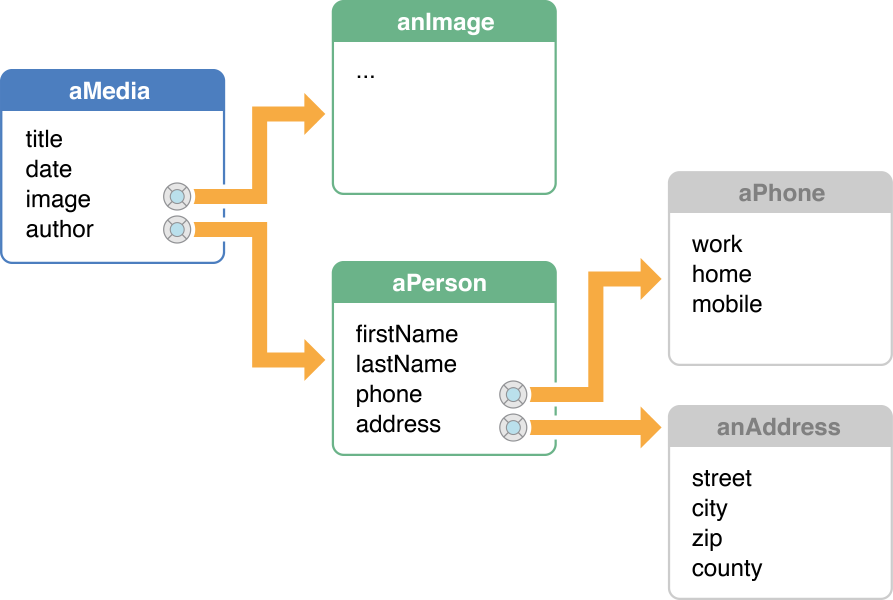
For example, Figure 2 illustrates the object diagram of the models in a media asset application. In this example, assume the application uses a document-based architecture in which MyDocument (the File’s Owner of the MyDocument.nib file) has a mediaAssets instance variable that is initialized to an array of Media objects.
Creating Views
The master interface shown in Figure 1 uses a table view in which each column in the table corresponds to a property of the displayed objects. Note that the table view displays attributes such as the title and date, as well as relationships such as the author. The author property is a to-one relationship (see Figure 2) in which the destination object is a Person object. You can display to-one relationships in a variety of ways. For example, the master interface displays only the author’s last name. The detail interface lets you select the author from a pop-up menu.
Using Interface Builder, lay out your master-detail interface similar to Figure 1. In this example, an image cell was dragged to the Image column to display a scaled version of the media image and a date formatter was dragged to the Date column. The Author column displays the last name of the authors but could be configured to display a menu as well by dragging a pop-up menu cell, NSPopUpButtonCell, to the Author column.
Creating Controllers
Next you need to connect your views to your models via a controller. NSArrayController is specifically designed to manage selectable collections of objects. For this reason, it is ideal for implementing a master-detail interface. After you create an array controller, you specify its content to be your collection of model objects. If the array controller is editable, it can also create instances of models and add them to the collection. For this to work, you also need to tell the array controller the class name the entity it is managing.
Follow these steps to create and configure an array controller for a master-detail interface:
Create an array controller by dragging an NSArrayController from the Interface Builder Controllers palette to your nib file, and optionally change the name of the controller. For example, change the name to
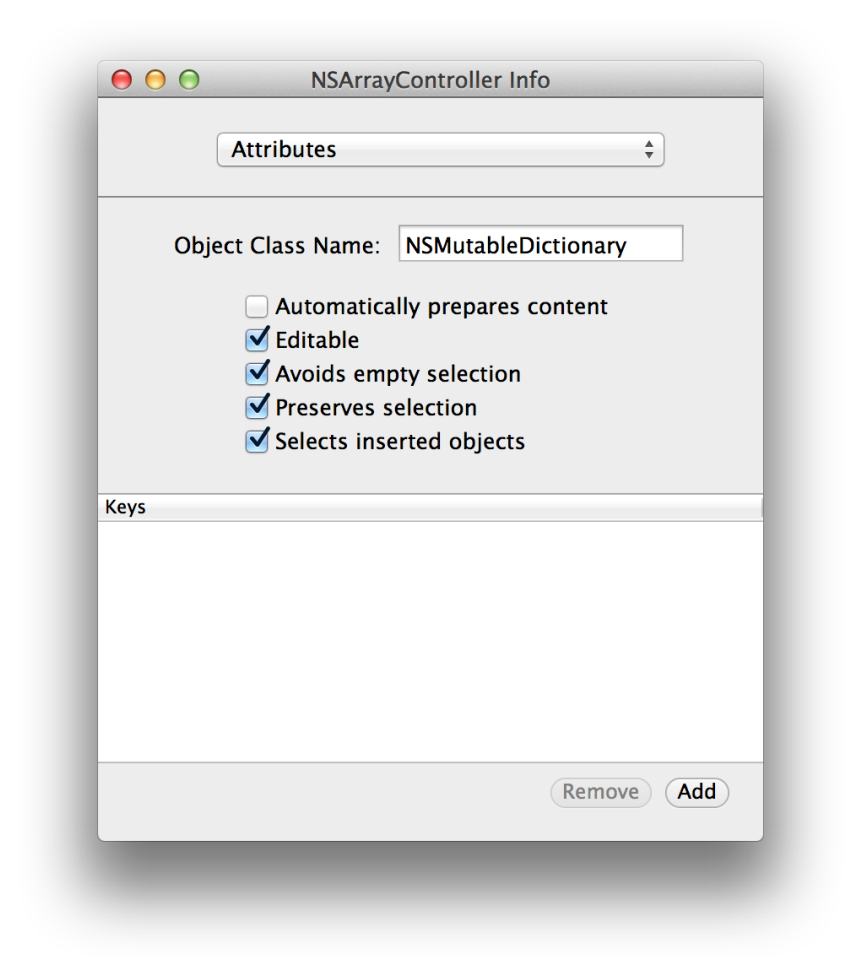
MediaAssetsController.Enter the class name of your model in the Object Class Name field on the Attributes pane of the Info window as shown in Figure 3. In the media asset application example, you would enter Media as the class name.
Deselect Editable on the Attributes pane if you don’t want the user to edit the models, or add and remove them from the collection.
Binding Controllers to Models
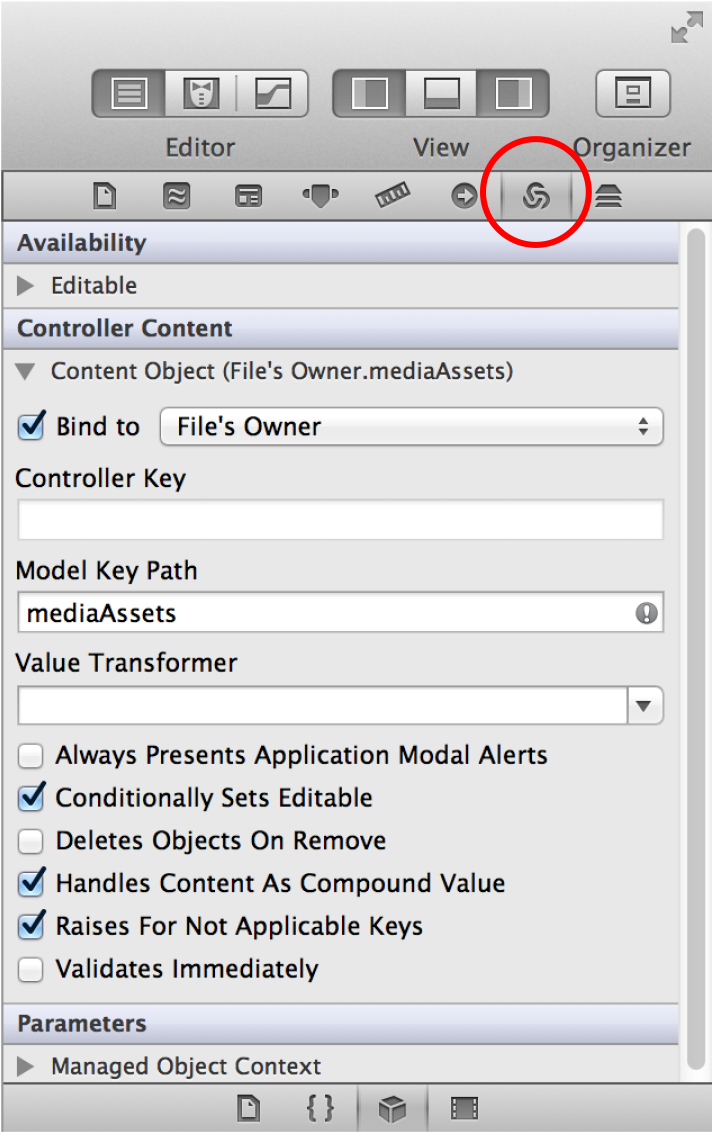
Each view and controller class exposes a set of bindings. You can inspect the bindings of an object using Interface Builder by selecting it and displaying the Bindings pane in the Info window. Select your array controller in the nib file and display its bindings as shown in Figure 4.
You specify the content of an array controller by configuring its contentArray binding. For example, assuming the File’s Owner maintains a collection of Media objects called mediaAssets, you would configure the contentArray binding as follows:
Set the
Bind toaspect to the object that maintains the collection of model objects (for example, the File’s Owner).Leave the
Controller Keyblank.Set the
Model Key Pathto the name of the array (for example,mediaAssets).
Figure 4 shows what the Bindings pane should look like when the contentArray binding is revealed.
Now this controller is configured to manage a collection of Media objects including adding and removing Media objects from the array. Go back to the Attributes pane if you want to change the default behavior of this controller—deselect Editable if you don’t want the user to edit the collection.
Binding Views to Controllers
Next, connect your views to your array controller by configuring the bindings of your view objects—bind each view in the master and detail interfaces to the array controller.
Setting some of these bindings can be complex if, for example, you want to represent an editable to-one relationship. This article covers the most common types of value bindings. See Displaying Images Using Bindings and Implementing To-One Relationships Using Pop-Up Menus for examples of more complex bindings.
In general, it helps to remember that most views that display some content have a binding called value or a binding that contains the word “value.”
Also, because you bind a view to a controller, you need to be familiar with the properties of controllers. These are the primary properties of an array controller that you typically use as the value of the Controller Key aspect:
arrangedObjects—specifies the collection of objects being displayed.selection—specifies the selected object inarrangedObjects.selectedObjects—specifies the selected objects inarrangedObjectsfor a multiple selection.
Binding the Master Interface
In the master interface, you actually configure the bindings of the table columns, not the bindings of a table view. Even if you use a special type of cell in the table column, for example, an image cell or NSPopUpButtonCell, you configure the table column, not the cell. The bindings for an NSTableColumn may change depending on its cell.
In this example, each row in the table view needs to correspond to a single Media object, and each column needs to display a property of that Media object. To display properties, you first select a table column in the table view, display the Bindings pane, and reveal the value binding. You will then bind the table column to the controller’s arrangedObjects key because you are specifying the contents of the entire column, not a single cell. Configure each value binding to display a property of the Media object as follows:
Set the
Bind toaspect to your array controller object. For example,MediaAssetsController.Set the
Controller KeytoarrangedObjects(the collection of objects being displayed).Set the
Model Key Pathto the property you want to appear in that column. For example, in the media asset application, set theModel Key Pathtodatein the Date column.
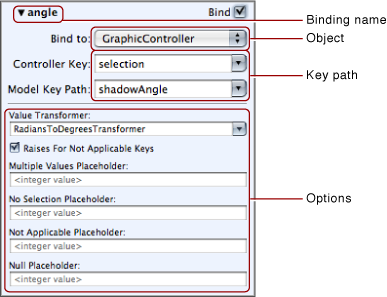
Figure 5 shows what the Bindings pane should look like when the value binding of the Title column is revealed.
In the case of the author property, you can set the Model Key Path to author.lastname if you want to simply display the last name. However, by default column cells are editable, so when you run your application, users will be able to change the author’s last name by editing the text in the Author column. If you don’t want this behavior, select the column and deselect Editable on the Attributes pane in the Info window.
Note that some Cocoa views already display lists of objects that work well with key-value coding. The Controller Key and Model Key Path aspects of a binding are concatenated to retrieve the value from the bound object. In the case of a table column, the Controller Key identifies an array; therefore the returned value is an array. For example, the Author table column uses the arrangedObjects.author.lastname key path to get an array of last names, instances of NSString, from the bound object.
Binding the Detail Interface
You bind the views in the detail interface similarly to the way you bind the master interface except that you set the Controller Key for each binding to selection, the currently selected object.
For example, you configure the value binding for the Title text field in the detail interface depicted in Figure 1 as follows:
Set the
Bind toaspect to your array controller object. For example,MediaAssetsController.Set the
Controller Keytoselection(the currently selected object).Set the
Model Key Pathto the property you wish displayed in that view. For example,title.
Copyright © 2003, 2014 Apple Inc. All Rights Reserved. Terms of Use | Privacy Policy | Updated: 2014-07-15