Subclassing NSControl
If you are going to create a custom NSControl class that performs its own initialization, you should override the designated initializer (initWithFrame:). Be aware, however, that this method is not called when an instance of your subclass of an Application Kit control class is unarchived from a nib.
If you create a custom control subclass that is paired with a custom cell subclass—for example, a custom subclass of NSSlider and a custom subclass of NSSliderCell—you have two ways of associating an instance of that custom cell with an instance of the custom control. The first approach requires that you have version 3 of Interface Builder. In Interface Builder when you place a control on a window, the control and its cell are instantiated and, when you save the user interface, these objects (along with other placed objects) are encoded and serialized to a nib file. Interface Builder also helps you define custom subclasses, including subclasses of framework control classes such as NSButton and NSSlider. Interface Builder also allows you to change the class of a placed control object to a custom control class, but earlier versions of the application give you no way to do the same with custom cells associated with the control object.
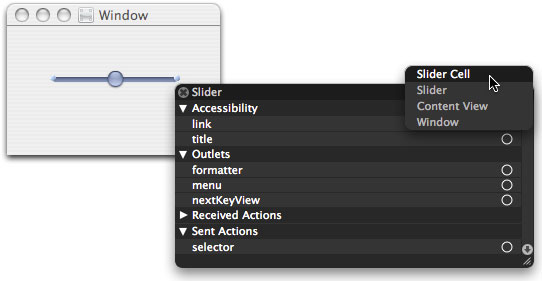
But version 3.0 of Interface Builder lets you set the class of a control’s cell. To do this, click the control to select it and right-click the mouse (Control-click on single-button mice). Then click again in the upper-right corner of the pop-up list that appears. A submenu lists the objects under the mouse pointer—including the control’s cell. In the case of an NSSliderCell object, as shown in Figure 1, the submenu includes a “Slider Cell” item. Select the cell item.
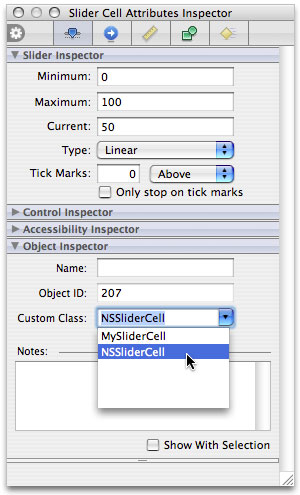
Next open the Inspector window for the selected cell object. Find the “Object inspector” section and, in the Custom Class combo box select (or enter) the name of your custom cell class.
If version 3.0 of Interface Builder is not available, you still have a programmatic way to assign an instance of a custom cell to a custom control, which is illustrated in Listing 1. In the custom control subclass, when all objects are unarchived from the nib file, create an instance of the custom cell and assign it all pertinent attributes of the current cell. Then set the custom cell as the cell of the control using the setCell: method of NSControl.
Listing 1 Creating and setting a custom cell for a custom control
- (void)awakeFromNib { |
MySliderCell *newCell = [[MySliderCell alloc] init]; |
id oldCell = [self cell]; |
[newCell setImage:[oldCell image]]; |
[newCell setMinValue:[oldCell minValue]]; |
[newCell setMaxValue:[oldCell maxValue]]; |
[newCell setSliderType:[oldCell sliderType]]; |
// .... set other slider cell attributes |
[self setCell:newCell]; |
[newCell release]; |
} |
You can override the cellClass method whenever a control needs to make a new cell for itself—for example if it is instantiated with initWithFrame:. The initWithFrame: method uses the return value of cellClass to allocate and initialize an NSCell object of the correct type.
Listing 2 Overriding cellClass
+ (Class) cellClass |
{ |
return [MySliderCell class]; |
} |
Note that overriding the cellClass class method of NSControl does not change the class of a cell object unarchived from a nib file.
Copyright © 2008 Apple Inc. All Rights Reserved. Terms of Use | Privacy Policy | Updated: 2008-10-15