Encapsulating Data
In addition to the messaging behavior covered in the previous chapter, an object also encapsulates data through its properties.
This chapter describes the Objective-C syntax used to declare properties for an object and explains how those properties are implemented by default through synthesis of accessor methods and instance variables. If a property is backed by an instance variable, that variable must be set correctly in any initialization methods.
If an object needs to maintain a link to another object through a property, it’s important to consider the nature of the relationship between the two objects. Although memory management for Objective-C objects is mostly handled for you through Automatic Reference Counting (ARC), it’s important to know how to avoid problems like strong reference cycles, which lead to memory leaks. This chapter explains the lifecycle of an object, and describes how to think in terms of managing your graph of objects through relationships.
Properties Encapsulate an Object’s Values
Most objects need to keep track of information in order to perform their tasks. Some objects are designed to model one or more values, such as a Cocoa NSNumber class to hold a numeric value or a custom XYZPerson class to model a person with a first and last name. Some objects are more general in scope, perhaps handling the interaction between a user interface and the information it displays, but even these objects need to keep track of user interface elements or the related model objects.
Declare Public Properties for Exposed Data
Objective-C properties offer a way to define the information that a class is intended to encapsulate. As you saw in Properties Control Access to an Object’s Values, property declarations are included in the interface for a class, like this:
@interface XYZPerson : NSObject |
@property NSString *firstName; |
@property NSString *lastName; |
@end |
In this example, the XYZPerson class declares string properties to hold a person’s first and last name.
Given that one of the primary principles in object-oriented programming is that an object should hide its internal workings behind its public interface, it’s important to access an object’s properties using behavior exposed by the object rather than trying to gain access to the internal values directly.
Use Accessor Methods to Get or Set Property Values
You access or set an object’s properties via accessor methods:
NSString *firstName = [somePerson firstName]; |
[somePerson setFirstName:@"Johnny"]; |
By default, these accessor methods are synthesized automatically for you by the compiler, so you don’t need to do anything other than declare the property using @property in the class interface.
The synthesized methods follow specific naming conventions:
The method used to access the value (the getter method) has the same name as the property.
The getter method for a property called
firstNamewill also be calledfirstName.The method used to set the value (the setter method) starts with the word “set” and then uses the capitalized property name.
The setter method for a property called
firstNamewill be calledsetFirstName:.
If you don’t want to allow a property to be changed via a setter method, you can add an attribute to a property declaration to specify that it should be readonly:
@property (readonly) NSString *fullName; |
As well as showing other objects how they are supposed to interact with the property, attributes also tell the compiler how to synthesize the relevant accessor methods.
In this case, the compiler will synthesize a fullName getter method, but not a setFullName: method.
If you want to use a different name for an accessor method, it’s possible to specify a custom name by adding attributes to the property. In the case of Boolean properties (properties that have a YES or NO value), it’s customary for the getter method to start with the word “is.” The getter method for a property called finished, for example, should be called isFinished.
Again, it’s possible to add an attribute on the property:
@property (getter=isFinished) BOOL finished; |
If you need to specify multiple attributes, simply include them as a comma-separated list, like this:
@property (readonly, getter=isFinished) BOOL finished; |
In this case, the compiler will synthesize only an isFinished method, but not a setFinished: method.
Dot Syntax Is a Concise Alternative to Accessor Method Calls
As well as making explicit accessor method calls, Objective-C offers an alternative dot syntax to access an object’s properties.
Dot syntax allows you to access properties like this:
NSString *firstName = somePerson.firstName; |
somePerson.firstName = @"Johnny"; |
Dot syntax is purely a convenient wrapper around accessor method calls. When you use dot syntax, the property is still accessed or changed using the getter and setter methods mentioned above:
Getting a value using
somePerson.firstNameis the same as using[somePerson firstName]Setting a value using
somePerson.firstName = @"Johnny"is the same as using[somePerson setFirstName:@"Johnny"]
This means that property access via dot syntax is also controlled by the property attributes. If a property is marked readonly, you’ll get a compiler error if you try to set it using dot syntax.
Most Properties Are Backed by Instance Variables
By default, a readwrite property will be backed by an instance variable, which will again be synthesized automatically by the compiler.
An instance variable is a variable that exists and holds its value for the life of the object. The memory used for instance variables is allocated when the object is first created (through alloc), and freed when the object is deallocated.
Unless you specify otherwise, the synthesized instance variable has the same name as the property, but with an underscore prefix. For a property called firstName, for example, the synthesized instance variable will be called _firstName.
Although it’s best practice for an object to access its own properties using accessor methods or dot syntax, it’s possible to access the instance variable directly from any of the instance methods in a class implementation. The underscore prefix makes it clear that you’re accessing an instance variable rather than, for example, a local variable:
- (void)someMethod { |
NSString *myString = @"An interesting string"; |
_someString = myString; |
} |
In this example, it’s clear that myString is a local variable and _someString is an instance variable.
In general, you should use accessor methods or dot syntax for property access even if you’re accessing an object’s properties from within its own implementation, in which case you should use self:
- (void)someMethod { |
NSString *myString = @"An interesting string"; |
self.someString = myString; |
// or |
[self setSomeString:myString]; |
} |
The exception to this rule is when writing initialization, deallocation or custom accessor methods, as described later in this section.
You Can Customize Synthesized Instance Variable Names
As mentioned earlier, the default behavior for a writeable property is to use an instance variable called _propertyName.
If you wish to use a different name for the instance variable, you need to direct the compiler to synthesize the variable using the following syntax in your implementation:
@implementation YourClass |
@synthesize propertyName = instanceVariableName; |
... |
@end |
For example:
@synthesize firstName = ivar_firstName; |
In this case, the property will still be called firstName, and be accessible through firstName and setFirstName: accessor methods or dot syntax, but it will be backed by an instance variable called ivar_firstName.
You Can Define Instance Variables without Properties
It’s best practice to use a property on an object any time you need to keep track of a value or another object.
If you do need to define your own instance variables without declaring a property, you can add them inside braces at the top of the class interface or implementation, like this:
@interface SomeClass : NSObject { |
NSString *_myNonPropertyInstanceVariable; |
} |
... |
@end |
@implementation SomeClass { |
NSString *_anotherCustomInstanceVariable; |
} |
... |
@end |
Access Instance Variables Directly from Initializer Methods
Setter methods can have additional side-effects. They may trigger KVC notifications, or perform further tasks if you write your own custom methods.
You should always access the instance variables directly from within an initialization method because at the time a property is set, the rest of the object may not yet be completely initialized. Even if you don’t provide custom accessor methods or know of any side effects from within your own class, a future subclass may very well override the behavior.
A typical init method looks like this:
- (id)init { |
self = [super init]; |
if (self) { |
// initialize instance variables here |
} |
return self; |
} |
An init method should assign self to the result of calling the superclass’s initialization method before doing its own initialization. A superclass may fail to initialize the object correctly and return nil so you should always check to make sure self is not nil before performing your own initialization.
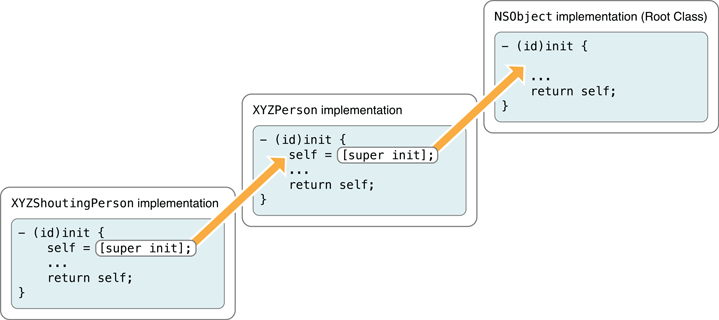
By calling [super init] as the first line in the method, an object is initialized from its root class down through each subclass init implementation in order. Figure 3-1 shows the process for initializing an XYZShoutingPerson object.
As you saw in the previous chapter, an object is initialized either by calling init, or by calling a method that initializes the object with specific values.
In the case of the XYZPerson class, it would make sense to offer an initialization method that set the person’s initial first and last names:
- (id)initWithFirstName:(NSString *)aFirstName lastName:(NSString *)aLastName; |
You’d implement the method like this:
- (id)initWithFirstName:(NSString *)aFirstName lastName:(NSString *)aLastName { |
self = [super init]; |
if (self) { |
_firstName = aFirstName; |
_lastName = aLastName; |
} |
return self; |
} |
The Designated Initializer is the Primary Initialization Method
If an object declares one or more initialization methods, you should decide which method is the designated initializer. This is often the method that offers the most options for initialization (such as the method with the most arguments), and is called by other methods you write for convenience. You should also typically override init to call your designated initializer with suitable default values.
If an XYZPerson also had a property for a date of birth, the designated initializer might be:
- (id)initWithFirstName:(NSString *)aFirstName lastName:(NSString *)aLastName |
dateOfBirth:(NSDate *)aDOB; |
This method would set the relevant instance variables, as shown above. If you still wished to provide a convenience initializer for just first and last names, you would implement the method to call the designated initializer, like this:
- (id)initWithFirstName:(NSString *)aFirstName lastName:(NSString *)aLastName { |
return [self initWithFirstName:aFirstName lastName:aLastName dateOfBirth:nil]; |
} |
You might also implement a standard init method to provide suitable defaults:
- (id)init { |
return [self initWithFirstName:@"John" lastName:@"Doe" dateOfBirth:nil]; |
} |
If you need to write an initialization method when subclassing a class that uses multiple init methods, you should either override the superclass’s designated initializer to perform your own initialization, or add your own additional initializer. Either way, you should call the superclass’s designated initializer (in place of [super init];) before doing any of your own initialization.
You Can Implement Custom Accessor Methods
Properties don’t always have to be backed by their own instance variables.
As an example, the XYZPerson class might define a read-only property for a person’s full name:
@property (readonly) NSString *fullName; |
Rather than having to update the fullName property every time the first or last name changed, it would be easier just to write a custom accessor method to build the full name string on request:
- (NSString *)fullName { |
return [NSString stringWithFormat:@"%@ %@", self.firstName, self.lastName]; |
} |
This simple example uses a format string and specifiers (as described in the previous chapter) to build a string containing a person’s first and last names separated by a space.
If you need to write a custom accessor method for a property that does use an instance variable, you must access that instance variable directly from within the method. For example, it’s common to delay the initialization of a property until it’s first requested, using a “lazy accessor,” like this:
- (XYZObject *)someImportantObject { |
if (!_someImportantObject) { |
_someImportantObject = [[XYZObject alloc] init]; |
} |
return _someImportantObject; |
} |
Before returning the value, this method first checks whether the _someImportantObject instance variable is nil; if it is, it allocates an object.
Properties Are Atomic by Default
By default, an Objective-C property is atomic:
@interface XYZObject : NSObject |
@property NSObject *implicitAtomicObject; // atomic by default |
@property (atomic) NSObject *explicitAtomicObject; // explicitly marked atomic |
@end |
This means that the synthesized accessors ensure that a value is always fully retrieved by the getter method or fully set via the setter method, even if the accessors are called simultaneously from different threads.
Because the internal implementation and synchronization of atomic accessor methods is private, it’s not possible to combine a synthesized accessor with an accessor method that you implement yourself. You’ll get a compiler warning if you try, for example, to provide a custom setter for an atomic, readwrite property but leave the compiler to synthesize the getter.
You can use the nonatomic property attribute to specify that synthesized accessors simply set or return a value directly, with no guarantees about what happens if that same value is accessed simultaneously from different threads. For this reason, it’s faster to access a nonatomic property than an atomic one, and it’s fine to combine a synthesized setter, for example, with your own getter implementation:
@interface XYZObject : NSObject |
@property (nonatomic) NSObject *nonatomicObject; |
@end |
@implementation XYZObject |
- (NSObject *)nonatomicObject { |
return _nonatomicObject; |
} |
// setter will be synthesized automatically |
@end |
Manage the Object Graph through Ownership and Responsibility
As you’ve already seen, memory for Objective-C objects is allocated dynamically (on the heap), which means you need to use pointers to keep track of an object’s address. Unlike scalar values, it’s not always possible to determine an object’s lifetime by the scope of one pointer variable. Instead, an object must be kept active in memory for as long as it is needed by other objects.
Rather than trying to worry about managing the lifecycle of each object manually, you should instead think about the relationships between objects.
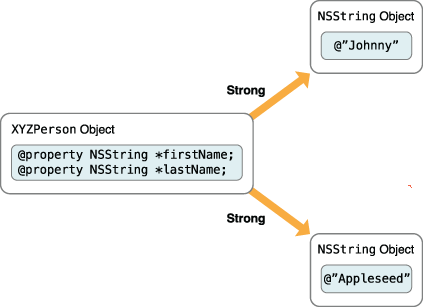
In the case of an XYZPerson object, for example, the two string properties for firstName and lastName are effectively “owned” by the XYZPerson instance. This means they should stay in memory as long as the XYZPerson object stays in memory.
When one object relies on other objects in this way, effectively taking ownership of those other objects, the first object is said to have strong references to the other objects. In Objective-C, an object is kept alive as long as it has at least one strong reference to it from another object. The relationships between the XYZPerson instance and the two NSString objects is shown in Figure 3-2.
When an XYZPerson object is deallocated from memory, the two string objects will also be deallocated, assuming there aren’t any other strong references left to them.
To add a little more complexity to this example, consider the object graph for an application like that shown in Figure 3-3.
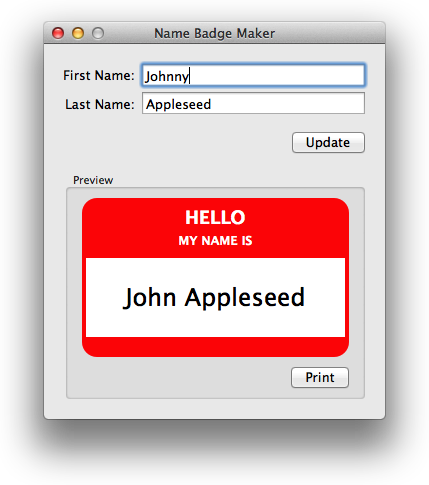
When the user clicks the Update button, the badge preview is updated with the relevant name information.
The first time a person’s details are entered and the update button clicked, the simplified object graph might look like Figure 3-4.
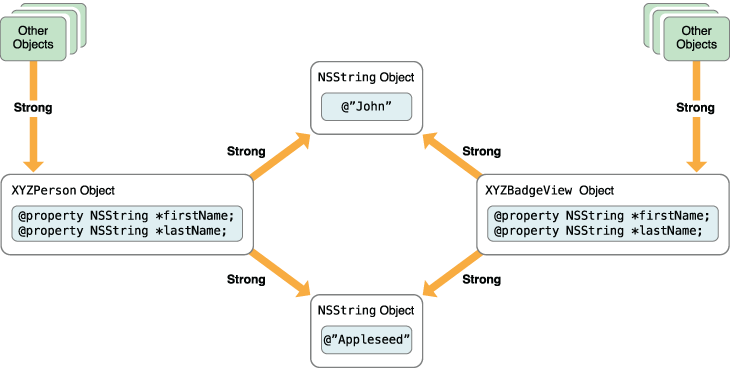
When the user modifies the person’s first name, the object graph changes to look like Figure 3-5.
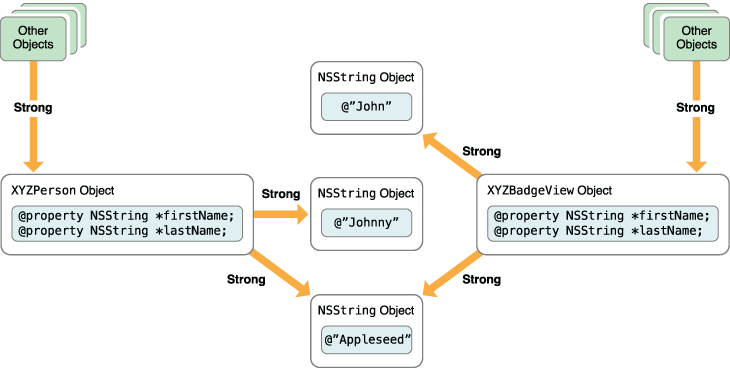
The badge display view maintains a strong relationship to the original @"John" string object, even though the XYZPerson object now has a different firstName. This means the @"John" object stays in memory, used by the badge view to print the name.
Once the user clicks the Update button a second time, the badge view is told to update its internal properties to match the person object, so the object graph looks like Figure 3-6.
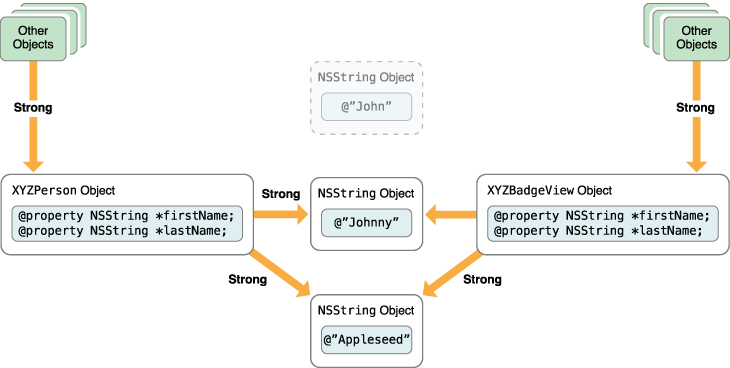
At this point, the original @"John" object no longer has any strong references to it, so it is removed from memory.
By default, both Objective-C properties and variables maintain strong references to their objects. This is fine for many situations, but it does cause a potential problem with strong reference cycles.
Avoid Strong Reference Cycles
Although strong references work well for one-way relationships between objects, you need to be careful when working with groups of interconnected objects. If a group of objects is connected by a circle of strong relationships, they keep each other alive even if there are no strong references from outside the group.
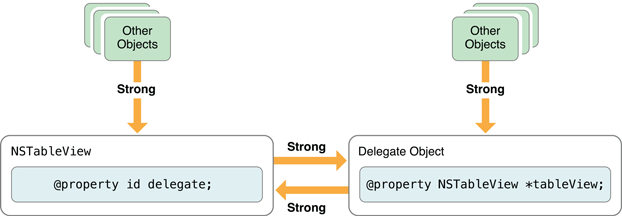
One obvious example of a potential reference cycle exists between a table view object (UITableView for iOS and NSTableView for OS X) and its delegate. In order for a generic table view class to be useful in multiple situations, it delegates some decisions to external objects. This means it relies on another object to decide what content it displays, or what to do if the user interacts with a specific entry in the table view.
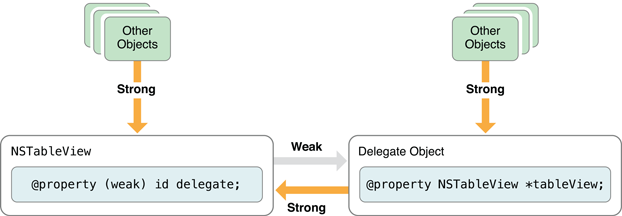
A common scenario is that the table view has a reference to its delegate and the delegate has a reference back to the table view, as shown in Figure 3-7.
A problem occurs if the other objects give up their strong relationships to the table view and delegate, as shown in Figure 3-8.
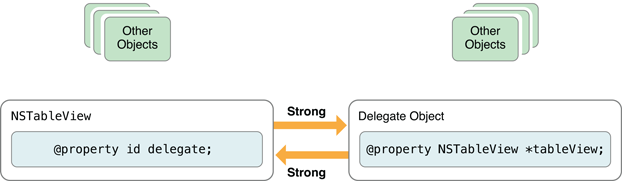
Even though there is no need for the objects to be kept in memory—there are no strong relationships to the table view or delegate other than the relationships between the two objects—the two remaining strong relationships keep the two objects alive. This is known as a strong reference cycle.
The way to solve this problem is to substitute one of the strong references for a weak reference. A weak reference does not imply ownership or responsibility between two objects, and does not keep an object alive.
If the table view is modified to use a weak relationship to its delegate (which is how UITableView and NSTableView solve this problem), the initial object graph now looks like Figure 3-9.
When the other objects in the graph give up their strong relationships to the table view and delegate this time, there are no strong references left to the delegate object, as shown in Figure 3-10.
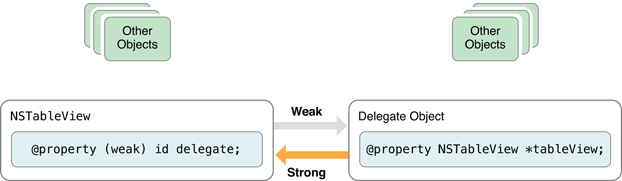
This means that the delegate object will be deallocated, thereby releasing the strong reference on the table view, as shown in Figure 3-11.
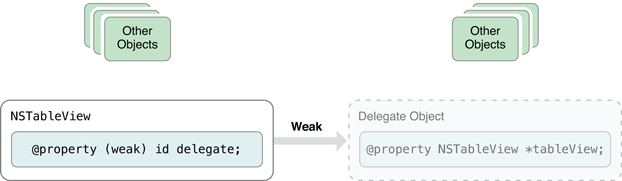
Once the delegate is deallocated, there are no longer any strong references to the table view, so it too is deallocated.
Use Strong and Weak Declarations to Manage Ownership
By default, object properties declared like this:
@property id delegate; |
use strong references for their synthesized instance variables. To declare a weak reference, add an attribute to the property, like this:
@property (weak) id delegate; |
Local variables (and non-property instance variables) also maintain strong references to objects by default. This means that the following code will work exactly as you expect:
NSDate *originalDate = self.lastModificationDate; |
self.lastModificationDate = [NSDate date]; |
NSLog(@"Last modification date changed from %@ to %@", |
originalDate, self.lastModificationDate); |
In this example, the local variable originalDate maintains a strong reference to the initial lastModificationDate object. When the lastModificationDate property is changed, the property no longer keeps a strong reference to the original date, but that date is still kept alive by the originalDate strong variable.
If you don’t want a variable to maintain a strong reference, you can declare it as __weak, like this:
NSObject * __weak weakVariable; |
Because a weak reference doesn’t keep an object alive, it’s possible for the referenced object to be deallocated while the reference is still in use. To avoid a dangerous dangling pointer to the memory originally occupied by the now deallocated object, a weak reference is automatically set to nil when its object is deallocated.
This means that if you use a weak variable in the previous date example:
NSDate * __weak originalDate = self.lastModificationDate; |
self.lastModificationDate = [NSDate date]; |
the originalDate variable may potentially be set to nil. When self.lastModificationDate is reassigned, the property no longer maintains a strong reference to the original date. If there are no other strong references to it, the original date will be deallocated and originalDate set to nil.
Weak variables can be a source of confusion, particularly in code like this:
NSObject * __weak someObject = [[NSObject alloc] init]; |
In this example, the newly allocated object has no strong references to it, so it is immediately deallocated and someObject is set to nil.
It’s also important to consider the implications of a method that needs to access a weak property several times, like this:
- (void)someMethod { |
[self.weakProperty doSomething]; |
... |
[self.weakProperty doSomethingElse]; |
} |
In situations like this, you might want to cache the weak property in a strong variable to ensure that it is kept in memory as long as you need to use it:
- (void)someMethod { |
NSObject *cachedObject = self.weakProperty; |
[cachedObject doSomething]; |
... |
[cachedObject doSomethingElse]; |
} |
In this example, the cachedObject variable maintains a strong reference to the original weak property value so that it can’t be deallocated as long as cachedObject is still in scope (and hasn’t been reassigned another value).
It’s particularly important to keep this in mind if you need to make sure a weak property is not nil before using it. It’s not enough just to test it, like this:
if (self.someWeakProperty) { |
[someObject doSomethingImportantWith:self.someWeakProperty]; |
} |
because in a multi-threaded application, the property may be deallocated between the test and the method call, rendering the test useless. Instead, you need to declare a strong local variable to cache the value, like this:
NSObject *cachedObject = self.someWeakProperty; // 1 |
if (cachedObject) { // 2 |
[someObject doSomethingImportantWith:cachedObject]; // 3 |
} // 4 |
cachedObject = nil; // 5 |
In this example, the strong reference is created in line 1, meaning that the object is guaranteed to be alive for the test and method call. In line 5, cachedObject is set to nil, thereby giving up the strong reference. If the original object has no other strong references to it at this point, it will be deallocated and someWeakProperty will be set to nil.
Use Unsafe Unretained References for Some Classes
There are a few classes in Cocoa and Cocoa Touch that don’t yet support weak references, which means you can’t declare a weak property or weak local variable to keep track of them. These classes include NSTextView, NSFont and NSColorSpace; for the full list, see Transitioning to ARC Release Notes.
If you need to use a weak reference to one of these classes, you must use an unsafe reference. For a property, this means using the unsafe_unretained attribute:
@property (unsafe_unretained) NSObject *unsafeProperty; |
For variables, you need to use __unsafe_unretained:
NSObject * __unsafe_unretained unsafeReference; |
An unsafe reference is similar to a weak reference in that it doesn’t keep its related object alive, but it won’t be set to nil if the destination object is deallocated. This means that you’ll be left with a dangling pointer to the memory originally occupied by the now deallocated object, hence the term “unsafe.” Sending a message to a dangling pointer will result in a crash.
Copy Properties Maintain Their Own Copies
In some circumstances, an object may wish to keep its own copy of any objects that are set for its properties.
As an example, the class interface for the XYZBadgeView class shown earlier in Figure 3-4 might look like this:
@interface XYZBadgeView : NSView |
@property NSString *firstName; |
@property NSString *lastName; |
@end |
Two NSString properties are declared, which both maintain implicit strong references to their objects.
Consider what happens if another object creates a string to set as one of the badge view’s properties, like this:
NSMutableString *nameString = [NSMutableString stringWithString:@"John"]; |
self.badgeView.firstName = nameString; |
This is perfectly valid, because NSMutableString is a subclass of NSString. Although the badge view thinks it’s dealing with an NSString instance, it’s actually dealing with an NSMutableString.
This means that the string can change:
[nameString appendString:@"ny"]; |
In this case, although the name was “John” at the time it was originally set for the badge view’s firstName property, it’s now “Johnny” because the mutable string was changed.
You might choose that the badge view should maintain its own copies of any strings set for its firstName and lastName properties, so that it effectively captures the strings at the time that the properties are set. By adding a copy attribute to the two property declarations:
@interface XYZBadgeView : NSView |
@property (copy) NSString *firstName; |
@property (copy) NSString *lastName; |
@end |
the view now maintains its own copies of the two strings. Even if a mutable string is set and subsequently changed, the badge view captures whatever value it has at the time it is set. For example:
NSMutableString *nameString = [NSMutableString stringWithString:@"John"]; |
self.badgeView.firstName = nameString; |
[nameString appendString:@"ny"]; |
This time, the firstName held by the badge view will be an unaffected copy of the original “John” string.
The copy attribute means that the property will use a strong reference, because it must hold on to the new object it creates.
If you need to set a copy property’s instance variable directly, for example in an initializer method, don’t forget to set a copy of the original object:
- (id)initWithSomeOriginalString:(NSString *)aString { |
self = [super init]; |
if (self) { |
_instanceVariableForCopyProperty = [aString copy]; |
} |
return self; |
} |
Exercises
Modify the
sayHellomethod from theXYZPersonclass to log a greeting using the person’s first name and last name.Declare and implement a new designated initializer used to create an
XYZPersonusing a specified first name, last name and date of birth, along with a suitable class factory method.Don’t forget to override
initto call the designated initializer.Test what happens if you set a mutable string as the person’s first name, then mutate that string before calling your modified
sayHellomethod. Change theNSStringproperty declarations by adding thecopyattribute and test again.Try creating
XYZPersonobjects using a variety of strong and weak variables in themain()function. Verify that the strong variables keep theXYZPersonobjects alive at least as long as you expect.In order to help verify when an
XYZPersonobject is deallocated, you might want to tie into the object lifecycle by providing adeallocmethod in theXYZPersonimplementation. This method is called automatically when an Objective-C object is deallocated from memory, and is normally used to release any memory you allocated manually, such as through the Cmalloc()function, as described in Advanced Memory Management Programming Guide.For the purposes of this exercise, override the
deallocmethod inXYZPersonto log a message, like this:- (void)dealloc {NSLog(@"XYZPerson is being deallocated");
}
Try setting each
XYZPersonpointer variable tonilto verify that the objects are deallocated when you expect them to be.Modify the
XYZPersonclass description so that you can keep track of a spouse or partner.You’ll need to decide how best to model the relationship, thinking carefully about object graph management.
Copyright © 2014 Apple Inc. All Rights Reserved. Terms of Use | Privacy Policy | Updated: 2014-09-17