Retired Document
Important: This document does not represent best practices for current development. You should convert your app to use AVFoundation instead. See Transitioning QTKit Code to AV Foundation.
Extending the Media Player Application
In this chapter, you extend your QTKit media player beyond the simple player you constructed in the previous chapter. This time, when completed, your QTKit media player application allows you not only to display and play back a video or audio file as a QuickTime movie but also to edit the contents of that movie file. To implement this media player, you’ll be surprised, again, at how few lines of Objective-C code you’ll have to write.
The goal of this chapter is to build on and extend your knowledge of the methods available in the QTKit framework. The focus, as in the previous chapter, is on how to accomplish media playback and, in this case, editing of video/audio content as efficiently as possible with a minimum of Objective-C code and in conformance with techniques for best practices in developing Cocoa applications.
Extend the MyMediaPlayer Project
To extend the MyMediaPlayer project:
Launch Xcode 3.2 and choose File > Open.
Select the MyMediaPlayer project you created in the previous chapter and open it.
In your MyMediaPlayer project, click the
MyDocument.hdeclaration file.Declare a
mMovieViewinstance variable to point to theQTMovieViewInterface Builder outlet, following the line of code in which you declared themovieinstance variable pointing to theQTMovieobject.IBOutlet QTMovieView *mMovieView;
At this point, the code in your
MyDocument.hfile should look like this:#import <Cocoa/Cocoa.h>
#import <QTKit/QTKit.h>
@interface MyDocument : NSDocument
{QTMovie *movie;
IBOutlet QTMovieView *mMovieView;
}
@property(retain) QTMovie *movie;
@end
Save your file.
This completes the first stage of your project. Now you use Interface Builder 3.2 to construct the user interface for your project.
Create the User Interface with Interface Builder
Interface Builder and Xcode are designed to work seamlessly together, enabling you to construct and implement the various elements in your project more efficiently and with less code overhead.
Launch Interface Builder 3.2 and open the
MyDocument.xibfile in your Xcode project window that you created following the steps in the previous chapter in Create the User Interface with Interface Builder.Press Control-drag to wire up the File’s Owner to the movie view object, specifying the
mMovieViewinstance variable as an outlet.Select the Window object in the
MyDocument.xibpanel.In the Inspector, click the Window attributes icon.
Define the behavior and appearance of the Window object.
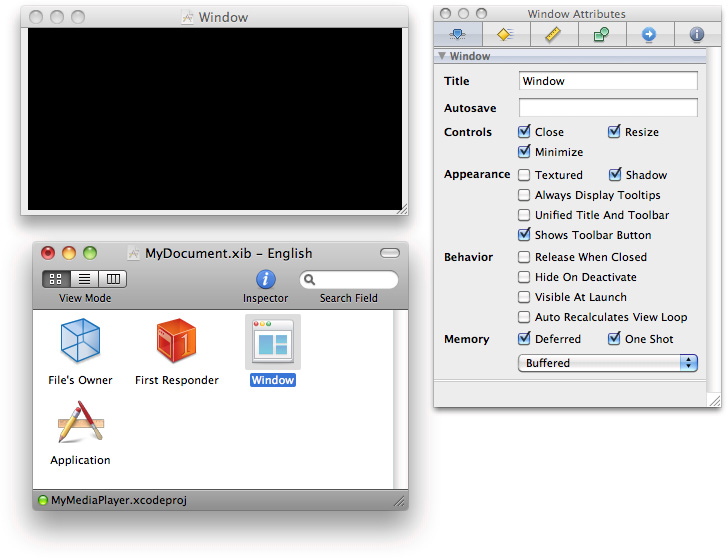
Save and quit Interface Builder.
This completes the sequence steps for constructing your media player user interface. In the next sequence, you return to your MyDocument.m implementation file to add the necessary blocks of code for your project.
Modify the Implementation File in Xcode
To modify the implementation file:
Open the
MyDocument.mfile and scroll down to the block of code that begins with the following:- (void)windowControllerDidLoadNib:(NSWindowController *) aController
To show the movie control grow box, use the
setShowsResizeIndicator:method.To hide the window’s resize indicator so it does not interfere with the movie control, use the
setShowsResizeIndicator:method.Add the following lines so that your code looks like this:
- (void)windowControllerDidLoadNib:(NSWindowController *) aController
{[super windowControllerDidLoadNib:aController];
[mMovieView setShowsResizeIndicator:YES];
[[mMovieView window] setShowsResizeIndicator:NO];
}
Inside the block of code beginning with the
readFromURL:ofType:error:method, which sets the contents of the document by reading from a file or file package, of a specified type, located by a URL, add this line:[newMovie setAttribute:[NSNumber numberWithBool:YES] forKey:QTMovieEditableAttribute];
Make sure the complete block of code appears as follows:
- (BOOL)readFromURL:(NSURL *)absoluteURL ofType:(NSString *)typeName error:(NSError **)outError
{QTMovie *newMovie = [QTMovie movieWithURL:absoluteURL error:outError];
if (newMovie) {[newMovie setAttribute:[NSNumber numberWithBool:YES] forKey:QTMovieEditableAttribute];
[self setMovie:newMovie];
}
return (newMovie != nil);
}
By calling the
setAttribute:forKey:method and using theQTMovieeditable attribute, you’ve marked the movie as editable. This means that any editing operations you choose, such as cut, copy, and paste, can be performed on the movie itself. The value for this key is of typeNSNumber, interpreted as a Boolean value. If the movie can be edited, the value isYES. Understanding how to use attributes to specify and perform certain tasks is important in working with the QTKit API. Attributes you can access in the QTKit framework are discussed in the next chapter, Customizing the Media Player Application.
That completes the construction and coding of your extended media player application. Now you’re ready to build and compile the application in Xcode.
Build and Compile Your Media Player Application
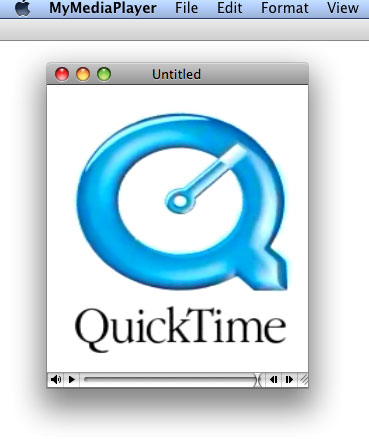
After you’ve completed these steps, launch your media player in Xcode, open and display QuickTime movies and perform editing on those movies.
In Xcode, build and run the media player application. In File > Open, select a movie and open it. The movie is completely editable with a slider bar for editing.
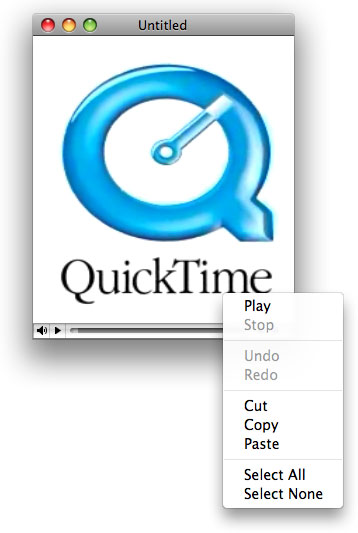
To access the editing features of the player or to control playback, stopping or starting the sample movie, control-click anywhere in the movie. A contextual menu appears.
Summary
In this chapter you learned how to:
Extend the functionality of the
MyMediaPlayerapplication, enabling you to open, play and edit QuickTime movies or audio files.In code, mark the movie as “editable” to perform editing operations such as cut, copy, and paste by using the
setAttribute:forKey:method.Specify a movie controller grow box, using the
setShowsResizeIndicator:method and hide the window’s resize indicator, using thesetShowsResizeIndicator:method.
Copyright © 2016 Apple Inc. All Rights Reserved. Terms of Use | Privacy Policy | Updated: 2016-08-26