The Classes That Support Document-Based Apps
There are three major classes in the document architecture: NSDocumentController, NSDocument, and NSWindowController. Objects of these classes divide and orchestrate the work of creating, saving, opening, and managing the documents of an app. They are arranged in a tiered one-to-many relationship, as depicted in Figure 2-1. An app can have only one NSDocumentController object, which creates and manages one or more NSDocument objects (one for each New or Open operation). In turn, an NSDocument object creates and manages one or more NSWindowController objects, one for each of the windows displayed for a document. In addition, some of these objects have responsibilities analogous to NSApplication and NSWindow delegates, such as approving major events like closing and quitting.
NSDocumentController, NSDocument, and NSWindowController objects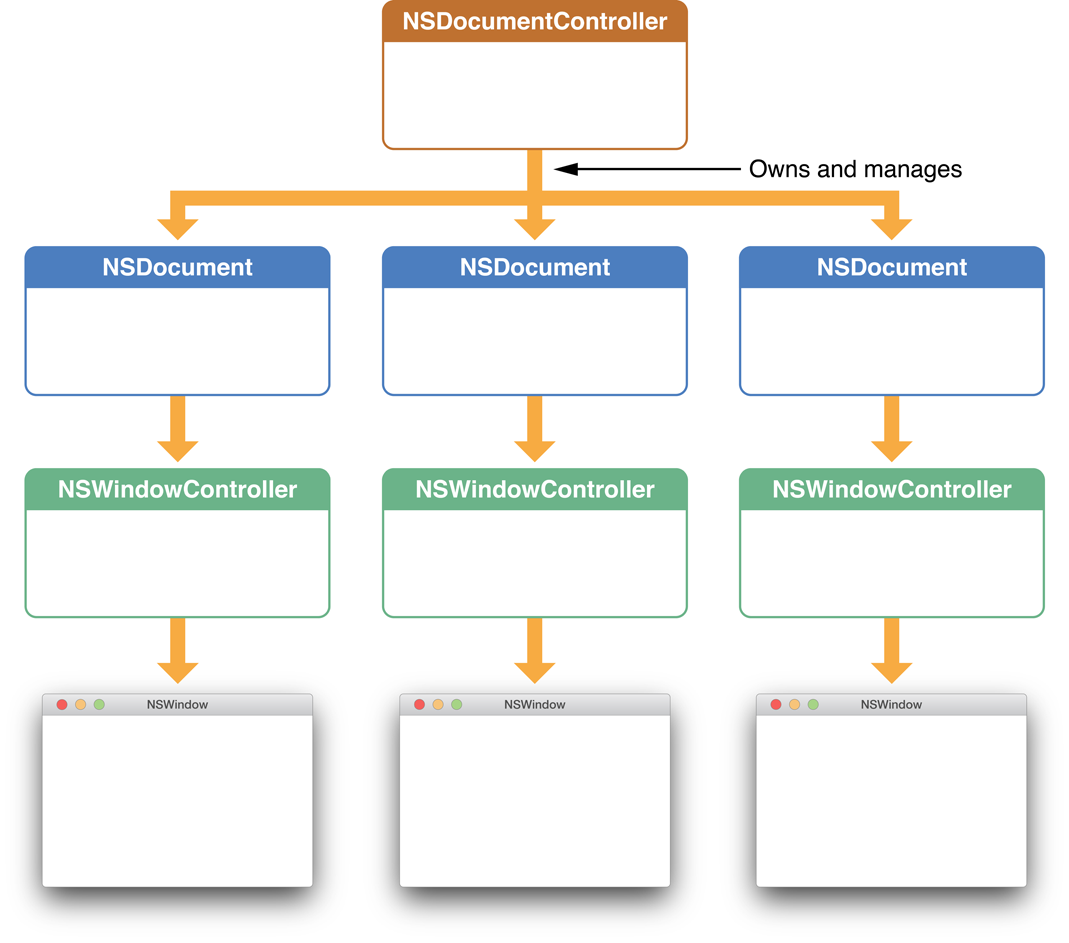
A Cocoa app includes a number of key objects in addition to the three major types of objects of the document architecture. Figure 2-2 shows how these objects fit into the overall Cocoa object infrastructure.

NSDocumentController Creates and Manages Documents
An app’s NSDocumentController object manages the documents in an app. In the MVC design pattern, an NSDocumentController object is a high-level controller. It has the following primary responsibilities:
Creates empty documents in response to the New item in the File menu
Creates documents initialized with data from a file in response to the Open item in the File menu
Tracks and manages those documents
Handles document-related menu items, such as Open Recent
When a user chooses New from the File menu, the NSDocumentController object gets the appropriate NSDocument subclass from the app’s Information property list and allocates and initializes an instance of this class. Likewise, when the user chooses Open, the NSDocumentController object displays the Open dialog, gets the user’s selection, finds the NSDocument subclass for the file, allocates an instance of the class, and initializes it with data from the file. In both cases, the NSDocumentController object adds a reference to the document object to an internal list to help manage its documents.
Most of the time, you can use NSDocumentController as is to manage your app’s documents. NSDocumentController is hard-wired to respond appropriately to certain app events, such as when the app starts up, when it terminates, when the system is shutting down, and when documents are opened or printed. Alternatively, you can create a custom delegate object and implement the delegate methods corresponding to the same events (see NSApplicationDelegate Protocol Reference).
NSDocument Presents and Stores Document Data
NSDocument is the base class for document objects in the app architecture—you must create an NSDocument subclass for each type of document your app handles. When your app is running, it has an NSDocument-based object for each open document. In the MVC design pattern, NSDocument is a model controller because it manages the data model, that is, the persistent data associated with its document. An NSDocument object has the following responsibilities:
Manages the display and capture of the data in its windows (with the assistance of its window controllers)
Loads and stores (that is, reads and writes) the persistent data associated with its document
Responds to action messages to save, print, revert, and close documents
Runs and manages the Save and Page Setup dialogs
A fully implemented NSDocument object also knows how to track its edited status, perform undo and redo operations, print document data, and validate its menu items. Although these behaviors aren’t completely provided by default, the NSDocument object does assist the developer in implementing each, in the following ways:
For tracking edited status,
NSDocumentprovides a method for updating a change counter.For undo and redo operations,
NSDocumentlazily creates anNSUndoManagerinstance when one is requested, responds appropriately to Undo and Redo menu commands, and updates the change counter when undo and redo operations are performed.For printing,
NSDocumentfacilitates the display of the Page Setup dialog and the subsequent modification of theNSPrintInfoobject used in printing. To do this, subclasses ofNSDocumentmust overrideprintOperationWithSettings:error:.To validate menu items,
NSDocumentimplementsvalidateUserInterfaceItem:to manage the enabled state and titles of the menu items Revert Document and Save (which becomes Save a Version after the document is first saved). If you want to validate other menu items, you can override this method, but be sure to invoke the superclass implementation. For more information on menu item validation, see NSUserInterfaceValidations Protocol Reference.
When designing your document objects, you should always maintain a clean separation between these data-handling activities of the document object itself and the code for managing the visual presentation of that data. The document object is responsible for the data, including the reading and writing of that data to disk. The visual presentation of that data is the responsibility of the associated window controller object. Keeping a clean separation between these two activities makes for a more modular design that can be updated more easily in the future.
Nonetheless, managing the document’s data and its user interface are closely related, which is why the document object owns and manages its window controllers. The document object also manages its menu, which is part of the user interface, because the state of its user commands—what commands are available and whether they are enabled—is determined by the state of the document data.
An NSDocument object should not contain or require the presence of any objects that are specific to the app’s user interface. Although a document can own and manage NSWindowController objects—which present the document visually and allow the user to edit it—it should not depend on these objects being there. For example, it might be desirable to have a document open in your app without having it visually displayed.
For details about subclassing NSDocument, see Creating the Subclass of NSDocument.
If you have a large data set or require a managed object model, you may want to use NSPersistentDocument, a subclass of NSDocument, to create a document-based app that uses Core Data. For more information, see Core Data Starting Point.
NSWindowController Manages One Document Window
An NSWindowController object manages one window associated with a document. That window is typically stored in a nib file. As such, in the MVC design pattern, it is a view controller. When an NSWindowController object receives a request from its owning NSDocument object, it loads the nib file containing a window, displays the window, and sets itself as the File’s Owner of the nib file. It also assumes responsibility for closing windows properly.
A window controller keeps track of its window using its window outlet. The window outlet should be connected to the window for which your window controller is responsible, as shown in Figure 2-3.
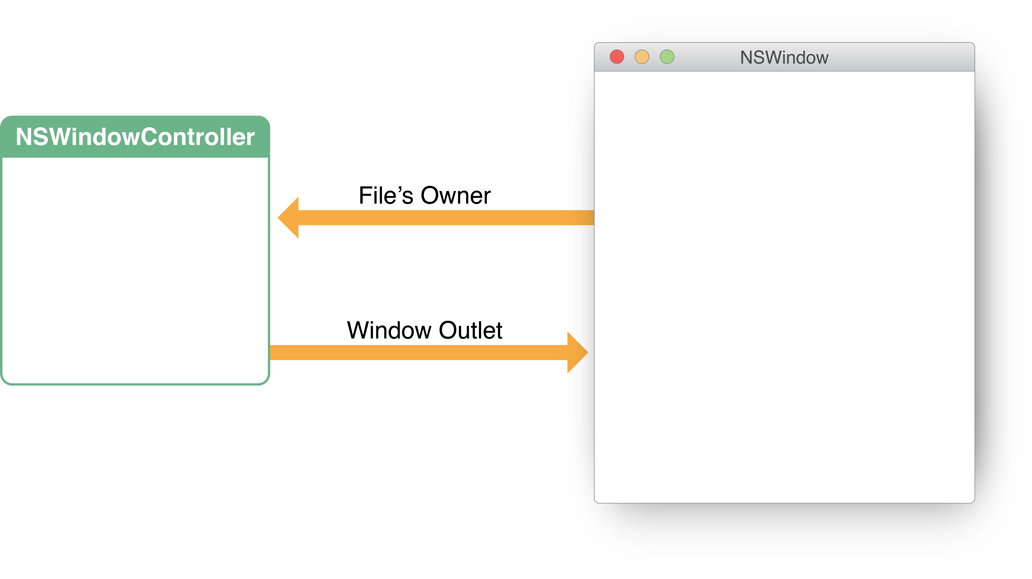
Although not required, it’s often convenient to set up your window controller as the delegate of the window it manages. In your nib file, connect the delegate outlet of the window your window controller is managing to the object that represents your window controller—specifically, the File’s Owner object.
The Xcode document-based app template does not subclass NSWindowController, and you do not need to do so if you are writing a simple app. However, if you are writing an app with more advanced requirements, as is typical, you will almost certainly want to do so. In addition, subclassing NSWindowController promotes better encapsulation of your view and model code. For more information, see You Should Subclass NSWindowController.
Subclassing Objects in the Document Architecture
You can create a document-based app without writing much code. You have only to create a document project, compose the human interface, implement a subclass of NSDocument, and add any other custom classes or behavior required by your app. However, most app requirements are more complex, so you can customize the default object architecture through subclassing and delegation, as described in this section.
Table 2-1 summarizes the object architecture and subclass requirements of a document-based app.
Class | Number of objects | Subclassing |
|---|---|---|
| 1 per document | Required |
| 1 per window | Optional (but recommended) |
| 1 per app | Optional (and unlikely) |
You Must Subclass NSDocument
Every app that uses the document architecture must create at least one subclass of NSDocument. To create a document-based Cocoa app, you choose the Xcode template for a Cocoa application presented in the New Project dialog and select the option Create Document-Based Application in the next pane. When you do this, you get a new app project that already contains a subclass of NSDocument and nib files for your document and app menu. Minimal or empty method implementations are provided for:
Reading and writing document data. Comments explain what you need to fill in, how to handle an error condition, and alternate reading and writing methods to override instead. The method bodies include code that throws an “unimplemented method” exception if you don’t change anything.
Initialization of the document object. The implementation contains the proper Cocoa initialization pattern, which calls the superclass initializer and provides a place for subclass-specific initialization.
Returning the document nib file name. This code overrides the
windowNibNamemethod to return the nib file name used for documents of this type. Comments explain situations where you should do alternate overrides.Post-nib-loading code. This override provides a place for code to be executed after the document window nib file is loaded. For example, objects in the nib cannot be initialized until after the nib is loaded.
Opting into autosaving. By leaving this override as written in the template to return
YES, you ensure that your document saves its data to disk automatically.
See Creating the Subclass of NSDocument for information about implementing the required methods in your NSDocument subclass.
You Should Subclass NSWindowController
Even if your document has only one window, it may be complex enough that you’d like to split up some of the logic in the controller layer to have a view controller as well as a model controller object. In this case, you should subclass NSWindowController as well as NSDocument. In this way, you can add specific knowledge of the app’s view layer that the window controller is responsible for managing. Any outlets and actions, and any other behavior that is specific to the management of the user interface, goes into the NSWindowController subclass. Especially for larger apps, splitting the controller duties between two classes makes a lot of sense. This strategy allows you to have documents that are open, but not onscreen, to avoid having to allocate memory and other resources of a front-end that may not be used in some circumstances.
Reasons to Subclass NSWindowController
If your document requires or allows multiple windows for a single document, that is a good reason to subclass NSWindowController. For example, a CAD program could need to present front, top, and side views, as well as a rendered 3D view of a document. When it does, you might want to have one or more subclasses of NSWindowController to manage the different kinds of windows that your document needs, and so you must create one of each in makeWindowControllers.
Some apps need only one window for a document but want to allow the user to create several copies of the window for a single document (sometimes this is called a multiple-view document) so that the user can have each window scrolled to a different position or displayed differently, such as at a different scale. In this case, your makeWindowControllers override would create only one NSWindowController object, and there would be a menu command or other control that allows the user to create others.
Another reason to subclass NSWindowController is to customize your document window titles. To customize a document's window title properly, subclass NSWindowController and override windowTitleForDocumentDisplayName:. If your app requires even deeper customization, override synchronizeWindowTitleWithDocumentName.
How to Subclass NSWindowController
Once you've decided to subclass NSWindowController, you need to change the default document-based app setup. First, add any Interface Builder outlets and actions for your document's user interface to the NSWindowController subclass instead of to the NSDocument subclass. The NSWindowController subclass instance should be the File’s Owner for the nib file because that creates better separation between the view-related logic and the model-related logic. Some menu actions can still be implemented in the NSDocument subclass. For example, Save and Revert Document are implemented by NSDocument, and you might add other menu actions of your own, such as an action for creating new views on a document.
Second, instead of overriding windowNibName in your NSDocument subclass, override makeWindowControllers. In makeWindowControllers, create at least one instance of your custom NSWindowController subclass and use addWindowController: to add it to the document. If your document always needs multiple controllers, create them all here. If a document can support multiple views but by default has one, create the controller for the default view here and provide user actions for creating other views.
You should not force the windows to be visible in makeWindowControllers. NSDocument does that for you if it’s appropriate.
An NSWindowController Subclass Manages Nib Files
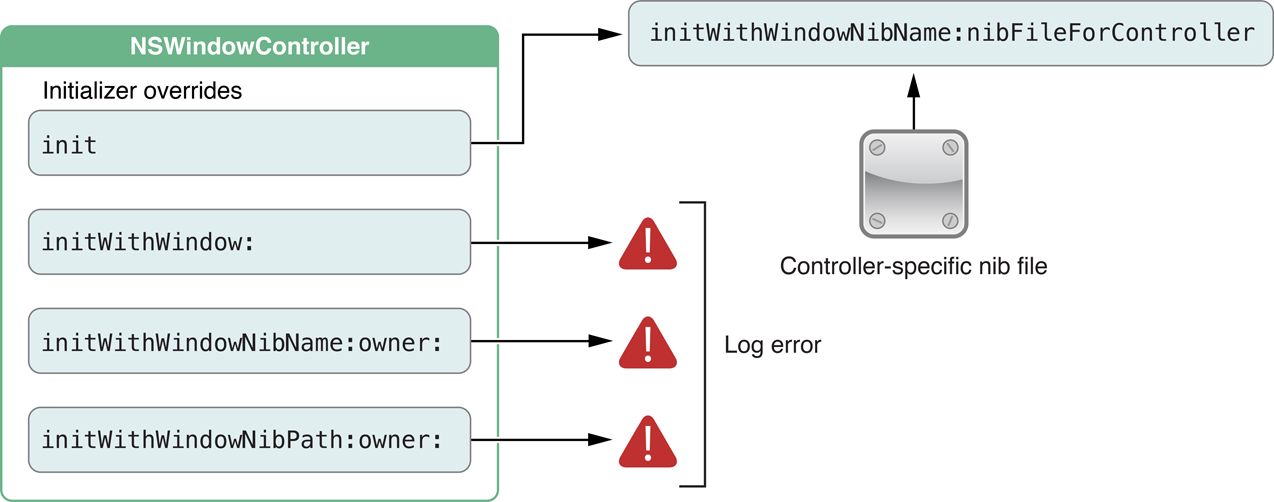
An NSWindowController object expects to be told what nib file to load (through its initWithWindowNib... methods) because it is a generic implementation of the default behavior for all window controllers. However, when you write a subclass of NSWindowController, that subclass is almost always designed to control the user interface contained in a particular nib file, and your subclass would not work with a different nib file. It is therefore inconvenient and error-prone for the instantiator of the subclass to have to tell it which nib file to load.
This problem is solved by overriding the init method to call the superclass’s initWithWindowNibName: method with the correct nib name. Then instantiators just use init, and the controller has the correct nib file. You can also override the initWithWindowNib... methods to log an error, as shown in Figure 2-4, because no instantiator should ever try to tell your subclass which nib file to use. It is a good idea for any NSWindowController subclass designed to work with a specific nib file to use this technique. You should do otherwise only if you are extending just the basic functionality of NSWindowController in your subclass and have not tied that functionality to any particular nib file.
An NSWindowController object without an associated NSDocument object is useful by itself. NSWindowController can be used as the base class for auxiliary panel controllers in order to gain the use of its nib management abilities. One common standalone use of NSWindowController subclasses is as controllers for shared panels such as find panels, inspectors, or preferences panels. For example, the Sketch sample app uses NSWindowController subclasses for its various secondary panels. In this case, you can make an NSWindowController subclass that implements a “shared-instance” method to create a singleton window controller object. For example, you could create a PreferencesController subclass with a sharedPreferenceController class method that creates a single instance the first time it is called and returns that same instance on all subsequent calls.
Because your subclass derives from NSWindowController, you can just tell it the name of your preferences nib file and it handles loading the nib file and managing the window automatically. You add your own outlets and actions, as usual, to hook up the specific user interface for your panel and add methods to manage the panel’s behavior.
You Rarely Need to Subclass NSDocumentController
Most apps do not need to subclass NSDocumentController. Almost anything that can be done by subclassing can be done just as easily by the app’s delegate. However, it is possible to subclass NSDocumentController if you need to.
For example, if you need to customize the Open dialog, an NSDocumentController subclass is needed. You can override the NSDocumentController method runModalOpenPanel:forTypes: to customize the dialog or add an accessory view. The addDocument: and removeDocument: methods are provided for subclasses that want to know when documents are opened or closed.
There are two ways to subclass NSDocumentController:
You can make an instance of your subclass in your app’s main nib file. This instance becomes the shared instance.
You can create an instance of your subclass in your app delegate’s
applicationWillFinishLaunching:method.
The first NSDocumentController object to be created becomes the shared instance. The AppKit framework creates the shared instance (using the NSDocumentController class) during the “finish launching” phase of app startup. So if you need a subclass instance, you must create it before AppKit does.
Copyright © 2012 Apple Inc. All Rights Reserved. Terms of Use | Privacy Policy | Updated: 2012-12-13