Build-Time Configuration Details
Configuring your app properly is an important part of the development process. Mac apps use a structured directory configuration to manage their code and resource files. And although most of the files are custom and are there to support your app, some are required by the system or the App Store and must be configured properly.
If you intend to sell your application through the Mac App Store or use iCloud storage, you also need to create an explicit app ID, create provisioning profiles, and enable the correct entitlements for your application. These procedures are explained in App Distribution Guide.
All of the requirements for preparing your app and distributing it on the App Store are described in the App Store Resource Center.
Configuring Your Xcode Project
To develop a Mac app, you create an Xcode project. An Xcode Project is a repository for all the files, resources, and information required to build your app (or one of a number of other software products). A project contains all the elements used to build your app and maintains the relationships between those elements. It contains one or more targets, which specify how to build the software. A project defines default build settings for all the targets in the project (each target can also specify its own build settings, which override the project build settings).
You create a new project using the Xcode File > New > New Project menu command, which invokes the New Project dialog. This dialog enables you to choose a template for your project, such as a Cocoa app, to name it, and to locate it in your file system. The New Project dialog also provides options, so you can specify whether your app uses the Cocoa document architecture or the Core Data framework. When you save your project, Xcode lets you to create a local Git repository to enable source code control for your project.
If you have two or more closely related projects, you should create an Xcode Workspace and add your projects to it. A workspace groups projects and other documents so you can work on them together. One project can use the products and shared libraries of another project while building, and Xcode does indexing across the entire workspace, extending the scope of content-aware features such as code completion.
Once you have created your project, you write and edit your code using the Xcode source editor. You also use Xcode to build and debug your code, setting breakpoints, viewing the values of variables, stepping through running code, and reviewing issues found during builds or code analysis.
When you create a new project, it includes one or more targets, where each target specifies one build product and the instructions for how the product is to be built. Most developers never need to change the default of the vast majority of build settings, but there are a few basic settings that you should check for each target, such as the deployment target (platform, OS version, and architecture), main user interface, and linked frameworks and libraries.
You also need to set up one or more schemes to specify the targets, build configuration, and executable configuration to use when the product specified by the target is launched. You use the project editor and the scheme editing dialog to edit build settings and control what happens when you build and run your code. Building and Running Your Code explains how to work with Xcode build settings and schemes.
For more information about using Xcode to create, configure, build, and debug your project, as well as archiving your program to package it for distribution or submission to the Mac App Store, see Xcode Overview.
The Information Property List File
An information property list (Info.plist) file contains essential runtime-configuration information for the app. Xcode provides a version of this file with every Mac application project and configures it with several standard keys. Although the default keys cover several important aspects of the app’s configuration, most apps require additional keys to specify their configuration fully.
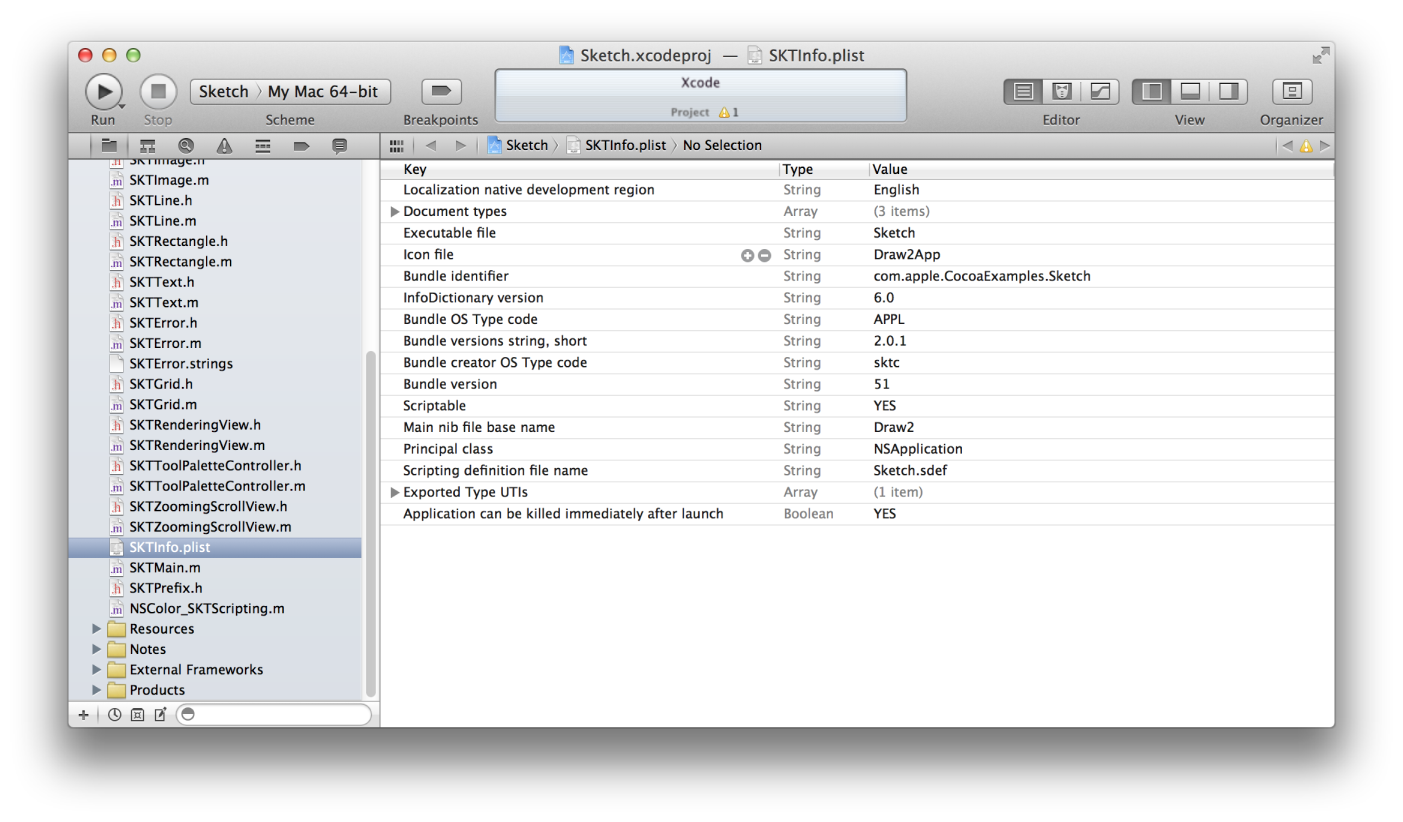
To view the contents of your Info.plist file, select it in the Groups & Files pane. Xcode displays a property list editor similar to the one in Figure 5-1 (which is from Xcode 3.2.5). You can use this window to edit the property values and add new key-value pairs. By default, Xcode displays a more user-friendly version of each key name. To see the key names that Xcode adds to the Info.plist file, Control-click an item in the editor and choose Show Raw Keys/Values from the contextual menu that appears.
Xcode automatically adds some important keys to the Info.plist file of all new projects and sets their initial values. However, there are several keys that Mac apps use commonly to configure their launch environment and runtime behavior. Here are some keys that you might want to add to your app’s Info.plist file specifically for OS X:
LSApplicationCategoryType(required for apps distributed using the App Store)CFBundleDisplayNameLSHasLocalizedDisplayNameNSHumanReadableCopyrightLSMinimumSystemVersionUTExportedTypeDeclarationsUTImportedTypeDeclarations
For detailed information about these and other keys that you can include in your app’s Info.plist file, see Information Property List Key Reference.
The OS X Application Bundle
When you build your Mac app, Xcode packages it as a bundle. A bundle is a directory in the file system that groups related resources together in one place. A Mac app bundle contains a single Contents directory, inside of which are additional files and directories with the app’s code, resources, and localized content. Table 5-1 lists the contents of a typical Mac app bundle, which for demonstration purposes is called MyApp. This example is for illustrative purposes only. Some of the files listed in this table may not appear in your own application bundles.
Files | Description |
|---|---|
| The executable file containing your app’s code. The name of this file is the same as your app name minus the This file is required. |
| Also known as the information property list file, a file containing configuration data for the app. The system uses this data to determine how to interact with the app at specific times. This file is required. For more information, see The Information Property List File. |
| The English version of the app’s main nib file. This file contains the default interface objects to load at app launch time. Typically, this nib file contains the app’s menu bar and application delegate object. It may also contain other controller objects that should always be available at launch time. (The name of the main nib file can be changed by assigning a different value to the This file is optional but recommended. For more information, see The Information Property List File |
| Nonlocalized resources are placed at the top level of the |
Other language-specific project directories | Localized resources are placed in subdirectories with an ISO 639-1 language abbreviation for a name plus an |
A Mac app should be internationalized and have a language.lproj directory for each language it supports. Even if you provide localized versions of your resources, though, include a default version of these files at the top level of your Resources directory. The default version is used when a specific localization is not available.
At runtime, you can access your app’s resource files from your code using the following steps:
Obtain a reference to your app’s main bundle object (typically using the
NSBundleclass).Use the methods of the bundle object to obtain a file-system path to the desired resource file.
Open (or access) the file and use it.
You obtain a reference to your app’s main bundle using the mainBundle class method of NSBundle. The pathForResource:ofType: method is one of several NSBundle methods that you can use to retrieve the location of resources. The following example shows how to locate a file called sun.png and create an image object using it. The first line gets the bundle object and the path to the file. The second line creates an NSImage object that you could use to display the image in your app.
NSString* imagePath = [[NSBundle mainBundle] pathForResource:@"sun" ofType:@"png"]; |
NSImage* sunImage = [[NSImage alloc] initWithContentsOfFile:imagePath]; |
For information on how to access and use resources in your app, see Resource Programming Guide. For more information about the structure of a Mac app bundle, see Bundle Programming Guide.
Internationalizing Your App
The process of preparing a project to handle content in different languages is called internationalization. The process of converting text, images, and other content into other languages is called localization. Project resources that are candidates for localization include:
Code-generated text, including locale-specific aspects of date, time, and number formatting
Static text—for example, strings you specify programmatically and display in parts of your user interface or an HTML file containing app help
Icons (including your app icon) and other images when those images either contain text or have some culture-specific meaning
Sound files containing spoken language
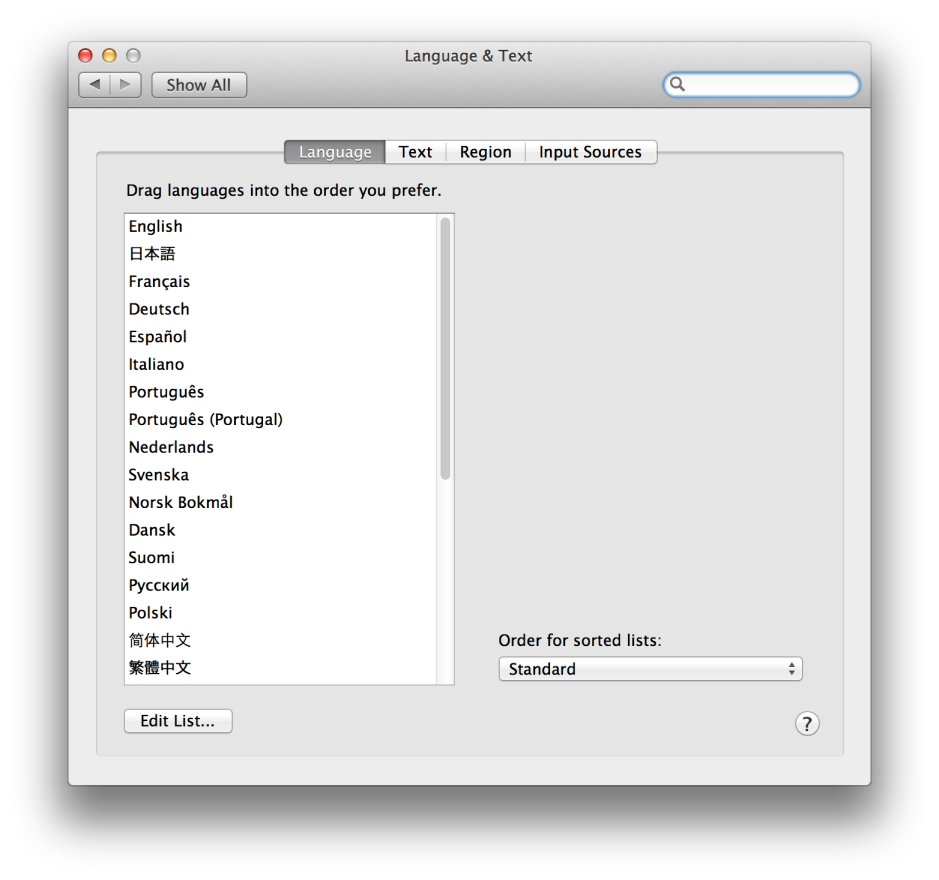
Users select their preferred language from the Language and Text system preference, shown in Figure 5-2.
Your application bundle can include multiple language-specific resource directories. The names of these directories consist of three components: an ISO 639-1 language code, an optional ISO 3166-1 region code, and a .lproj suffix. For example, to designate resources localized to English, the bundle would be named en.lproj. By convention, these directories are called lproj directories.
Each lproj directory contains a localized copy of the app’s resource files. When you request the path to a resource file using the NSBundle class or the CFBundleRef opaque type, the path you get back automatically reflects the resource for the user’s preferred language.
For more information about internationalization and how you support localized content in your Mac apps, see Internationalization and Localization Guide.
Copyright © 2015 Apple Inc. All Rights Reserved. Terms of Use | Privacy Policy | Updated: 2015-03-09