High Resolution Explained: Features and Benefits
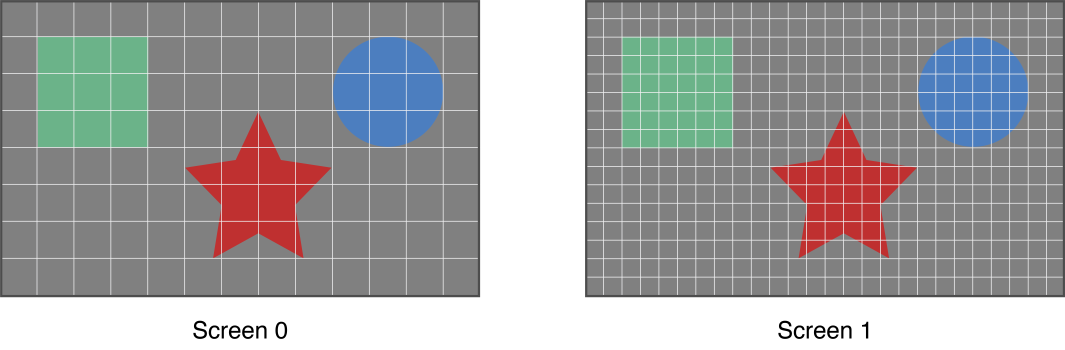
The two defining characteristics of high resolution for OS X are high pixel density and the virtual screen. In OS X, there are four times as many pixels for a given area on a high-resolution display. An increase in pixel density means that drawing is more precise, resulting in sharper text, extremely detailed photos, and a more defined user interface.
The virtual screen decouples the physical pixels drawn in device space from the user space your app draws to, so you don’t need to concern yourself with the characteristics of the display on which your app runs. The system frameworks are optimized and updated to perform the work needed to map user space to device space. Most of the time, your app won’t need to be aware of whether it is drawing to a standard- or a high-resolution display, or whether the user drags a window from one resolution display to another.
The high-resolution implementation on OS X brings with it several features and benefits. Understanding these will help as you optimize your app.
Points Don’t Correspond to Pixels
OS X refers to screen size in points, not pixels. A point is one unit in user space, prior to any transformations on the space. Because, on a high-resolution display, there are four onscreen pixels for each point, points can be expressed as floating-point values. Values that are integers in standard resolution, such as mouse coordinates, are floating-point values on a high-resolution display, allowing for greater precision for such things as graphics alignment.
Your app draws to a view using points in user space. The window server composites drawing operations to an offscreen buffer called the backing store. When it comes time to display the contents of the backing store onscreen, the window server scales the content appropriately, mapping points to onscreen pixels. The result is that if you draw the same content on two similar devices, and only one of them has a high-resolution screen, the content appears to be about the same size on both devices, as shown in Figure 1-1. Size invariance is a key feature of high resolution.
In your own drawing code you will use points most of the time, but there are instances when you might need to know how points are mapped to pixels. For example, on a high-resolution screen, you might want to provide more detail in your content or adjust the position or size of content in subtle ways. For those cases, it is possible to obtain the backing scale factor, which tells you the relationship between points and pixels for a particular object (a view, window, or screen). The backing scale factor is not global—it is a property of the object (layer, view, window) and is influenced by the display on which it is placed. In all cases, this value will be either 1.0 or 2.0, depending on the resolution of the underlying device. (For more information, see Getting Scale Information). The fact that the backing scale factor is always a whole number is another key feature of high resolution.
Resolution Can Change Dynamically
OS X supports a dynamic environment that can include more than one display, of which one or both can be standard or high resolution. Because of this, users can:
Connect or disconnect a second display
Close the lid of a laptop and use it with an external display
Drag an app window from one display to another
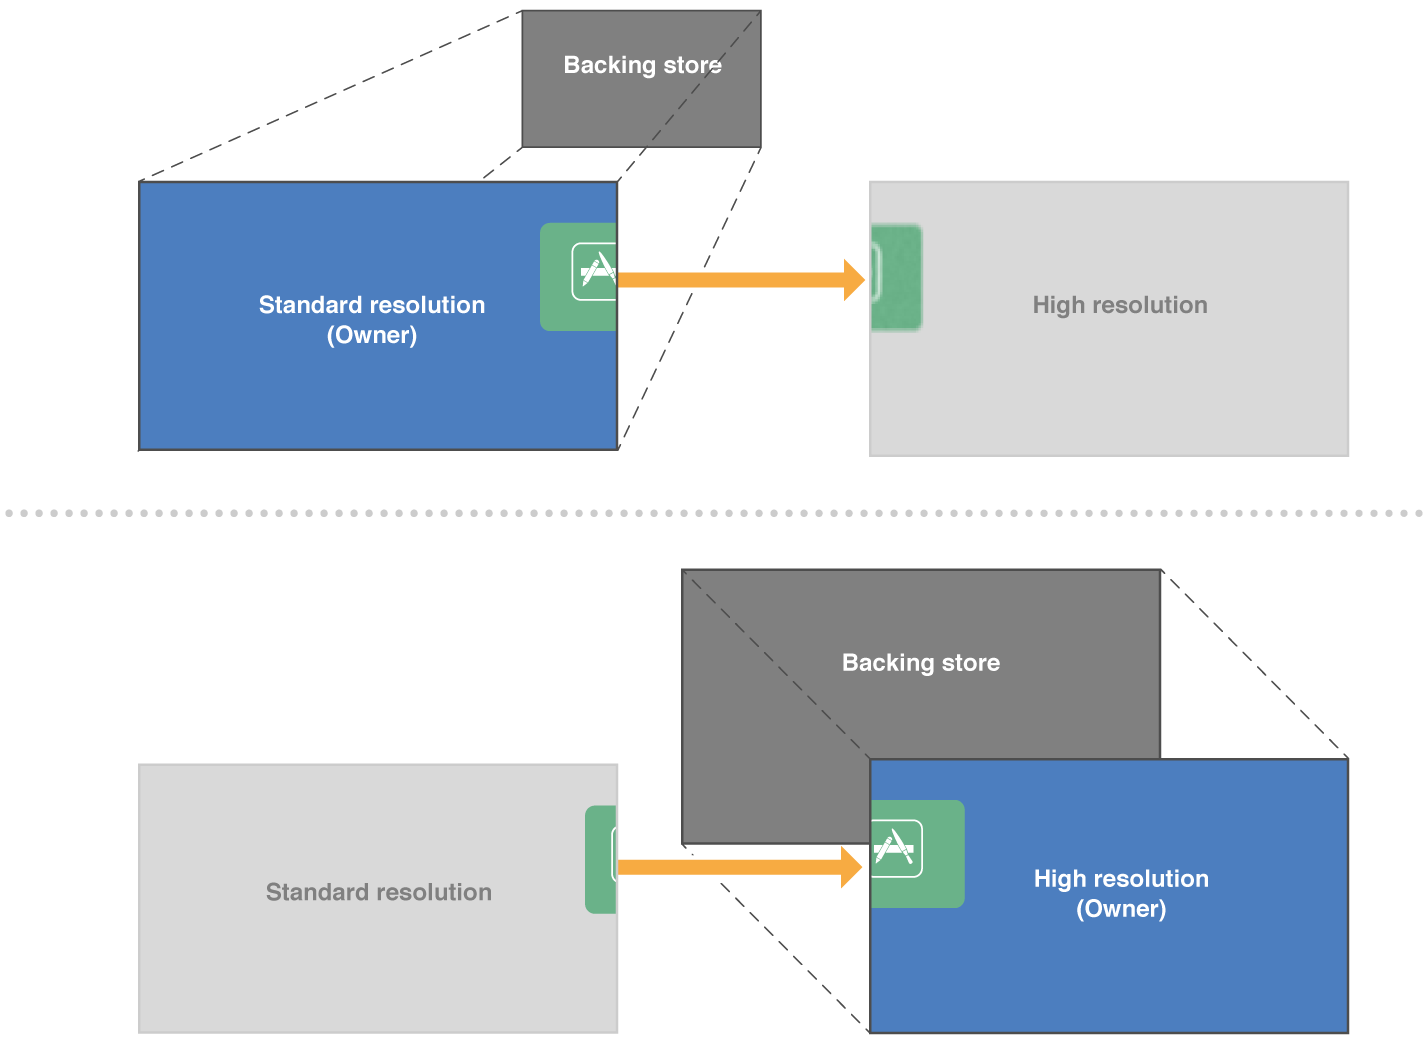
The backing store of a window is owned by the display on which the window is drawn. If a user drags the window from one display to another, the ownership of the backing store changes as soon as the destination display has more than 50% of the window’s content (as shown in Figure 1-2). When ownership changes, OS X handles as many of these dynamic changes as it can.
Most of the time, OS X automates dynamic resolution changes, seamlessly switching content from standard to high resolution. There are some cases for which your app will need to take action when a change in resolution occurs (see Handle Dynamic Changes in Window Resolution Only When You Must).
OS X Provides Many Drawing Improvements Automatically
Regardless of the underlying screen’s resolution, the drawing technologies in OS X provide support for making your rendered content look good. For example:
Standard AppKit views (text views, buttons, table views, and so on) automatically render correctly at any resolution.
Vector-based content (
NSBezierPath,CGPathRef, PDF, and so on) automatically takes advantage of any additional pixels to render sharper lines for shapes.Cocoa text automatically renders sharper at higher resolutions.
AppKit supports the automatic loading of high-resolution variants of your images.
Most of your existing drawing code will work without modification because the window server automatically accounts for the size of the backing store for a window graphics context. Any content you draw in the drawRect: method will be at the appropriate resolution for the underlying device. However, any drawing code that uses memory you create, such as Quartz bitmaps, will require you to manage the content.
For bitmapped images to appear sharp on a high-resolution display, you will need to create versions of your image resources that have twice the resolution as before. But after you provide those versions, AppKit will manage loading the appropriate version for the resolution. For more information on updating your image resources, see Provide High-Resolution Versions of All App Graphics Resources.
Image Representations Are Ideal for High Resolution
The notion of image representation is important for high resolution. An image representation object (NSImageRep) represents an image at a specific user size and pixel density, using a specific color space, and in a specific data format. NSImage objects use image representations to manage image data. An NSImage object can contain multiple image representation objects.
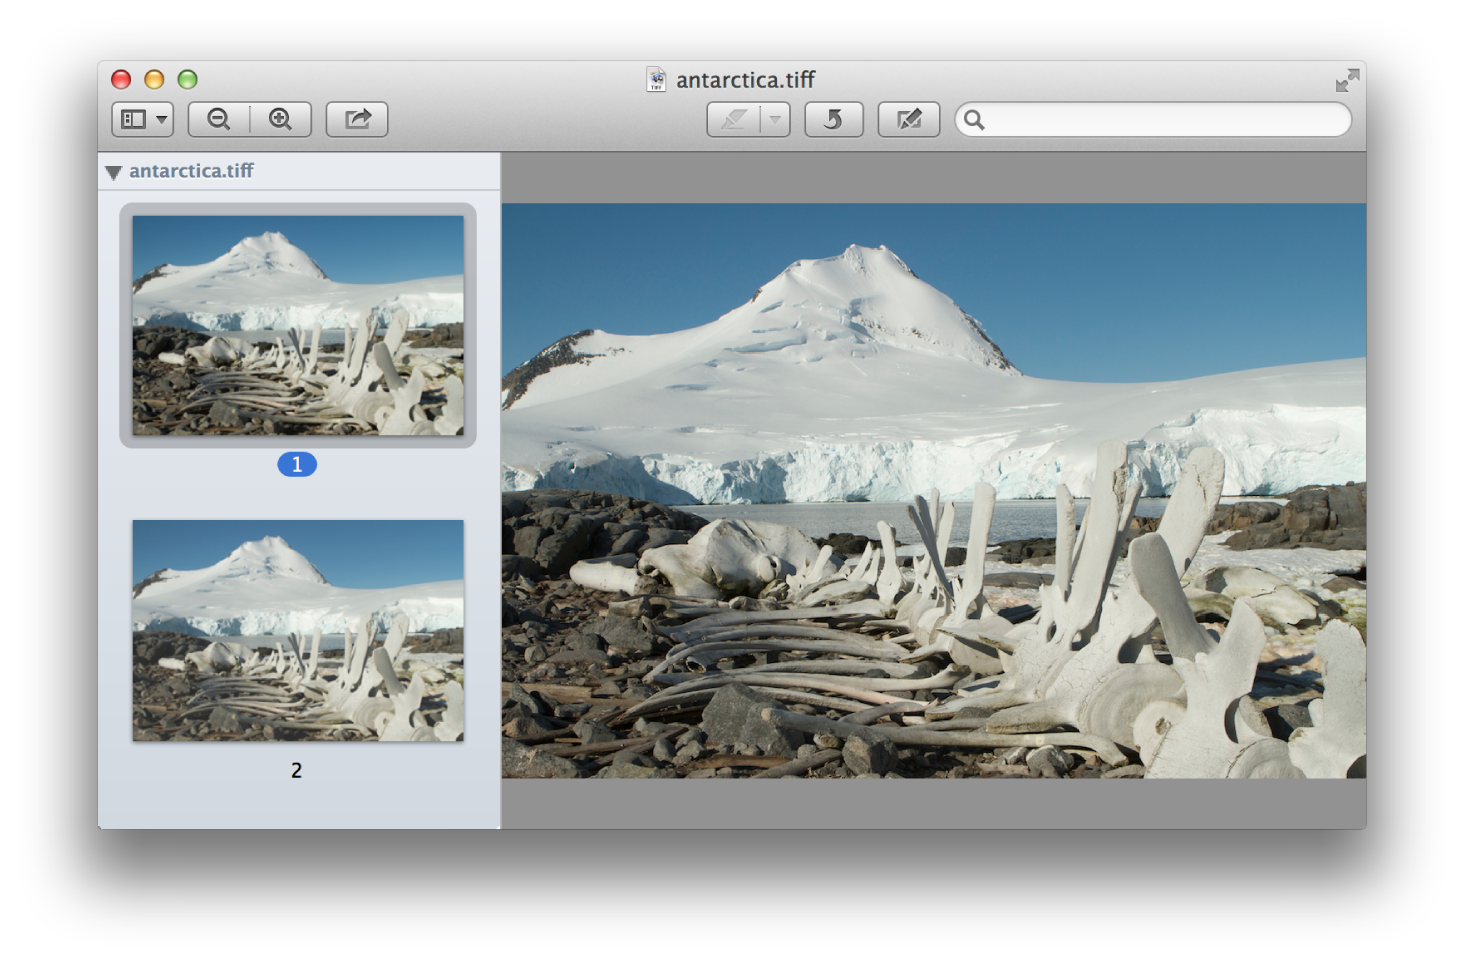
For file-based images, NSImage creates an image representation object for each separate image stored in a file. Although most image formats support only a single image, formats such as TIFF can store multiple images. To support high resolution, you can provide pairs of images—one standard resolution and the other high resolution—in the same file, as shown in Figure 1-3. When it comes time to display the image in your app, NSImage chooses the smallest image representation that has more pixels than the destination. For information on how to package and load images, see Package Multiple Versions of Image Resources into One File and Load Images Using High-Resolution-Savvy Image-Loading Methods.
Floating-Point Glyph Advancements Result in Improved Text Layout
Using screen fonts (for font sizes 16 pt and smaller) optimizes text layout for a standard-resolution display. For screen font, text is laid out using integral glyph advancements. Because the higher pixel density on a high-resolution display allows for floating-point glyph advancements even at small font sizes, screen font is no longer required. Floating-point advancements result in more precise layout, as shown in Figure 1-4, and allows for kerning and ligatures for smaller font sizes. If your app is document-based and supports text editing and layout, you should familiarize yourself with the default text settings. See Adjust Font Settings to Ensure Document Compatibility.

OS X Optimizes the High-Resolution User Experience for Existing Apps
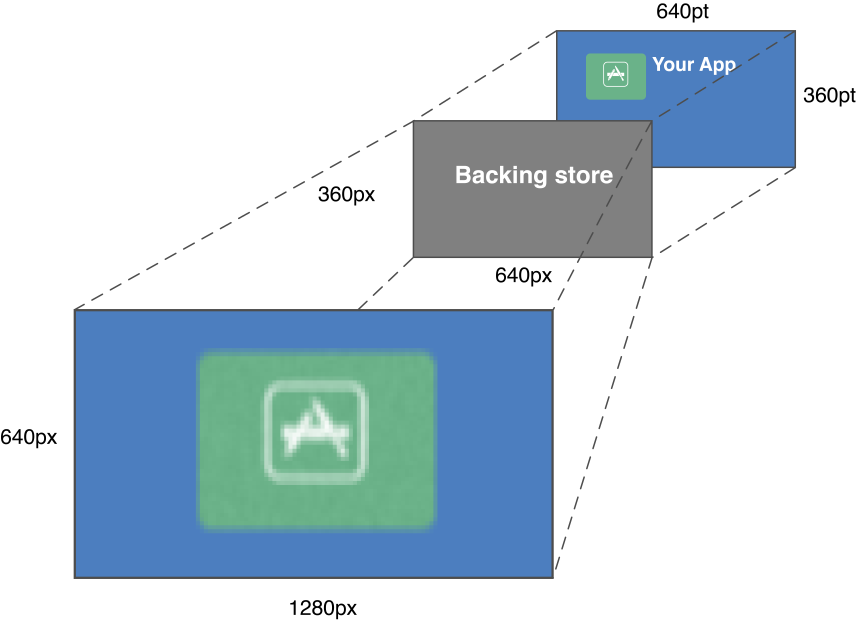
How well an existing app runs in high resolution depends on the frameworks and graphics resources it uses. An app whose code base has not yet been optimized for high-resolution graphics will either run in framework-scaled mode or magnified mode. Most Cocoa apps will run in framework-scaled mode; other apps will run in magnified mode. The difference between the modes is the size of the backing store. In magnified mode (shown in Figure 1-5), the backing store has one-fourth the number of pixels as a high-resolution display (half the width and height of the display). The system must magnify the contents of the backing store to fill the display. In framework-scaled mode, the backing store has the same number of pixels as the display. Each mode is explained in more detail in the sections that follow.
Framework-Scaled Mode Provides Automatic Scaling
Most existing Cocoa apps are scaled automatically. In framework-scaled mode, the application framework automatically adjusts the drawing size to ensure sharp graphics whether the display is standard or high resolution. The size of the backing store adjusts to accommodate the actual number of pixels onscreen. Application frameworks draw all standard user interface elements—such as buttons, menus, and the window title bar—to the correct size for the resolution.
When the framework detects that the controls need to be drawn on a high-resolution display, it adjusts the backing store to accommodate scaling each dimension by 2x. Whether standard or high resolution, the user sees high-quality rendering of the controls. The controls appear the same size to the user regardless of the backing store size, but on a high-resolution display, the controls look sharper due to the density of the backing pixels.
Any vector-based drawing performed by an app is scaled for high resolution and will look as sharp as the standard user interface elements.
Bitmapped images are magnified for high-resolution display. Images will be the correct user size, but will appear slightly fuzzy due to the magnification. Apps need to provide high-resolution versions of images to get the best user experience.
Magnified Mode Accommodates Apps That Aren’t Yet Ready for High Resolution
In magnified mode (as shown in Figure 1-5), the window backing store remains at 1x scaling. The system scales the contents using nearest-neighbor interpolation to draw the content on a high-resolution display. The user interface is sized as you expect, with no additional detail, and might look slightly blurry as a result.
All apps that are not Cocoa apps run in magnified mode. However, a Cocoa app can also run in magnified mode if:
The user sets the option to open the app in low resolution (see Figure 1-7).
The app is known to have significant issues when running in framework-scaled mode, so the system makes an exception and instead runs the app in magnified mode.
Because of the loss of detail, you should rely on magnified mode only until you make the necessary changes to support high-resolution graphics in your app.
An App’s High-Resolution Capability Is Available in the Info Window
Users can find out whether an app is running in low resolution by opening its Info window and looking at the “Open in Low Resolution” checkbox, as shown in Figure 1-7. Apps that aren’t Cocoa apps have this checkbox selected and unavailable (dimmed). Most Cocoa apps have this checkbox available, but not selected. A user can choose to run a Cocoa app in magnified mode if the app has usability issues related to high resolution.

Some Cocoa apps that are not fully optimized for high resolution might have the checkbox selected and available by default. These apps will run in magnified mode unless the user overrides the default setting. Users might want to override the default if the issues related to high resolution are tolerable.
If the “Open in Low Resolution” checkbox is selected by default for your app—whether the checkbox is available (dimmed) or not—you can change the default by:
Fixing all bugs related to high resolution
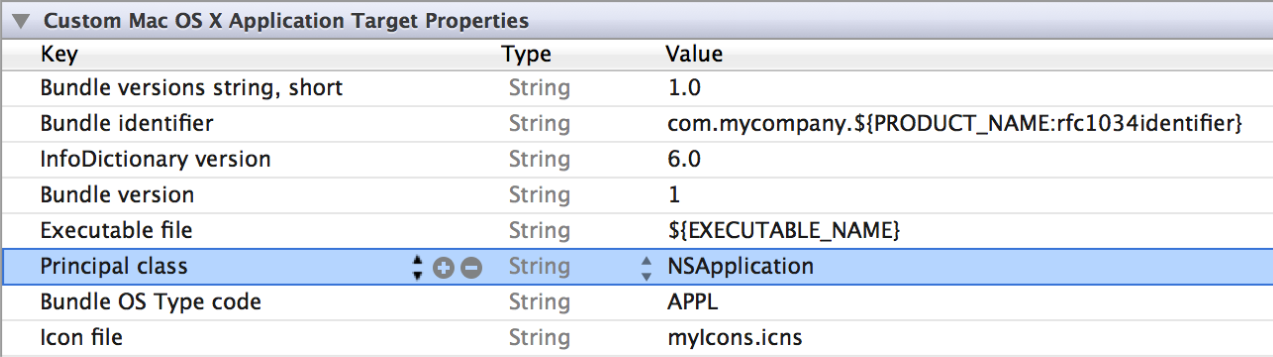
Setting the
NSHighResolutionCapableattribute toYES, in the Info.plist for the app, as shown in Figure 1-8.Figure 1-8 The key that indicates an app is ready for high resolution 
When users update to the revised version of your app, they will be able to enjoy the high-resolution version.
If your app is optimized for high resolution, you can request that the “Open in Low Resolution” checkbox is not displayed by adding the NSHighResolutionMagnifyAllowed key to the Info.plist for your app. Then, set the key’s value to NO (Boolean value). A value of YES (the default) means that checkbox should be shown as usual.
Copyright © 2012 Apple Inc. All Rights Reserved. Terms of Use | Privacy Policy | Updated: 2012-09-19