Retired Document
Important: This document is retired because the content has been migrated to SpriteKit reference.
Advanced Scene Processing
Working with SpriteKit involves manipulating the contents of the scene tree to animate content onscreen. Normally, actions are at the heart of that system. However, by hooking into the scene processing directly, you can create other behaviors that cannot be done with actions alone. To do that, you need to learn:
How a scene processes animations
How to add your own behaviors during scene processing
How a Scene Processes Frames of Animation
In the traditional view system, the contents of a view are rendered once and then rendered again only when the model’s contents change. This model works very well for views, because in practice most view content is static. SpriteKit, on the other hand, is designed explicitly for dynamic content. SpriteKit continuously updates the scene contents and renders it to ensure that animation is smooth and accurate.
The process of animating and rendering the scene is tied to the scene object (SKScene). Scene and action processing runs only when the scene is presented. A presented scene runs a rendering loop that alternates between processing the scene’s node tree and rendering it. This model is similar to the rendering and processing loop used in most games.
Figure 5-1 shows the steps used by a scene to execute the rendering loop.
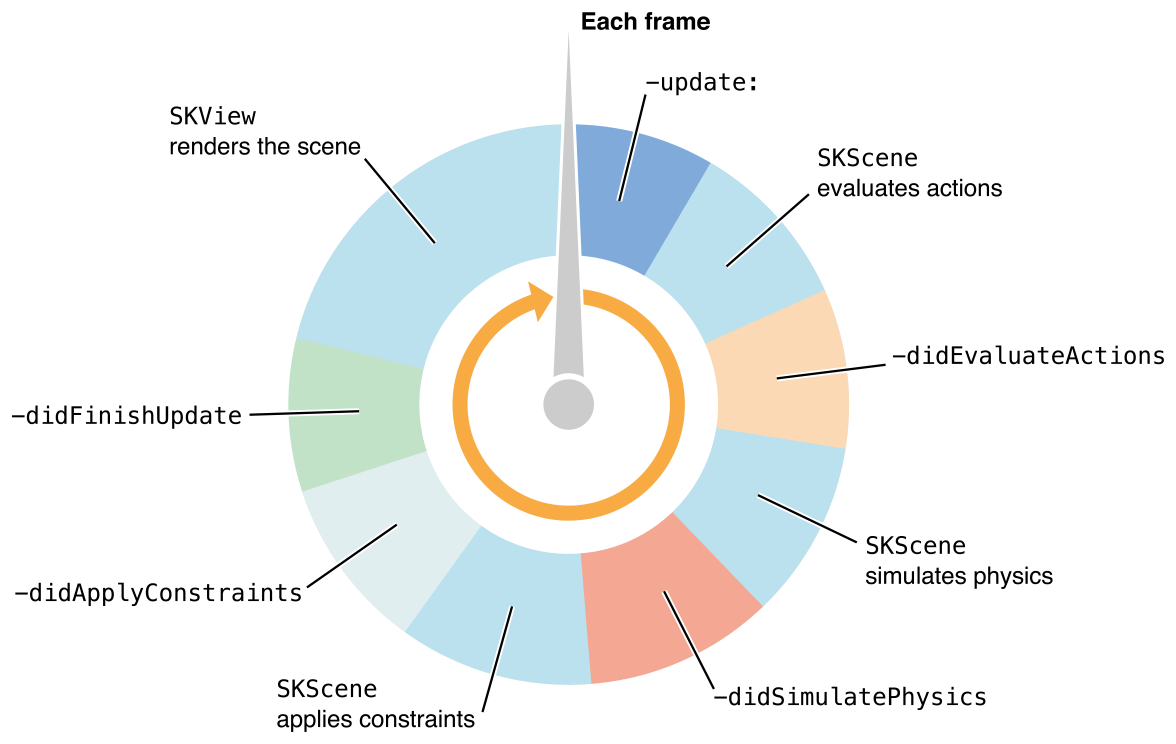
Each time through the rendering loop, the scene’s contents are updated and then rendered. You can’t override the rendering behavior; instead you update the nodes in the scene. However, the scene includes methods you can override to customize scene processing, and you can use actions and physics to alter properties of nodes in the tree. Here are the steps in the rendering loop:
The scene’s
update:method is called with the time elapsed so far in the simulation.This is the primary place to implement your own in-game simulation, including input handling, artificial intelligence, game scripting, and other similar game logic. Often, you use this method to make changes to nodes or to run actions on nodes.
The scene processes actions on all the nodes in the tree. It finds any running actions and applies those changes to the tree. In practice, because of custom actions, you can also hook into the action mechanism to call your own code.
You cannot directly control the order in which actions are processed or cause the scene to skip actions on certain nodes, except by removing the actions from those nodes or removing the nodes from the tree.
The scene’s
didEvaluateActionsmethod is called after all actions for the frame have been processed.The scene simulates physics on nodes in the tree that have physics bodies.
Adding physics to nodes in a scene is described in Simulating Physics, but the end result of simulating physics is that the position and rotation of nodes in the tree may be adjusted by the physics simulation. Your game can also receive callbacks when physics bodies come into contact with each other.
The scene’s
didSimulatePhysicsmethod is called after all physics for the frame has been simulated.The scene applies any constraints associated with nodes in the scene.
Constraints are used to establish relationships in the scene. For example, you can apply a constraint that makes sure a node is always pointed at another node, regardless of how it is moved. By using constraints, you avoid needing to write a lot of custom code in your scene handling.
The scene calls its
didApplyConstraintsmethod.The scene calls its
didFinishUpdatemethod.This is your last chance to make changes to the scene.
The scene is rendered.
Working With Scene Delegates
Although subclassing the scene class is a common way to handle scene processing, you can avoid it by using a delegate object instead. All of the scene processing methods described above have related methods in the SKSceneDelegate protocol. If a delegate is provided to the scene and the delegate implements one of these methods, that method is called instead of the one on the scene. For example, an iOS app might use view controller as the delegate.
Post-Processing in Scenes
A scene can process the actions on the scene tree in any order. For this reason, if you have tasks that you need to run each frame and you need precise control over when they run, you should use the didEvaluateActions and didSimulatePhysics methods to perform those tasks. Typically, you make changes during post-processing that require the final calculated positions of certain nodes in the tree. Your post-processing can take these positions and perform other useful work on the tree.
Here are some examples of post-processing tasks you might perform:
Centering the scene’s content on a particular node.
Adding debugging information as an overlay over the scene content.
Copying nodes from one part of the tree to another. For example, you might have an effect node whose children need to be the same as other nodes in the tree.
Example: Centering the Scene on a Node
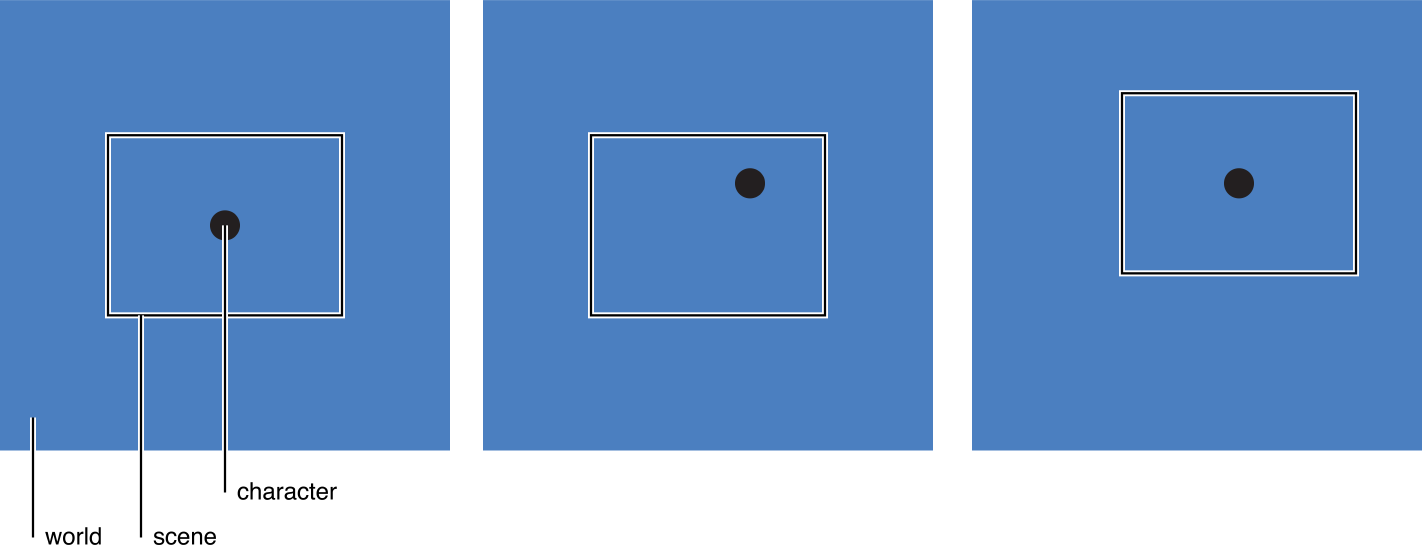
Centering a scene’s content on a node is useful for implementing cameras and similar concepts in games that require content scrolling. In this case, the content is larger than the scene’s frame. As the player moves around, the character stays fixed in place while the world moves around them. The scene remains locked to the character regardless of where the player moves the character.
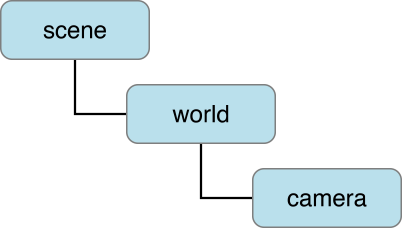
SpriteKit does not provide built-in support for cameras, but the implementation is very straightforward. The world and the camera are each represented by a node in the scene. The world is a direct child of the scene and the camera is a descendant of the world node. This arrangement of nodes is useful because it gives the game world a coordinate system that is not tied to the scene’s coordinate system. You can use this coordinate system to lay out the world content.
The camera is placed inside the world. The world can slide around in the scene. Because the camera is a node, you can use actions—and even physics—to move the camera. Then, in a post-processing step, you reposition the world node in the scene so that the camera node is centered on the scene, as shown in Figure 5-3. The world is placed in the scene so that the character is centered. Then, the character is moved around inside the world. Finally, a post-processing step repositions the world so that the character is centered again.
Here are the steps for this implementation:
Place the scene’s anchor point at the center of the scene.
self.anchorPoint = CGPointMake (0.5,0.5);
Use a world node to represent the scrolling world.
SKNode *myWorld = [SKNode node];
[self addChild:myWorld];
The children of the world node are sprite nodes (or other nodes) that represent the game’s content. (Code not shown).
Use a node inside the world to represent the camera.
SKNode *camera = [SKNode node];
camera.name = @"camera";
[myWorld addChild:camera];
Use the
didFinishUpdatemethod to center the scene on the camera.- (void)didFinishUpdate
{[self centerOnNode: [self childNodeWithName: @"//camera"]];
}
- (void) centerOnNode: (SKNode *) node
{CGPoint cameraPositionInScene = [node.scene convertPoint:node.position fromNode:node.parent];
node.parent.position = CGPointMake(node.parent.position.x - cameraPositionInScene.x, node.parent.position.y - cameraPositionInScene.y);
}
The
centerOnNode:method converts the camera’s current position into scene coordinates, then subtracts those coordinates from the world’s position to slide the character to the(0,0)position.
Example: Adding a Debugging Overlay
When you are developing a game using SpriteKit, it is helpful to show live visual debugging information about what’s happening in the scene. For example, any of the following information might be useful when debugging your game:
Artificial intelligence decisions by characters in the scene
Locations in the world that trigger scripted actions
Physics information such as gravity, other forces, or even the size of physics bodies
Shape and label nodes are particularly useful for annotating the behavior of your game.
To add a debug overlay, the best approach is to use a single node to represent the overlay and add it to the scene. All of the debugging information is represented by nodes that are descendants of this node. You place this node in the scene with a z coordinate that places it above all other scene content. The debug node may be, but does not have to be, a direct child of the scene. For example, in a scrolling world, the information you are placing in the overlay might be tied to world coordinates instead of scene coordinates.
Before the scene starts processing a frame, you remove this node from the scene and then remove its children. The assumption is that the debugging information needs to be updated every frame. After the scene simulates physics, the node is added back into the scene and its contents are regenerated.
Create a property for the debugging node in the scene class and initialize it when the scene is first presented.
@property (SKNode *) debugOverlay;
self.debugOverlay = [SKNode node];
[self addChild:self.debugOverlay];
Remove the node before actions are processed.
- (void)update:(NSTimeInterval)currentTime
{[self.debugOverlay removeFromParent];
[self.debugOverlay removeAllChildren];
}
Add the node after the scene is processed.
- (void)didFinishUpdate
{[self addChild:self.debugOverlay];
// add code to create and add debugging images to the debug node.
// This example displays a gravity vector.
SKShapeNode *gravityLine = [[SKShapeNode alloc] init];
gravityLine.position = CGPointMake (200,200);
CGMutablePathRef path = CGPathCreateMutable();
CGPathMoveToPoint(path, NULL, 0.0, 0.0);
CGPathAddLineToPoint(path, 0, self.physicsWorld.gravity.x*10, self.physicsWorld.gravity.y*10);
CGPathCloseSubpath(path);
gravityLine.path = path;
CGPathRelease(path);
[self.debugOverlay addChild: gravityLine]; }
Example: Replicating Information in the Scene
Replicating information in the tree is similar to the techniques used to add a debugging overlay. When you pre-process the scene, you remove the stale copies of the nodes from the tree. Then, during post-processing, you copy the nodes from one part of the tree to another. You use copies of the nodes because each node can have only one parent.
In some cases, you only need to update a small amount of information in each frame. In this case, constantly adding, removing, and copying nodes could be costly. Instead, make the copies once, and then use your post-processing step to update the important properties.
copyNode.position = originalNode.position; |
Forcing one node to have the same position as another node can also be handled automatically using constraint objects. See SKConstraint Class Reference.
Copyright © 2015 Apple Inc. All Rights Reserved. Terms of Use | Privacy Policy | Updated: 2015-03-09