Incorporating Controllers into Your Game
Game controllers provide new ways for players to interact with your game. When you design your game, it is up to you to decide whether a controller is appropriate and, if so, how it is used within your game. When a player has a controller, you might make it the exclusive source of input data to your game or it may be only one of many sources of input data. In the latter case, its controls are used along with data from other sensors, such as the touchscreen and motion sensors, to create an experience that builds upon the individual strengths of each input type. Therefore, to create a great user experience in your game, you should understand controllers, the kinds of input data they provide, and how a player uses the controls. Only then can you see how the controller can best be used in your game.
In this chapter, you’ll learn:
How the controls on a game controller compare to other kinds of input
The characteristics of game controllers supported by the Made-for-iPhone/iPod/iPad (MFi) program
Apple’s requirements for games that implement game controller support
How to map your game’s actions to controls on the controller
How to refer to specific controls on the controller
Specific actions you can take to ensure that game controllers add to your game’s experiences
Supplying Inputs to Your Game
Interactivity is a critical and necessary part of gameplay. Players continuously interpret sensory information (graphics, audio) provided by the game. From this data, players choose which actions to take. Then, players provide input data to the game to enact their plans. This decision loop (observe, orient, decide, act) happens continuously until the game completes. In an action game, this decision loop happens very quickly because the game does not pause while players are deciding how to act. In other games, where time does not pass automatically, players may be able to act more deliberately. But in all games, players decide what to do and then try to do it.
When you design a game, it’s a good idea to assess the different ways in which a player might control your game and then choose input methods that are appropriate. A game’s controls should feel natural to players. Although a player ought to feel challenged by your game, he or she should not feel challenged or frustrated by your game’s controls. Game controllers add to the input types available to you. Besides controllers, there are other sources of input data available to your game. For example:
Touch interface. The screen of an iOS device receives touch inputs from a player’s fingers. Touch input is a natural way for players to manipulate things onscreen but can often be imprecise; a player can select a somewhat small area quickly, but cannot select a pixel-sized area accurately. Also, because there is no tactile feedback provided for the objects being touched, it is difficult to manipulate objects that aren’t being viewed directly. For example, in the past, iOS games have simulated thumbsticks by drawing a picture of a thumbstick onscreen. These virtual controls do not work as well as an actual thumbstick because a player cannot pay close attention simultaneously to the thumbstick and the other elements onscreen.
Motion. The player manipulates the entire device, and the accelerometer and gyro systems provide input data to your game. As with the touch interface, motion controls can be very intuitive. But because the screen moves with the device, the onscreen images are constantly in motion.
Mouse. A player manipulates a mouse or trackpad, causing a cursor to move. Alternatively, the mouse movement can be interpreted as deltas and used to rotate or move a camera in the game. Even though mouse-based interfaces are indirect, they can provide pixel-level precision.
Keyboard. A keyboard provides discrete key inputs that can be mapped directly to actions in a game. Keyboards provide distinct control areas and tactile feedback.
The game controllers that Apple supports provide two additional options:
Analog buttons and triggers. Buttons and triggers provide tactile controls that can be mapped to specific game actions. When a player presses a button, an action is triggered. All buttons and triggers on MFi game controllers are pressure sensitive. After a certain amount of pressure has been applied to activate the button, the button measures the amount of force that is applied to the button. Thus, your game can either determine whether a button is pressed (discrete controls) or determine how much pressure has been applied to the button (analog).
Analog thumbsticks and analog directional pads. Thumbsticks and directional pads provide two axes of motion relative to a neutral, default position. As with buttons, thumbsticks and directional pads are analog controls, measuring how far the control has been moved from the neutral position. When the player releases a thumbstick or directional pad, it snaps back to this neutral position. Any dead-zone calculations are automatically performed by the Game Controller framework, so your game does not need to do this work.
Understanding the Controllers Supported by Apple
Apple has created specifications for distinct kinds of MFi game controllers. Although specific controllers vary, many common characteristics must be implemented strictly according to the specification.
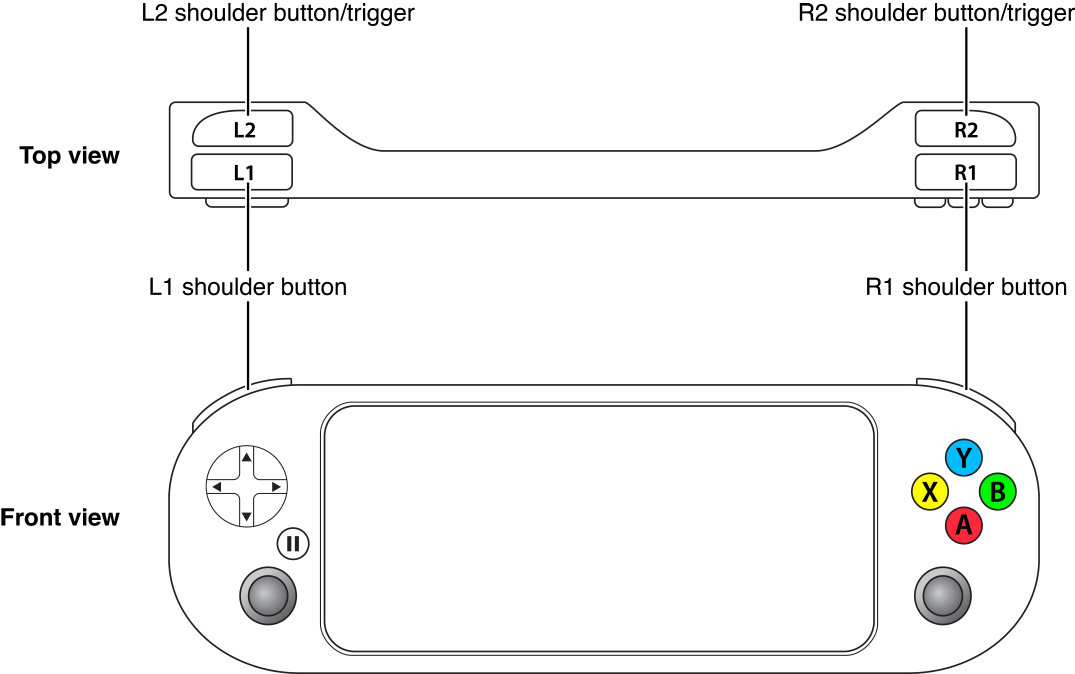
The extended control layout contains the following controls:
Four analog face buttons arranged in a diamond on the right side of the controller (labeled A, B, X, and Y)
An analog directional pad on the left side of the controller
Two analog thumbsticks on the left and right sides of the controller
Two analog shoulder buttons (labeled L1 and R1)
Two analog triggers (labeled L2 and R2)
A button to pause and resume gameplay
The Siri Remote has its own micro control layout.
An analog directional pad on the top of the remote
Two digital buttons (A,X)
One button to pause and resume gameplay
Controllers Are Either Standalone or Formfitting
A standalone controller is a separate device from a Mac, iOS, or tvOS device. When a player plays a game with a standalone controller, the controller is the only device the player can easily manipulate. Other controls are not usually accessible.
A formfitting controller is designed to work only with iOS devices (and each is typically designed to work with a specific device or range of similar devices). The iOS device is placed inside the controller always in a landscape orientation. The touchscreen and motion controls remain available to the player.
Controllers Communicate Wirelessly or Are Connected Directly
A wireless controller is not visible to the device until it has been explicitly paired with the device. Normally, the player does this by going to the Bluetooth settings and discovering the controller. However, your game can also provide this support directly; see Discovering Wireless Controllers.
Controllers that are connected directly to an iOS device using the lightning connector are discovered automatically as soon as they are connected.
Apple-Defined Controllers
Apple supports both formfitting and standalone extended controller designs.
Formfitting Extended iOS Controller
A formfitting extended controller supports the extended control layout. Figure 1-1 shows the control layout for an extended controller attached to an iPhone.
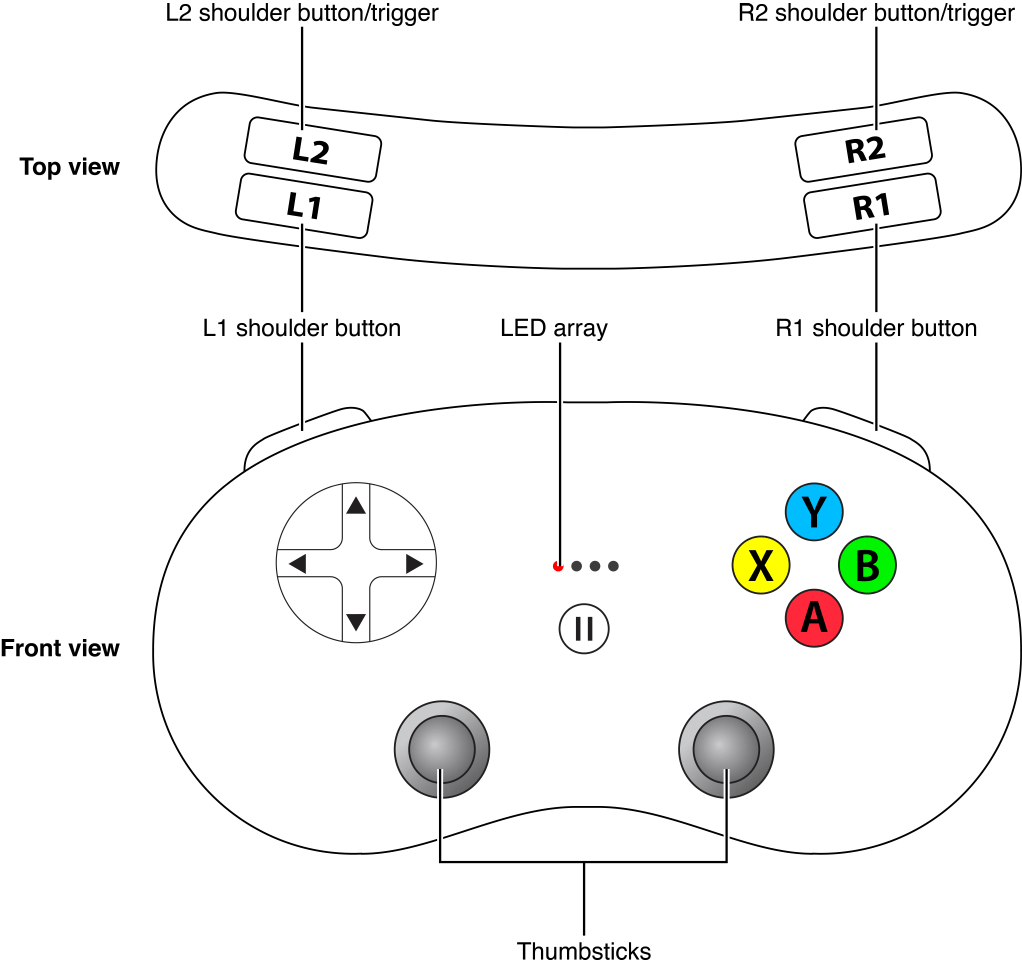
Standalone Extended Controller
A standalone extended controller supports the extended control layout. Figure 1-2 shows a picture of such a controller.
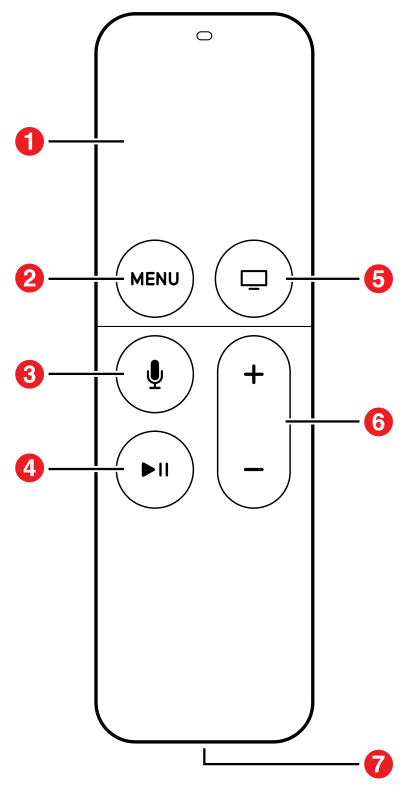
Siri Remote
The Siri Remote supports the micro control layout. Figure 1-2 shows a picture of the remote. When used as a game controller, the touch surface (1) is used as a directional pad. A button is located underneath the trackpad. The Play/Pause button (4) is available as a second button, and the Menu button (2) is used to pause and resume the game. The Siri Remote also supports a subset of the motion profile.
Requirements for Games That Support Game Controllers
Apple has created specific requirements you must follow for any game that supports game controllers. These requirements are designed to make sure that games are always playable.
iOS and OS X games must support a noncontroller option. Your game may not require the use of a controller. If a player does not have a controller, your game must provide a fallback interface. For example, an iOS game might use motion-based sensors, or virtual controls that appear only when a controller is not available.
tvOS games must support the Siri Remote or an MFi game controller. A tvOS game may require the use of an MFi game controller, although the recommendation is to also support the Siri Remote whenever possible for your gameplay. When a game controller is required, the App Store displays a Game Controller Required badge and may warn users further if they have not yet paired a compatible game controller with their Apple TV.
Games must be playable using standalone controllers. If you support the extended controller, it is possible that the controller is not physically connected to the device. This means that the player cannot easily interact with the device and the controller simultaneously. Your primary gameplay should be completely accessible from the controller. You should also try to make other interfaces, such as menus, accessible from the controller.
You must support pause notifications. All controllers include a button that, when pressed, triggers a pause notification. When this notification is received while gameplay is active, your game should toggle between pausing and resuming gameplay. When the game is not being played (such as when you are at a menu screen), the button should be ignored or be treated as a menu button, returning to a previous screen of content. (This behavior is especially common on tvOS).
Mapping Game Actions to Controls
Part of your game design is deciding which controls are useful to your game so that you can map them to the different actions a player can take. Consider not only your game’s design but also the physical layout of controls. A player’s hands are not going to be on all of the controls simultaneously, so you need to consider how the player interacts with the controls as your game is being played. This means creating and testing your control layouts on actual hardware controllers to ensure that they work in practice.
Use the A and B Buttons for Common Actions
The A and B buttons on the diamond are easy for a player to access, so common actions should often be placed on them. By convention, the A button is used to enable or activate actions, and the B button cancels or reverses those actions. For example, to implement support for game menus, use the directional pad to select an item and the A button to perform the action associated with that item. The B button cancels the selection (or perhaps moves the focus to an earlier menu, if the player is navigating through a hierarchy of options).
Use the Trigger or Shoulder Buttons for Primary Actions
The trigger and shoulder buttons are natural controls to use for important actions, because players can activate those controls with their index fingers while using their thumbs to manipulate the thumbsticks, the directional pad, and the diamond buttons.
Use the Directional Pad or the Left Thumbstick to Control Movement
If you use the left thumbstick to control movement, a player can easily control all aspects of movement with the left thumb, while leaving other fingers available to manipulate other controls. Although the directional pad can be used to control movement, it also has a different tactile feel. On an extended controller, use the thumbstick to control movement and the directional pad to perform other actions.
Be careful when assigning actions to both axes of a thumbstick or directional pad. The actions associated with those axes should either be closely related to each other or be actions that are selected discretely. Avoid placing discrete actions on an axis if the other axis must be used simultaneously to control other actions; it makes the controls needlessly difficult. For example:
Do use both axes if the movement actions are related. For example, first-person games often use the vertical axis to move forward or backward, and the horizontal axis to turn left or right. Similarly, to control an airplane, the vertical axis is used to control pitch, and the horizontal axis to bank the airplane. In both cases, the same action—movement—is being performed, so the controls are easy to grasp.
Do use both axes of a directional pad if the axes are being used to select discrete actions. Use the cardinal directions (up, down, left, and right) to create four discrete actions. You can also combine button values from the two axes and use them to create actions on the diagonals (top-left, top-right, bottom-left, bottom-right).
Don’t include steering behavior on the horizontal axis and acceleration on the vertical axis, because those behaviors are so different. Instead, move acceleration and braking to the shoulder buttons or triggers.
Don’t use one axis to control movement and the other axis to control discrete actions (such as jumping or crouching).
Use the Right Thumbstick for Optional Actions
The right thumbstick can be challenging to use simultaneously with the diamond buttons. For this reason, the right thumbstick should typically be connected to actions that permit the player to take a hand off the thumbstick. For example, a flight simulator might use the right thumbstick to let the player look around; if the player briefly has to use other controls, the thumbstick snaps back so that the viewer is looking straight ahead.
Don’t Overload the Player
Players cannot manipulate all of the control elements on a controller simultaneously, so design layouts that make it easy for a player to intuitively switch between the available control elements. The best way to design good control layouts is to test your control layouts with players using actual hardware. You should change your control layout if players cannot easily and intuitively control your game. Consider the following general guidelines when testing a control layout:
Watch how the player moves his or her fingers to manipulate the controls. Controls that must be usable simultaneously should almost always be controlled by different fingers.
The A, B, X, and Y buttons can be pressed in combination to create new, distinct actions. For example, you might combine A and B, X and Y, or even all four buttons at the same time. However, pressing three buttons at the same time is difficult. You can also consider combining the face buttons with one of the shoulder buttons or triggers, because those controls are usually manipulated with different fingers.
Pressing a shoulder button and pulling the trigger on the same side of the controller simultaneously can be difficult.
If your game mixes touchscreen controls with controller inputs, the player may need to move the thumb or fingers off the controller to touch the screen. Avoid sequences of actions where a player must rapidly switch between touching the screen and using the controller.
Use Control Layouts That Players Are Familiar With
Here are three control layouts you might consider for your game. If your game is a flight simulator, platform game, or racing game, you should adhere as closely as possible to these control layouts, because players are already familiar with them.
Table 1-2 shows the controls for a flight simulator, using the left hand to fly the aircraft and the right hand to initiate most other actions.
Control | Action |
|---|---|
Left Thumbstick or Directional Pad | Flight controls |
A Button | Afterburners |
B Button | Speed Brakes |
Right Trigger (R2) | Fire guns |
Left Trigger (L2) | Fire missile |
Table 1-2 shows the controls for a platform game.
Control | Action |
|---|---|
Left Thumbstick or Directional Pad | Movement |
A or B Button | Jump |
X or Y Button | Run or use item |
Left or Right Shoulder | Crouch |
Table 1-3 shows a typical control layout for a racing game. In this example, multiple controls are assigned to the same action, letting players choose which controls they prefer. This layout also keeps you from adding confusing controls to the vertical axis of the directional pad.
Control | Action |
|---|---|
Left Thumbstick or Directional Pad (horizontal axis) | Steer |
A Button | Accelerate |
X or B Button | Brake |
Right Trigger (R2) or Shoulder | Accelerate |
Left Trigger or Shoulder | Brake |
Y Button | Use item |
Identifying Controls Within Your Game
As you implement controller support in your game, make sure you describe those controls to the player. A player should always be able to learn what a control is used for. For example, you might want to implement a tutorial to teach players how to play your game, or you might include a screen of content that describes the controls. Every controller has consistent labeling based on the control layout. Use this terminology consistently to refer to the controls so that players always see the same control names regardless of the game they are playing.
Table 1-4 provides the control names on an extended controller.
Control name | Abbreviation |
|---|---|
A button | A |
B button | B |
X button | X |
Y button | Y |
Directional pad | D-pad |
Left shoulder button | L1 |
Right shoulder button | R1 |
Left trigger | L2 |
Right trigger | R2 |
Left thumbstick | L thumbstick |
Right thumbstick | R thumbstick |
Building a Great User Experience with Controllers
When implemented well, controllers provide a great user experience because they expand on the options available to the player and leave more space on the screen to be used for gameplay, rather than for control elements. Still, you need to do some work to ensure that your game plays well with controllers. Building a great control layout is the start of this process. Consider these other guidelines and hints when polishing your game:
Formfitting controllers always hold the iOS device in landscape orientation. Orientation changes are awkward when the iOS device is installed in a formfitting controller. Your game should be locked to a landscape orientation when playing in a formfitting controller.
Remove redundant controls from the screen when the controller is connected to the device. If your game creates controls onscreen, such as buttons or virtual thumbsticks, hide these controls when a controller is connected. They are not necessary, and they might be distracting to the player.
If your game does not require interaction with the screen, make sure the screen does not go to sleep. In an iOS or tvOS app, use the
UIApplicationobject’sidleTimerDisabledproperty to prevent the screen from going to sleep.Support pausing and resuming your game. You must always handle pause and resume notifications in your game. If a player has a standalone controller, the controller is the most convenient way for that player to pause and resume gameplay. When the notification is received, your game should toggle the game between an active and a paused state.
Because the Game Controller framework does not visually indicate that the button was pressed, it’s up to you to indicate that gameplay has paused by using a visual cue, an audio cue, or both. Until the game is resumed, provide onscreen information that indicates that the game is paused and what the player must do to resume gameplay. You can also choose to show some sort of secondary, nongameplay behavior. For example, you might show an onscreen menu that let’s the player choose another activity inside your game. Essentially, pausing stops the normal gameplay and brings up whatever secondary behavior you want to show players. Your app (and even all of the controller’s inputs) remain active. The players should be able to use the controller to navigate through this secondary behavior.
When you cannot completely pause gameplay, such as in a multiplayer game, pause what you can and let the rest continue to run. Even though gameplay is running, the controller’s inputs should be ignored inside your gameplay. The inputs should either control onscreen menus or be ignored.
Be sure to coordinate the pause and resume behavior with other events in your app. For example, when your game is moved to the background, gameplay is usually paused. When the game is later moved back to the foreground, gameplay remains paused until the player chooses to resume it. However, by integrating this behavior with the controller, the controller can resume play, even though it wasn’t used originally to pause the game.
If the profile supports a control, it should be mapped to some function in your game. For example, if your game needs only button A, do not leave B, X, and Y unused. Instead, map all four buttons to the same action.
React when a controller is connected or disconnected. Choose an approach that is intuitive to the player. For example, if your game is being played and a controller is connected to the game, assume that the player wants to use the controller and switch to those controls. Similarly, if two controllers are connected, favor a formfitting controller over a standalone controller.
Be conservative when a player disconnects the controller. Assume that it was disconnected by accident and pause gameplay immediately. If the player resumes the game from the device, switch to a control layout that does not use the game controller.
Support as much as possible using the controller. If the player is using a standalone controller, assume that the player cannot touch the screen because the screen might be out of reach. Ensure that menus and other game actions can be activated using the game controller.
When necessary, require the player to release a button before pressing it again. Sometimes you need a player to release a button before accepting the button as being pressed. For example, if you are implementing menu support using the controller and you use the same button (A) for all actions, then a player may inadvertently select multiple menus before they can release the button. Instead, require the player to release the button after each action is triggered. (If your game displays a menu while the game is being played, the player may already be holding a button down when the menu appears.)
Copyright © 2016 Apple Inc. All Rights Reserved. Terms of Use | Privacy Policy | Updated: 2016-09-13