Retired Document
Important: OpenGL was deprecated in macOS 10.14. To create high-performance code on GPUs, use the Metal framework instead. See Metal.
Drawing to a Window or View
The OpenGL programming interface provides hundreds of drawing commands that drive graphics hardware. It doesn't provide any commands that interface with the windowing system of an operating system. Without a windowing system, the 3D graphics of an OpenGL program are trapped inside the GPU. Figure 2-1 shows a cube drawn to a Cocoa view.

This chapter shows how to display OpenGL drawing onscreen using the APIs provided by OS X. (This chapter does not show how to use GLUT.) The first section describes the overall approach to drawing onscreen and provides an overview of the functions and methods used by each API.
General Approach
To draw your content to a view or a layer, your application uses the NSOpenGL classes from within the Cocoa application framework. While the CGL API is used by your applications only to create full-screen content, every NSOpenGLContext object contains a CGL context object. This object can be retrieved from the NSOpenGLContext when your application needs to reference it directly. To show the similarities between the two, this chapter discusses both the NSOpenGL classes and the CGL API.
To draw OpenGL content to a window or view using the NSOpenGL classes, you need to perform these tasks:
Set up the renderer and buffer attributes that support the OpenGL drawing you want to perform.
Each of the OpenGL APIs in OS X has its own set of constants that represent renderer and buffer attributes. For example, the all-renderers attribute is represented by the
NSOpenGLPFAAllRenderersconstant in Cocoa and thekCGLPFAAllRenderersconstant in the CGL API.Request, from the operating system, a pixel format object that encapsulates pixel storage information and the renderer and buffer attributes required by your application. The returned pixel format object contains all possible combinations of renderers and displays available on the system that your program runs on and that meets the requirements specified by the attributes. The combinations are referred to as virtual screens. (See Virtual Screens.)
There may be situations for which you want to ensure that your program uses a specific renderer. Choosing Renderer and Buffer Attributes discusses how to set up an attributes array that guarantees the system passes back a pixel format object that uses only that renderer.
If an error occurs, your application may receive a
NULLpixel format object. Your application must handle this condition.Create a rendering context and bind the pixel format object to it. The rendering context keeps track of state information that controls such things as drawing color, view and projection matrices, characteristics of light, and conventions used to pack pixels.
Your application needs a pixel format object to create a rendering context.
Release the pixel format object. Once the pixel format object is bound to a rendering context, its resources are no longer needed.
Bind a drawable object to the rendering context. For a windowed context, this is typically a Cocoa view.
Make the rendering context the current context. The system sends OpenGL drawing to whichever rendering context is designated as the current one. It's possible for you to set up more than one rendering context, so you need to make sure that the one you want to draw to is the current one.
Perform your drawing.
The specific functions or methods that you use to perform each of the steps are discussed in the sections that follow.
Drawing to a Cocoa View
There are two ways to draw OpenGL content to a Cocoa view. If your application has modest drawing requirements, then you can use the NSOpenGLView class. See Drawing to an NSOpenGLView Class: A Tutorial.
If your application is more complex and needs to support drawing to multiple rendering contexts, you may want to consider subclassing the NSView class. For example, if your application supports drawing to multiple views at the same time, you need to set up a custom NSView class. See Drawing OpenGL Content to a Custom View.
Drawing to an NSOpenGLView Class: A Tutorial
The NSOpenGLView class is a lightweight subclass of the NSView class that provides convenience methods for setting up OpenGL drawing. An NSOpenGLView object maintains an NSOpenGLPixelFormat object and an NSOpenGLContext object into which OpenGL calls can be rendered. It provides methods for accessing and managing the pixel format object and the rendering context, and handles notification of visible region changes.
An NSOpenGLView object does not support subviews. You can, however, divide the view into multiple rendering areas using the OpenGL function glViewport.
This section provides step-by-step instructions for creating a simple Cocoa application that draws OpenGL content to a view. The tutorial assumes that you know how to use Xcode and Interface Builder. If you have never created an application using the Xcode development environment, see Getting Started with Tools.
Create a Cocoa application project named Golden Triangle.
Add the OpenGL framework to your project.
Add a new file to your project using the Objective-C class template. Name the file
MyOpenGLView.mand create a header file for it.Open the
MyOpenGLView.hfile and modify the file so that it looks like the code shown in Listing 2-1 to declare the interface.Listing 2-1 The interface for
MyOpenGLView#import <Cocoa/Cocoa.h>
@interface MyOpenGLView : NSOpenGLView
{}
- (void) drawRect: (NSRect) bounds;
@end
Save and close the
MyOpenGLView.hfile.Open the
MyOpenGLView.mfile and include thegl.hfile, as shown in Listing 2-2.Listing 2-2 Include
OpenGL/gl.h#import "MyOpenGLView.h"
#include <OpenGL/gl.h>
@implementation MyOpenGLView
@end
Implement the
drawRect:method as shown in Listing 2-3, adding the code after the@implementationstatement. The method sets the clear color to black and clears the color buffer in preparation for drawing. Then,drawRect:calls your drawing routine, which you’ll add next. The OpenGL commandglFlushdraws the content provided by your routine to the view.Listing 2-3 The
drawRect:method forMyOpenGLView-(void) drawRect: (NSRect) bounds
{glClearColor(0, 0, 0, 0);
glClear(GL_COLOR_BUFFER_BIT);
drawAnObject();
glFlush();
}
Add the code to perform your drawing. In your own application, you'd perform whatever drawing is appropriate. But for the purpose of learning how to draw OpenGL content to a view, add the code shown in Listing 2-4. This code draws a 2D, gold-colored triangle, whose dimensions are not quite the dimensions of a true golden triangle, but good enough to show how to perform OpenGL drawing.
Make sure that you insert this routine before the
drawRect:method in theMyOpenGLView.mfile.Listing 2-4 Code that draws a triangle using OpenGL commands
static void drawAnObject ()
{glColor3f(1.0f, 0.85f, 0.35f);
glBegin(GL_TRIANGLES);
{glVertex3f( 0.0, 0.6, 0.0);
glVertex3f( -0.2, -0.3, 0.0);
glVertex3f( 0.2, -0.3 ,0.0);
}
glEnd();
}
Open the
MainMenu.xibin Interface Builder.Change the window’s title to
Golden Triangle.Drag an
NSOpenGLViewobject from the Library to the window. Resize the view to fit the window.Change the class of this object to
MyOpenGLView.Open the Attributes pane of the inspector for the view, and take a look at the renderer and buffer attributes that are available to set. These settings save you from setting attributes programmatically.
Only those attributes listed in the Interface Builder inspector are set when the view is instantiated. If you need additional attributes, you need to set them programmatically.
Build and run your application. You should see content similar to the triangle shown in Figure 2-2.
Figure 2-2 The output from the Golden Triangle program 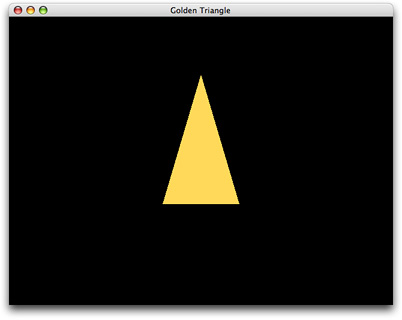
This example is extremely simple. In a more complex application, you'd want to do the following:
Replace the immediate-mode drawing commands with commands that persist your vertex data inside OpenGL. See OpenGL Application Design Strategies.
In the interface for the view, declare a variable that indicates whether the view is ready to accept drawing. A view is ready for drawing only if it is bound to a rendering context and that context is set to be the current one.
Cocoa does not call initialization routines for objects created in Interface Builder. If you need to perform any initialization tasks, do so in the
awakeFromNibmethod for the view. Note that because you set attributes in the inspector, there is no need to set them up programmatically unless you need additional ones. There is also no need to create a pixel format object programmatically; it is created and loaded when Cocoa loads the nib file.Your
drawRect:method should test whether the view is ready to draw into. You need to provide code that handles the case when the view is not ready to draw into.OpenGL is at its best when doing real-time and interactive graphics. Your application needs to provide a timer or support user interaction. For more information about creating animation in your OpenGL application, see Synchronize with the Screen Refresh Rate.
Drawing OpenGL Content to a Custom View
This section provides an overview of the key tasks you need to perform to customize the NSView class for OpenGL drawing. Before you create a custom view for OpenGL drawing, you should read Creating a Custom View in View Programming Guide.
When you subclass the NSView class to create a custom view for OpenGL drawing, you override any Quartz drawing or other content that is in that view. To set up a custom view for OpenGL drawing, subclass NSView and create two private variables—one which is an NSOpenGLContext object and the other an NSOpenGLPixelFormat object, as shown in Listing 2-5.
Listing 2-5 The interface for a custom OpenGL view
@class NSOpenGLContext, NSOpenGLPixelFormat; |
@interface CustomOpenGLView : NSView |
{ |
@private |
NSOpenGLContext* _openGLContext; |
NSOpenGLPixelFormat* _pixelFormat; |
} |
+ (NSOpenGLPixelFormat*)defaultPixelFormat; |
- (id)initWithFrame:(NSRect)frameRect pixelFormat:(NSOpenGLPixelFormat*)format; |
- (void)setOpenGLContext:(NSOpenGLContext*)context; |
- (NSOpenGLContext*)openGLContext; |
- (void)clearGLContext; |
- (void)prepareOpenGL; |
- (void)update; |
- (void)setPixelFormat:(NSOpenGLPixelFormat*)pixelFormat; |
- (NSOpenGLPixelFormat*)pixelFormat; |
@end |
In addition to the usual methods for the private variables (openGLContext, setOpenGLContext:, pixelFormat, and setPixelFormat:) you need to implement the following methods:
+ (NSOpenGLPixelFormat*) defaultPixelFormatUse this method to allocate and initialize the
NSOpenGLPixelFormatobject.- (void) clearGLContextUse this method to clear and release the
NSOpenGLContextobject.- (void) prepareOpenGLUse this method to initialize the OpenGL state after creating the
NSOpenGLContextobject.
You need to override the update and initWithFrame: methods of the NSView class.
updatecalls theupdatemethod of theNSOpenGLContextclass.initWithFrame:pixelFormatretains the pixel format and sets up the notificationNSViewGlobalFrameDidChangeNotification. See Listing 2-6.
Listing 2-6 The initWithFrame:pixelFormat: method
- (id)initWithFrame:(NSRect)frameRect pixelFormat:(NSOpenGLPixelFormat*)format |
{ |
self = [super initWithFrame:frameRect]; |
if (self != nil) { |
_pixelFormat = [format retain]; |
[[NSNotificationCenter defaultCenter] addObserver:self |
selector:@selector(_surfaceNeedsUpdate:) |
name:NSViewGlobalFrameDidChangeNotification |
object:self]; |
} |
return self; |
} |
- (void) _surfaceNeedsUpdate:(NSNotification*)notification |
{ |
[self update]; |
} |
If the custom view is not guaranteed to be in a window, you must also override the lockFocus method of the NSView class. See Listing 2-7. This method makes sure that the view is locked prior to drawing and that the context is the current one.
Listing 2-7 The lockFocus method
- (void)lockFocus |
{ |
NSOpenGLContext* context = [self openGLContext]; |
[super lockFocus]; |
if ([context view] != self) { |
[context setView:self]; |
} |
[context makeCurrentContext]; |
} |
The reshape method is not supported by the NSView class. You need to update bounds in the drawRect: method, which should take the form shown in Listing 2-8.
Listing 2-8 The drawRect method for a custom view
-(void) drawRect |
{ |
[context makeCurrentContext]; |
//Perform drawing here |
[context flushBuffer]; |
} |
There may be other methods that you want to add. For example, you might consider detaching the context from the drawable object when the custom view is moved from the window, as shown in Listing 2-9.
Listing 2-9 Detaching the context from a drawable object
-(void) viewDidMoveToWindow |
{ |
[super viewDidMoveToWindow]; |
if ([self window] == nil) |
[context clearDrawable]; |
} |
Copyright © 2004, 2018 Apple Inc. All Rights Reserved. Terms of Use | Privacy Policy | Updated: 2018-06-04