Code Signing Tasks
Typically, Xcode handles most code signing tasks for you, helping you manage your code signing identity, and applying your code signature to apps that you build and distribute. Letting Xcode handle code signing is generally the simplest and safest choice, because Xcode is designed with best practices built in. Read this chapter to gain a better understanding of what Xcode does on your behalf, or to handle special cases where you need to intervene in the code signing process.
About the Code Signing Identity
You sign code using a code signing identity, which consists of a private key plus a digital certificate. The private key is an encryption key that only you have, making it impossible for anyone to forge your signature, as long as you keep the key secure. The digital certificate has a usage extension that enables it to be used for signing, and it contains the public key that complements your private key. The certificate is not secret, and is itself generally signed by a certificate authority, which effectively vouches for your identity. The simple act of code signing does not require a certificate authority’s signature on your certificate, but your signature is much more useful this way because anyone encountering your signature can be confident of its origin.
You can use more than one signing identity, each for its own purpose, such as one for beta seeds and one for final, released products. Also, you typically have different identities for iOS and macOS apps. However, most organizations use a single identity for a given platform and purpose. In other words, you typically do not have more than one Mac App Distribution identity, even if you publish many different apps, but you do have different identities for distributing macOS apps and iOS apps.
Before You Obtain a Signing Identity
Before you obtain a code signing identity and sign your code, consider the following points:
Depending on your company’s internal policies, you might have to involve your company’s build and integration, legal, and marketing departments in decisions about what sort of signing identity to use and how to obtain it. Start this process well in advance of the time you need to actually sign the code for distribution to customers.
Any signed version of your code that gets into the hands of users will appear to have been endorsed by your company for use. Therefore, you might not want to use your “final” signing identity to sign code that is still in development.
A signing identity, no matter how obtained, is completely compromised if it is ever out of the physical control of whoever is authorized to sign the code. That means that the signing identity’s private key must never, under any circumstances, be given to end users, and should be restricted to one or a small number of trusted persons within your company. Before obtaining a signing identity and proceeding to sign code, determine who within your company will possess the identity, who can use it, and how it will be kept safe. For example, if the identity must be used by more than one person, you can keep it in the keychain of a secure computer and give the password of the keychain only to authorized users, or you can put the identity on a smart card to which only authorized users have the PIN.
Obtaining Your Signing Identities
The usual way to obtain a certificate for your signing identity is to get it from Apple. When you sign up for the Apple Developer Program, you gain access to the developer portal, where you can generate certificates for a variety of purposes, including Developer ID certificates (for public distribution of Mac apps), Mac App Distribution certificates (for submitting to the Mac App Store), iOS Distribution certificates (for submitting to the App Store), and others.
Xcode helps manage your code signing identities when you use the certificates available through the developer portal. For details on how to use Xcode to do this, see Manage signing certificates in Xcode Help.
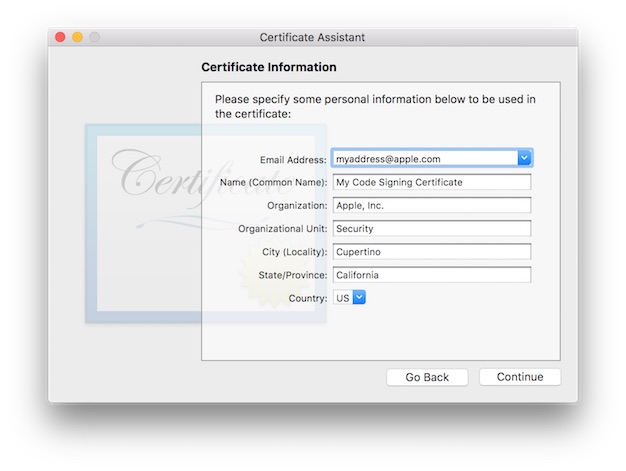
If you choose to manage your signing identities manually because you are using a certificate authority other than Apple, you create them using the Certificate Assistant, which is provided as part of the Keychain Access application. You use this tool to create a public/private key pair, add these keys to your keychain, and generate a certificate request that you send to a certificate authority. In response, the certificate authority sends you a signed certificate that, in combination with the private key stored only on your system and known only to you, completes your digital identity. These are essentially the same steps Xcode carries out on your behalf (using Apple as the certificate authority) when it manages your code signing identity.
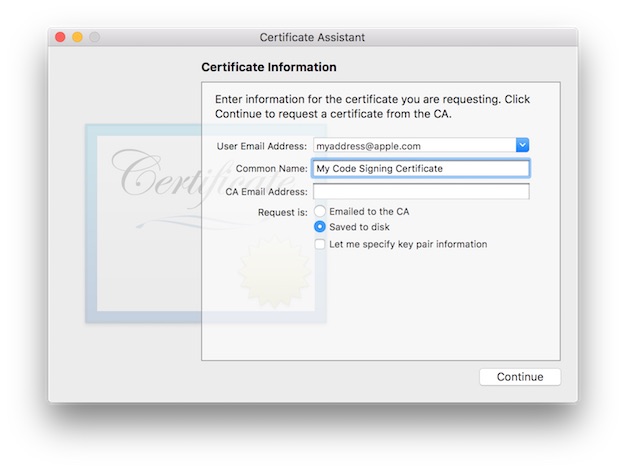
Open Applications > Utilities > Keychain Access.
From the Keychain Access menu, choose Certificate Assistant > Request a Certificate from a Certificate Authority….
Fill in your email address and a name for the certificate, and select
Saved to disk. Then click Continue.Select a place to store the request on disk, and click Save.
Upload the certificate request to the certificate authority (for example, to Apple using the developer portal, as part of the certificate generation flow).
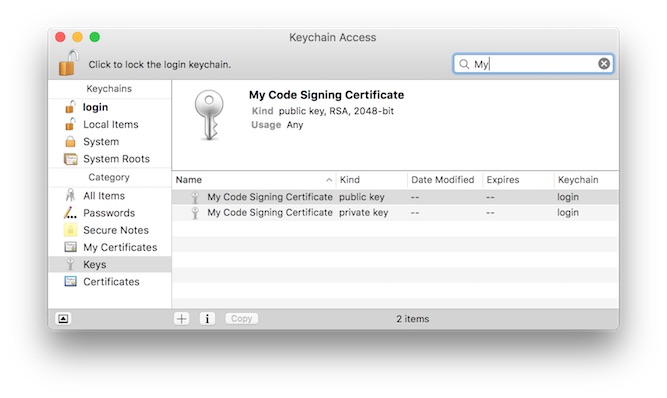
Download the generated certificate (a file with a
cerextension).Open the certificate file by double clicking on it.
Keychain Access imports the certificate and associates it with the corresponding private key you created earlier.
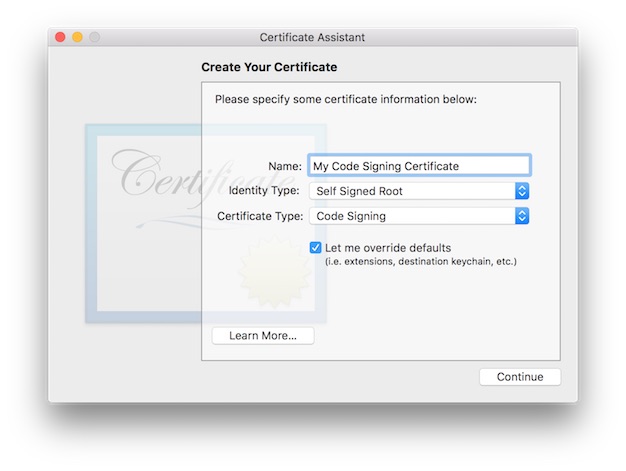
Alternatively, you can create and self-sign a certificate using Certificate Assistant, and not involve a certificate authority. This can be useful during internal testing and development.
Open Applications > Utilities > Keychain Access.
From the Keychain Access menu, choose Certificate Assistant > Create a Certificate.
Fill in a name for the certificate. This name appears in the Keychain Access utility as the name of the certificate.
Choose
Self Signed Rootfrom theIdentity Typepop-up menu.Choose
Code Signingfrom theCertificate Typepop-up menu.Check the
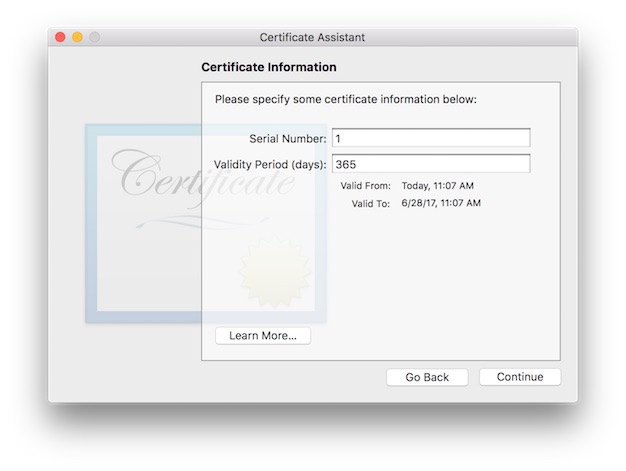
Let me override defaultscheckbox. ClickContinue.Specify a serial number for the certificate.
Any number will do as long as you have no other certificate with the same name and serial number.
Click
Continue.Fill in the information for the certificate. Click
Continue.Accept the defaults for the rest of the dialogs.
Adding an Info.plist to Single-File Tools
As discussed in The Digital Signature, by default, the system uses the Info.plist file of an application bundle to determine the code’s designated requirement. Although single-file tools don’t normally have an Info.plist, you can add one.
Add an
Info.plistfile to your project.Make sure the
Info.plistfile has at least the following keys:CFBundleIdentifierThis value is the default unique name of your program for code signing purposes, and must be globally unique. To ensure uniqueness, include your company’s name in the value. The usual form for this identifier is a hierarchical name in reverse DNS notation, starting with the top-level domain, followed by the company name, followed by the organization within the company, and ending with the product name. For example, the
CFBundleIdentifiervalue for thecodesigncommand iscom.apple.security.codesign.CFBundleNameThis is the app’s short display name, a string no longer than 16 characters, and typically the name of the target. For the codesign command, the value is simply
codesign.
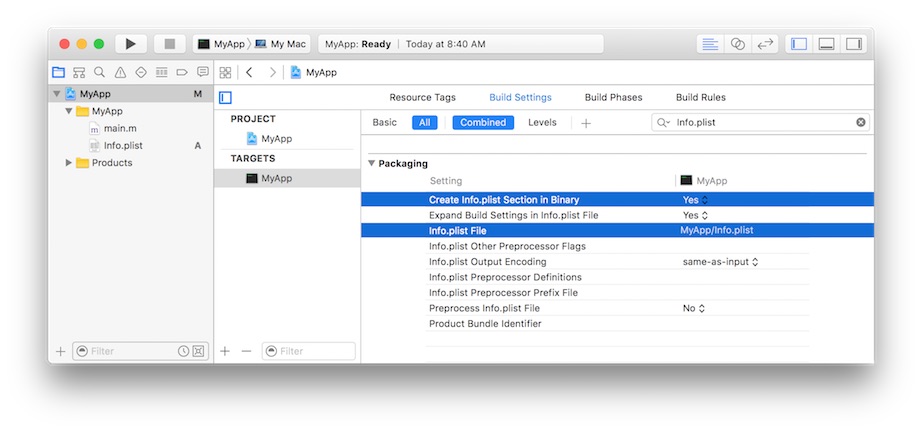
In Xcode, in the target’s Build Settings, change the
Create Info.plist Section in Binarysetting toYes, and provide the path to the file in theInfo.plist Filesetting as shown in Figure 3-6.
As an example, Listing 3-1 gives the contents of the Info.plist file for the codesign command.
Listing 3-1 The Info.plist file contents for the codesign command
<plist version="1.0"> |
<dict> |
<key>CFBundleDevelopmentRegion</key> |
<string>English</string> |
<key>CFBundleIdentifier</key> |
<string>com.apple.security.codesign</string> |
<key>CFBundleInfoDictionaryVersion</key> |
<string>6.0</string> |
<key>CFBundleName</key> |
<string>codesign</string> |
<key>CFBundleVersion</key> |
<string>0.3</string> |
</dict> |
</plist> |
Signing Your Code Manually
Whether Xcode manages your signing identity or you set it up manually, Xcode normally signs code that you build using the codesign tool. Xcode does this as the final step in the build process, and again when exporting for distribution. In the unusual case that you sign your code manually, or to interrogate an app for details about its signature, you use the codesign command line tool directly. See the codesign man page for a complete enumeration of the options this tool takes.
What to Code Sign
You sign all the individual components of your app, leaving no gaps, including:
Nested code. First, you recursively sign all of the helpers, tools, libraries, frameworks, and other components that your app relies on, and that are bundled with your app. See Ensuring Proper Code Signatures for Nested Code for a discussion of how to properly embed and sign nested code in your app bundle. Also see Using Library Validation for additional information about verifying libraries as a matter of system policy.
Mach-O executables. The signing software applies individual signatures to each architectural component of a universal binary that represents the main executable of your app. These are independent, and usually only the native architecture on the end user's system is verified. To apply the signature, the
codesignutility adds the signature directly to the executable file.Resources. Everything in an application bundle that is not explicit code (either nested code bundles or the main executable) is a resource, and all resources are signed. The resource files themselves are not modified as a result of signing. Instead,
codesignplaces the digital signatures corresponding to all the application bundle’s non-code files in a special plist file within the bundle, namelyContents/_CodeSignature/CodeResources. Thecodesignutility places the signatures of any nested code here as well, which is why nested code is signed first.
When to Code Sign
You sign as the last step before shipping your product, after all development and testing are done. Making changes after you sign invalidates the signature. Consider a signed application bundle as a read-only entity. Also, because code that you sign with a distribution certificate bears your stamp of approval, avoid handing out signed code that is not final.
In practice, Xcode applies your signature when you export your app for distribution. Alternatively, you can run codesign at any time on any system running macOS 10.5 or later, provided you have access to the signing identity. You can for example include it as a step in custom Makefile scripts.
How to Code Sign Manually
Xcode normally signs on your behalf. You simply choose a signing identity in the General tab of a given target, and Xcode takes care of the details. This is usually the best option, because Xcode evolves with each new version to match changes in recommended code signing procedures and settings. Any customizations you introduce, on the other hand, require explicit maintenance.
When you do need additional control over the process, you add flags to the “Other Code Signing Flags” item of the project’s Build Settings tab, as shown in Figure 3-7. Xcode passes these directly to the codesign command. Xcode still does most of the work, but you have the ability to influence specific aspects of the signing procedure.

In rare cases when you need to sign manually (or to interrogate an existing code signature, as described in Examining a Code Signature), you use the codesign command directly, as described below. This is generally the option of last resort, but may be helpful in certain special cases, especially when trying to debug an issue. Note that your signing identity must be in a keychain for codesign commands to work.
Signing Code Manually
To sign the code located at <code-path>, using the signing identity <identity>, use the following command:
codesign -s <identity> <code-path> |
The <code-path> value may be a bundle folder or a specific code binary. See What to Code Sign for more details.
The identity, whether obtained manually or automatically, and which must exist on one of your keychains, can be named with any (case sensitive) substring of the certificate's common name attribute, as long as the substring is unique throughout your keychains. (Signing identities are discussed in About the Code Signing Identity.)
This command gives no confirmation of success by default. To get feedback, include the -v option:
codesign -s <identity> -v <code-path> |
Use the -r option to specify an internal requirement. With this option you can specify a text file containing the requirements, a precompiled requirements binary, or the actual requirement text prefixed with an equal sign (=). For example, to add an internal requirement that only the built-in Perl interpreter be allowed to host a Perl script:
codesign -s <identity> -r="host => anchor apple and identifier com.apple.perl" <code-path> |
The code requirement language is described in Code Signing Requirement Language.
If you have built your own certificate hierarchy (perhaps using Certificate Assistant—see About the Code Signing Identity), and want to use your certificate’s anchor to form a designated requirement for your program:
codesign -s <identity> -r="designated => anchor /my/anchor/cert and identifier com.mycorp.myprog" <code-path> |
You can also use the csreq command to write the requirements out to a file, and then use the path to that file as the input value for the -r option in the codesign command. See the man page for csreq for more information on that command.
Here are some other examples of requirements:
anchor apple– The code is signed by Apple.anchor trusted– The anchor is trusted (for code signing) by the system.certificate leaf = /path/to/certificate– The leaf (signing) certificate is the one specified.certificate leaf = /path/to/certificate and identifier "com.mycorp.myprog"– The leaf certificate and program identifier are as specified.info[mykey] = myvalue– TheInfo.plistkeymykeyexists and has the valuemyvalue.
Except for the explicit anchor trusted requirement, the system does not consult its trust settings database when verifying a code requirement. Therefore, as long as you don’t add this designated requirement to your code signature, the anchor certificate you use for signing your code does not have to be introduced to the user’s system for validation to succeed.
Adding Entitlements for Sandboxing Manually
To enable App Sandbox for an application, Xcode adds your entitlement property list to the signature during the signing process. If you are code signing manually, use the --entitlements flag, naming the target’s entitlements property list file:
codesign --entitlements /path/to/entitlements.plist -s <identity> <code-path> |
For a list of entitlement keys that can appear in the entitlement property list, see Entitlement Key Reference. For more information about App Sandbox, read App Sandbox Design Guide.
Sharing a Designated Requirement
If your application consists of a main executable with one or more helper tools that work together, appearing to the user as a single app, you can make these pieces of code indistinguishable to code signing by giving them all the same designated requirement. In that case, all your program components have access to the same keychain items and validate as the same program. Do this only if the programs involved are truly meant to form a single entity, with no distinctions made.
At first glance, the obvious way to achieve this is to give each entity the same CFBundleIdentifier in its respective Info.plist file, in which case codesign will automatically apply the same designated requirement to each. However, this is not recommended. Instead, give each individual app or tool that you ship its own identity (for example, com.mycorp.myprog for the main app, and com.mycorp.myprog.helper1 and com.mycorp.myprog.helper2 for its helpers). Then, manually assign the designated requirement to be the same for all of them, rather than allowing codesign to generate the DR automatically. Do this by adding the -r flag to “Other Code Signing Flags” in Xcode, with an appropriate argument, or if signing manually:
codesign —s <identity> -r "designated => anchor /my/anchor/cert and identifier com.mycorp.myprog" <code-path> |
Ensuring Proper Code Signatures for Nested Code
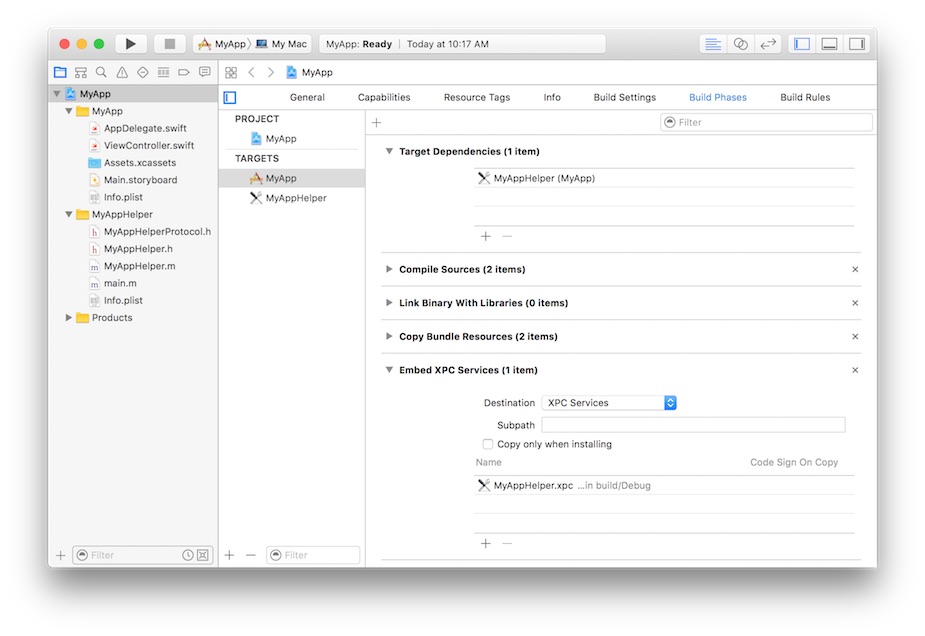
Starting in macOS 10.9, the code signing tool records nested code (such as frameworks or XPC services that you add to your app) in the embedding code’s resource envelope using the nested codes’s own code signature. This means that when a code signature is created for an item, all the nested code that item contains must already be signed correctly or the signing attempt fails. Xcode nests code like this by default, as long as all of the nested items exist as targets in your project, and your app’s build depends on these targets. Figure 3-8 shows an example of Xcode’s Build Phases panel for an XPC service called MyAppHelper properly nested in the MyApp app. Xcode begins the signing process at the deepest level of hierarchy (which in this case is the MyAppHelper service), working outward, and signing your top level app bundle as the final step.
For this process to work properly, ensure that you include nested code in standard locations within a bundle, as shown in Table 3-1.
Location | Description |
|---|---|
Contents | Top content directory of the bundle |
Contents/MacOS | Helper apps and tools |
Contents/Frameworks | Frameworks, dylibs |
Contents/PlugIns | Plug-ins, both loadable and extensions |
Contents/XPCServices | XPC services |
Contents/Helpers | Helper apps and tools |
Contents/Library/Automator | Automator actions |
Contents/Library/Spotlight | Spotlight importers |
Contents/Library/LoginItems | Installable login items |
Contents/Library/LaunchServices | Privileged helper tools installed by the ServiceManagement framework |
The system expects these locations to contain only code. When evaluating an app bundle’s code signature, the system will reject arbitrary data files found in these locations because they're unsigned. Conversely, the code signing machinery considers anything not in one of these directories, including code, to be a resource. Any code not in one of these directories is therefore sealed twice: once as code, and once as a resource in the outer signature. This wastes both signing and verification time and storage space. Also, this can break the outer signature of apps that use their own update mechanisms to replace nested code. If this nested code is being treated as a resource, the outer signature doesn't know that this nested content is actually code.
Do not use custom subdirectories inside the code nesting directories shown in Table 3-1. For example, place all your XPC services directly in the Contents/XPCServices directory. Do not organize them into subdirectories like Contents/XPCServices/Net and Contents/XPCServices/Math. Creating a custom directory hierarchy in one of these locations can break the code signing machinery, depending on the names of the subdirectories, and while it may appear to work in some cases, it is not a supported practice.
Store Python, Perl, shell, and other script files, and other non-Mach-O executables in your app's Contents/Resources directory. While it's possible to sign such executables and store them in Contents/MacOS, this is not recommended. This is because code signing uses extended attributes to store signatures in non-Mach-O executables such as script files. If the extended attributes are lost, the program's signature will be broken. Many file transfer techniques do not preserve extended attributes, nor are they preserved when uploading to the Mac App Store. When you put the script in the Contents/Resources directory, codesign stores the associated signature in the Contents/_CodeSignature/CodeResources file, which is preserved. Thus, in practice, a properly signed app that has all of its files in the correct places does not contain any signatures stored as extended attributes.
The code signing machinery performs some framework checks specifically on frameworks that are nested within other code. It's possible that signing a framework will succeed, but the result fails to validate when placed into another bundle's Frameworks directory. Make sure the framework is structured correctly per the requirements above.
Bundles must have their Info.plist in the proper location. For app bundles, this is in Contents. For frameworks, this is in Versions/Current/Resources.
If signing or validation using the codesign command fails due to problems with nested code, the command outputs an additional line:
In subcomponent: path |
This output indicates which nested code caused the problem. Always look for this line to correctly interpret a code signing failure. If Xcode produces a code signing error during distribution signing, and you have nested code, this is something to check for.
Using Library Validation
Starting in iOS 8 and macOS 10.10, the system offers library validation as a policy for the dynamic libraries that a process links against. The policy is simple: A program may link against any library with the same team identifier in its code signature as the main executable, or with any Apple system library. Requests to link against other libraries are denied.
In iOS, an Apple system library is a library that Apple mastered into the OS image. In macOS, an Apple system library is a library shipped in /System/Library. The team identifier is the 10-character alphanumeric string, such as YH9SZ5LKR4, associated with your developer account, and recorded in your Apple-issued signing certificate.
In iOS, library validation is always enabled for all apps. There is nothing you need to do to opt in. In macOS, you may opt in to library validation by passing the library flag to the codesign tool when signing manually:
codesign -s <identity> -o library Example.app |
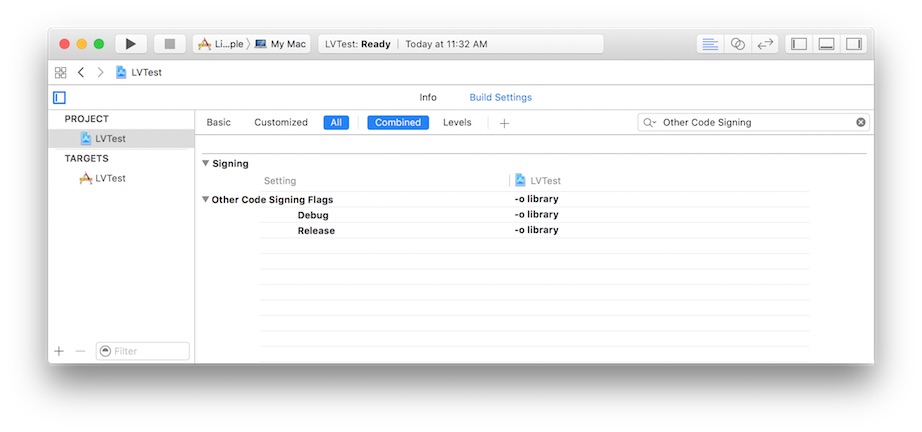
You opt in to library validation when Xcode code signs for you by selecting the main project, going into Build Settings, and adding -o library to the “Other Code Signing Flags” section, as shown in Figure 3-9.
To avoid signing errors when using library validation in your project, create embedded frameworks as Xcode targets of the same project, and build with standard settings. This ensures that the main executable and all frameworks are signed with the same certificate, and thus have the same team identifier. If you forget to sign frameworks that are built externally to the project and later copied into the bundle, library validation fails.
When the library validation policy denies an executable file from being mapped into the process’s address space, it generates a syslog error message with the tag [deny- mmap]. The error string includes the name of the process, the pid, and the path to the dynamic library. For example, the process ls with pid 528 trying to load the library /private/tmp/libncurses.5.4.dylib generates the following output:
AMFI: ls(pid 528) - [deny-mmap] mapped file does not have a matching team identifier: /private/ tmp/libncurses.5.4.dylib |
AMFI: ls(pid 528) - [deny-mmap] process has team identifier BGHDFMN54X: /private/tmp/ libncurses.5.4.dylib |
AMFI: ls(pid 528) - [deny-mmap] mapped file has team identifier GDASFLKMKO: /private/tmp/ libncurses.5.4.dylib |
Signing Installer Packages
Xcode does not create signed installer packages for you. Instead, you create signed installer packages (with a .pkg extension) by supplying an installer signing identity to the productbuild tool. For example, to create the package Product.pkg from a distribution file Product.dist, and sign it with your identity, as found in your keychain:
productbuild --distribution Product.dist --sign <identity> Product.pkg |
As with signed code, when you create a flat-file installation package, any modification after signing invalidates the signature.
Signing Disk Images
Beginning in macOS 10.11.5, you can apply a code signature to read-only, compressed disk images that you use to distribute content. This is the recommended alternative to the deprecated xip file format, which is a signed archive you create with the xip command line utility.
Xcode does not handle signing disk images. Instead, use the command line codesign tool to do this manually:
codesign -s <identity> <disk-image> |
When you sign your app with a Developer ID and distribute it using a disk image, it is possible to package additional unsigned code, such as dynamic libraries or scripts, together with the signed app bundle on the same disk image. If your app loads this extra content at runtime using a file system path relative to its own bundle, you have introduced a security risk. Because the extra code is outside the app bundle, and thus not covered by the app’s code signature, you can’t be certain that the extra content is intact. This is known as the repackaging problem because a bad actor can repackage your app bundle with a different, potentially malicious version of the external resources, and distribute the altered disk image as if it came from you.
To combat this problem, beginning in macOS 10.12, when an app is launched from a read-only disk image, the operating system employs Gatekeeper path randomization. The system copies the app to a random location in the file system before executing it, invalidating any relative paths that the app uses to access unprotected content outside its own app bundle.
You can bypass path randomization by code signing your disk image before you distribute it. When launching an app from a code-signed disk image, Gatekeeper disables path randomization because all the contents of the disk image are covered by a code signature.
Examining a Code Signature
Whether you code sign manually or Xcode does it for you, when you want to test the integrity of signed code or evaluate the way in which the system is going to treat signed code, you use the codesign and spctl command line tools.
Using codesign to Investigate a Code Signature
You use the codesign command to interrogate an app or other signed entity about its signature. To verify the signature on a signed binary, use the -v option with no other options:
codesign -v <code-path> |
This command confirms whether the code binaries at <code-path> are actually signed, the signature is valid, all the sealed components are unaltered, and the signature passes some basic consistency checks. It does not by default check that the code satisfies any requirements except its own designated requirement. To check a particular requirement, use the -R option. For example, to check that the Apple Mail application is identified as Mail, signed by Apple, and secured with Apple’s root signing certificate:
codesign -v -R="identifier com.apple.mail and anchor apple" /Applications/Mail.app |
Note that, unlike the -r option, the -R option takes only a single requirement rather than a requirements collection (no => tags). Add one or more additional -v options to get details on the validation process. Here is a longer example that demonstrates these concepts:
$ # Make a copy of the md5 tool. |
$ cp /sbin/md5 . |
$ # The copy still satisfies its DR. |
$ codesign -vvvv ./md5 |
./md5: valid on disk |
./md5: satisfies its Designated Requirement |
$ # And we can check that it's signed by Apple. |
$ codesign -vvvv -R="anchor apple" ./md5 |
./md5: valid on disk |
./md5: satisfies its Designated Requirement |
./md5: explicit requirement satisfied |
$ # Modify the binary. |
$ chmod u+w ./md5 |
$ dd if=/dev/zero bs=1 count=1 seek=8192 conv=notrunc of=./md5 |
1+0 records in |
1+0 records out |
1 bytes transferred in 0.000036 secs (27777 bytes/sec) |
$ # The modified program no longer satisfies its DR. |
$ codesign -vvvv ./md5 |
./md5: code or signature modified |
$ # But we can resign the modified program with our signature. |
$ codesign -s my-signing-identity -f ./md5 |
./md5: replacing existing signature |
$ # And the modified program now satisfies its DR. |
$ codesign -vvvv ./md5 |
./md5: valid on disk |
./md5: satisfies its Designated Requirement |
$ # But not our supplement requirement. |
$ codesign -vvvv -R="anchor apple" ./md5 |
./md5: valid on disk |
./md5: satisfies its Designated Requirement |
test-requirement: failed to satisfy code requirement(s) |
If you pass a number rather than a path to the verify option, codesign takes the number to be the process ID (pid) of a running process, and performs dynamic validation instead.
When verifying signatures, add --deep to ensure recursive validation of nested code. Without --deep, validation will be shallow. Note that Gatekeeper always performs --deep style validation, as described in Checking Gatekeeper Conformance.
To get information about a code signature (without actually verifying it), use the -d option. For example, to output the code signature’s internal requirements, use the following command:
codesign -d -r- <code-path> |
Using spctl to Test a Code Signature Against System Policies
After you have produced your final deliverable, but before you ship it, you can use the spctl(8) tool to test your code signatures against various system policies that the user may set. Because the tool evaluates against the policies on the local machine, the outcome is affected by the settings in the Security preferences pane, and can further be modified by parental controls, remote management, and so on. Conversely, changes made with spctl (such as adding or disabling rules) affect future Gatekeeper judgments directly.
The basic syntax for code signing assessment is shown below:
# Assess an application or tool |
spctl --assess --type execute myTool |
# Assess an installer package |
spctl --assess --type install myInstallerPackage.pkg |
If your application or package signature is valid, these tools exit silently with an exit status of 0. (Type echo $? to display the exit status of the last command.) If the signature is invalid, these tools print an error message and exit with a nonzero exit status.
For more detailed information about why the assessment failed, you can add the --verbose flag. For example:
spctl --assess --verbose=4 /bin/ls |
This prints the following output:
/bin/ls: accepted |
source=Apple System |
To see everything the system has to say about an assessment, pass the --raw option. With this flag, the spctl tool prints a detailed assessment as a property list.
To approve a program (exactly as if done through a user prompt), type:
spctl --add --label mytest /some/program |
The --label is an optional tag that you can add to your own rules. This tag allows you to remove the rule easily by typing:
spctl --remove --label mytest |
Note that this removes all rules that match the label, which means that it is a handy way to clean up after testing. You can also temporarily suspend your rules by typing:
spctl --disable --label mytest |
and reenable them later by typing:
spctl --enable --label mytest |
To see a list of the current assessment rules, use the --list flag. For example:
spctl --list --type execute |
The resulting list of rules might look like this:
3[Apple System] P0 allow execute |
anchor apple |
4[Mac App Store] P0 allow execute |
anchor apple generic and certificate leaf[field.1.2.840.113635.100.6.1.9] exists |
5[Developer ID] P0 allow execute |
anchor apple generic and certificate 1[field.1.2.840.113635.100.6.2.6] exists and certificate leaf[field.1.2.840.113635.100.6.1.13] exists |
7[UNLABELED] P0 allow execute [/var/tmp/firefly/RUN-FIREFLY-JOBS/test1.app] |
cdhash H"f34c03450da53c07ac69282089b68723327f278a" |
8[UNLABELED] P0 allow execute [/var/tmp/firefly/RUN-FIREFLY-JOBS/test1.app] |
identifier "org.tpatko.Run-Firefly-Job-X-Cores" and certificate root = H"5056a3983e3b7f44e17e3db8e483b35b6745b236" |
Notice that the list above includes a number of predefined rules that describe the handling of certain classes of code. For example, rule 5 captures all applications signed by a Developer ID. You can disable those applications by typing:
spctl --disable --label "Developer ID" |
This command tells the system to no longer allow execution of any Developer ID-signed applications that the user has not previously run. This is exactly what happens when you use the preference UI to switch to "Mac App Store only".
Each rule in the list has a unique number that can be used to address it. For example, if you type:
spctl --list --label "Developer ID" |
you might get a list of rules that looks like this:
5[Developer ID] P0 allow execute |
anchor apple generic and certificate 1[field.1.2.840.113635.100.6.2.6] exists and certificate leaf[field.1.2.840.113635.100.6.1.13] exists |
6[Developer ID] P0 allow install |
anchor apple generic and certificate 1[field.1.2.840.113635.100.6.2.6] exists and certificate leaf[field.1.2.840.113635.100.6.1.14] exists |
Notice that there are separate rules for execution (5) and installation (6), and you can enable and disable them separately. For example, to enable installation of new applications signed with a Developer ID, you can type:
spctl --enable --rule 6 |
Finally, spctl allows you to enable or disable the security assessment policy subsystem.
sudo spctl --master-enable # enables assessment |
sudo spctl --master-disable # disables assessment |
spctl --status # shows whether assessment is enabled |
For more information, see the manual page for spctl(8).
Checking Gatekeeper Conformance
It’s a good idea to test your app for Gatekeeper conformance before you ship, especially if you sign your app with a Developer ID and distribute by some means other than the Mac App Store, such as through a website.
Gatekeeper is a configurable system facility that examines files that you download to your Mac, for example from a website or in an email attachment. It applies rules to decide whether to allow or reject an attempt to open an item for the first time on a given system. When deciding whether to allow an app to run, Gatekeeper uses the app’s code signature to test the integrity and authorship of the app. By default, Gatekeeper only allows apps that have an intact signature, and that are downloaded from the Mac App Store or are signed with a Developer ID.
In addition to this primary tactic, Gatekeeper does the following:
Beginning with macOS 10.9.5, Gatekeeper rejects any code signed with Version 1 code signatures (those created with macOS versions prior to 10.9). Among other things, this implies that no resource “holes” are allowed (all resource files must have a valid signature), and code should be properly nested, as described in Ensuring Proper Code Signatures for Nested Code.
Beginning with macOS 10.10.4, Gatekeeper verifies that no libraries are loaded from outside an app bundle. If an app uses
@rpathor an absolute path to link to a dynamic library outside of the app, Gatekeeper rejects the app. This restriction applies to the app’s main executable and any other executable in the bundle, including libraries. This restriction applies even if the path does not exist (which normally causes the dynamic linker to fall back to a library inside the bundle). The error will appear in the system log, with a message like the following for an appMyApp.apptrying to link against the librarylibLibrary.dylibin the nonstandard location/foo:7/8/15 4:00:19.942 PM CoreServicesUIAgent[5940]: File /Applications/MyApp.app/Contents/MacOS/MyApp failed on loadCmd /foo/libLibrary.dylib
7/8/15 4:00:19.942 PM CoreServicesUIAgent[5940]: Fails dylib check
As with other Gatekeeper functions, this check is performed the first time the app is run. It does not apply to libraries that the app loads itself using the
dlopenfunction, although those libraries are still potentially subject to library validation, as described in Using Library Validation. It also does not apply to libraries loaded from paths where libraries are expected to reside, such as/System,/Library, and/usr/.Beginning with macOS 10.11, Gatekeeper rejects code signed with signatures that don't cover the entire app bundle. This should not affect anyone using normal build tools. Gatekeeper also rejects apps containing symbolic links that:
Point to nowhere.
Point to places that are legitimately excluded from the app's signature.
Point outside the app bundle, except to locations in
/Systemand/Library.
A nested bundle may contain symlinks that point into the enclosing bundle.
Testing Conformance with Command Line Tools
To get a sense of whether your app conforms to Gatekeeper policies when you distribute with Developer ID, you can use the following codesign command to mimic what Gatekeeper does:
codesign --verify --deep --strict --verbose=2 <code-path> |
If your app is signed properly, the output looks like this:
<code-path>: valid on disk |
<code-path>: satisfies its Designated Requirement |
Alternately, the spctl utility is actually a command-line interface to the same security assessment policy subsystem that Gatekeeper uses. Like Gatekeeper, spctl only accepts Developer ID signed apps and apps downloaded from the Mac App Store by default. Run spctl on your app like this:
spctl -a -t exec -vv <code-path> |
This is the output if your app's signature is accepted:
<code-path>: accepted |
source=Developer ID |
origin=<identity> |
If you get any result other than accepted, your app is not compatible with Gatekeeper.
Testing Conformance Explicitly
The codesign and spctl tools give a good sense of how Gatekeeper will respond to your app, but they are not exhaustive. For example, they do not test for the condition that libraries be loaded from inside the bundle or from one of the standard system locations. Therefore, it is best to actually invoke Gatekeeper as a final test before shipping. To do this:
Package your app the way you ship it, such as in a disk image.
Download your app from its website, mail it to yourself, or send it to yourself using AirDrop or Message. This quarantines the app. This is necessary to trigger the Gatekeeper check as Gatekeeper only checks quarantined files the first time they're opened.
Drag-install your app to the
/Applicationsfolder and launch it.If there is no dialog at all, you missed a step. Check the instructions and repeat the test.
If you see the dialog with a message that the app you are trying to open is from the Internet, and providing an Open button, the test succeeded.
If you're told that only apps from the Mac App Store or registered developers can be installed, your app isn't Developer ID-signed. Use the Xcode Organizer to export a Developer ID-signed copy of your app and repeat the test. It may also be that the system doesn't think your bundle is an app bundle because its
Info.plistdoesn't have itsCFBundlePackageTypeproperty set toAPPL.If you get any other complaint, your signature is broken.
Using Hash Agility
Beginning in macOS 10.11.5, stronger cryptographic hashing is available to both create and evaluate code signatures. When you build and code sign using macOS 10.11.5 or later, the code signing machinery uses the improved hashing to create a code signature. There is nothing you need to do to adopt this behavior. At the same time, to maintain backward compatibility, the system includes a legacy code signature alongside the modern one, in a way that works transparently with older systems.
Similarly, during code signature evaluation on macOS 10.11.5 or later, the system uses the stronger signature if it is available, but still interprets older signatures if necessary. As with signing, there is nothing you need to do to adopt the improved hashing during code signature evaluation. Together, these are referred to as hash agility.
Shipping and Updating Your Product
Maintaining the integrity of a code signature requires the signed code installed on the user’s system to be identical to the code that you signed. It does not matter how you package, deliver, or install your product as long as you don’t introduce any changes into the product. Compression, encoding, and encrypting the code are all fine because decompression, decoding, and decryption reverse these processes exactly. You can even use binary patching, because that process updates both the code and the embedded signature simultaneously. You can use any installer you like, as long as it doesn't write anything into the product as it installs it. Drag-installs are fine as well. As long as the final product on the user’s system is bit-for-bit identical to the signed code you produced, the signature remains intact.
When you have qualified a new version of your product, sign it just as you signed the previous version, with the same identifier and the same designated requirement. The user’s system considers the new version of your product to be the same program as the previous version. For example, Keychain Services does not distinguish older and newer versions of your program as long as both are signed and the unique Identifier remains constant.
Copyright © 2016 Apple Inc. All Rights Reserved. Terms of Use | Privacy Policy | Updated: 2016-09-13