Manage Your Workflow in Xcode
As you saw in the tutorial Your First Mac App, you perform your major workflow tasks in the Xcode workspace window. A separate Organizer window allows you to perform ancillary tasks, such as reading documentation, managing source repositories, and preparing your app for submission to the Mac App Store.
The workspace window features a navigator area, an editor area, and a utility area. In Your First Mac App, you used the navigator area to select files to edit. You used the editor area to edit source files and to design user interface components. In the utility area, you set the button title and a default value for the slider.
Customize Your Workspace
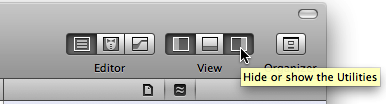
You can hide the navigator, editor, and utility areas in various combinations. In Your First Mac App, you used the View selector in the toolbar to hide and disclose the utility area. Hiding the utility area allowed you to view a larger editor area, whereas disclosing the utility area allowed you to inspect and select various object attributes.
You can customize the workspace in other ways, such as by using Safari-style tabs to implement multiple, workflow-specific layouts of the workspace window. For example, you can use one tab to view a header file and another to view an implementation file.
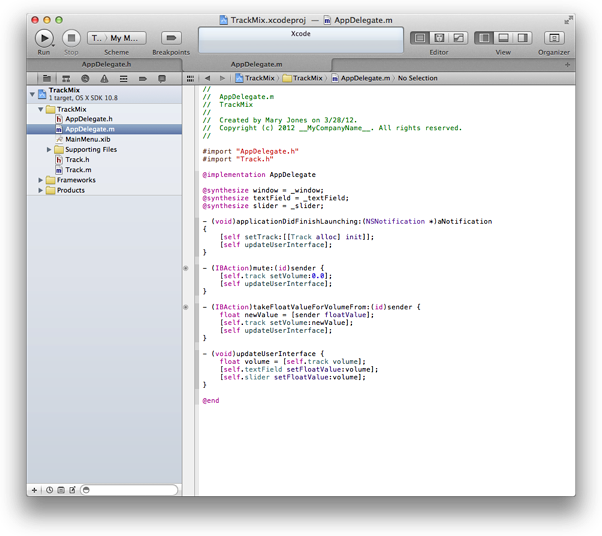
Select AppDelegate.h in the project navigator to display the header file in the source editor.
Choose View > Show Tab Bar.
Choose File > New > Tab.
Select AppDelegate.m in the project editor to display the implementation file in the tabbed source editor window.
Click the tabs to move between source files.
To remove a tab, move the pointer to the tab and click its close box.
You can hide the tab bar by choosing View > Hide Tab Bar.
You can also create multiple workspace windows. Each tab or workspace window can be customized independently of the others.
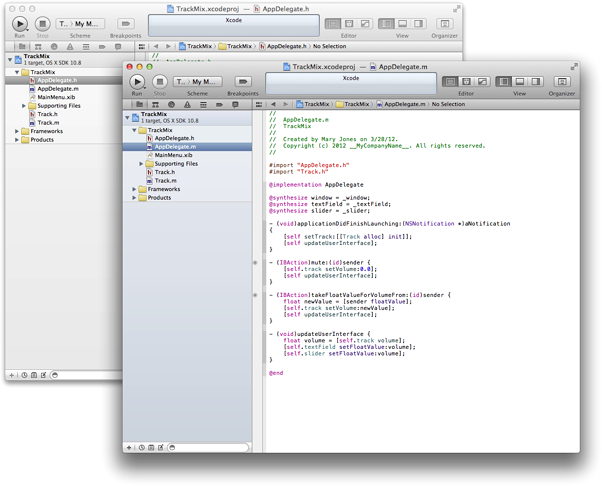
Select AppDelegate.h in the project navigator to display the header file in the source editor.
Choose File > New > Window to open a new workspace window.
Select AppDelegate.m in the project editor to display the implementation file in the new window.
Customize either window, such as by showing and hiding the utilities area with the View selector.
Write Faster with Code Completion and Automatic Issue Correction
If you followed the Your First Mac App tutorial in Xcode, you probably noticed that Xcode suggests code completions as you type. By taking advantage of code completion, you write code more efficiently and accurately. Xcode also offers in-line issue detection and automatic issue correction. When possible, Xcode describes the problem and offers a possible solution.
In your TrackMix project, select Track.h in the project navigator to display the header file for your Track class.
Add a property to the Track class to store the name of the track. Begin by typing
@. Xcode displays possible completions for you to choose from. You should see: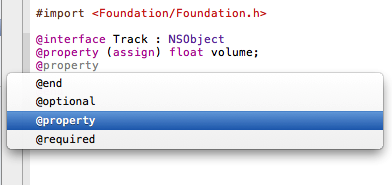
Continue typing
@puntil@propertyis the only option listed. Press Return.Finish typing the property declaration, using code completion, until you’ve added this code:
@property (copy) NSString *name
Notice that Xcode issues a warning in the gutter. Click the warning icon to view the diagnosis. You should see something like this:
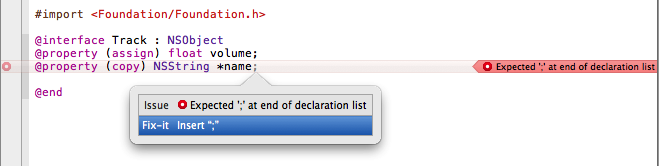
Because you are typing a declaration, Xcode expects a semicolon. Press Return to accept the Fix-it correction from Xcode.
Find Xcode Help Quickly
During the course of app development, you perform a lot of operations in Xcode. If you need assistance with a task, Xcode provides workflow-sensitive help, which you can access directly from the Xcode user interface. This assistance includes easy-to-follow steps, videos or screenshots, and concise descriptions that help you get back to work quickly.
In your TrackMix project, select AppDelegate.h in the project navigator to display the header file in the source editor.
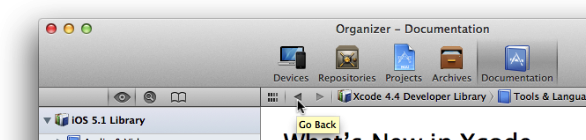
If you are reading this document in the Xcode Documentation organizer, locate its Go Back button. You will need to click it to return to this document after performing the remaining steps.
Control-click anywhere in the source editor.
A contextual menu opens in which Source Editor Help is the final item.
Choose Source Editor Help to display a list of common source-editor tasks.
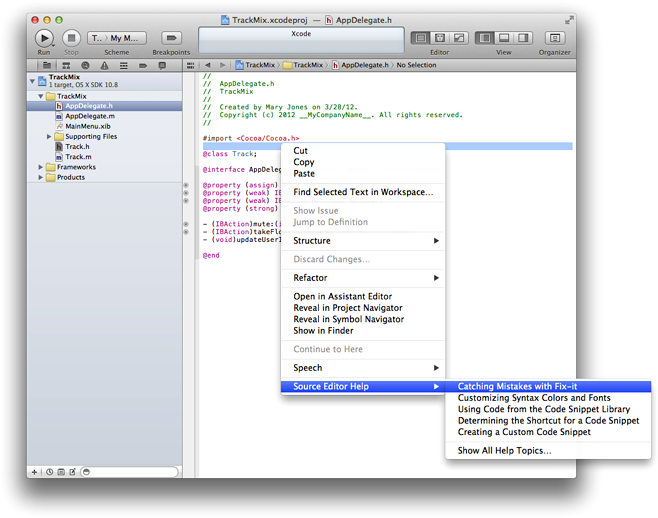
Choose Source Editor Help > “Catching Mistakes with Fix-it” to see a help article in the Documentation organizer.
Click the thumbnail image to play an instructional video.
Improve the Performance of Your App
To ensure that you deliver the best user experience for your software, launch the Instruments application from Xcode to analyze the performance of your app as it runs. Instruments gathers data from your running app and presents it in a graphical timeline.
You can gather data about your app’s memory usage, disk activity, network activity, and graphics performance, among other measurements. By viewing the data together, you can analyze different aspects of your app’s performance to identify potential areas of improvement. You can automate the testing of your app’s user interface elements. You can also compare your app’s behavior at different times to determine whether your changes improve the performance of your app.
From your TrackMix project in Xcode, choose Product > Perform Action > Profile Without Building.
If necessary, click Build & Profile.
Instruments launches and appears in the foreground.
Under Mac OS X in the left column, click All to see the available trace templates.
Select the Leaks template and click Profile.
The Instruments app appears, and the TrackMix app launches.
Try moving the TrackMix slider up and down or typing a value into the text field.
Click Stop in the Instruments app to stop recording performance data.
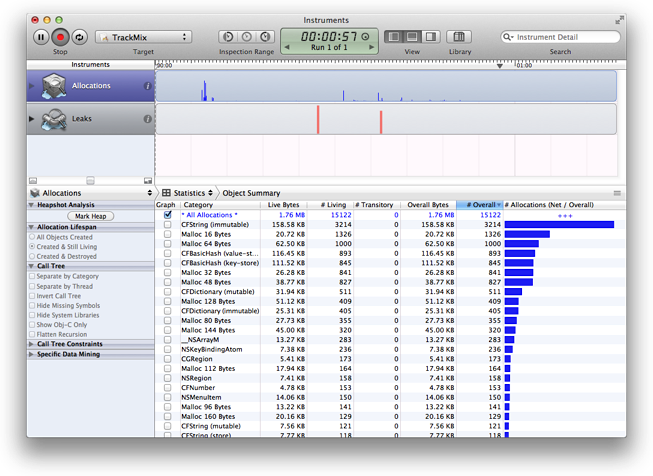
Click Allocations in the Instruments pane to examine TrackMix’s memory allocations.
For example, the track pane graphs where the memory allocations occurred, allowing you to see how frequently memory allocations occurred throughout the program. (Large spikes in the track pane can indicate potential bottlenecks that you might want to mitigate by either preallocating some blocks or being more lazy about other blocks.)
Manage Versions of Your App
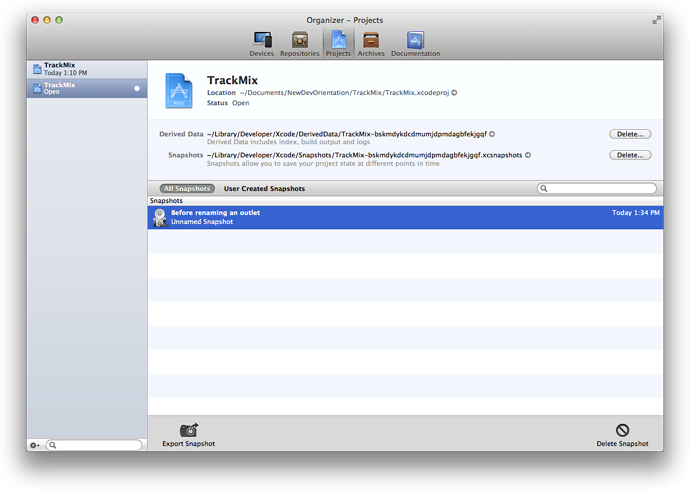
If something goes wrong because of a code change you make, an Xcode snapshot makes it easy to restore your project, even a deleted project, to a previous state. A snapshot saves the current state of your project onto disk for possible restoration later. The Projects organizer in Xcode lists your snapshots.
You can create a snapshot manually whenever you like, and you can set Xcode to automatically create snapshots in other circumstances, such as before every build or before executing every Find and Replace operation.
With the TrackMix project open, choose File > Create Snapshot.
Type a name and description in the provided fields.
Click Create Snapshot.
To view the snapshot, Choose Window > Organizer to display the Organizer window.
Click the Projects button. You should see a list of all snapshots.
Source control management (SCM) allows you to keep track of changes at a more fine-grained level than snapshots allow. (Source control management also helps you coordinate efforts if you work with a team of programmers.) An SCM system saves multiple versions of each file onto disk, storing metadata about each version of each file in an SCM repository.
Xcode supports two popular SCM systems: Git and Subversion. Xcode includes a version editor that makes it easy to compare versions of files saved in repositories from either system. If you find you’ve introduced bugs in your code, you can compare changes between the latest version of a file and an earlier version that worked correctly, helping you to zero in on the source of the trouble.
Distribute and Publish Your App
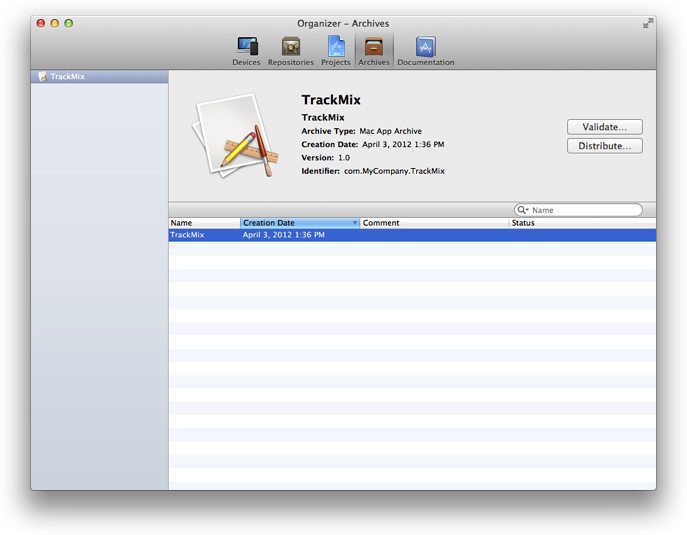
Xcode makes it easy to share your app for user testing and to publish your app on the Mac App Store. You start the distribution process by using the scheme editor to create an archive of your app in Xcode. You can then use the Archives organizer in Xcode to share your app with others for testing.
When you’re ready to publish your app, use the Archives organizer to perform essential validation tests required for Mac App Store publication. Passing these tests ensures that your app’s approval process is as fast as possible. You'll then be ready to submit your app directly to the Mac App Store from Xcode.
You’ll learn more about distributing and publishing your app in the article Prepare for Mac App Store Submission later in this road map.
© 2013 Apple Inc. All Rights Reserved. (Last updated: 2013-04-23)